User Guide
Page 3
... Loading the Paper ...1-2 Loading the Ribbon...1-6 Installing the Print Catcher...1-7 Connecting the Cables ...1-8 Connecting the power cable ...1-8 Connecting the USB cable...1-8 Turning On the Printer...1-9 2 Printer Driver Software Installing the Printer Driver...2-2 Borderless Printing ...2-2 Customizing Printer Properties...2-3 Customizing Printing Preferences...2-3 Color Management using ADOBE PHOTOSHOP 7.0 or Greater 2-4 Custom Image Composition Packages ...2-5 Creating a Custom Package ...2-5 Selecting a Custom Package ...2-6 Resolving Printing Problems ...2-7 Uninstalling the Printer...
... Loading the Paper ...1-2 Loading the Ribbon...1-6 Installing the Print Catcher...1-7 Connecting the Cables ...1-8 Connecting the power cable ...1-8 Connecting the USB cable...1-8 Turning On the Printer...1-9 2 Printer Driver Software Installing the Printer Driver...2-2 Borderless Printing ...2-2 Customizing Printer Properties...2-3 Customizing Printing Preferences...2-3 Color Management using ADOBE PHOTOSHOP 7.0 or Greater 2-4 Custom Image Composition Packages ...2-5 Creating a Custom Package ...2-5 Selecting a Custom Package ...2-6 Resolving Printing Problems ...2-7 Uninstalling the Printer...

User Guide
Page 5
... contains the correct size paper and ribbon for the printer. 102 mm (4.0 in.) 102 mm (4.0 in.) 102 mm (4.0 in.) 102 mm (4.0 in.) 102 mm (4.0 in.) P250_0020AC 1-1 Use caution when lifting or moving the printer. IMPORTANT: Install the printer driver software before you begin your printer. • USB cable (included). IMPORTANT: The printer weighs 18 kg (40 lbs). 1 Setting Up the Printer Before You Begin IMPORTANT: Your KODAK PROFESSIONAL 9810 Digital Photo Printer may...
... contains the correct size paper and ribbon for the printer. 102 mm (4.0 in.) 102 mm (4.0 in.) 102 mm (4.0 in.) 102 mm (4.0 in.) 102 mm (4.0 in.) P250_0020AC 1-1 Use caution when lifting or moving the printer. IMPORTANT: Install the printer driver software before you begin your printer. • USB cable (included). IMPORTANT: The printer weighs 18 kg (40 lbs). 1 Setting Up the Printer Before You Begin IMPORTANT: Your KODAK PROFESSIONAL 9810 Digital Photo Printer may...
User Guide
Page 7
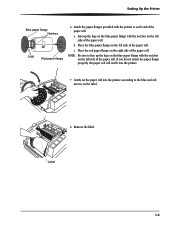
... the notches on the label. 8. Gently set the paper roll into the printer. 7. Label 1-3 c. b. NOTE: Be sure to each end of the paper roll. Remove the label. a. Attach the paper flanges provided with the printer to line up the lugs on the blue paper flange with the notches on the right side of the paper roll. Place the red paper flange on the left side of the paper roll.
... the notches on the label. 8. Gently set the paper roll into the printer. 7. Label 1-3 c. b. NOTE: Be sure to each end of the paper roll. Remove the label. a. Attach the paper flanges provided with the printer to line up the lugs on the blue paper flange with the notches on the right side of the paper roll. Place the red paper flange on the left side of the paper roll.

User Guide
Page 11
... a paper jam when making prints. Push the right side of the take -up spool into the printer as shown. Rotate the take -up spool until it by turning the take -up spool. IMPORTANT: Slack in the ribbon, remove it locks into the rear spool holder on the left side of the take -up spool into place. 9. Place the left . 8. Installing the Print Catcher...
... a paper jam when making prints. Push the right side of the take -up spool into the printer as shown. Rotate the take -up spool until it by turning the take -up spool. IMPORTANT: Slack in the ribbon, remove it locks into the rear spool holder on the left side of the take -up spool into place. 9. Place the left . 8. Installing the Print Catcher...
User Guide
Page 13
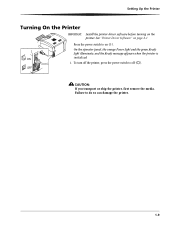
OFF CAUTION: If you transport or ship the printer, first remove the media. Failure to off ( ). On the operator panel, the orange Power light and the green Ready light illuminate, and the Ready message appears when the printer is ON initialized. 1. Setting Up the Printer Turning On the Printer IMPORTANT: Install the printer driver software before turning on ( | ). To turn off the printer, press the power switch to do so can damage the printer. 1-9 Press the power switch to on the printer. See "Printer Driver Software" on page 2-1.
OFF CAUTION: If you transport or ship the printer, first remove the media. Failure to off ( ). On the operator panel, the orange Power light and the green Ready light illuminate, and the Ready message appears when the printer is ON initialized. 1. Setting Up the Printer Turning On the Printer IMPORTANT: Install the printer driver software before turning on ( | ). To turn off the printer, press the power switch to do so can damage the printer. 1-9 Press the power switch to on the printer. See "Printer Driver Software" on page 2-1.
User Guide
Page 15
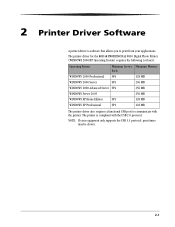
... the printer. The printer driver for the KODAK PROFESSIONAL 9810 Digital Photo Printer (WINDOWS 2000/XP Operating System) requires the following (or later): Operating System Minimum Service Minimum Memory Pack WINDOWS 2000 Professional SP4 WINDOWS 2000 Server SP4 WINDOWS 2000 Advanced Server SP4 128 MB 256 MB 256 MB WINDOWS Server 2003 WINDOWS XP Home Edition SP1 WINDOWS XP Professional SP1 256 MB 128 MB 128 MB The printer driver also requires a functional USB port to print...
... the printer. The printer driver for the KODAK PROFESSIONAL 9810 Digital Photo Printer (WINDOWS 2000/XP Operating System) requires the following (or later): Operating System Minimum Service Minimum Memory Pack WINDOWS 2000 Professional SP4 WINDOWS 2000 Server SP4 WINDOWS 2000 Advanced Server SP4 128 MB 256 MB 256 MB WINDOWS Server 2003 WINDOWS XP Home Edition SP1 WINDOWS XP Professional SP1 256 MB 128 MB 128 MB The printer driver also requires a functional USB port to print...

User Guide
Page 16
... will still install correctly. Press the power switch to off ( ) to turn off the printer. 2. IMPORTANT: One or more screens may show the KODAK Photo Printer 8800. Borderless Printing For borderless printing, set the size of the image sizes shown above. • Set scaling to 103% (using the printer driver's Properties / Advanced option). • Use the Scale to Fill option if your application supports this feature. 2-2 Click Printer Driver to install the printer driver. 1. Follow the on-screen instructions to...
... will still install correctly. Press the power switch to off ( ) to turn off the printer. 2. IMPORTANT: One or more screens may show the KODAK Photo Printer 8800. Borderless Printing For borderless printing, set the size of the image sizes shown above. • Set scaling to 103% (using the printer driver's Properties / Advanced option). • Use the Scale to Fill option if your application supports this feature. 2-2 Click Printer Driver to install the printer driver. 1. Follow the on-screen instructions to...
User Guide
Page 18
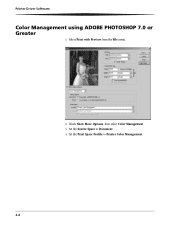
Printer Driver Software Color Management using ADOBE PHOTOSHOP 7.0 or Greater 1. Set the Print Space Profile to Document. 4. Select Print with Preview from the File menu. 2. Set the Source Space to Printer Color Management. 2-4 Check Show More Options, then select Color Management. 3.
Printer Driver Software Color Management using ADOBE PHOTOSHOP 7.0 or Greater 1. Set the Print Space Profile to Document. 4. Select Print with Preview from the File menu. 2. Set the Source Space to Printer Color Management. 2-4 Check Show More Options, then select Color Management. 3.
User Guide
Page 21
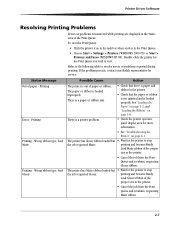
..., requesting Matte ribbon. 2-7 printing and become Ready. Load Matte ribbon of the proper size in the printer. • Check that the paper or ribbon is not jammed and is out of the proper size in the Print Queue. • Choose Start > Settings > Printers (WINDOWS 2000 OS) or Start > Printers and Faxes (WINDOWS XP OS). Load Glossy ribbon of paper or ribbon. Printer Driver Software Resolving Printing Problems Errors or problems encountered while printing are displayed in the task bar when a job is loaded improperly. Wrong ribbon type, load Glossy...
..., requesting Matte ribbon. 2-7 printing and become Ready. Load Matte ribbon of the proper size in the printer. • Check that the paper or ribbon is not jammed and is out of the proper size in the Print Queue. • Choose Start > Settings > Printers (WINDOWS 2000 OS) or Start > Printers and Faxes (WINDOWS XP OS). Load Glossy ribbon of paper or ribbon. Printer Driver Software Resolving Printing Problems Errors or problems encountered while printing are displayed in the task bar when a job is loaded improperly. Wrong ribbon type, load Glossy...
User Guide
Page 22
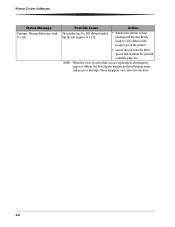
.... • Wait for the printer to stop printing and become Ready. Load 8 x 12L ribbon of the proper type in the printer. • Cancel the job from the Print Queue and resubmit the job with a smaller page size. These disappear once you are replacing or checking the paper or ribbon, the Print Queue displays an Error-Printing status and an error message. NOTE: When the cover is open while you close the door. 2-8 Printer Driver Software Status Message Printing -
.... • Wait for the printer to stop printing and become Ready. Load 8 x 12L ribbon of the proper type in the printer. • Cancel the job from the Print Queue and resubmit the job with a smaller page size. These disappear once you are replacing or checking the paper or ribbon, the Print Queue displays an Error-Printing status and an error message. NOTE: When the cover is open while you close the door. 2-8 Printer Driver Software Status Message Printing -
User Guide
Page 23
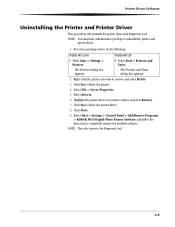
... Select Drivers. 6. For your operating system, do the following: WINDOWS 2000 • Select Start > Settings > Printers. Click Yes to uninstall the printer and printer driver. 1. NOTE: This also removes the Diagnostic tool. 2-9 Printer Driver Software Uninstalling the Printer and Printer Driver This procedure will uninstall the printer driver and Diagnostic tool. NOTE: You must have Administrator privilege to delete the printer driver. 8. Select Start > Settings > Control Panel > Add/Remove Programs > KODAK 9810 Digital Photo Printer Software and follow the directions...
... Select Drivers. 6. For your operating system, do the following: WINDOWS 2000 • Select Start > Settings > Printers. Click Yes to uninstall the printer and printer driver. 1. NOTE: This also removes the Diagnostic tool. 2-9 Printer Driver Software Uninstalling the Printer and Printer Driver This procedure will uninstall the printer driver and Diagnostic tool. NOTE: You must have Administrator privilege to delete the printer driver. 8. Select Start > Settings > Control Panel > Add/Remove Programs > KODAK 9810 Digital Photo Printer Software and follow the directions...
User Guide
Page 25
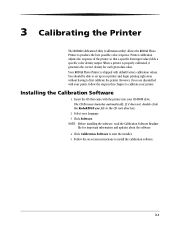
... Printer The KODAK Calibration Utility (calibration utility) allows the KODAK Photo Printer to start the installer. 5. However, if you are dissatisfied with default factory calibration values. If it generates the correct density for important information and updates about the software. 4. NOTE: Before installing the software, read the Calibration Software Readme file for each given data value. Select your printer and begin printing right away without having to calibrate your CD-ROM...
... Printer The KODAK Calibration Utility (calibration utility) allows the KODAK Photo Printer to start the installer. 5. However, if you are dissatisfied with default factory calibration values. If it generates the correct density for important information and updates about the software. 4. NOTE: Before installing the software, read the Calibration Software Readme file for each given data value. Select your printer and begin printing right away without having to calibrate your CD-ROM...
User Guide
Page 26
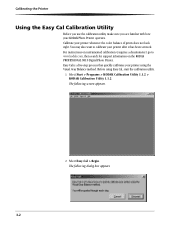
... calibrate your printer whenever the color balance of prints does not look right. The following dialog box appears. 3-2 You may also want to www.kodak.com, then search for support information on the KODAK PROFESSIONAL 9810 Digital Photo Printer. Select Start > Programs > KODAK Calibration Utility 1.1.2 > KODAK Calibration Utility 1.1.2. Select Easy-Cal > Begin. The following screen appears. 2. Calibrate your printer after it has been serviced. Before using the Visual Gray Balance method. Easy Cal is...
... calibrate your printer whenever the color balance of prints does not look right. The following dialog box appears. 3-2 You may also want to www.kodak.com, then search for support information on the KODAK PROFESSIONAL 9810 Digital Photo Printer. Select Start > Programs > KODAK Calibration Utility 1.1.2 > KODAK Calibration Utility 1.1.2. Select Easy-Cal > Begin. The following screen appears. 2. Calibrate your printer after it has been serviced. Before using the Visual Gray Balance method. Easy Cal is...
User Guide
Page 27
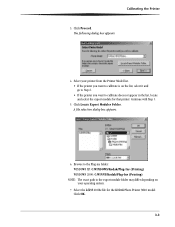
... want to calibrate is on your printer from the Printer Model list. • If the printer you want to calibrate does not appear in the list, locate and select the export module for the KODAK Photo Printer 9810 model. Select the kdk9810.8be file for that printer. The following dialog box appears. 4. Click OK. 3-3 Select your operating system. 7. A file selection dialog box appears. 6. Continue with Step...
... want to calibrate is on your printer from the Printer Model list. • If the printer you want to calibrate does not appear in the list, locate and select the export module for the KODAK Photo Printer 9810 model. Select the kdk9810.8be file for that printer. The following dialog box appears. 4. Click OK. 3-3 Select your operating system. 7. A file selection dialog box appears. 6. Continue with Step...
User Guide
Page 33
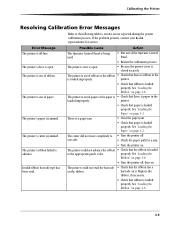
... page 1-2. • Clear the paper jam. • Check that paper is jammed. The printer's ribbon failed to resolve errors reported during the printer calibration process. The printer is loaded properly. The printer is out of ribbon or the ribbon • Check that the ribbon is ribbon in the loaded improperly. one side. • Check the paper path for service. properly. The printer could not read . The printer could not advance the ribbon • Check that there is loaded to • Turn the printer...
... page 1-2. • Clear the paper jam. • Check that paper is jammed. The printer's ribbon failed to resolve errors reported during the printer calibration process. The printer is loaded properly. The printer is out of ribbon or the ribbon • Check that the ribbon is ribbon in the loaded improperly. one side. • Check the paper path for service. properly. The printer could not read . The printer could not advance the ribbon • Check that there is loaded to • Turn the printer...
User Guide
Page 35
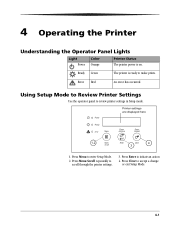
... Enter to enter Setup Mode. 2. Printer settings are displayed here 1,2 4 3 1. Press Menu to initiate an action 4. Press Menu Scroll repeatedly to make prints. Ready Green The printer is on. Using Setup Mode to Review Printer Settings Use the operator panel to accept a change or exit Setup Mode. 4-1 Error Red An error has occurred. 4 Operating the Printer Understanding the Operator Panel Lights Light Color Power Orange Printer Status The printer power is ready to scroll through the printer settings. 3. Press Clear to review printer settings in Setup mode.
... Enter to enter Setup Mode. 2. Printer settings are displayed here 1,2 4 3 1. Press Menu to initiate an action 4. Press Menu Scroll repeatedly to make prints. Ready Green The printer is on. Using Setup Mode to Review Printer Settings Use the operator panel to accept a change or exit Setup Mode. 4-1 Error Red An error has occurred. 4 Operating the Printer Understanding the Operator Panel Lights Light Color Power Orange Printer Status The printer power is ready to scroll through the printer settings. 3. Press Clear to review printer settings in Setup mode.
User Guide
Page 42
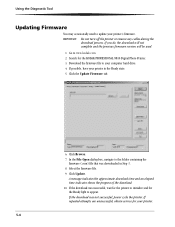
..., obtain service for the KODAK PROFESSIONAL 9810 Digital Photo Printer. 3. Click the Update Firmware tab. 6. If the download was successful, wait for the printer to initialize and for the Ready light to update your printer in Step 3. 8. IMPORTANT: Do not turn off the printer or remove any cables during the download process. Search for your computer hard drive. 4. Click Browse. 7. Select the firmware file. 9. Using the Diagnostic Tool Updating Firmware You may occasionally need to...
..., obtain service for the KODAK PROFESSIONAL 9810 Digital Photo Printer. 3. Click the Update Firmware tab. 6. If the download was successful, wait for the printer to initialize and for the Ready light to update your printer in Step 3. 8. IMPORTANT: Do not turn off the printer or remove any cables during the download process. Search for your computer hard drive. 4. Click Browse. 7. Select the firmware file. 9. Using the Diagnostic Tool Updating Firmware You may occasionally need to...
User Guide
Page 43
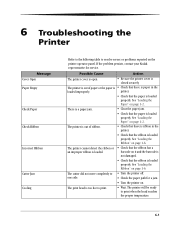
... Kodak representative for a jam. • Turn the printer on. The printer is out of ribbon. • Check that the ribbon is loaded properly. barcode on page 1-6. one side. • Check the paper path for service. 6 Troubleshooting the Printer Message Cover Open Paper Empty Check Paper Check Ribbon Incorrect Ribbon Cutter Jam Cooling Refer to the following table to resolve errors or problems reported on page 1-2. See "Loading the Paper" on the printer operator panel. See "Loading the Paper" on page 1-6. The printer cannot detect the ribbon or • Check...
... Kodak representative for a jam. • Turn the printer on. The printer is out of ribbon. • Check that the ribbon is loaded properly. barcode on page 1-6. one side. • Check the paper path for service. 6 Troubleshooting the Printer Message Cover Open Paper Empty Check Paper Check Ribbon Incorrect Ribbon Cutter Jam Cooling Refer to the following table to resolve errors or problems reported on page 1-2. See "Loading the Paper" on the printer operator panel. See "Loading the Paper" on page 1-6. The printer cannot detect the ribbon or • Check...
User Guide
Page 51
... F firmware, updating, 5-4 H humidity, printer specifications, A-1 I installing calibration software, 3-1 paper, 1-2 printer driver, 2-2 ribbon, 1-6 L labels, safety, B-2 loading paper, 1-2 ribbon, 1-6 N noise emission spec, B-3 O operator panel error/red light, 4-1 language, 4-2 making a test print, 4-2 power/orange light, 4-1 printer settings, 4-2 Ready message, 4-2 ready/green light, 4-1 setup mode, 4-2 standby timeout, 4-2 P paper cutter and print head registration, adjusting, 5-1 paper, loading, 1-2 power cable, 1-8 requirements, A-1 turning on, 1-9 preferences, 2-3 print head and paper...
... F firmware, updating, 5-4 H humidity, printer specifications, A-1 I installing calibration software, 3-1 paper, 1-2 printer driver, 2-2 ribbon, 1-6 L labels, safety, B-2 loading paper, 1-2 ribbon, 1-6 N noise emission spec, B-3 O operator panel error/red light, 4-1 language, 4-2 making a test print, 4-2 power/orange light, 4-1 printer settings, 4-2 Ready message, 4-2 ready/green light, 4-1 setup mode, 4-2 standby timeout, 4-2 P paper cutter and print head registration, adjusting, 5-1 paper, loading, 1-2 power cable, 1-8 requirements, A-1 turning on, 1-9 preferences, 2-3 print head and paper...
User Guide
Page 52
Index R radio frequency compliance, B-2 Ready message, operator panel, 4-2 recycling, B-3 ribbon, loading, 1-6 S safety compliance, B-2 tips, B-1 warning labels, B-2 setting up the printer, 1-1 setup mode, 4-1 software installing calibration software, 3-1 printer driver, 2-2 USB cable, connecting, 1-8 uninstalling, 2-9, 3-8 specifications printer, A-1 switch, power, 1-9 T temperature printer specifications, A-1 test print, making, 4-3 troubleshooting the printer, 6-1 U uninstalling calibration software, 3-8 printer driver, 2-9 updating firmware, 5-4 USB cable, connecting, 1-8 I-2
Index R radio frequency compliance, B-2 Ready message, operator panel, 4-2 recycling, B-3 ribbon, loading, 1-6 S safety compliance, B-2 tips, B-1 warning labels, B-2 setting up the printer, 1-1 setup mode, 4-1 software installing calibration software, 3-1 printer driver, 2-2 USB cable, connecting, 1-8 uninstalling, 2-9, 3-8 specifications printer, A-1 switch, power, 1-9 T temperature printer specifications, A-1 test print, making, 4-3 troubleshooting the printer, 6-1 U uninstalling calibration software, 3-8 printer driver, 2-9 updating firmware, 5-4 USB cable, connecting, 1-8 I-2


