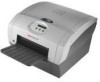
User Guide
Page 3
... Begin ...1-1 Recommended Air Flow Clearances ...1-1 Loading the Paper ...1-2 Loading the Ribbon...1-6 Installing the Print Catcher...1-7 Connecting the Cables ...1-8 Connecting the power cable ...1-8 Connecting the USB cable...1-8 Turning On the Printer...1-9 2 Printer Driver Software Installing the Printer Driver...2-2 Borderless Printing ...2-2 Customizing Printer Properties...2-3 Customizing Printing Preferences...2-3 Color Management using ADOBE PHOTOSHOP 7.0 or Greater 2-4 Custom Image Composition Packages ...2-5 Creating a Custom Package...
... Begin ...1-1 Recommended Air Flow Clearances ...1-1 Loading the Paper ...1-2 Loading the Ribbon...1-6 Installing the Print Catcher...1-7 Connecting the Cables ...1-8 Connecting the power cable ...1-8 Connecting the USB cable...1-8 Turning On the Printer...1-9 2 Printer Driver Software Installing the Printer Driver...2-2 Borderless Printing ...2-2 Customizing Printer Properties...2-3 Customizing Printing Preferences...2-3 Color Management using ADOBE PHOTOSHOP 7.0 or Greater 2-4 Custom Image Composition Packages ...2-5 Creating a Custom Package...

User Guide
Page 11
... take-up spool into the printer as they exit the printer. • Set the print catcher into the rear spool holder on the right. 7. Take-up spool into place. 9. Print catcher 1-7 If there is any slack in the ribbon can cause a paper jam when making prints. IMPORTANT: Slack in the ribbon... on the left side of the take -up spool. Remove the label/wrapper from the ribbon. Installing the Print Catcher The print catcher collects finished prints as shown. Place the left . 8. Push the right side of the take -up spool 6. Setting Up the Printer Label/wrapper 5.
... take-up spool into the printer as they exit the printer. • Set the print catcher into the rear spool holder on the right. 7. Take-up spool into place. 9. Print catcher 1-7 If there is any slack in the ribbon can cause a paper jam when making prints. IMPORTANT: Slack in the ribbon... on the left side of the take -up spool. Remove the label/wrapper from the ribbon. Installing the Print Catcher The print catcher collects finished prints as shown. Place the left . 8. Push the right side of the take -up spool 6. Setting Up the Printer Label/wrapper 5.
User Guide
Page 45
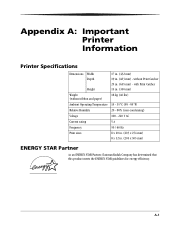
... mm) 8 x 12 in . (635 mm) - with Print Catcher 13 in. (330 mm) Weight (without Print Catcher 25 in . (203 x 305 mm) ENERGY STAR Partner As an ENERGY STAR Partner, Eastman Kodak Company has determined that this product meets the ENERGY STAR guidelines for energy efficiency. A-1 Appendix A: Important Printer Information Printer Specifications Dimensions Width Depth Height 17 in...
... mm) 8 x 12 in . (635 mm) - with Print Catcher 13 in. (330 mm) Weight (without Print Catcher 25 in . (203 x 305 mm) ENERGY STAR Partner As an ENERGY STAR Partner, Eastman Kodak Company has determined that this product meets the ENERGY STAR guidelines for energy efficiency. A-1 Appendix A: Important Printer Information Printer Specifications Dimensions Width Depth Height 17 in...

