
User Guide
Page 1
Kodak EasyShare printer dock plus series 3 User's Guide www.kodak.com For interactive tutorials, www.kodak.com/go/howto
Kodak EasyShare printer dock plus series 3 User's Guide www.kodak.com For interactive tutorials, www.kodak.com/go/howto

User Guide
Page 5
...for your printer dock 1 Installing the custom camera insert 2 Connecting the power 3 Handling and storing the color cartridge 3 Installing and removing the color cartridge 4 Handling and storing the paper 5 Loading paper 6 Installing and removing the paper tray 7 2 Setting up your digital camera 8 Docking and ...charging your digital camera 8 Setting the picture quality 10 Tagging pictures for printing 11 3 Printing without a computer 12 Printing from your digital camera 12 Printing from the internal card reader 13 Printing from a Kodak card reader ...
...for your printer dock 1 Installing the custom camera insert 2 Connecting the power 3 Handling and storing the color cartridge 3 Installing and removing the color cartridge 4 Handling and storing the paper 5 Loading paper 6 Installing and removing the paper tray 7 2 Setting up your digital camera 8 Docking and ...charging your digital camera 8 Setting the picture quality 10 Tagging pictures for printing 11 3 Printing without a computer 12 Printing from your digital camera 12 Printing from the internal card reader 13 Printing from a Kodak card reader ...
User Guide
Page 6
...Transferring pictures from the internal card reader 28 Transferring pictures from a Kodak card reader 29 Printing from a computer 30 Canceling printing 33 Uninstalling the software 34 5 Using the wireless features of your printer dock 35 Printing from a Bluetooth® wireless technology enabled device 35 ...Printing and transferring over a Wi-Fi wireless network 37 Printing from an infrared device 42 Using the Kodak remote control 42 6 Reviewing pictures 43 ...
...Transferring pictures from the internal card reader 28 Transferring pictures from a Kodak card reader 29 Printing from a computer 30 Canceling printing 33 Uninstalling the software 34 5 Using the wireless features of your printer dock 35 Printing from a Bluetooth® wireless technology enabled device 35 ...Printing and transferring over a Wi-Fi wireless network 37 Printing from an infrared device 42 Using the Kodak remote control 42 6 Reviewing pictures 43 ...

User Guide
Page 7
Table of contents 9 Appendix 68 Printer dock specifications 68 Wireless channels 69 Important safety instructions 70 Extending battery life 71 Upgrading your software and firmware 72 Additional care and maintenance 72 Warranty...73 Regulatory compliance 75 www.kodak.com/go/support v
Table of contents 9 Appendix 68 Printer dock specifications 68 Wireless channels 69 Important safety instructions 70 Extending battery life 71 Upgrading your software and firmware 72 Additional care and maintenance 72 Warranty...73 Regulatory compliance 75 www.kodak.com/go/support v

User Guide
Page 8
...1 Getting started Finding a location for paper travel. ■ For proper ventilation, make sure the top and back of the printer dock are not blocked. ■ When connecting power or USB cables, keep the cables clear of the paper path to the front... (12.7 cm) clearance from the back of the printer dock for your printer dock ■ Place the printer dock on all sides of the printer dock to high levels of the printer dock. ■ Avoid areas where ventilation ducts, open doors, or frequent passersby might expose the printer dock and paper to let you connect and disconnect cables, ...
...1 Getting started Finding a location for paper travel. ■ For proper ventilation, make sure the top and back of the printer dock are not blocked. ■ When connecting power or USB cables, keep the cables clear of the paper path to the front... (12.7 cm) clearance from the back of the printer dock for your printer dock ■ Place the printer dock on all sides of the printer dock to high levels of the printer dock. ■ Avoid areas where ventilation ducts, open doors, or frequent passersby might expose the printer dock and paper to let you connect and disconnect cables, ...
User Guide
Page 9
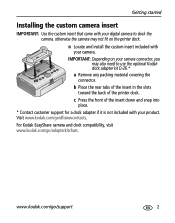
... not fit on your camera connector, you may also need to use the optional Kodak dock adapter kit D-26.* a Remove any packing material covering the connector. For Kodak EasyShare camera and dock compatibility, visit www.kodak.com/go/adapterkitchart. IMPORTANT: Depending on the printer dock. ■ Locate and install the custom insert included with your camera. c Press the...
... not fit on your camera connector, you may also need to use the optional Kodak dock adapter kit D-26.* a Remove any packing material covering the connector. For Kodak EasyShare camera and dock compatibility, visit www.kodak.com/go/adapterkitchart. IMPORTANT: Depending on the printer dock. ■ Locate and install the custom insert included with your camera. c Press the...

User Guide
Page 10
... outlet. Getting started Connecting the power RISK OF ELECTRIC SHOCK: Use only the AC power adapter included with your camera, printer dock, or computer. 1 If a digital camera is docked, remove it. 2 Connect the AC power cord to the AC power adapter, then to the back of high-temperature ...environments (such as a vehicle parked in the sun). 3 www.kodak.com/go/support Other adapters or cords can damage your printer dock. Handling and storing the color cartridge ■ For best quality prints, store the color cartridge in a location where...
... outlet. Getting started Connecting the power RISK OF ELECTRIC SHOCK: Use only the AC power adapter included with your camera, printer dock, or computer. 1 If a digital camera is docked, remove it. 2 Connect the AC power cord to the AC power adapter, then to the back of high-temperature ...environments (such as a vehicle parked in the sun). 3 www.kodak.com/go/support Other adapters or cords can damage your printer dock. Handling and storing the color cartridge ■ For best quality prints, store the color cartridge in a location where...

User Guide
Page 11
... . 3 Slide the color cartridge in, label side up on the cartridge spool, then rotate the spool clockwise. Doing so could reduce the number of the printer dock. 2 Check to make sure there is no slack in the color cartridge ribbon. To remove slack, push in place if there is off before attempting..." into place. 4 Close the cartridge door. ■ To remove the color cartridge, open the cartridge door, then push up , with the arrow pointing toward the printer dock. Make sure the Paper light is a paper error. www.kodak.com/go/support 4
... . 3 Slide the color cartridge in, label side up on the cartridge spool, then rotate the spool clockwise. Doing so could reduce the number of the printer dock. 2 Check to make sure there is no slack in the color cartridge ribbon. To remove slack, push in place if there is off before attempting..." into place. 4 Close the cartridge door. ■ To remove the color cartridge, open the cartridge door, then push up , with the arrow pointing toward the printer dock. Make sure the Paper light is a paper error. www.kodak.com/go/support 4

User Guide
Page 13
... missing perforated tabs. 4 Load the paper into the paper tray, with the Kodak logo side facing down. Do not load paper that is the fully open, or paper loading position. 3 Carefully "fan" the paper to keep the sheets from the printer dock if installed (see page 7). 2 From the closed position, slide the paper...
... missing perforated tabs. 4 Load the paper into the paper tray, with the Kodak logo side facing down. Do not load paper that is the fully open, or paper loading position. 3 Carefully "fan" the paper to keep the sheets from the printer dock if installed (see page 7). 2 From the closed position, slide the paper...

User Guide
Page 14
This is the semi-open, or installation position. 2 Open the paper tray door on the printer dock, make sure to keep out dust and debris. ■ When the paper tray is empty, the Paper light glows red. After refilling and installing the ... the paper tray cover partway back, about 1.2 in. (3 cm) to clear the paper error and resume printing. 7 www.kodak.com/go/support IMPORTANT: To ensure the paper tray fits squarely on the printer dock. 3 Slide the paper tray in the installation position while installing. ■ Pull the paper tray out to remove it...
This is the semi-open, or installation position. 2 Open the paper tray door on the printer dock, make sure to keep out dust and debris. ■ When the paper tray is empty, the Paper light glows red. After refilling and installing the ... the paper tray cover partway back, about 1.2 in. (3 cm) to clear the paper error and resume printing. 7 www.kodak.com/go/support IMPORTANT: To ensure the paper tray fits squarely on the printer dock. 3 Slide the paper tray in the installation position while installing. ■ Pull the paper tray out to remove it...
User Guide
Page 15
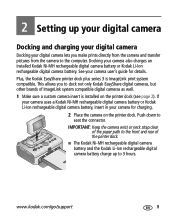
... camera Docking and charging your digital camera Docking your digital camera lets you to dock not only Kodak EasyShare digital cameras, but other brands of the printer dock. ■ The Kodak Ni-MH rechargeable digital camera battery and the Kodak Li-Ion rechargeable digital camera battery charge up to seat the connector. Plus, the Kodak EasyShare printer dock plus series 3 is installed on the printer dock.
... camera Docking and charging your digital camera Docking your digital camera lets you to dock not only Kodak EasyShare digital cameras, but other brands of the printer dock. ■ The Kodak Ni-MH rechargeable digital camera battery and the Kodak Li-Ion rechargeable digital camera battery charge up to seat the connector. Plus, the Kodak EasyShare printer dock plus series 3 is installed on the printer dock.

User Guide
Page 16
... Make sure the Ni-MH rechargeable battery is left in the camera. 2 Place your EasyShare camera on how much charge is in the battery. NOTE: A full refresh cycle takes up your Kodak Ni-MH rechargeable digital camera battery, follow the tips under Extending battery life, page 71.... Setting up to maintain the charge. For Kodak EasyShare camera and dock compatibility, visit www.kodak.com/go /support If these tips don't help, the battery may leave the camera on the printer dock to 8 hours, depending on the printer dock (see the camera user's guide. do not require refreshing....
... Make sure the Ni-MH rechargeable battery is left in the camera. 2 Place your EasyShare camera on how much charge is in the battery. NOTE: A full refresh cycle takes up your Kodak Ni-MH rechargeable digital camera battery, follow the tips under Extending battery life, page 71.... Setting up to maintain the charge. For Kodak EasyShare camera and dock compatibility, visit www.kodak.com/go /support If these tips don't help, the battery may leave the camera on the printer dock to 8 hours, depending on the printer dock (see the camera user's guide. do not require refreshing....

User Guide
Page 17
... the picture quality Before taking pictures, change the picture quality setting (or resolution) on as discharging green lights progresses). www.kodak.com/go /accessories. Ascending Charging battery (lights steady turn off as charging green lights progresses). Charging is complete when all... three lights are proportional to 3:2 . See your digital camera to the printer dock paper, preventing unwanted cropping of your digital camera 3 Press and hold the Battery charging lights/Refresh button, , until the Battery...
... the picture quality Before taking pictures, change the picture quality setting (or resolution) on as discharging green lights progresses). www.kodak.com/go /accessories. Ascending Charging battery (lights steady turn off as charging green lights progresses). Charging is complete when all... three lights are proportional to 3:2 . See your digital camera to the printer dock paper, preventing unwanted cropping of your digital camera 3 Press and hold the Battery charging lights/Refresh button, , until the Battery...

User Guide
Page 19
...Print button, . The first three passes apply layers of yellow, magenta, and cyan colors to print, press the Left/Right control on the printer dock, . www.kodak.com/go/support 12 The Print light blinks, and printing starts.The paper cycles four times before it is complete before removing paper, the paper..., all tagged pictures are printed (see page 15). ■ To review and choose pictures to the print, and the fourth pass applies the Kodak XtraLifeTM coating that protects and preserves the image. The current or most recent picture appears on the printer dock (see page 8).
...Print button, . The first three passes apply layers of yellow, magenta, and cyan colors to print, press the Left/Right control on the printer dock, . www.kodak.com/go/support 12 The Print light blinks, and printing starts.The paper cycles four times before it is complete before removing paper, the paper..., all tagged pictures are printed (see page 15). ■ To review and choose pictures to the print, and the fourth pass applies the Kodak XtraLifeTM coating that protects and preserves the image. The current or most recent picture appears on the printer dock (see page 8).

User Guide
Page 20
... the camera. ■ To exit without a computer Printing from your SDIO, SD, or MMC memory card. 1 Open the accessory door on the printer dock. IMPORTANT: Insert the card only as shown, then push the card into the card slot. NOTE: If the memory card contains pictures tagged for printing..., instead of Kodak products, or visit www.kodak.com/go/accessories. 13 www.kodak.com/go/support Do not insert or remove a card when the printer dock is transferring pictures (see page 15).
... the camera. ■ To exit without a computer Printing from your SDIO, SD, or MMC memory card. 1 Open the accessory door on the printer dock. IMPORTANT: Insert the card only as shown, then push the card into the card slot. NOTE: If the memory card contains pictures tagged for printing..., instead of Kodak products, or visit www.kodak.com/go/accessories. 13 www.kodak.com/go/support Do not insert or remove a card when the printer dock is transferring pictures (see page 15).

User Guide
Page 21
... instead of printing the current picture, all tagged pictures are not supported. 1 Open the accessory door on the printer dock. 2 Plug the USB connector from a Kodak card reader Your printer dock is complete before removing paper, the paper tray, the color cartridge, or the camera. ■ To exit without... a computer Printing from the card reader into the USB device connector located on the side of the printer dock. 3 Insert the memory card into the card reader (see page 15). www.kodak.com/go /accessories. however, other accessories at a time. ■ To print the current picture,...
... instead of printing the current picture, all tagged pictures are not supported. 1 Open the accessory door on the printer dock. 2 Plug the USB connector from a Kodak card reader Your printer dock is complete before removing paper, the paper tray, the color cartridge, or the camera. ■ To exit without... a computer Printing from the card reader into the USB device connector located on the side of the printer dock. 3 Insert the memory card into the card reader (see page 15). www.kodak.com/go /accessories. however, other accessories at a time. ■ To print the current picture,...

User Guide
Page 22
...button, . The Print light blinks, printing starts, and tagged pictures are printed. Printing from a PictBridge compatible camera or device The Kodak EasyShare printer dock plus offers PictBridge compatibility, which lets you the option to review pictures, choose printing options, and print. IMPORTANT: To avoid paper ... before removing paper, the paper tray, the color cartridge, or the camera. ■ To bypass printing of the printer dock. 3 Use your camera is docked, a message appears on your camera or card as they are printed. IMPORTANT: To avoid paper misfeeds or jams, wait...
...button, . The Print light blinks, printing starts, and tagged pictures are printed. Printing from a PictBridge compatible camera or device The Kodak EasyShare printer dock plus offers PictBridge compatibility, which lets you the option to review pictures, choose printing options, and print. IMPORTANT: To avoid paper ... before removing paper, the paper tray, the color cartridge, or the camera. ■ To bypass printing of the printer dock. 3 Use your camera is docked, a message appears on your camera or card as they are printed. IMPORTANT: To avoid paper misfeeds or jams, wait...

User Guide
Page 24
... When printing from a PictBridge compatible camera or device (see page 15), the number of copies that are printed is automatically selected. 17 www.kodak.com/go/support For example, if you choose to print a picture with 2 up selected, 2 copies are printed on one sheet of copies ...x 3 in. (5.1 x 7.6 cm) pictures are each tagged for printing one sheet of the picture size options on the printer dock, the closest available picture size option on the printer dock is determined by the setting on your camera or device. If the picture size option selected on your device does not match...
... When printing from a PictBridge compatible camera or device (see page 15), the number of copies that are printed is automatically selected. 17 www.kodak.com/go/support For example, if you choose to print a picture with 2 up selected, 2 copies are printed on one sheet of copies ...x 3 in. (5.1 x 7.6 cm) pictures are each tagged for printing one sheet of the picture size options on the printer dock, the closest available picture size option on the printer dock is determined by the setting on your camera or device. If the picture size option selected on your device does not match...

User Guide
Page 25
NOTE: If you wish to begin printing. www.kodak.com/go/support 18 Printing without a computer Printing different pictures on the same sheet 1 Tag the pictures you want to print on your camera, duplicate ... one copy of a picture when tagging them on your digital camera (see page 11). 2 Place the camera on the printer dock, or insert the memory card into the internal card reader or a connected Kodak 8-in-1 card reader (sold separately). 3 Press the Picture Size button repeatedly to select either 2 up , 4 up , or 9 up , depending...
NOTE: If you wish to begin printing. www.kodak.com/go/support 18 Printing without a computer Printing different pictures on the same sheet 1 Tag the pictures you want to print on your camera, duplicate ... one copy of a picture when tagging them on your digital camera (see page 11). 2 Place the camera on the printer dock, or insert the memory card into the internal card reader or a connected Kodak 8-in-1 card reader (sold separately). 3 Press the Picture Size button repeatedly to select either 2 up , 4 up , or 9 up , depending...

User Guide
Page 26
...camera screen. 2 Press the Left/Right control on the printer dock. For each picture, choose the number of copies, then press the Print button, . 19 www.kodak.com/go/support Method 2: using the printer dock 1 Place the camera on the printer dock, picture to print. , to select the number of copies... you would like to print. 2 Place the camera on the printer dock, or insert the memory card into the ...
...camera screen. 2 Press the Left/Right control on the printer dock. For each picture, choose the number of copies, then press the Print button, . 19 www.kodak.com/go/support Method 2: using the printer dock 1 Place the camera on the printer dock, picture to print. , to select the number of copies... you would like to print. 2 Place the camera on the printer dock, or insert the memory card into the ...

