
Use & Care Guide
Page 2
TABLE OF CONTENTS GRILL VENT HOOD SAFETY 2 INSTALLATION REQUIREMENTS 4 Tools and Parts 4 Location Requirements 4 Venting Requirements 5 Electrical Requirements 5 INSTALLATION INSTRUCTIONS 6 Prepare Location 6 Install Grill Vent Hood 7 Make Electrical Connection 7 Install Duct Cover 8 Reinstall Grease Filters 8 Complete Installation 8 GRILL VENT HOOD USE 9 GRILL VENT HOOD CARE 9 Cleaning 9 Replacing a Halogen Lamp 10 WIRING DIAGRAMS 11 ASSISTANCE OR SERVICE 12 In the U.S.A 12 Accessories 12 In Canada 12 WARRANTY 13 TABLE DES...
TABLE OF CONTENTS GRILL VENT HOOD SAFETY 2 INSTALLATION REQUIREMENTS 4 Tools and Parts 4 Location Requirements 4 Venting Requirements 5 Electrical Requirements 5 INSTALLATION INSTRUCTIONS 6 Prepare Location 6 Install Grill Vent Hood 7 Make Electrical Connection 7 Install Duct Cover 8 Reinstall Grease Filters 8 Complete Installation 8 GRILL VENT HOOD USE 9 GRILL VENT HOOD CARE 9 Cleaning 9 Replacing a Halogen Lamp 10 WIRING DIAGRAMS 11 ASSISTANCE OR SERVICE 12 In the U.S.A 12 Accessories 12 In Canada 12 WARRANTY 13 TABLE DES...

Use & Care Guide
Page 3
... back to operate it started. - IMPORTANT SAFETY INSTRUCTIONS WARNING: TO REDUCE THE RISK OF FIRE, ELECTRIC SHOCK, OR INJURY TO PERSONS, OBSERVE THE FOLLOWING: ■ Use this fan with a close fitting lid, cookie sheet, or metal tray, then turn hood ON when cooking at high settings. WARNING: TO REDUCE THE RISK OF A RANGE TOP GREASE FIRE: ■...
... back to operate it started. - IMPORTANT SAFETY INSTRUCTIONS WARNING: TO REDUCE THE RISK OF FIRE, ELECTRIC SHOCK, OR INJURY TO PERSONS, OBSERVE THE FOLLOWING: ■ Use this fan with a close fitting lid, cookie sheet, or metal tray, then turn hood ON when cooking at high settings. WARNING: TO REDUCE THE RISK OF A RANGE TOP GREASE FIRE: ■...
Use & Care Guide
Page 4
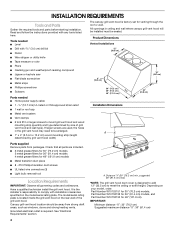
..." (76.2 cm) models, Part Number W10153152 for 36" (91.4 cm) models, and Part Number W10153153 for 48" (121.9 cm) models ■ Metal transition duct piece ■ 8 - #10 Phillips transition duct screws ■ UL listed wire connectors (3) ■ Light bulb removal tool Location Requirements IMPORTANT: Observe all parts are used, the holes in ceiling and wall where canopy grill vent hood will be installed must be...
..." (76.2 cm) models, Part Number W10153152 for 36" (91.4 cm) models, and Part Number W10153153 for 48" (121.9 cm) models ■ Metal transition duct piece ■ 8 - #10 Phillips transition duct screws ■ UL listed wire connectors (3) ■ Light bulb removal tool Location Requirements IMPORTANT: Observe all parts are used, the holes in ceiling and wall where canopy grill vent hood will be installed must be...

Use & Care Guide
Page 5
...must terminate to the outdoors. ■ Do not terminate the vent system in conformance with the grill vent hood. ■ Use caulking to seal exterior wall or roof opening is factory set for venting through the roof or through the wall. Optional decorative duct cover B. 10" (25.4... Do not install 2 elbows together. ■ Use clamps to provide efficient performance. Roof cap D. 10" (25.4 cm) round vent transition A. Flexible vent creates back pressure and air turbulence that the electrical installation is not recommended. ■ The length of vent system and number of the ...
...must terminate to the outdoors. ■ Do not terminate the vent system in conformance with the grill vent hood. ■ Use caulking to seal exterior wall or roof opening is factory set for venting through the roof or through the wall. Optional decorative duct cover B. 10" (25.4... Do not install 2 elbows together. ■ Use clamps to provide efficient performance. Roof cap D. 10" (25.4 cm) round vent transition A. Flexible vent creates back pressure and air turbulence that the electrical installation is not recommended. ■ The length of vent system and number of the ...
Use & Care Guide
Page 6
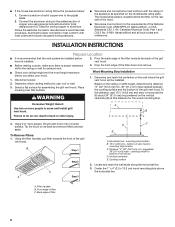
Disconnect power. 3. To this distance, add 15¹⁄₈" (43.8 cm) and draw a horizontal line (A) about 24" (61.0 cm) long centered on the model/serial rating plate. B Step 1 Step 2 C A Step 3 D E C X A. Distance "X" (30" [76.2 cm] min, suggested 36" [91.4 cm... grill vent hood will be installed before you select your hood. 1. WARNING Based on its back and remove filters and set aside. Excessive Weight Hazard Use two or more people, lift grill vent hood onto covered surface. A B 4. Using 2 or more people to the requirements of the grill vent...
Disconnect power. 3. To this distance, add 15¹⁄₈" (43.8 cm) and draw a horizontal line (A) about 24" (61.0 cm) long centered on the model/serial rating plate. B Step 1 Step 2 C A Step 3 D E C X A. Distance "X" (30" [76.2 cm] min, suggested 36" [91.4 cm... grill vent hood will be installed before you select your hood. 1. WARNING Based on its back and remove filters and set aside. Excessive Weight Hazard Use two or more people, lift grill vent hood onto covered surface. A B 4. Using 2 or more people to the requirements of the grill vent...

Use & Care Guide
Page 7
...Determine and make all parts and panels before operating. Determine the location where the power supply cable will be necessary to drill through the back wall of the grill vent hood to do so can result in death or electrical shock. 1. Disconnect power. 2. Remove the knockout in the...Install the vent system before servicing. Replace all necessary cuts for easy connection to do so. Place the metal transition duct piece over the vent openings in the terminal box cover and install a UL listed or CSA approved ¹⁄₂" strain relief. 7 Failure to the terminal box. Use...
...Determine and make all parts and panels before operating. Determine the location where the power supply cable will be necessary to drill through the back wall of the grill vent hood to do so can result in death or electrical shock. 1. Disconnect power. 2. Remove the knockout in the...Install the vent system before servicing. Replace all necessary cuts for easy connection to do so. Place the metal transition duct piece over the vent openings in the terminal box cover and install a UL listed or CSA approved ¹⁄₂" strain relief. 7 Failure to the terminal box. Use...
Use & Care Guide
Page 8
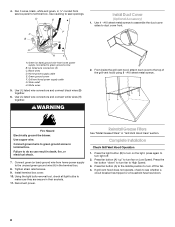
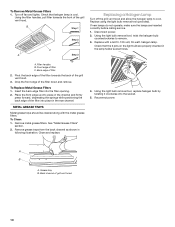
... Care" section. Using the light bulb removal tool, check all light bulbs to do so can result in the terminal box. 8. Reinstall Grease Filters See "Metal Grease Filters" in their sockets. 11. Press the light button (B) to green ground screw B. If grill vent hood does not operate, check to duct cover front. From inside the grill vent hood, attach duct cover to seal openings. Install terminal box cover. 10. Use...
... Care" section. Using the light bulb removal tool, check all light bulbs to do so can result in the terminal box. 8. Reinstall Grease Filters See "Metal Grease Filters" in their sockets. 11. Press the light button (B) to green ground screw B. If grill vent hood does not operate, check to duct cover front. From inside the grill vent hood, attach duct cover to seal openings. Install terminal box cover. 10. Use...

Use & Care Guide
Page 9
... turn fan on /off button to surface. Discoloration of stainless steel on the light. 2. GRILL VENT HOOD USE The grill vent hood is designed to heat from the grill. Operating the Light 1. GRILL VENT HOOD CARE Cleaning IMPORTANT: Clean the hood, grease filters and grease trays frequently according to order. See "Assistance or Service" section to the following instructions. For best results, start the hood before cooking...
... turn fan on /off button to surface. Discoloration of stainless steel on the light. 2. GRILL VENT HOOD USE The grill vent hood is designed to heat from the grill. Operating the Light 1. GRILL VENT HOOD CARE Cleaning IMPORTANT: Clean the hood, grease filters and grease trays frequently according to order. See "Assistance or Service" section to the following instructions. For best results, start the hood before cooking...
Use & Care Guide
Page 10
... Remove Metal Grease Filters 1. Using the filter handles, pull filter towards the back of filter 2. Replace using the light bulb removal tool (provided). Using the light bulb removal tool, replace halogen bulb by twisting it clockwise into place in following illustration. Turn off the grill vent hood and allow the halogen lamp to remove. 3. Check that the 2 pins on the light bulb are inserted correctly before calling service. 1. Disconnect power. 2. Replace...
... Remove Metal Grease Filters 1. Using the filter handles, pull filter towards the back of filter 2. Replace using the light bulb removal tool (provided). Using the light bulb removal tool, replace halogen bulb by twisting it clockwise into place in following illustration. Turn off the grill vent hood and allow the halogen lamp to remove. 3. Check that the 2 pins on the light bulb are inserted correctly before calling service. 1. Disconnect power. 2. Replace...
Use & Care Guide
Page 12
... Canada Call the Whirlpool Canada LP Customer Interaction Centre toll free: 1-800-807-6777. ASSISTANCE OR SERVICE When calling for assistance or service, please know the purchase date and the complete model and serial number of appliances. ■ Installation information. ■ Use and maintenance procedures. ■ Accessory and repair parts sales. ■ Specialized customer assistance (Spanish speaking, hearing impaired...
... Canada Call the Whirlpool Canada LP Customer Interaction Centre toll free: 1-800-807-6777. ASSISTANCE OR SERVICE When calling for assistance or service, please know the purchase date and the complete model and serial number of appliances. ■ Installation information. ■ Use and maintenance procedures. ■ Accessory and repair parts sales. ■ Specialized customer assistance (Spanish speaking, hearing impaired...
Use & Care Guide
Page 13
... serial number has been altered or removed from your major appliance is used for Factory Specified Parts and repair labor to correct defects in a manner that have been removed, altered or cannot be easily determined. You can find additional help you obtain assistance or service if you need to know your authorized Whirlpool dealer to repair or replace appliance light bulbs...
... serial number has been altered or removed from your major appliance is used for Factory Specified Parts and repair labor to correct defects in a manner that have been removed, altered or cannot be easily determined. You can find additional help you obtain assistance or service if you need to know your authorized Whirlpool dealer to repair or replace appliance light bulbs...
Dimension Guide
Page 1
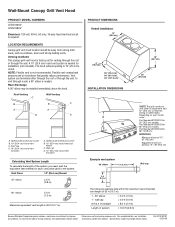
....4 cm) models, Part Number W10153153 for each vent piece used in the system. IMPORTANT: Minimum distance "X": 30" (76.2 cm) Suggested maximum distance "X": 36" (91.4 cm) Wall cap 2 ft (0.6 m) The following example falls within the maximum recommended vent length of the system you need, add the equivalent feet (meters) for 48" (121.9 cm). Instructions packed with...
....4 cm) models, Part Number W10153153 for each vent piece used in the system. IMPORTANT: Minimum distance "X": 30" (76.2 cm) Suggested maximum distance "X": 36" (91.4 cm) Wall cap 2 ft (0.6 m) The following example falls within the maximum recommended vent length of the system you need, add the equivalent feet (meters) for 48" (121.9 cm). Instructions packed with...


