Use & Care Guide
Page 2
... safety messages in this manual and on your appliance. TABLE OF CONTENTS GRILL VENT HOOD SAFETY 2 INSTALLATION REQUIREMENTS 4 Tools and Parts 4 Location Requirements 4 Venting Requirements 5 Electrical Requirements 5 INSTALLATION INSTRUCTIONS 6 Prepare Location 6 Install Grill Vent Hood 7 Make Electrical Connection 7 Install Duct Cover 8 Reinstall Grease Filters 8 Complete Installation 8 GRILL VENT HOOD USE 9 GRILL VENT HOOD CARE 9 Cleaning 9 Replacing a Halogen Lamp 10 WIRING DIAGRAMS 11 ASSISTANCE OR SERVICE 12 In the U.S.A 12...
... safety messages in this manual and on your appliance. TABLE OF CONTENTS GRILL VENT HOOD SAFETY 2 INSTALLATION REQUIREMENTS 4 Tools and Parts 4 Location Requirements 4 Venting Requirements 5 Electrical Requirements 5 INSTALLATION INSTRUCTIONS 6 Prepare Location 6 Install Grill Vent Hood 7 Make Electrical Connection 7 Install Duct Cover 8 Reinstall Grease Filters 8 Complete Installation 8 GRILL VENT HOOD USE 9 GRILL VENT HOOD CARE 9 Cleaning 9 Replacing a Halogen Lamp 10 WIRING DIAGRAMS 11 ASSISTANCE OR SERVICE 12 In the U.S.A 12...

Use & Care Guide
Page 3
... CAREFUL TO PREVENT BURNS. Do not use only. CAUTION: To reduce risk of fuel burning equipment to prevent power from being called. - CAUTION: For general ventilating use to operate it started. - The fire is small and contained in accordance with any solid-state speed control device. aBased on fan or filter. ■ Use proper pan size. IMPORTANT SAFETY INSTRUCTIONS...
... CAREFUL TO PREVENT BURNS. Do not use only. CAUTION: To reduce risk of fuel burning equipment to prevent power from being called. - CAUTION: For general ventilating use to operate it started. - The fire is small and contained in accordance with any solid-state speed control device. aBased on fan or filter. ■ Use proper pan size. IMPORTANT SAFETY INSTRUCTIONS...
Use & Care Guide
Page 4
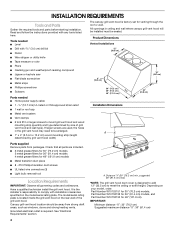
... grease filters for 30" (76.2 cm) models 3 metal grease filters for 36" (91.4 cm) models 4 metal grease filters for 48" (121.9 cm) models ■ Metal transition duct piece ■ 8 - #10 Phillips transition duct screws ■ UL listed wire connectors (3) ■ Light bulb removal tool Location Requirements IMPORTANT: Observe all governing codes and ordinances. Have a qualified technician install the grill vent hood. A. Product Dimensions Vented Installations...
... grease filters for 30" (76.2 cm) models 3 metal grease filters for 36" (91.4 cm) models 4 metal grease filters for 48" (121.9 cm) models ■ Metal transition duct piece ■ 8 - #10 Phillips transition duct screws ■ UL listed wire connectors (3) ■ Light bulb removal tool Location Requirements IMPORTANT: Observe all governing codes and ordinances. Have a qualified technician install the grill vent hood. A. Product Dimensions Vented Installations...

Use & Care Guide
Page 5
...operation: ■ Use no more than 1 elbow is adequate. A 10" (25.4 cm) round vent system is adequate and in the system. Optional decorative duct cover B. 10" (25.4 cm) round vent and elbow C. Ensure that the electrical installation is needed . Plastic or metal foil vent is not recommended. ■ The length of vent system and number... If codes permit and a separate ground wire is not recommended. Rigid metal vent is factory set for venting through the roof or through the wall. NOTE: Flexible vent is used in conformance with the grill vent hood. ■ Use caulking ...
...operation: ■ Use no more than 1 elbow is adequate. A 10" (25.4 cm) round vent system is adequate and in the system. Optional decorative duct cover B. 10" (25.4 cm) round vent and elbow C. Ensure that the electrical installation is needed . Plastic or metal foil vent is not recommended. ■ The length of vent system and number... If codes permit and a separate ground wire is not recommended. Rigid metal vent is factory set for venting through the roof or through the wall. NOTE: Flexible vent is used in conformance with the grill vent hood. ■ Use caulking ...
Use & Care Guide
Page 6
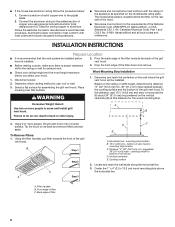
... Installation 1. Failure to use: roof or wall. 3. B Step 1 Step 2 C A Step 3 D E C X A. Horizontal line - bottom of copper wire using special connectors and/or tools designed and UL listed for the wood mounting strip. A. Front edge of the filter down and remove. Disconnect power. 3. Drop the front edge of filter C. Excessive Weight Hazard Use two or more people, lift grill vent hood onto covered...
... Installation 1. Failure to use: roof or wall. 3. B Step 1 Step 2 C A Step 3 D E C X A. Horizontal line - bottom of copper wire using special connectors and/or tools designed and UL listed for the wood mounting strip. A. Front edge of the filter down and remove. Disconnect power. 3. Drop the front edge of filter C. Excessive Weight Hazard Use two or more people, lift grill vent hood onto covered...

Use & Care Guide
Page 7
... further secured by installing 2 screws into the wall. Make Electrical Connection WARNING B A. Failure to the wood mounting strip, it may be run. 3. Remove terminal box cover. 3. Tighten screws securely. Back of the grill vent hood onto the mounting strip. 3. Determine and make all parts and panels before operating. Pull enough power supply cable through the grill vent hood, mounting...
... further secured by installing 2 screws into the wall. Make Electrical Connection WARNING B A. Failure to the wood mounting strip, it may be run. 3. Remove terminal box cover. 3. Tighten screws securely. Back of the grill vent hood onto the mounting strip. 3. Determine and make all parts and panels before operating. Pull enough power supply cable through the grill vent hood, mounting...
Use & Care Guide
Page 8
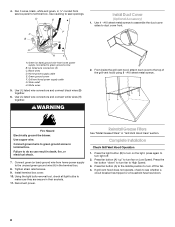
... to green ground screw in their sockets. 11. Using the light bulb removal tool, check all light bulbs to turn fan on the light, press again to duct cover front. Complete Installation Check Grill Vent Hood Operation 1. D E C B F G Install Duct Cover (Optional Accessory) 1. UL listed wire connectors (3) C. White wires 5. Use UL listed wire connectors and connect white wires (H) together. Install terminal box cover. 10. Press the fan button "down" to...
... to green ground screw in their sockets. 11. Using the light bulb removal tool, check all light bulbs to turn fan on the light, press again to duct cover front. Complete Installation Check Grill Vent Hood Operation 1. D E C B F G Install Duct Cover (Optional Accessory) 1. UL listed wire connectors (3) C. White wires 5. Use UL listed wire connectors and connect white wires (H) together. Install terminal box cover. 10. Press the fan button "down" to...

Use & Care Guide
Page 9
... the stainless steel, do not use . For small, difficult-to-clean areas, use Heavy Duty Degreaser Part Number 31552 (not included), a commercial degreaser designed for stainless steel. Operating the Light 1. Press the light ON/OFF button (B) to turn fan to High Speed. 2. GRILL VENT HOOD CARE Cleaning IMPORTANT: Clean the hood, grease filters and grease trays frequently according to order. See "Assistance or Service" section to remove smoke...
... the stainless steel, do not use . For small, difficult-to-clean areas, use Heavy Duty Degreaser Part Number 31552 (not included), a commercial degreaser designed for stainless steel. Operating the Light 1. Press the light ON/OFF button (B) to turn fan to High Speed. 2. GRILL VENT HOOD CARE Cleaning IMPORTANT: Clean the hood, grease filters and grease trays frequently according to order. See "Assistance or Service" section to remove smoke...
Use & Care Guide
Page 10
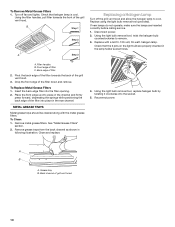
... off fan and lights. Replace using the light bulb removal tool (provided). Disconnect power. 2. Front edge of filter 2. Back edge of filter C. Drop the front edge of the grill vent hood. 3. To Clean: 1. Using the light bulb removal tool, replace halogen bulb by twisting it clockwise into the filter opening. 2. Grease tray B. Turn off the grill vent hood and allow the halogen lamp to remove. 3. Using the light bulb removal tool, twist...
... off fan and lights. Replace using the light bulb removal tool (provided). Disconnect power. 2. Front edge of filter 2. Back edge of filter C. Drop the front edge of the grill vent hood. 3. To Clean: 1. Using the light bulb removal tool, replace halogen bulb by twisting it clockwise into the filter opening. 2. Grease tray B. Turn off the grill vent hood and allow the halogen lamp to remove. 3. Using the light bulb removal tool, twist...
Use & Care Guide
Page 12
... consultants provide assistance with the same precision used to local dealers, repair parts distributors and service companies. Accessories Outdoor Grill Vent Hood Duct Covers 30" (76.2 cm): Order Part Number W10153151 36" (91.4 cm): Order Part Number W10153152 48" (121.9 cm): Order Part Number W10153153 In Canada Call the Whirlpool Canada LP Customer Interaction Centre toll free: 1-800-807-6777. For further assistance If...
... consultants provide assistance with the same precision used to local dealers, repair parts distributors and service companies. Accessories Outdoor Grill Vent Hood Duct Covers 30" (76.2 cm): Order Part Number W10153151 36" (91.4 cm): Order Part Number W10153152 48" (121.9 cm): Order Part Number W10153153 In Canada Call the Whirlpool Canada LP Customer Interaction Centre toll free: 1-800-807-6777. For further assistance If...
Use & Care Guide
Page 13
... operator instructions and/or installation instructions. 4. Service calls to refrigerator or freezer product failures. 7. Cosmetic damage, including scratches, dents, chips or other than normal, single-family household use your sales slip together for repairs. Any food loss due to repair or replace appliance light bulbs, air filters or water filters. This major appliance is covered by the customer. Major appliances with the removal...
... operator instructions and/or installation instructions. 4. Service calls to refrigerator or freezer product failures. 7. Cosmetic damage, including scratches, dents, chips or other than normal, single-family household use your sales slip together for repairs. Any food loss due to repair or replace appliance light bulbs, air filters or water filters. This major appliance is covered by the customer. Major appliances with the removal...
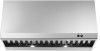
Dimension Guide
Page 1
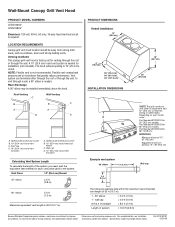
...on your model, order: Part Number W10153151 for 30" (76.2 cm) models, Part Number W10153152 for 36" (91.4 cm) models, Part Number W10153153 for venting through the roof or through the wall. W10153187 02-20-09 Wall-Mount Canopy Grill Vent Hood M PRODUCT MODEL NUMBERS UXG7360V UXG7480V... to change materials and specifications without notice. Specifications subject to improve Dimensions are for each vent piece used in the system. Ref. LOCATION REQUIREMENTS Canopy grill vent hood location should be installed immediately above the hood. Optional decorative duct cover B. 10" (25.4...
...on your model, order: Part Number W10153151 for 30" (76.2 cm) models, Part Number W10153152 for 36" (91.4 cm) models, Part Number W10153153 for venting through the roof or through the wall. W10153187 02-20-09 Wall-Mount Canopy Grill Vent Hood M PRODUCT MODEL NUMBERS UXG7360V UXG7480V... to change materials and specifications without notice. Specifications subject to improve Dimensions are for each vent piece used in the system. Ref. LOCATION REQUIREMENTS Canopy grill vent hood location should be installed immediately above the hood. Optional decorative duct cover B. 10" (25.4...


