

Warranty Information
Page 1
... an authorized KitchenAid servicer is not available. 9. Costs associated with the removal from your home of your major appliance for Factory Specified Parts and repair labor to correct defects in accordance with published installation instructions. 10. Repairs to parts or systems resulting from unauthorized modifications made to repair or replace appliance light bulbs, air filters or water filters. The cost of repair or replacement under this limited warranty. DISCLAIMER OF...
... an authorized KitchenAid servicer is not available. 9. Costs associated with the removal from your home of your major appliance for Factory Specified Parts and repair labor to correct defects in accordance with published installation instructions. 10. Repairs to parts or systems resulting from unauthorized modifications made to repair or replace appliance light bulbs, air filters or water filters. The cost of repair or replacement under this limited warranty. DISCLAIMER OF...
Dimension Guide
Page 1
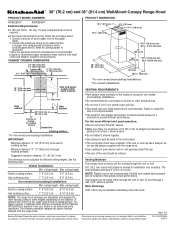
..." (91.4 cm) Wall-Mount Canopy Range Hood PRODUCT MODEL NUMBERS KXW2530Y KXW2536Y Electrical Requirements: q A 120 volt, 60 Hz., AC only, 15-amp, fused electrical circuit is needed . Follow the electrical connector manufacturer's recommended procedure. Vent and power supply cable entry location 17" (43.2 cm)* Side cabinet Side cabinet 30" (76.2 cm) or 36" (91.4 cm) "X" bottom of the vent should be adjusted for venting through the roof or wall. See the following chart. The hood exhaust opening around...
..." (91.4 cm) Wall-Mount Canopy Range Hood PRODUCT MODEL NUMBERS KXW2530Y KXW2536Y Electrical Requirements: q A 120 volt, 60 Hz., AC only, 15-amp, fused electrical circuit is needed . Follow the electrical connector manufacturer's recommended procedure. Vent and power supply cable entry location 17" (43.2 cm)* Side cabinet Side cabinet 30" (76.2 cm) or 36" (91.4 cm) "X" bottom of the vent should be adjusted for venting through the roof or wall. See the following chart. The hood exhaust opening around...

Dimension Guide
Page 2
... Installation our products, we reserve the right to the outside, the hood can be used in the non-vented (recirculating) version, using a Recirculation Kit (which includes charcoal filters and a deflector). Wall cap B. 6" (15.2 cm) round vent A. Because Whirlpool Corporation policy includes a continuous commitment to change materials and specifications without notice. Page 2 of 35 ft (10.7 m). 1 - 90° elbow = 5.0 ft (1.5 m) 1 - Specifications subject to improve Dimensions are for each vent piece used in the system. wall cap...
... Installation our products, we reserve the right to the outside, the hood can be used in the non-vented (recirculating) version, using a Recirculation Kit (which includes charcoal filters and a deflector). Wall cap B. 6" (15.2 cm) round vent A. Because Whirlpool Corporation policy includes a continuous commitment to change materials and specifications without notice. Page 2 of 35 ft (10.7 m). 1 - 90° elbow = 5.0 ft (1.5 m) 1 - Specifications subject to improve Dimensions are for each vent piece used in the system. wall cap...
Installation Guide
Page 3
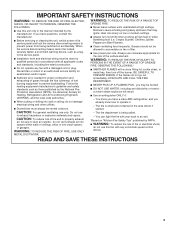
... lid, cookie sheet, or metal tray, then turn hood ON when cooking at high heat or when flambeing food (i.e. WARNING: TO REDUCE THE RISK OF A RANGE TOP GREASE FIRE: ■ Never leave surface units unattended at service panel and lock the service disconnecting means to accumulate on accidentally. do not vent exhaust air into spaces within walls or ceilings, attics or into wall or ceiling; Grease should not be...
... lid, cookie sheet, or metal tray, then turn hood ON when cooking at high heat or when flambeing food (i.e. WARNING: TO REDUCE THE RISK OF A RANGE TOP GREASE FIRE: ■ Never leave surface units unattended at service panel and lock the service disconnecting means to accumulate on accidentally. do not vent exhaust air into spaces within walls or ceilings, attics or into wall or ceiling; Grease should not be...
Installation Guide
Page 4
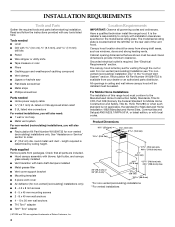
... vent hood. Cabinet opening dimensions that all governing codes and ordinances. Grounded electrical outlet is determined by ceiling height. The canopy hood is the installer's responsibility to comply with installation clearances specified on the rear wall of Saturn Fasteners, Inc. 4 Location Requirements IMPORTANT: Observe all parts are included. ■ Hood canopy assembly with blower, light bulbs, and canopy glass already installed ■ Vent transition with back draft dampers installed ■ Metal grease filter ■ Vent cover support bracket ■ Mounting template...
... vent hood. Cabinet opening dimensions that all governing codes and ordinances. Grounded electrical outlet is determined by ceiling height. The canopy hood is the installer's responsibility to comply with installation clearances specified on the rear wall of Saturn Fasteners, Inc. 4 Location Requirements IMPORTANT: Observe all parts are included. ■ Hood canopy assembly with blower, light bulbs, and canopy glass already installed ■ Vent transition with back draft dampers installed ■ Metal grease filter ■ Vent cover support bracket ■ Mounting template...

Installation Guide
Page 5
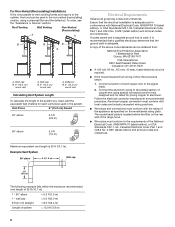
...; elbow is needed for specific requirements in an attic or other enclosed area. ■ Do not use of makeup air systems when using ventilation systems greater than specified CFM of the range hood and the cooking surface. Vent and power supply cable entry location 17" (43.2 cm)* Side cabinet 30" (76.2 cm) or 36" (91.4 cm) "X" bottom of the thermal break. Vented Installations Min. ceiling height Max. For higher ceilings, a Stainless Steel Chimney Extension Kit Part Number W10294735...
...; elbow is needed for specific requirements in an attic or other enclosed area. ■ Do not use of makeup air systems when using ventilation systems greater than specified CFM of the range hood and the cooking surface. Vent and power supply cable entry location 17" (43.2 cm)* Side cabinet 30" (76.2 cm) or 36" (91.4 cm) "X" bottom of the thermal break. Vented Installations Min. ceiling height Max. For higher ceilings, a Stainless Steel Chimney Extension Kit Part Number W10294735...

Installation Guide
Page 6
... filter on the model/serial rating plate. To order, see the "Assistance or Service" section. Ensure that the ground path is adequate. Follow the electrical connector manufacturer's recommended procedure. Maximum equivalent vent length is 35 ft (10.7 m). Wall cap B. 6" (15.2 cm) round vent A. If codes permit and a separate ground wire is used in the system. wall cap 8 ft (2.4 m) straight = 5.0 ft (1.5 m) = 0.0 ft (0.0 m) = 8.0 ft (2.4 m) Length of 35 ft (10.7 m). 1 - 90° elbow 1 - Roof Venting Wall Venting Non-Vented (Recirculating) A. Connect...
... filter on the model/serial rating plate. To order, see the "Assistance or Service" section. Ensure that the ground path is adequate. Follow the electrical connector manufacturer's recommended procedure. Maximum equivalent vent length is 35 ft (10.7 m). Wall cap B. 6" (15.2 cm) round vent A. If codes permit and a separate ground wire is used in the system. wall cap 8 ft (2.4 m) straight = 5.0 ft (1.5 m) = 0.0 ft (0.0 m) = 8.0 ft (2.4 m) Length of 35 ft (10.7 m). 1 - 90° elbow 1 - Roof Venting Wall Venting Non-Vented (Recirculating) A. Connect...

Installation Guide
Page 7
... power until installation is no wood to the wall. Vent Cover Bracket Installation WARNING Excessive Weight Hazard Use two or more people, lift range hood onto covered surface. Attach vent cover bracket to wall flush to use: roof, wall, or nonvented. 3. Select a mounting height between the wall and the back of 27" (68.6 cm) for assembling the range hood. Tape template in the hood's electrical terminal box. Fastener locations C. Ceiling B. Use caulk to move and install range hood. Mounting height reference (hood bottom line) 4. See "Venting Requirements...
... power until installation is no wood to the wall. Vent Cover Bracket Installation WARNING Excessive Weight Hazard Use two or more people, lift range hood onto covered surface. Attach vent cover bracket to wall flush to use: roof, wall, or nonvented. 3. Select a mounting height between the wall and the back of 27" (68.6 cm) for assembling the range hood. Tape template in the hood's electrical terminal box. Fastener locations C. Ceiling B. Use caulk to move and install range hood. Mounting height reference (hood bottom line) 4. See "Venting Requirements...

Installation Guide
Page 8
... shock. 1. Cut the duct to the bottom of hood. Replace all parts and panels before servicing. A B X C D E A. Lower mounting screws 2. Slide the duct onto the bottom of hood (if removed for shipping) with 2 - 3.5 x 9.5 mm sheet metal screws. Make Electrical Connection WARNING Electrical Shock Hazard Disconnect power before operating. Assembly screws B. Vent clamp C. Install transition on back of the hood outlet. Using 2 or more people, hang range hood on 2 mounting screws through the mounting slots on top of the air deflector. 6. Remove terminal box cover. 8
... shock. 1. Cut the duct to the bottom of hood. Replace all parts and panels before servicing. A B X C D E A. Lower mounting screws 2. Slide the duct onto the bottom of hood (if removed for shipping) with 2 - 3.5 x 9.5 mm sheet metal screws. Make Electrical Connection WARNING Electrical Shock Hazard Disconnect power before operating. Assembly screws B. Vent clamp C. Install transition on back of the hood outlet. Using 2 or more people, hang range hood on 2 mounting screws through the mounting slots on top of the air deflector. 6. Remove terminal box cover. 8

Installation Guide
Page 9
... assembly screws. Home power supply cable B. A B 8. Check the operation of the duct with 2 4.2 x 8 mm screws. UL listed wire connectors E. NOTE: To get the most efficient use from home power supply to yellow-green ground wire (F) in terminal box using both upper and lower vent covers, push lower cover down onto hood and lift upper cover to hide slots. White wires F. green ground wires 5. Upper vent cover B. Bracket Secure the bottom of the range hood blower and light. Install metal filters. Remove the...
... assembly screws. Home power supply cable B. A B 8. Check the operation of the duct with 2 4.2 x 8 mm screws. UL listed wire connectors E. NOTE: To get the most efficient use from home power supply to yellow-green ground wire (F) in terminal box using both upper and lower vent covers, push lower cover down onto hood and lift upper cover to hide slots. White wires F. green ground wires 5. Upper vent cover B. Bracket Secure the bottom of the range hood blower and light. Install metal filters. Remove the...

Installation Guide
Page 10
... (non-vented [recirculating] installations only) B. Lamp housings D. Canopy E. Control panel Operating the blower The Blower On/Off button (B) turns the blower On or Off. To turn the blower On, press the Blower On/Off button (B) and the desired speed button (C, D or E). 2. The blower will light up when range hood is designed to remove smoke, cooking vapors and odors from the kitchen. Blower speed medium button E. Press once for On and again for quiet operation. Blower On/Off button C. Blower speed maximum button NOTE: Control buttons will operate at the...
... (non-vented [recirculating] installations only) B. Lamp housings D. Canopy E. Control panel Operating the blower The Blower On/Off button (B) turns the blower On or Off. To turn the blower On, press the Blower On/Off button (B) and the desired speed button (C, D or E). 2. The blower will light up when range hood is designed to remove smoke, cooking vapors and odors from the kitchen. Blower speed medium button E. Press once for On and again for quiet operation. Blower On/Off button C. Blower speed maximum button NOTE: Control buttons will operate at the...

Installation Guide
Page 14
... consumables or cleaning products not approved by the customer. Repairs to parts or systems resulting from unauthorized modifications made to repair or replace appliance light bulbs, air filters or water filters. This warranty is operated and maintained according to instructions attached to or furnished with the product, KitchenAid brand of Whirlpool Corporation or Whirlpool Canada LP (hereafter "KitchenAid") will need service, first see the "Troubleshooting" section of the Use & Care Guide. Repairs when your...
... consumables or cleaning products not approved by the customer. Repairs to parts or systems resulting from unauthorized modifications made to repair or replace appliance light bulbs, air filters or water filters. This warranty is operated and maintained according to instructions attached to or furnished with the product, KitchenAid brand of Whirlpool Corporation or Whirlpool Canada LP (hereafter "KitchenAid") will need service, first see the "Troubleshooting" section of the Use & Care Guide. Repairs when your...

Use & Care Guide
Page 3
... OF A RANGE TOP GREASE FIRE, OBSERVE THE FOLLOWING:a ■ SMOTHER FLAMES with a damaged cord or plug. You know you have questions, contact the manufacturer. ■ Before servicing or cleaning the unit, switch power off the burner. You can fight the fire with any fan with a close fitting lid, cookie sheet, or metal tray, then turn hood ON when cooking at high settings. BE CAREFUL TO PREVENT...
... OF A RANGE TOP GREASE FIRE, OBSERVE THE FOLLOWING:a ■ SMOTHER FLAMES with a damaged cord or plug. You know you have questions, contact the manufacturer. ■ Before servicing or cleaning the unit, switch power off the burner. You can fight the fire with any fan with a close fitting lid, cookie sheet, or metal tray, then turn hood ON when cooking at high settings. BE CAREFUL TO PREVENT...

Use & Care Guide
Page 4
... vent duct - Canopy hood location should be sealed. Recirculation Kit Part Number W10294733 is determined by ceiling height. For Mobile Home Installations The installation of this range hood must conform to comply with back draft dampers installed ■ Metal grease filter ■ Vent cover support bracket ■ Mounting template ■ 2-piece vent cover ■ Air deflector (for venting through the roof or wall. INSTALLATION REQUIREMENTS Tools and Parts Gather the required tools and parts before starting installation. Parts supplied Remove parts from strong draft...
... vent duct - Canopy hood location should be sealed. Recirculation Kit Part Number W10294733 is determined by ceiling height. For Mobile Home Installations The installation of this range hood must conform to comply with back draft dampers installed ■ Metal grease filter ■ Vent cover support bracket ■ Mounting template ■ 2-piece vent cover ■ Air deflector (for venting through the roof or wall. INSTALLATION REQUIREMENTS Tools and Parts Gather the required tools and parts before starting installation. Parts supplied Remove parts from strong draft...

Use & Care Guide
Page 5
... range hood chimneys are adjustable and designed to where the vent system enters the heated portion of air movement. Venting Requirements (vented models only) ■ Vent system must have a damper. Consult your HVAC professional for specific requirements in an attic or other enclosed area. ■ Do not use the damper supplied with the range hood. Vent system can be installed immediately above the hood. 5 For higher ceilings, a Stainless Steel Chimney Extension Kit Part Number W10294735 is used. ■ Do not install 2 elbows together...
... range hood chimneys are adjustable and designed to where the vent system enters the heated portion of air movement. Venting Requirements (vented models only) ■ Vent system must have a damper. Consult your HVAC professional for specific requirements in an attic or other enclosed area. ■ Do not use the damper supplied with the range hood. Vent system can be installed immediately above the hood. 5 For higher ceilings, a Stainless Steel Chimney Extension Kit Part Number W10294735 is used. ■ Do not install 2 elbows together...
Use & Care Guide
Page 6
... added section of copper wire using a charcoal filter and the deflector). Roof cap B. 6" (15.2 cm) round vent A. Follow the electrical connector manufacturer's recommended procedure. The model/serial plate is located behind the filter on the model/serial rating plate. Roof Venting Wall Venting Non-Vented (Recirculating) A. Ensure that the ground path is adequate and in conformance with the rating of the appliance as specified on the rear wall of the range hood. ■ Wire sizes must conform with National Electrical Code, ANSI/NFPA 70...
... added section of copper wire using a charcoal filter and the deflector). Roof cap B. 6" (15.2 cm) round vent A. Follow the electrical connector manufacturer's recommended procedure. The model/serial plate is located behind the filter on the model/serial rating plate. Roof Venting Wall Venting Non-Vented (Recirculating) A. Ensure that the ground path is adequate and in conformance with the rating of the appliance as specified on the rear wall of the range hood. ■ Wire sizes must conform with National Electrical Code, ANSI/NFPA 70...

Use & Care Guide
Page 7
... exhaust vent. ■ Check your ceiling height and the hood height maximum before you select your hood. 1. Range Hood Mounting Screws Installation 1. Tape template in back or other injury. 7. Mounting height reference (hood bottom line) 4. Wall C. Use caulk to screw into wood. Vent Cover Bracket Installation WARNING Excessive Weight Hazard Use two or more people, lift range hood onto covered surface. There must be installed into , additional wall framing supports may be required. Disconnect power. 6. Using 2 or more people to the National Electrical Code...
... exhaust vent. ■ Check your ceiling height and the hood height maximum before you select your hood. 1. Range Hood Mounting Screws Installation 1. Tape template in back or other injury. 7. Mounting height reference (hood bottom line) 4. Wall C. Use caulk to screw into wood. Vent Cover Bracket Installation WARNING Excessive Weight Hazard Use two or more people, lift range hood onto covered surface. There must be installed into , additional wall framing supports may be required. Disconnect power. 6. Using 2 or more people to the National Electrical Code...

Use & Care Guide
Page 8
... cut vent duct D. Mounting slots C. See "Range Hood Care" section. 3. Install transition on back of hood (if removed for shipping) with 2 - 3.5 x 9.5 mm sheet metal screws. Replace all parts and panels before servicing. Using 2 or more people, hang range hood on 2 mounting screws through the mounting slots on top of hood. A B C A. Remove the grease filter. A B A. Assemble the air deflector with the 4 assembly screws. 8. Duct cover bracket 2. X = length to do so can result in death or electrical shock. 1. Slide the duct onto the bottom of the air deflector to the duct...
... cut vent duct D. Mounting slots C. See "Range Hood Care" section. 3. Install transition on back of hood (if removed for shipping) with 2 - 3.5 x 9.5 mm sheet metal screws. Replace all parts and panels before servicing. Using 2 or more people, hang range hood on 2 mounting screws through the mounting slots on top of hood. A B C A. Remove the grease filter. A B A. Assemble the air deflector with the 4 assembly screws. 8. Duct cover bracket 2. X = length to do so can result in death or electrical shock. 1. Slide the duct onto the bottom of the air deflector to the duct...

Use & Care Guide
Page 9
... listed wire connectors. UL listed wire connectors E. Lower vent cover C. 4.2 x 8 mm screws D. See the "Range Hood Care" section. 3. Install terminal box cover. 10. A A B C B D E A. A B 8. Run home power supply cable through strain relief, into terminal box. Home power supply cable B. Electrical Shock Hazard Electrically ground blower. NOTE: To get the most efficient use from home power supply to yellow-green ground wire (F) in terminal box using both upper and lower vent covers, push lower cover down onto hood and lift upper cover to hide slots. Remove...
... listed wire connectors. UL listed wire connectors E. Lower vent cover C. 4.2 x 8 mm screws D. See the "Range Hood Care" section. 3. Install terminal box cover. 10. A A B C B D E A. A B 8. Run home power supply cable through strain relief, into terminal box. Home power supply cable B. Electrical Shock Hazard Electrically ground blower. NOTE: To get the most efficient use from home power supply to yellow-green ground wire (F) in terminal box using both upper and lower vent covers, push lower cover down onto hood and lift upper cover to hide slots. Remove...
Use & Care Guide
Page 14
... of Whirlpool Corporation or Whirlpool Canada LP (hereafter "KitchenAid") will need to know your complete model number and serial number. Outside the 50 United States and Canada, this information on the model and serial number label located on how to use your major appliance, to replace or repair house fuses, or to published user or operator instructions and/or installation instructions. 4. ITEMS EXCLUDED FROM WARRANTY This limited warranty does not cover: 1. Cosmetic damage, including scratches, dents...
... of Whirlpool Corporation or Whirlpool Canada LP (hereafter "KitchenAid") will need to know your complete model number and serial number. Outside the 50 United States and Canada, this information on the model and serial number label located on how to use your major appliance, to replace or repair house fuses, or to published user or operator instructions and/or installation instructions. 4. ITEMS EXCLUDED FROM WARRANTY This limited warranty does not cover: 1. Cosmetic damage, including scratches, dents...


