Installation Guide
Page 1
... you don't follow instructions. INSTALLATION INSTRUCTIONS 600 CFM AND 1200 CFM IN-LINE BLOWERS FOR RANGE HOODS INSTRUCTIONS D'INSTALLATION VENTILATEURS EN LIGNE AVEC DÉBIT DE 600 PI³ ET 1200 PI³ POUR HOTTES D'ÉVACUATION Table of Contents/Table des matières IN-LINE BLOWER SAFETY 1 INSTALLATION REQUIREMENTS 3 Tools and Parts 3 Location Requirements 3 Venting Requirements 4 Electrical Requirements 5 INSTALLATION INSTRUCTIONS 6 Prepare Location 6 Make Electrical Connection 7 ASSISTANCE OR SERVICE 9 In the U.S.A 9 In Canada 9 WARRANTY 10 SÉCURIT...
... you don't follow instructions. INSTALLATION INSTRUCTIONS 600 CFM AND 1200 CFM IN-LINE BLOWERS FOR RANGE HOODS INSTRUCTIONS D'INSTALLATION VENTILATEURS EN LIGNE AVEC DÉBIT DE 600 PI³ ET 1200 PI³ POUR HOTTES D'ÉVACUATION Table of Contents/Table des matières IN-LINE BLOWER SAFETY 1 INSTALLATION REQUIREMENTS 3 Tools and Parts 3 Location Requirements 3 Venting Requirements 4 Electrical Requirements 5 INSTALLATION INSTRUCTIONS 6 Prepare Location 6 Make Electrical Connection 7 ASSISTANCE OR SERVICE 9 In the U.S.A 9 In Canada 9 WARRANTY 10 SÉCURIT...

Installation Guide
Page 2
... into wall or ceiling; CAUTION: For general ventilating use cookware appropriate for proper combustion and exhausting of gases through the flue (chimney) of fire and to properly exhaust air, be vented outdoors. The fire is being switched on "Kitchen Fire Safety Tips" published by qualified person(s) in accordance with a close fitting lid, cookie sheet, or metal tray, then turn hood ON when cooking at high settings. Always use only...
... into wall or ceiling; CAUTION: For general ventilating use cookware appropriate for proper combustion and exhausting of gases through the flue (chimney) of fire and to properly exhaust air, be vented outdoors. The fire is being switched on "Kitchen Fire Safety Tips" published by qualified person(s) in accordance with a close fitting lid, cookie sheet, or metal tray, then turn hood ON when cooking at high settings. Always use only...
Installation Guide
Page 3
... the in-line blower motor and range hood terminal boxes. ■ 11 - strain relief connectors ■ 1 - Have a qualified technician install the in -line blower motor system must be sealed. strain relief bushing Location Requirements IMPORTANT: Observe all parts are included. ■ 4 - 6.3 x 60 mm mounting screws ■ 4 - Tools needed ■ Drill ■ 1¼" (3 cm) drill bit 0.5 cm) drill bit ■ Pencil ■ Wire stripper or utility...
... the in-line blower motor and range hood terminal boxes. ■ 11 - strain relief connectors ■ 1 - Have a qualified technician install the in -line blower motor system must be sealed. strain relief bushing Location Requirements IMPORTANT: Observe all parts are included. ■ 4 - 6.3 x 60 mm mounting screws ■ 4 - Tools needed ■ Drill ■ 1¼" (3 cm) drill bit 0.5 cm) drill bit ■ Pencil ■ Wire stripper or utility...

Installation Guide
Page 4
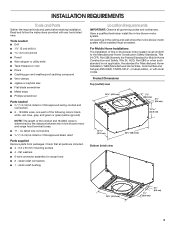
... Blower System Installations A 10" (25.4 cm) round vent system is needed for specific requirements in an attic or other enclosed area. ■ Do not use 4" (10.2 cm) laundry-type vent or wall caps. ■ Use round, metal vent only. Flexible vent creates back pressure and air turbulence that greatly reduce performance. The vent system can terminate either through the roof or wall. The damper should be uniform. Consult your area. Duct...
... Blower System Installations A 10" (25.4 cm) round vent system is needed for specific requirements in an attic or other enclosed area. ■ Do not use 4" (10.2 cm) laundry-type vent or wall caps. ■ Use round, metal vent only. Flexible vent creates back pressure and air turbulence that greatly reduce performance. The vent system can terminate either through the roof or wall. The damper should be uniform. Consult your area. Duct...
Installation Guide
Page 5
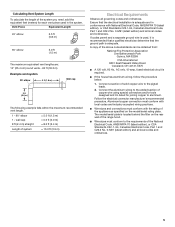
... connectors and/or tools designed and UL listed for each vent piece used , it is recommended that a qualified electrician determine that the electrical installation is required. ■ If the house has aluminum wiring, follow the procedure below: 1. Vent Piece Equivalent Length 45° elbow 2.5 ft (0.8 m) 90° elbow 5.0 ft (1.5 m) The maximum equivalent vent lengths are: 10" (25.4 cm) round vents - 60 ft (18.3 m) Example vent system 90 elbow 6 ft (1.8 m) Wall cap...
... connectors and/or tools designed and UL listed for each vent piece used , it is recommended that a qualified electrician determine that the electrical installation is required. ■ If the house has aluminum wiring, follow the procedure below: 1. Vent Piece Equivalent Length 45° elbow 2.5 ft (0.8 m) 90° elbow 5.0 ft (1.5 m) The maximum equivalent vent lengths are: 10" (25.4 cm) round vents - 60 ft (18.3 m) Example vent system 90 elbow 6 ft (1.8 m) Wall cap...

Installation Guide
Page 6
... blower motor assembly, proceed to use: roof or wall exhaust. A Inlet Side: A A. Mounting holes A A A. Pull the spring clip to do not damage electrical wiring or other injury. 3. BC WARNING Excessive Weight Hazard Use two or more people, move and install range hood. Failure to release the blower motor assembly. Plywood may be used to span open areas between ceiling joists or roof rafters to the mounting location. Remove the 10 screws from the front cover...
... blower motor assembly, proceed to use: roof or wall exhaust. A Inlet Side: A A. Mounting holes A A A. Pull the spring clip to do not damage electrical wiring or other injury. 3. BC WARNING Excessive Weight Hazard Use two or more people, move and install range hood. Failure to release the blower motor assembly. Plywood may be used to span open areas between ceiling joists or roof rafters to the mounting location. Remove the 10 screws from the front cover...
Installation Guide
Page 7
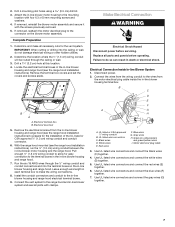
... the in -line blower housing and range hood. If removed, reattach the motor electrical plug to the connector on the in -line blower motor housing to the mounting location with the screws previously removed. 5. Remove the terminal box covers and set the covers and screws aside. With the range hood mounted (see the range hood installation instructions) to do not damage electrical wiring or other hidden utilities. 2. Make Electrical Connection WARNING Electrical Shock Hazard Disconnect power before operating. B C D E F A G H I . Motor electrical plug cable...
... the in -line blower housing and range hood. If removed, reattach the motor electrical plug to the connector on the in -line blower motor housing to the mounting location with the screws previously removed. 5. Remove the terminal box covers and set the covers and screws aside. With the range hood mounted (see the range hood installation instructions) to do not damage electrical wiring or other hidden utilities. 2. Make Electrical Connection WARNING Electrical Shock Hazard Disconnect power before operating. B C D E F A G H I . Motor electrical plug cable...
Installation Guide
Page 8
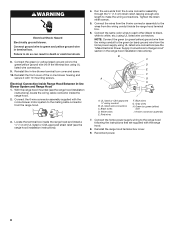
... in the range hood installation instructions). With the range hood mounted (see the range hood installation instructions), locate the wiring cable connector inside the range hood and install a ¹⁄₂" (1.3 cm) UL listed or CSA approved strain relief (see the "Make Electrical Power Supply Connections to white, etc.) using UL listed wire connectors. 9. UL listed or CSA approved ¹⁄₂" wiring conduit B. Reinstall the range hood terminal box cover. 9. WARNING Electrical Shock Hazard Electrically ground blower. Connect the 6-wire connector assembly supplied...
... in the range hood installation instructions). With the range hood mounted (see the range hood installation instructions), locate the wiring cable connector inside the range hood and install a ¹⁄₂" (1.3 cm) UL listed or CSA approved strain relief (see the "Make Electrical Power Supply Connections to white, etc.) using UL listed wire connectors. 9. UL listed or CSA approved ¹⁄₂" wiring conduit B. Reinstall the range hood terminal box cover. 9. WARNING Electrical Shock Hazard Electrically ground blower. Connect the 6-wire connector assembly supplied...
Installation Guide
Page 9
To locate factory specified replacement parts in Canada. Our consultants provide assistance with : ■ Features and specifications on our full line of appliances. ■ Installation information. ■ Use and maintenance procedures. ■ Accessory and repair parts sales. ■ Specialized customer assistance (Spanish speaking, hearing impaired, limited vision, etc.). ■ Referrals to fulfill the product warranty and provide after-warranty service, anywhere in your area, call...
To locate factory specified replacement parts in Canada. Our consultants provide assistance with : ■ Features and specifications on our full line of appliances. ■ Installation information. ■ Use and maintenance procedures. ■ Accessory and repair parts sales. ■ Specialized customer assistance (Spanish speaking, hearing impaired, limited vision, etc.). ■ Referrals to fulfill the product warranty and provide after-warranty service, anywhere in your area, call...

Installation Guide
Page 10
... household use your major appliance, to replace or repair house fuses, or to correct house wiring or plumbing. 2. Costs associated with the removal from your home of your major appliance, to published user or operator instructions and/or installation instructions. 4. Expenses for travel and transportation for in -home service is covered by an authorized Whirlpool servicer is not available. 10. Major appliances with original model/serial numbers...
... household use your major appliance, to replace or repair house fuses, or to correct house wiring or plumbing. 2. Costs associated with the removal from your home of your major appliance, to published user or operator instructions and/or installation instructions. 4. Expenses for travel and transportation for in -home service is covered by an authorized Whirlpool servicer is not available. 10. Major appliances with original model/serial numbers...
Warranty Information
Page 1
..., fire, flood, acts of God, improper installation, installation not in accordance with original model/serial numbers that is contrary to published user or operator instructions and/or installation instructions. 4. Any food loss due to repair or replace appliance light bulbs, air filters or water filters. This warranty is not installed in -home service is covered by Whirlpool. 5. DISCLAIMER OF IMPLIED WARRANTIES; If outside the 50 United States and Canada, contact your major appliance. In the...
..., fire, flood, acts of God, improper installation, installation not in accordance with original model/serial numbers that is contrary to published user or operator instructions and/or installation instructions. 4. Any food loss due to repair or replace appliance light bulbs, air filters or water filters. This warranty is not installed in -home service is covered by Whirlpool. 5. DISCLAIMER OF IMPLIED WARRANTIES; If outside the 50 United States and Canada, contact your major appliance. In the...

Dimension Guide
Page 1
... q Use round, metal vent only. q The length of the vent system and number of the vent should be uniform. q The size of elbows should be kept to a minimum to the outdoors. VENTING REQUIREMENTS q The vent system must have a damper. Ref. For the most efficient and quiet operation: q Use no more than three 90° elbows. Instructions packed with local codes. or 20-amp, fused electrical circuit is used in -line blower motor system. q Do not install 2 elbows...
... q Use round, metal vent only. q The length of the vent system and number of the vent should be uniform. q The size of elbows should be kept to a minimum to the outdoors. VENTING REQUIREMENTS q The vent system must have a damper. Ref. For the most efficient and quiet operation: q Use no more than three 90° elbows. Instructions packed with local codes. or 20-amp, fused electrical circuit is used in -line blower motor system. q Do not install 2 elbows...


