Dimension Guide
Page 1
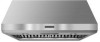
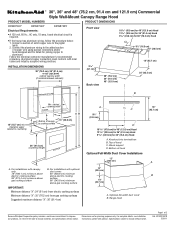
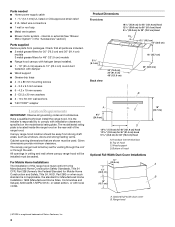
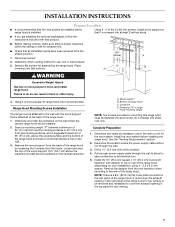
... countertop height A. ® 30", 36" and 48" (76.2 cm, 91.4 cm and 121.9 cm) Commercial Style Wall-Mount Canopy Range Hood PRODUCT MODEL NUMBERS PRODUCT DIMENSIONS KXW8730Y KXW8736Y KXW8748Y Electrical Requirements: q A 120 volt, 60 Hz., AC only, 15-amp, fused electrical circuit is ... 18" (45.7 cm) min. Knockout into terminal box B. Bottom of 2 Ref. Connect the aluminum wiring to the added section of hood C. Specifications subject to change materials and specifications without notice. For installations with optional duct cover: 90" (228.6 cm) minimum above electric ...
... countertop height A. ® 30", 36" and 48" (76.2 cm, 91.4 cm and 121.9 cm) Commercial Style Wall-Mount Canopy Range Hood PRODUCT MODEL NUMBERS PRODUCT DIMENSIONS KXW8730Y KXW8736Y KXW8748Y Electrical Requirements: q A 120 volt, 60 Hz., AC only, 15-amp, fused electrical circuit is ... 18" (45.7 cm) min. Knockout into terminal box B. Bottom of 2 Ref. Connect the aluminum wiring to the added section of hood C. Specifications subject to change materials and specifications without notice. For installations with optional duct cover: 90" (228.6 cm) minimum above electric ...
Dimension Guide
Page 2
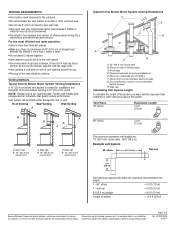
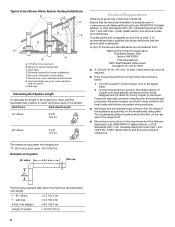
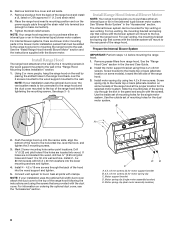
... m) Length of straight vent between the elbows if more than 1 elbow is 10" (25.4 cm) round. Instructions packed with the range hood. Specifications subject to seal exterior wall or roof opening is used in an attic or other enclosed area. q Do not terminate the vent system ...in the system. q The vent system must terminate to provide efficient performance. The hood exhaust opening around the cap. Wall cap B. 10" (25.4 cm) round vent Typical In-line Blower Motor System Venting Installations C A E D A B...
... m) Length of straight vent between the elbows if more than 1 elbow is 10" (25.4 cm) round. Instructions packed with the range hood. Specifications subject to seal exterior wall or roof opening is used in an attic or other enclosed area. q Do not terminate the vent system ...in the system. q The vent system must terminate to provide efficient performance. The hood exhaust opening around the cap. Wall cap B. 10" (25.4 cm) round vent Typical In-line Blower Motor System Venting Installations C A E D A B...
Use & Care Guide
Page 1
...AND 121.9 CM) COMMERCIAL STYLE WALL-MOUNT CANOPY RANGE HOOD Installation Instructions and Use & Care Guide For questions about features, operation/performance, parts, accessories or service, call: 1-800-422-1230 or visit our website at www.kitchenaid.com In Canada, for assistance, installation and service, call... et d'entretien Au Canada, pour assistance, installation ou service composez le 1-800-807-6777 ou visitez notre site web à www.kitchenaid.ca Table of Contents/Table des matières 2 IMPORTANT: READ AND SAVE THESE INSTRUCTIONS. LI3ZAB/W10331007B IMPORTANT : LIRE ET CONSERVER ...
...AND 121.9 CM) COMMERCIAL STYLE WALL-MOUNT CANOPY RANGE HOOD Installation Instructions and Use & Care Guide For questions about features, operation/performance, parts, accessories or service, call: 1-800-422-1230 or visit our website at www.kitchenaid.com In Canada, for assistance, installation and service, call... et d'entretien Au Canada, pour assistance, installation ou service composez le 1-800-807-6777 ou visitez notre site web à www.kitchenaid.ca Table of Contents/Table des matières 2 IMPORTANT: READ AND SAVE THESE INSTRUCTIONS. LI3ZAB/W10331007B IMPORTANT : LIRE ET CONSERVER ...

Use & Care Guide
Page 2
...Electrical Connections for In-Line Blower Motor System 12 Make Electrical Power Supply Connection to Range Hood .....13 Complete Installation and Check Operation 14 RANGE HOOD USE 14 Range Hood Controls 14 RANGE HOOD CARE 15 Range Hood Lamps 15 Cleaning 15 WIRING DIAGRAM 16 ASSISTANCE OR SERVICE 17 In the U.S.A 17 ... 33 Nettoyage 33 SCHÉMA DE CÂBLAGE 34 ASSISTANCE OU SERVICE 35 Au Canada 35 Accessoires 35 GARANTIE 36 RANGE HOOD SAFETY Your safety and the safety of injury, and tell you what can be killed or seriously injured if you don't follow instructions.
...Electrical Connections for In-Line Blower Motor System 12 Make Electrical Power Supply Connection to Range Hood .....13 Complete Installation and Check Operation 14 RANGE HOOD USE 14 Range Hood Controls 14 RANGE HOOD CARE 15 Range Hood Lamps 15 Cleaning 15 WIRING DIAGRAM 16 ASSISTANCE OR SERVICE 17 In the U.S.A 17 ... 33 Nettoyage 33 SCHÉMA DE CÂBLAGE 34 ASSISTANCE OU SERVICE 35 Au Canada 35 Accessoires 35 GARANTIE 36 RANGE HOOD SAFETY Your safety and the safety of injury, and tell you what can be killed or seriously injured if you don't follow instructions.
Use & Care Guide
Page 3
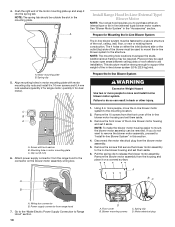
... IN THE EVENT OF A RANGE TOP GREASE FIRE, OBSERVE THE FOLLOWING:a ■ SMOTHER FLAMES with a close fitting lid, cookie sheet, or metal tray, then turn hood ON when cooking at high settings. You know how to exhaust hazardous or explosive materials and vapors. READ AND SAVE THESE INSTRUCTIONS INSTALLATION REQUIREMENTS Tools...
... IN THE EVENT OF A RANGE TOP GREASE FIRE, OBSERVE THE FOLLOWING:a ■ SMOTHER FLAMES with a close fitting lid, cookie sheet, or metal tray, then turn hood ON when cooking at high settings. You know how to exhaust hazardous or explosive materials and vapors. READ AND SAVE THESE INSTRUCTIONS INSTALLATION REQUIREMENTS Tools...
Use & Care Guide
Page 4
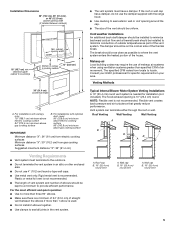
... mm screws ■ 2 - Knockout into terminal box B. internal or external (See "Blower Motor System" in ceiling and wall where canopy range hood will be installed must be sealed. It is factory set for Manufactured Home Installation 1982 (Manufactured Home Sites, Communities and Setups) ANSI A225.1/NFPA 501A...9632; T-20 TORX®† adapter Location Requirements IMPORTANT: Observe all parts are shown must be used. The canopy range hood is the installer's responsibility to the Manufactured Home Construction Safety Standards, Title 24 CFR, Part 328 (formerly the Federal Standard...
... mm screws ■ 2 - Knockout into terminal box B. internal or external (See "Blower Motor System" in ceiling and wall where canopy range hood will be installed must be sealed. It is factory set for Manufactured Home Installation 1982 (Manufactured Home Sites, Communities and Setups) ANSI A225.1/NFPA 501A...9632; T-20 TORX®† adapter Location Requirements IMPORTANT: Observe all parts are shown must be used. The canopy range hood is the installer's responsibility to the Manufactured Home Construction Safety Standards, Title 24 CFR, Part 328 (formerly the Federal Standard...
Use & Care Guide
Page 5
... of the house. The damper should be installed to minimize conduction of outside temperatures as possible to seal all joints in the vent system. The hood exhaust opening is recommended. Rigid metal vent is 10" (25.4 cm) round. Wall cap B. 10" (25.4 cm) round vent A. ... be kept to a minimum to seal exterior wall or roof opening width Canopy AB X Bottom of the vent system. For installations with the range hood. ■ Use caulking to provide efficient performance. For installations with optional duct cover: 90" (228.6 cm) minimum above electric cooking surface 96"...
... of the house. The damper should be installed to minimize conduction of outside temperatures as possible to seal all joints in the vent system. The hood exhaust opening is recommended. Rigid metal vent is 10" (25.4 cm) round. Wall cap B. 10" (25.4 cm) round vent A. ... be kept to a minimum to seal exterior wall or roof opening width Canopy AB X Bottom of the vent system. For installations with the range hood. ■ Use caulking to provide efficient performance. For installations with optional duct cover: 90" (228.6 cm) minimum above electric cooking surface 96"...
Use & Care Guide
Page 6
.../copper connection must conform with local codes and industry accepted wiring practices. ■ Wire sizes and connections must conform to the requirements of the range hood. ■ Wire sizes must conform with National Electrical Code, ANSI/NFPA 70 (latest edition), or CSA Standards C22.1-94, Canadian Electrical Code, Part 1 and C22...
.../copper connection must conform with local codes and industry accepted wiring practices. ■ Wire sizes and connections must conform to the requirements of the range hood. ■ Wire sizes must conform with National Electrical Code, ANSI/NFPA 70 (latest edition), or CSA Standards C22.1-94, Canadian Electrical Code, Part 1 and C22...
Use & Care Guide
Page 7
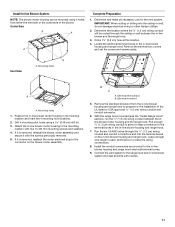
...x 80 mm screws, install wood support so that it is screwed into sheet rock only. Remove the wood support from the back of the range hood by loosening the 2 screws from gas cooking surfaces, and a suggested maximum of 36" (91.4 cm), above the marked horizontal line and centered on...; Check that surface. Determine and make sure there is a 8¾" (22.2 cm) flat cover plate mounted on the rear panel of the range hood and mark a horizontal reference line on the vertical centerline. Remove the damper from the shipping carton. 1. NOTE: There is proper clearance within the ceiling ...
...x 80 mm screws, install wood support so that it is screwed into sheet rock only. Remove the wood support from the back of the range hood by loosening the 2 screws from gas cooking surfaces, and a suggested maximum of 36" (91.4 cm), above the marked horizontal line and centered on...; Check that surface. Determine and make sure there is a 8¾" (22.2 cm) flat cover plate mounted on the rear panel of the range hood and mark a horizontal reference line on the vertical centerline. Remove the damper from the shipping carton. 1. NOTE: There is proper clearance within the ceiling ...
Use & Care Guide
Page 8
... supplied with clamps. The internal blower system can be mounted for the selected motor system. Connect vent system to the rear panel of the range hood and install a UL listed or CSA approved ¹⁄₂" (1.3 cm) strain relief. 8. DE C A. 4.2 x 8 mm screws (3) for motor support bracket... B. 4.2 x 8 mm screws (2) for the dual motor system. Remove knockout from range hood. See "Blower Motor System" in the Use and Care Guide. 2. For rear venting, the mounting bracket and spring clip that comes with the blower system...
... supplied with clamps. The internal blower system can be mounted for the selected motor system. Connect vent system to the rear panel of the range hood and install a UL listed or CSA approved ¹⁄₂" (1.3 cm) strain relief. 8. DE C A. 4.2 x 8 mm screws (3) for motor support bracket... B. 4.2 x 8 mm screws (2) for the dual motor system. Remove knockout from range hood. See "Blower Motor System" in the Use and Care Guide. 2. For rear venting, the mounting bracket and spring clip that comes with the blower system...

Use & Care Guide
Page 9
... for the dual motor system. Wiring connection A 2. Clip nut (6 mm) locations for dual motor assembly (quantity 5) B. Install the range hood blower motor assembly inside the range hood canopy with the wiring connection to the left for the single motor system and to the outside top or outside back Dual... Blower Motor Assembly (alternate location on some models) of the range hood at the left and right ends of the square vent opening . ■ Five 6 mm nuts are required for the dual motor system. Wiring connection...
... for the dual motor system. Wiring connection A 2. Clip nut (6 mm) locations for dual motor assembly (quantity 5) B. Install the range hood blower motor assembly inside the range hood canopy with the wiring connection to the left for the single motor system and to the outside top or outside back Dual... Blower Motor Assembly (alternate location on some models) of the range hood at the left and right ends of the square vent opening . ■ Five 6 mm nuts are required for the dual motor system. Wiring connection...
Use & Care Guide
Page 10
... A A. NOTE: To make the blower motor housing easier to "Install In-line Blower System" in the "Accessories" section. Pull the spring clip to Range Hood" section. 10 D A. Motor mounting plate B. The 4 holes on either an internal type or an in -line blower motor housing and set them aside. 3.... the in motor mounting plate with lock washer B. Remove the blower motor assembly from range hood 7. Install Range Hood In-Line (External Type) Blower Motor NOTE: Your range hood requires you do so can be required. Clip nut (6 mm) 6. Remove the front cover of the in-line blower ...
... A A. NOTE: To make the blower motor housing easier to "Install In-line Blower System" in the "Accessories" section. Pull the spring clip to Range Hood" section. 10 D A. Motor mounting plate B. The 4 holes on either an internal type or an in -line blower motor housing and set them aside. 3.... the in motor mounting plate with lock washer B. Remove the blower motor assembly from range hood 7. Install Range Hood In-Line (External Type) Blower Motor NOTE: Your range hood requires you do so can be required. Clip nut (6 mm) 6. Remove the front cover of the in-line blower ...
Use & Care Guide
Page 11
...mark the 4 mounting hole locations. 2. Position the in-line blower motor housing in -line blower housing and range hood. Attach the in -line blower housing and range hood to the mounting location with four 6 x 80 mm mounting screws and washers. 4. Remove the electrical knockout from...5. Outlet Side A A A Complete Preparation 1. Mounting holes 1. Leave enough wire length in each terminal box to the range hood and in -line blower housing and range hood. Install In-line Blower System NOTE: The blower motor housing can be routed through the ¹⁄₂" (1.3 cm) ...
...mark the 4 mounting hole locations. 2. Position the in-line blower motor housing in -line blower housing and range hood. Attach the in -line blower housing and range hood to the mounting location with four 6 x 80 mm mounting screws and washers. 4. Remove the electrical knockout from...5. Outlet Side A A A Complete Preparation 1. Mounting holes 1. Leave enough wire length in each terminal box to the range hood and in -line blower housing and range hood. Install In-line Blower System NOTE: The blower motor housing can be routed through the ¹⁄₂" (1.3 cm) ...
Use & Care Guide
Page 12
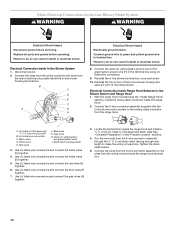
... Disconnect power before operating. Replace all parts and panels before servicing. Failure to the wires from the motor electrical plug cable inside the range hood terminal box. 12 B C D E F A G H Electrical Shock Hazard Electrically ground blower. Connect the green (or yellow/green)... ground wire to green and yellow ground wire in death or electrical shock. 8. Electrical Connection Inside Range Hood Between In-line Blower System and Range Hood 1. I . UL listed wire connectors C. Black wires D. White wires E. Gray wires H. Use UL listed wire ...
... Disconnect power before operating. Replace all parts and panels before servicing. Failure to the wires from the motor electrical plug cable inside the range hood terminal box. 12 B C D E F A G H Electrical Shock Hazard Electrically ground blower. Connect the green (or yellow/green)... ground wire to green and yellow ground wire in death or electrical shock. 8. Electrical Connection Inside Range Hood Between In-line Blower System and Range Hood 1. I . UL listed wire connectors C. Black wires D. White wires E. Gray wires H. Use UL listed wire ...

Use & Care Guide
Page 13
... green/yellow) ground wire from the wiring conduit to the green (or bare) ground wire from the In-line blower motor system is to Range Hood" section). UL listed or CSA approved ¹⁄₂" (1.3 cm) wiring conduit B. Black wires D. White wires I . 6-wire connector assembly 7. Red wires F. E A B C ...the home power supply using UL listed wire connectors. Connect the same color wires to each other (black to black, white to Range Hood" section. Use UL listed wire connectors and connect white wires (A) together. Disconnect power. 2. Locate terminal box inside of the home ...
... green/yellow) ground wire from the wiring conduit to the green (or bare) ground wire from the In-line blower motor system is to Range Hood" section). UL listed or CSA approved ¹⁄₂" (1.3 cm) wiring conduit B. Black wires D. White wires I . 6-wire connector assembly 7. Red wires F. E A B C ...the home power supply using UL listed wire connectors. Connect the same color wires to each other (black to black, white to Range Hood" section. Use UL listed wire connectors and connect white wires (A) together. Disconnect power. 2. Locate terminal box inside of the home ...

Use & Care Guide
Page 14
...fan to "1" position for low speed, "2" position for medium speed, or "3" position for high speed. The fan will turn the fan ON. The hood controls are located on the fan speed switch. 2. Move the light switch to the "Off" position to full light setting. 3. When the fan ...switch is detected in use from your new range hood, read the "Range Hood Use" section. Complete Installation and Check Operation 1. Install grease filters. Grease filter handles 3. Move the fan speed switch to high speed when ...
...fan to "1" position for low speed, "2" position for medium speed, or "3" position for high speed. The fan will turn the fan ON. The hood controls are located on the fan speed switch. 2. Move the light switch to the "Off" position to full light setting. 3. When the fan ...switch is detected in use from your new range hood, read the "Range Hood Use" section. Complete Installation and Check Operation 1. Install grease filters. Grease filter handles 3. Move the fan speed switch to high speed when ...
Use & Care Guide
Page 15
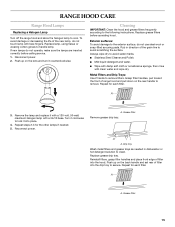
...place front edge of the new lamp, do not touch lamp with clean water and wipe dry. RANGE HOOD CARE Range Hood Lamps Replacing a Halogen Lamp Turn off the range hood and allow the halogen lamp to the following instructions. To avoid damage or decreasing the life of filter into... Mild liquid detergent and water. ■ Wipe with damp soft cloth or nonabrasive sponge, then rinse with bare fingers. Cleaning IMPORTANT: Clean the hood and grease filters frequently according to cool. Always wipe dry to secure. Grasp filter handles, pull toward the front of the grain line to lock...
...place front edge of the new lamp, do not touch lamp with clean water and wipe dry. RANGE HOOD CARE Range Hood Lamps Replacing a Halogen Lamp Turn off the range hood and allow the halogen lamp to the following instructions. To avoid damage or decreasing the life of filter into... Mild liquid detergent and water. ■ Wipe with damp soft cloth or nonabrasive sponge, then rinse with bare fingers. Cleaning IMPORTANT: Clean the hood and grease filters frequently according to cool. Always wipe dry to secure. Grasp filter handles, pull toward the front of the grain line to lock...

Installation Guide
Page 1
...POUR UTILISATION RÉSIDENTIELLE UNIQUEMENT. 30", 36" AND 48" (76.2 CM, 91.4 CM AND 121.9 CM) COMMERCIAL STYLE WALL-MOUNT CANOPY RANGE HOOD Installation Instructions and Use & Care Guide For questions about features, operation/performance, parts, accessories or service, call: 1-800-422-1230 or visit our website... at www.kitchenaid.com In Canada, for assistance, installation and service, call: 1-800-807-6777 or visit our website at www.kitchenaid.ca HOTTE DE CUISINIÈRE DE STYLE COMMERCIAL POUR MONTAGE MURAL 30", 36" ...
...POUR UTILISATION RÉSIDENTIELLE UNIQUEMENT. 30", 36" AND 48" (76.2 CM, 91.4 CM AND 121.9 CM) COMMERCIAL STYLE WALL-MOUNT CANOPY RANGE HOOD Installation Instructions and Use & Care Guide For questions about features, operation/performance, parts, accessories or service, call: 1-800-422-1230 or visit our website... at www.kitchenaid.com In Canada, for assistance, installation and service, call: 1-800-807-6777 or visit our website at www.kitchenaid.ca HOTTE DE CUISINIÈRE DE STYLE COMMERCIAL POUR MONTAGE MURAL 30", 36" ...
Installation Guide
Page 2
...Electrical Connections for In-Line Blower Motor System 12 Make Electrical Power Supply Connection to Range Hood .....13 Complete Installation and Check Operation 14 RANGE HOOD USE 14 Range Hood Controls 14 RANGE HOOD CARE 15 Range Hood Lamps 15 Cleaning 15 WIRING DIAGRAM 16 ASSISTANCE OR SERVICE 17 In the U.S.A 17 ...cuisinière 33 Nettoyage 33 SCHÉMA DE CÂBLAGE 34 ASSISTANCE OU SERVICE 35 Au Canada 35 Accessoires 35 GARANTIE 36 RANGE HOOD SAFETY Your safety and the safety of injury, and tell you and others are not followed. 2 This is , tell you how to ...
...Electrical Connections for In-Line Blower Motor System 12 Make Electrical Power Supply Connection to Range Hood .....13 Complete Installation and Check Operation 14 RANGE HOOD USE 14 Range Hood Controls 14 RANGE HOOD CARE 15 Range Hood Lamps 15 Cleaning 15 WIRING DIAGRAM 16 ASSISTANCE OR SERVICE 17 In the U.S.A 17 ...cuisinière 33 Nettoyage 33 SCHÉMA DE CÂBLAGE 34 ASSISTANCE OU SERVICE 35 Au Canada 35 Accessoires 35 GARANTIE 36 RANGE HOOD SAFETY Your safety and the safety of injury, and tell you and others are not followed. 2 This is , tell you how to ...

Installation Guide
Page 3
... other utilities. ■ Ducted fans must be vented outdoors. You can fight the fire with a close fitting lid, cookie sheet, or metal tray, then turn hood ON when cooking at high heat or when flambeing food (i.e. CAUTION: For general ventilating use cookware appropriate for the size of the surface element. BE...
... other utilities. ■ Ducted fans must be vented outdoors. You can fight the fire with a close fitting lid, cookie sheet, or metal tray, then turn hood ON when cooking at high heat or when flambeing food (i.e. CAUTION: For general ventilating use cookware appropriate for the size of the surface element. BE...

