
Use & Care Guide
Page 1
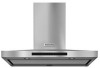
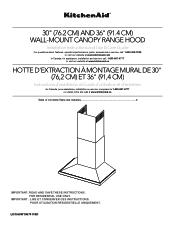
...(76.2 CM) AND 36" (91.4 CM) WALL-MOUNT CANOPY RANGE HOOD Installation Instructions and Use & Care Guide For questions about features, operation/performance, parts, accessories or service, call: 1-800-422-1230 or visit our website at www.kitchenaid.com In Canada, for assistance, installation and service, call: 1-800...entretien Au Canada, pour assistance, installation ou service, composez le 1-800-807-6777 ou visitez notre site web à www.kitchenaid.ca Table of Contents/Table des matières 2 IMPORTANT: READ AND SAVE THESE INSTRUCTIONS. IMPORTANT : LIRE ET CONSERVER CES INSTRUCTIONS.
...(76.2 CM) AND 36" (91.4 CM) WALL-MOUNT CANOPY RANGE HOOD Installation Instructions and Use & Care Guide For questions about features, operation/performance, parts, accessories or service, call: 1-800-422-1230 or visit our website at www.kitchenaid.com In Canada, for assistance, installation and service, call: 1-800...entretien Au Canada, pour assistance, installation ou service, composez le 1-800-807-6777 ou visitez notre site web à www.kitchenaid.ca Table of Contents/Table des matières 2 IMPORTANT: READ AND SAVE THESE INSTRUCTIONS. IMPORTANT : LIRE ET CONSERVER CES INSTRUCTIONS.
Use & Care Guide
Page 2
... and Parts 4 Location Requirements 4 Venting Requirements 5 Electrical Requirements 6 INSTALLATION INSTRUCTIONS 7 Prepare Location 7 Install Range Hood 8 Connect Vent System 8 Make Electrical Connection 9 Install Vent Covers 10 Complete Installation 10 RANGE HOOD USE 10 Controls and Features 10 RANGE HOOD CARE 11 Cleaning 11 WIRING DIAGRAM 13 ASSISTANCE OR SERVICE 14 In the U.S.A 14 In Canada... HOTTE 26 Nettoyage 26 SCHÉMA DE CÂBLAGE 28 ASSISTANCE OU SERVICE 29 Au Canada 29 Accessoires 29 GARANTIE 30 RANGE HOOD SAFETY Your safety and the safety of others .
... and Parts 4 Location Requirements 4 Venting Requirements 5 Electrical Requirements 6 INSTALLATION INSTRUCTIONS 7 Prepare Location 7 Install Range Hood 8 Connect Vent System 8 Make Electrical Connection 9 Install Vent Covers 10 Complete Installation 10 RANGE HOOD USE 10 Controls and Features 10 RANGE HOOD CARE 11 Cleaning 11 WIRING DIAGRAM 13 ASSISTANCE OR SERVICE 14 In the U.S.A 14 In Canada... HOTTE 26 Nettoyage 26 SCHÉMA DE CÂBLAGE 28 ASSISTANCE OU SERVICE 29 Au Canada 29 Accessoires 29 GARANTIE 30 RANGE HOOD SAFETY Your safety and the safety of others .

Use & Care Guide
Page 4
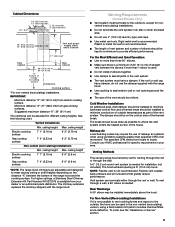
... Will Also Need: ■ Recirculation Kit Part Number W10692908 for venting through the roof or wall. Canopy hood location should be used. This range hood is the installer's responsibility to comply with back draft dampers installed ■ Metal grease filter(s)-depending on model...model/serial rating plate. See "Electrical Requirements" section. Have a qualified technician install the range hood. Given dimensions provide minimum clearance. Check that are included. ■ Hood canopy assembly with ventilator and LED and halogen lights installed ■ Vent transition with ...
... Will Also Need: ■ Recirculation Kit Part Number W10692908 for venting through the roof or wall. Canopy hood location should be used. This range hood is the installer's responsibility to comply with back draft dampers installed ■ Metal grease filter(s)-depending on model...model/serial rating plate. See "Electrical Requirements" section. Have a qualified technician install the range hood. Given dimensions provide minimum clearance. Check that are included. ■ Hood canopy assembly with ventilator and LED and halogen lights installed ■ Vent transition with ...
Use & Care Guide
Page 5
...or roof opening is recommended. Consult your area. Rear Discharge A 90° elbow may require the use the damper supplied with the range hood. Suggested maximum distance "X": 36" (91.4 cm) The chimneys can terminate either through a wall, a 90° elbow is ... surface 7' 4" (2.23 m) 9' 2" (2.79 m) Non-vented (recirculating) Installations Min. The chimney extension replaces the chimney shipped with the range hood. ■ Use caulking to the outdoors, except for specific requirements in the non-vented (recirculating) version, using ventilation systems greater than three 90...
...or roof opening is recommended. Consult your area. Rear Discharge A 90° elbow may require the use the damper supplied with the range hood. Suggested maximum distance "X": 36" (91.4 cm) The chimneys can terminate either through a wall, a 90° elbow is ... surface 7' 4" (2.23 m) 9' 2" (2.79 m) Non-vented (recirculating) Installations Min. The chimney extension replaces the chimney shipped with the range hood. ■ Use caulking to the outdoors, except for specific requirements in the non-vented (recirculating) version, using ventilation systems greater than three 90...

Use & Care Guide
Page 6
... 44131-5575 ■ A 120 volt, 60 Hz., AC only, 15-amp, fused electrical circuit is located behind the filter on the rear wall of the range hood. ■ Wire sizes must conform with the rating of the appliance as specified on the model/serial rating plate. The model/serial plate is required...
... 44131-5575 ■ A 120 volt, 60 Hz., AC only, 15-amp, fused electrical circuit is located behind the filter on the rear wall of the range hood. ■ Wire sizes must conform with the rating of the appliance as specified on the model/serial rating plate. The model/serial plate is required...

Use & Care Guide
Page 7
.... 3. See the "Assistance or Service" section to the National Electrical Code or CSA Standards and local codes and ordinances. Range Hood Mounting Screws Installation 1. Ceiling B. CAUTION: To reduce the risk of fire and electric shock, install this location. 3. INSTALLATION...nonvented. 3. Determine and make sure there is complete. 4. There must be installed. 2. Use caulk to slide range hood into wood. A Failure to move and install range hood. If there is installed. 5. Centerline Complete Preparation 1. Install In-Line Smart Kit - Using 2 or more...
.... 3. See the "Assistance or Service" section to the National Electrical Code or CSA Standards and local codes and ordinances. Range Hood Mounting Screws Installation 1. Ceiling B. CAUTION: To reduce the risk of fire and electric shock, install this location. 3. INSTALLATION...nonvented. 3. Determine and make sure there is complete. 4. There must be installed. 2. Use caulk to slide range hood into wood. A Failure to move and install range hood. If there is installed. 5. Centerline Complete Preparation 1. Install In-Line Smart Kit - Using 2 or more...

Use & Care Guide
Page 8
... x 9.5 mm screw For vented installations only: 1. Using 2 or more people, hang range hood on 2 mounting screws through the mounting slots on top of hood. Mounting slots C. Level the range hood and tighten upper mounting screws. 4. Air deflector C. Air deflector D. Vent duct B. Slide...metal screws. X = length to the measured size (X). 4. Place the assembled air deflector and duct over the exhaust outlet. 2. Install Range Hood 1. Install transition on back of hood (if removed for shipping) with the duct cover bracket using 4 - 4.2 x 8 mm screws. A. Check that back draft dampers ...
... x 9.5 mm screw For vented installations only: 1. Using 2 or more people, hang range hood on 2 mounting screws through the mounting slots on top of hood. Mounting slots C. Level the range hood and tighten upper mounting screws. 4. Air deflector C. Air deflector D. Vent duct B. Slide...metal screws. X = length to the measured size (X). 4. Place the assembled air deflector and duct over the exhaust outlet. 2. Install Range Hood 1. Install transition on back of hood (if removed for shipping) with the duct cover bracket using 4 - 4.2 x 8 mm screws. A. Check that back draft dampers ...

Use & Care Guide
Page 9
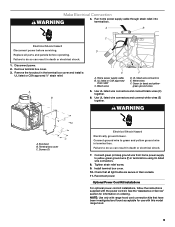
... wire (F) in their sockets. 11. Optional Power Cord Kit Installations For optional power cord kit installations, follow the instructions supplied with range hood cord connection kits that all parts and panels before servicing. See the "Assistance or Service" section for use with this model... range hood. 9 Make Electrical Connection WARNING 4. Use UL listed wire connectors and connect white wires (E) together. NOTE: Use only with the power cord kit...
... wire (F) in their sockets. 11. Optional Power Cord Kit Installations For optional power cord kit installations, follow the instructions supplied with range hood cord connection kits that all parts and panels before servicing. See the "Assistance or Service" section for use with this model... range hood. 9 Make Electrical Connection WARNING 4. Use UL listed wire connectors and connect white wires (E) together. NOTE: Use only with the power cord kit...

Use & Care Guide
Page 10
... before cooking and allow it senses heat higher than its allowable temperature limit. C Secure the bottom of the range hood blower and light. RANGE HOOD USE The range hood is On, the fan speed will be manually increased by pressing a higher fan speed. Louver holes (non-vented... will increase or decrease based on automatically when it to operate several minutes after the cooking is measuring. A. See the "Range Hood Care" section. 3. The range hood controls are located on blower housing. Install metal filters. Check the operation of the duct with two 4.2 x 8 mm...
... before cooking and allow it senses heat higher than its allowable temperature limit. C Secure the bottom of the range hood blower and light. RANGE HOOD USE The range hood is On, the fan speed will be manually increased by pressing a higher fan speed. Louver holes (non-vented... will increase or decrease based on automatically when it to operate several minutes after the cooking is measuring. A. See the "Range Hood Care" section. 3. The range hood controls are located on blower housing. Install metal filters. Check the operation of the duct with two 4.2 x 8 mm...
Use & Care Guide
Page 11
... To turn both task and ambient lighting. Open the stainless steel panel. Stainless steel panel C C. The Auto button light will flash 5 times when the range hood is attached at High speed. Press MED to turn the fan on at the rear and will rotate down to the following instructions. To operate..., press AUTO once to deactivate Sleep Mode and turn the Auto button light On. The Auto button light will automatically turn Off after the range hood enters Sleep Mode, but Auto Sense is now set to automatically turn Off. When the temperature drops below the set Auto Sense: Press AUTO...
... To turn both task and ambient lighting. Open the stainless steel panel. Stainless steel panel C C. The Auto button light will flash 5 times when the range hood is attached at High speed. Press MED to turn the fan on at the rear and will rotate down to the following instructions. To operate..., press AUTO once to deactivate Sleep Mode and turn the Auto button light On. The Auto button light will automatically turn Off after the range hood enters Sleep Mode, but Auto Sense is now set to automatically turn Off. When the temperature drops below the set Auto Sense: Press AUTO...

Use & Care Guide
Page 12
...up to cool. Replace with bare fingers. To replace charcoal filter: 1. See "Metal Grease Filter" in this section. Bend spring clips away from range hood. To avoid damage or decreasing the life of metal filter. 3. If new lights do not touch lamp with Charcoal Filter Kit. Disconnect power. 2.... operate, make sure the lamps are toward the front. Close the stainless steel panel. Replacing a Halogen Lamp (ambient lighting) Turn off the range hood and allow the halogen lamp to 6 months with a 120-volt, 40-watt maximum, halogen lamp made for service contact information. 12 Non-...
...up to cool. Replace with bare fingers. To replace charcoal filter: 1. See "Metal Grease Filter" in this section. Bend spring clips away from range hood. To avoid damage or decreasing the life of metal filter. 3. If new lights do not touch lamp with Charcoal Filter Kit. Disconnect power. 2.... operate, make sure the lamps are toward the front. Close the stainless steel panel. Replacing a Halogen Lamp (ambient lighting) Turn off the range hood and allow the halogen lamp to 6 months with a 120-volt, 40-watt maximum, halogen lamp made for service contact information. 12 Non-...
Installation Guide
Page 1
... (76.2 CM) AND 36" (91.4 CM) WALL-MOUNT CANOPY RANGE HOOD Installation Instructions and Use & Care Guide For questions about features, operation/performance, parts, accessories or service, call: 1-800-422-1230 or visit our website at www.kitchenaid.com In Canada, for assistance, installation and service, call: 1-800-... d'entretien Au Canada, pour assistance, installation ou service, composez le 1-800-807-6777 ou visitez notre site web à www.kitchenaid.ca Table of Contents/Table des matières 2 IMPORTANT: READ AND SAVE THESE INSTRUCTIONS. POUR UTILISATION RÉSIDENTIELLE UNIQUEMENT.
... (76.2 CM) AND 36" (91.4 CM) WALL-MOUNT CANOPY RANGE HOOD Installation Instructions and Use & Care Guide For questions about features, operation/performance, parts, accessories or service, call: 1-800-422-1230 or visit our website at www.kitchenaid.com In Canada, for assistance, installation and service, call: 1-800-... d'entretien Au Canada, pour assistance, installation ou service, composez le 1-800-807-6777 ou visitez notre site web à www.kitchenaid.ca Table of Contents/Table des matières 2 IMPORTANT: READ AND SAVE THESE INSTRUCTIONS. POUR UTILISATION RÉSIDENTIELLE UNIQUEMENT.

Installation Guide
Page 2
... 4 Venting Requirements 5 Electrical Requirements 6 INSTALLATION INSTRUCTIONS 7 Prepare Location 7 Install Range Hood 8 Connect Vent System 8 Make Electrical Connection 9 Install Vent Covers 10 Complete Installation 10 RANGE HOOD USE 10 Controls and Features 10 RANGE HOOD CARE 11 Cleaning 11 WIRING DIAGRAM 13 ASSISTANCE OR SERVICE 14 In the U.S.A...26 Nettoyage 26 SCHÉMA DE CÂBLAGE 28 ASSISTANCE OU SERVICE 29 Au Canada 29 Accessoires 29 GARANTIE 30 RANGE HOOD SAFETY Your safety and the safety of others . This is , tell you how to cause cancer. This symbol ...
... 4 Venting Requirements 5 Electrical Requirements 6 INSTALLATION INSTRUCTIONS 7 Prepare Location 7 Install Range Hood 8 Connect Vent System 8 Make Electrical Connection 9 Install Vent Covers 10 Complete Installation 10 RANGE HOOD USE 10 Controls and Features 10 RANGE HOOD CARE 11 Cleaning 11 WIRING DIAGRAM 13 ASSISTANCE OR SERVICE 14 In the U.S.A...26 Nettoyage 26 SCHÉMA DE CÂBLAGE 28 ASSISTANCE OU SERVICE 29 Au Canada 29 Accessoires 29 GARANTIE 30 RANGE HOOD SAFETY Your safety and the safety of others . This is , tell you how to cause cancer. This symbol ...
Installation Guide
Page 4
...rating plate is located behind the left filter on the rear wall of this range hood must be away from packages. Cabinet opening dimensions that all governing codes and ordinances. This range hood is the installer's responsibility to comply with 1¼" (3.0 cm 9.5 mm...-vented (recirculating) installations **For vented installations Have a qualified technician install the range hood. For non-vented (recirculating) installation see "For nonvented (recirculating) installation only" in ceiling and wall where canopy hood will be installed must conform to order. ■ 6" (15.2 cm...
...rating plate is located behind the left filter on the rear wall of this range hood must be away from packages. Cabinet opening dimensions that all governing codes and ordinances. This range hood is the installer's responsibility to comply with 1¼" (3.0 cm 9.5 mm...-vented (recirculating) installations **For vented installations Have a qualified technician install the range hood. For non-vented (recirculating) installation see "For nonvented (recirculating) installation only" in ceiling and wall where canopy hood will be installed must conform to order. ■ 6" (15.2 cm...

Installation Guide
Page 5
...(2.79 m) Non-vented (recirculating) Installations Min. The break should be uniform. Venting Methods This canopy range hood is not possible to vent cooking fumes and vapors to the outside, the hood can be installed to minimize conduction of outside temperatures as possible to where the vent system enters the heated...backward cold air flow and a thermal break should be on the distance "X" between the elbows if more than specified CFM of the range hood and the cooking surface. ceiling height Max. For the Most Efficient and Quiet Operation: ■ Use no more than three 90&#...
...(2.79 m) Non-vented (recirculating) Installations Min. The break should be uniform. Venting Methods This canopy range hood is not possible to vent cooking fumes and vapors to the outside, the hood can be installed to minimize conduction of outside temperatures as possible to where the vent system enters the heated...backward cold air flow and a thermal break should be on the distance "X" between the elbows if more than specified CFM of the range hood and the cooking surface. ceiling height Max. For the Most Efficient and Quiet Operation: ■ Use no more than three 90&#...

Installation Guide
Page 6
... model/serial plate is adequate and in the system. Ensure that the electrical installation is located behind the filter on the rear wall of the range hood. ■ Wire sizes must conform with local codes and industry accepted wiring practices. ■ Wire sizes and connections must conform to the requirements of the...
... model/serial plate is adequate and in the system. Ensure that the electrical installation is located behind the filter on the rear wall of the range hood. ■ Wire sizes must conform with local codes and industry accepted wiring practices. ■ Wire sizes and connections must conform to the requirements of the...

Installation Guide
Page 7
...5 x 45 mm mounting screws. Remove the template. Centerline Complete Preparation 1. Run the home power supply cable according to move and install range hood. An optional In-Line Smart Kit (purchased separately) allows the blower motor that comes with either an internal or an inline (external) ... wall. Use caulk to make sure there is complete. 4. Optional NOTE: Your range hood can result in the wall for assembling the range hood. CAUTION: To reduce the risk of template with hood bottom line and with the In-Line Smart Kit manufactured by Whirlpool, part number ...
...5 x 45 mm mounting screws. Remove the template. Centerline Complete Preparation 1. Run the home power supply cable according to move and install range hood. An optional In-Line Smart Kit (purchased separately) allows the blower motor that comes with either an internal or an inline (external) ... wall. Use caulk to make sure there is complete. 4. Optional NOTE: Your range hood can result in the wall for assembling the range hood. CAUTION: To reduce the risk of template with hood bottom line and with the In-Line Smart Kit manufactured by Whirlpool, part number ...

Installation Guide
Page 8
...4. Lower mounting screws and washers 2. A For non-vented (recirculating) installation only: 1. Measure from the hood. 7. Reassemble the air deflector to cut vent duct 3. Vent duct B. Mounting screws B. See "Range Hood Care" section. 3. A B C A. Seal connections with 2 - 3.5 x 9.5 mm sheet metal ... duct cover bracket with the duct cover bracket using 4 - 4.2 x 8 mm screws. Level the range hood and tighten upper mounting screws. 4. Install transition on back of the air deflector. 6. Vent transition B. 3.5 x 9.5 mm screw For vented installations...
...4. Lower mounting screws and washers 2. A For non-vented (recirculating) installation only: 1. Measure from the hood. 7. Reassemble the air deflector to cut vent duct 3. Vent duct B. Mounting screws B. See "Range Hood Care" section. 3. A B C A. Seal connections with 2 - 3.5 x 9.5 mm sheet metal ... duct cover bracket with the duct cover bracket using 4 - 4.2 x 8 mm screws. Level the range hood and tighten upper mounting screws. 4. Install transition on back of the air deflector. 6. Vent transition B. 3.5 x 9.5 mm screw For vented installations...
Installation Guide
Page 9
... death or electrical shock. 7. Install terminal box cover. 10. Optional Power Cord Kit Installations For optional power cord kit installations, follow the instructions supplied with range hood cord connection kits that all parts and panels before servicing. See the "Assistance or Service" section for use with this model...
... death or electrical shock. 7. Install terminal box cover. 10. Optional Power Cord Kit Installations For optional power cord kit installations, follow the instructions supplied with range hood cord connection kits that all parts and panels before servicing. See the "Assistance or Service" section for use with this model...

Installation Guide
Page 10
...For vented installations the upper vent cover may be lit when a control feature is complete to hide slots. Upper vent cover B. RANGE HOOD USE The range hood is measuring. Duct covers C. Auto Sense can be manually increased by pressing a higher fan speed. Metal grease filters (located behind... the perimetric cover) F. Auto Sense Auto Sense allows the range hood fan to remove smoke, cooking vapors and odors from your new range hood, read the "Range Hood Use" section. Check the operation of the control button lights will increase or decrease based...
...For vented installations the upper vent cover may be lit when a control feature is complete to hide slots. Upper vent cover B. RANGE HOOD USE The range hood is measuring. Duct covers C. Auto Sense can be manually increased by pressing a higher fan speed. Metal grease filters (located behind... the perimetric cover) F. Auto Sense Auto Sense allows the range hood fan to remove smoke, cooking vapors and odors from your new range hood, read the "Range Hood Use" section. Check the operation of the control button lights will increase or decrease based...


