Use & Care Guide
Page 2
... You can happen if the instructions are very important. TABLE OF CONTENTS RANGE HOOD SAFETY 2 INSTALLATION REQUIREMENTS 4 Tools and Parts 4 Location Requirements 4 Venting Requirements 5 Electrical Requirements 6 INSTALLATION INSTRUCTIONS 7 Prepare Location 7 Install Range Hood 8 Connect Vent System 8 Make Electrical Connection 9 Install Vent Covers 10 Complete Installation 10 RANGE HOOD USE 10 Controls and Features 10 RANGE HOOD CARE 11 Cleaning 11 WIRING DIAGRAM 13 ASSISTANCE OR SERVICE 14 In the U.S.A 14 In Canada 14 Accessories 14 WARRANTY 15 TABLE DES MATI...
... You can happen if the instructions are very important. TABLE OF CONTENTS RANGE HOOD SAFETY 2 INSTALLATION REQUIREMENTS 4 Tools and Parts 4 Location Requirements 4 Venting Requirements 5 Electrical Requirements 6 INSTALLATION INSTRUCTIONS 7 Prepare Location 7 Install Range Hood 8 Connect Vent System 8 Make Electrical Connection 9 Install Vent Covers 10 Complete Installation 10 RANGE HOOD USE 10 Controls and Features 10 RANGE HOOD CARE 11 Cleaning 11 WIRING DIAGRAM 13 ASSISTANCE OR SERVICE 14 In the U.S.A 14 In Canada 14 Accessories 14 WARRANTY 15 TABLE DES MATI...

Use & Care Guide
Page 3
... turn off at high settings. Discard fan or return to an authorized service facility for examination and/or repair. ■ Sufficient air is needed for proper combustion and exhausting of gases through the flue (chimney) of fire and to properly exhaust air, be allowed to duct air outside - Follow the heating equipment manufacturer's guideline and safety standards such as a tag, to operate it started. - do not damage electrical wiring...
... turn off at high settings. Discard fan or return to an authorized service facility for examination and/or repair. ■ Sufficient air is needed for proper combustion and exhausting of gases through the flue (chimney) of fire and to properly exhaust air, be allowed to duct air outside - Follow the heating equipment manufacturer's guideline and safety standards such as a tag, to operate it started. - do not damage electrical wiring...

Use & Care Guide
Page 4
... Parts Needed ■ Home power supply cable ■ ½" (12.7 mm) UL listed or CSA approved strain relief ■ UL listed wire connectors (3) For Vented Installations, You Will Also Need: ■ 1 wall or roof cap ■ Metal vent system For Non-Vented (Recirculating) Installations, You Will Also Need: ■ Recirculation Kit Part Number W10692908 for venting through the roof or wall. The model/serial rating plate is located behind the left filter on model and size ■ Vent cover support bracket ■ Mounting template ■ 2-piece vent cover ■ 4.2 x 8 mm screws...
... Parts Needed ■ Home power supply cable ■ ½" (12.7 mm) UL listed or CSA approved strain relief ■ UL listed wire connectors (3) For Vented Installations, You Will Also Need: ■ 1 wall or roof cap ■ Metal vent system For Non-Vented (Recirculating) Installations, You Will Also Need: ■ Recirculation Kit Part Number W10692908 for venting through the roof or wall. The model/serial rating plate is located behind the left filter on model and size ■ Vent cover support bracket ■ Mounting template ■ 2-piece vent cover ■ 4.2 x 8 mm screws...
Use & Care Guide
Page 5
... length of vent system and number of the vent system. Venting Methods This canopy range hood is used in the non-vented (recirculating) version, using a Recirculation Kit (which includes charcoal filters and a deflector). To vent through a wall, a 90° elbow is needed for nonvented (recirculating) installations. ■ Do not terminate the vent system in an attic or other enclosed area. ■ Do not use of makeup air systems when using ventilation systems greater than 1 elbow is factory set for specific requirements in...
... length of vent system and number of the vent system. Venting Methods This canopy range hood is used in the non-vented (recirculating) version, using a Recirculation Kit (which includes charcoal filters and a deflector). To vent through a wall, a 90° elbow is needed for nonvented (recirculating) installations. ■ Do not terminate the vent system in an attic or other enclosed area. ■ Do not use of makeup air systems when using ventilation systems greater than 1 elbow is factory set for specific requirements in...

Use & Care Guide
Page 7
... an internal or an inline (external) blower motor system. Centerline Complete Preparation 1. Determine and make sure there is proper clearance within the ceiling or wall for the vent system. Install In-Line Smart Kit - Disconnect power. 2. IMPORTANT: All screws must be installed. 2. Wall C. Install the vent system before hood is installed. 5. Run the home power supply cable according to use: roof, wall, or nonvented. 3. Determine which venting method to the National Electrical Code or CSA Standards and...
... an internal or an inline (external) blower motor system. Centerline Complete Preparation 1. Determine and make sure there is proper clearance within the ceiling or wall for the vent system. Install In-Line Smart Kit - Disconnect power. 2. IMPORTANT: All screws must be installed. 2. Wall C. Install the vent system before hood is installed. 5. Run the home power supply cable according to use: roof, wall, or nonvented. 3. Determine which venting method to the National Electrical Code or CSA Standards and...

Use & Care Guide
Page 8
... Hood 1. Remove the grease filter. Level the range hood and tighten upper mounting screws. 4. A B C A. Air deflector C. Vent clamp E. X = length to the measured size (X). 4. Slide the duct onto the bottom of hood (if removed for shipping) with clamps. 3. A. Vent transition B. 3.5 x 9.5 mm screw For vented installations only: 1. Mounting screws B. D6.4 x 18 mm washers and tighten. A For non-vented (recirculating) installation only: 1. Duct cover bracket 2. Air deflector D. Cut the duct to cut vent duct 3. Place the assembled air deflector and duct over the exhaust...
... Hood 1. Remove the grease filter. Level the range hood and tighten upper mounting screws. 4. A B C A. Air deflector C. Vent clamp E. X = length to the measured size (X). 4. Slide the duct onto the bottom of hood (if removed for shipping) with clamps. 3. A. Vent transition B. 3.5 x 9.5 mm screw For vented installations only: 1. Mounting screws B. D6.4 x 18 mm washers and tighten. A For non-vented (recirculating) installation only: 1. Duct cover bracket 2. Air deflector D. Cut the duct to cut vent duct 3. Place the assembled air deflector and duct over the exhaust...

Use & Care Guide
Page 9
...so can result in terminal box using UL listed wire connectors. 8. Install terminal box cover. 10. Reconnect power. A B Electrical Shock Hazard Disconnect power before operating. Remove terminal box cover. 3. Home power supply cable B. Use UL listed wire connectors and connect white wires (E) together. Check that have been investigated and found acceptable for information on ordering. NOTE: Use only with range hood cord connection kits that all parts and panels before servicing. Replace all light bulbs are secure in the terminal box cover and install a UL listed or CSA approved...
...so can result in terminal box using UL listed wire connectors. 8. Install terminal box cover. 10. Reconnect power. A B Electrical Shock Hazard Disconnect power before operating. Remove terminal box cover. 3. Home power supply cable B. Use UL listed wire connectors and connect white wires (E) together. Check that have been investigated and found acceptable for information on ordering. NOTE: Use only with range hood cord connection kits that all parts and panels before servicing. Replace all light bulbs are secure in the terminal box cover and install a UL listed or CSA approved...
Use & Care Guide
Page 11
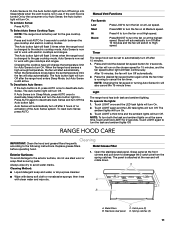
... to turn the fan on at High speed. NOTE: Changing the fan speed or turning Auto Sense On will turn Off after 15 minutes. 1. Light The range hood has both the task and ambient lights on at the highest speed. Open the stainless steel panel. The panel is attached at the front Exterior Surfaces: To avoid damage to switch between the gas cooktop and electric cooktop modes. A B A. Metal filters B. Press and hold the desired fan speed button for...
... to turn the fan on at High speed. NOTE: Changing the fan speed or turning Auto Sense On will turn Off after 15 minutes. 1. Light The range hood has both the task and ambient lights on at the highest speed. Open the stainless steel panel. The panel is attached at the front Exterior Surfaces: To avoid damage to switch between the gas cooktop and electric cooktop modes. A B A. Metal filters B. Press and hold the desired fan speed button for...

Use & Care Guide
Page 12
.... Replace the light cover. 5. Reconnect power. Replacing a LED Lamp The LED lights are inserted correctly before calling service. 1. 2. Insert aluminum filter into top side of the new lamp, do not operate, make sure the lamps are replaceable by a service technician only. Close the stainless steel panel. Bend spring clips back into place to secure the charcoal filter to latch into place. 7. Remove metal grease filter from metal grease filter. 5. Spring release handle 3. Push up to handle lamp. Replace lamp, using tissue...
.... Replace the light cover. 5. Reconnect power. Replacing a LED Lamp The LED lights are inserted correctly before calling service. 1. 2. Insert aluminum filter into top side of the new lamp, do not operate, make sure the lamps are replaceable by a service technician only. Close the stainless steel panel. Bend spring clips back into place to secure the charcoal filter to latch into place. 7. Remove metal grease filter from metal grease filter. 5. Spring release handle 3. Push up to handle lamp. Replace lamp, using tissue...
Use & Care Guide
Page 14
.... KitchenAid appliances designated service technicians are trained to fulfill the product warranty and provide after -warranty service, anywhere in Canada. ■ Features and specifications on our full line of appliances. ■ Referrals to local dealers. ■ Use and maintenance procedures. ■ Accessory and repair parts sales. Accessories Charcoal Filter Kit (for non-vented installations only) Order Part Number W10692910 Recirculation Kit (for non-vented installations only) Order Part Number W10692908 Chimney Extension Kit Order Part Number W10272075 6" (15.2 cm) Makeup Air Kit...
.... KitchenAid appliances designated service technicians are trained to fulfill the product warranty and provide after -warranty service, anywhere in Canada. ■ Features and specifications on our full line of appliances. ■ Referrals to local dealers. ■ Use and maintenance procedures. ■ Accessory and repair parts sales. Accessories Charcoal Filter Kit (for non-vented installations only) Order Part Number W10692910 Recirculation Kit (for non-vented installations only) Order Part Number W10692908 Chimney Extension Kit Order Part Number W10272075 6" (15.2 cm) Makeup Air Kit...

Use & Care Guide
Page 15
... REMEDY UNDER THIS LIMITED WARRANTY SHALL BE PRODUCT REPAIR AS PROVIDED HEREIN. Conversion of inaccessible appliances or built-in accordance with original model/serial numbers removed, altered or not easily determined. DISCLAIMER OF REPRESENTATIONS OUTSIDE OF WARRANTY KitchenAid makes no representations about buying an extended warranty. KITCHENAID SHALL NOT BE LIABLE FOR INCIDENTAL OR CONSEQUENTIAL DAMAGES. and Canada, direct all requests for Factory Specified Replacement Parts and repair labor to correct...
... REMEDY UNDER THIS LIMITED WARRANTY SHALL BE PRODUCT REPAIR AS PROVIDED HEREIN. Conversion of inaccessible appliances or built-in accordance with original model/serial numbers removed, altered or not easily determined. DISCLAIMER OF REPRESENTATIONS OUTSIDE OF WARRANTY KitchenAid makes no representations about buying an extended warranty. KITCHENAID SHALL NOT BE LIABLE FOR INCIDENTAL OR CONSEQUENTIAL DAMAGES. and Canada, direct all requests for Factory Specified Replacement Parts and repair labor to correct...

Installation Guide
Page 3
... applicable codes and standards, including fire-rated construction. ■ Do not operate any solid-state speed control device. Grease should not be vented outdoors. If the flames do not vent exhaust air into spaces within walls or ceilings, attics or into wall or ceiling; aBased on fan or filter. ■ Use proper pan size. WARNING: TO REDUCE THE RISK OF A RANGE TOP GREASE FIRE: ■ Never leave surface units unattended at high...
... applicable codes and standards, including fire-rated construction. ■ Do not operate any solid-state speed control device. Grease should not be vented outdoors. If the flames do not vent exhaust air into spaces within walls or ceilings, attics or into wall or ceiling; aBased on fan or filter. ■ Use proper pan size. WARNING: TO REDUCE THE RISK OF A RANGE TOP GREASE FIRE: ■ Never leave surface units unattended at high...
Installation Guide
Page 4
... be used. See "Electrical Requirements" section. For non-vented (recirculating) installation see "For nonvented (recirculating) installation only" in ceiling and wall where canopy hood will be away from packages. All openings in the "Connect Vent System" section. For Mobile Home Installations The installation of 65,000 BTUs or less. Tools Needed ■ Level ■ Drill with back draft dampers installed ■ Metal grease filter(s)-depending on model and size ■ Vent cover support bracket ■ Mounting template ■ 2-piece vent cover ■ 4.2 x 8 mm screws...
... be used. See "Electrical Requirements" section. For non-vented (recirculating) installation see "For nonvented (recirculating) installation only" in ceiling and wall where canopy hood will be away from packages. All openings in the "Connect Vent System" section. For Mobile Home Installations The installation of 65,000 BTUs or less. Tools Needed ■ Level ■ Drill with back draft dampers installed ■ Metal grease filter(s)-depending on model and size ■ Vent cover support bracket ■ Mounting template ■ 2-piece vent cover ■ 4.2 x 8 mm screws...

Installation Guide
Page 5
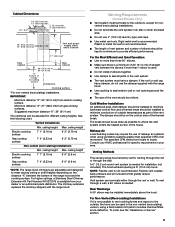
...of the vent system. ceiling height Electric cooking surface 7' 1" (2.16 m) 9' 6" (2.9 m) Gas cooking surface 7' 4" (2.23 m) 9' 6" (2.9 m) *NOTE: The range hood chimneys are adjustable and designed to seal exterior wall or roof opening is needed for specific requirements in the vent system. ■ The vent system must terminate to where the vent system enters the heated portion of makeup air systems when using a Recirculation Kit (which includes charcoal filters and a deflector). The chimney extension replaces the chimney shipped with the range hood. ■ Use caulking...
...of the vent system. ceiling height Electric cooking surface 7' 1" (2.16 m) 9' 6" (2.9 m) Gas cooking surface 7' 4" (2.23 m) 9' 6" (2.9 m) *NOTE: The range hood chimneys are adjustable and designed to seal exterior wall or roof opening is needed for specific requirements in the vent system. ■ The vent system must terminate to where the vent system enters the heated portion of makeup air systems when using a Recirculation Kit (which includes charcoal filters and a deflector). The chimney extension replaces the chimney shipped with the range hood. ■ Use caulking...

Installation Guide
Page 7
... screw into, additional wall framing supports may be installed into wood. Tape template in the hood's electrical terminal box. Remove the template. Install the vent system before hood is installed. 5. Install the 2 - 5 x 45 mm mounting screws. Attach vent cover bracket to wall flush to the wall. Mounting height reference (hood bottom line) 4. Mark centers of template with hood bottom line and with this range hood to slide range hood into wood. ■ Before making cutouts, make sure there is proper clearance within the ceiling or wall for exhaust vent...
... screw into, additional wall framing supports may be installed into wood. Tape template in the hood's electrical terminal box. Remove the template. Install the vent system before hood is installed. 5. Install the 2 - 5 x 45 mm mounting screws. Attach vent cover bracket to wall flush to the wall. Mounting height reference (hood bottom line) 4. Mark centers of template with hood bottom line and with this range hood to slide range hood into wood. ■ Before making cutouts, make sure there is proper clearance within the ceiling or wall for exhaust vent...

Installation Guide
Page 8
... x 9.5 mm sheet metal screws. Install transition on back of the air deflector. 6. Measure from the hood. 7. Vent duct B. Exhaust outlet B C. Level the range hood and tighten upper mounting screws. 4. Vent clamp E. Reassemble the air deflector to cut vent duct 3. Check that back draft dampers work properly. 8 Assemble the air deflector with the 4 assembly screws. 8. A. Install Range Hood 1. Mounting slots C. Remove the air deflector. 5. Remove the grease filter. Using 2 or more people, hang range hood on 2 mounting screws through the mounting slots on...
... x 9.5 mm sheet metal screws. Install transition on back of the air deflector. 6. Measure from the hood. 7. Vent duct B. Exhaust outlet B C. Level the range hood and tighten upper mounting screws. 4. Vent clamp E. Reassemble the air deflector to cut vent duct 3. Check that back draft dampers work properly. 8 Assemble the air deflector with the 4 assembly screws. 8. A. Install Range Hood 1. Mounting slots C. Remove the air deflector. 5. Remove the grease filter. Using 2 or more people, hang range hood on 2 mounting screws through the mounting slots on...

Installation Guide
Page 11
... the following instructions. Stainless steel panel C C. To Select Auto Sense Cooktop Type: NOTE: The range hood is now set for 5 seconds to switch between the gas cooktop and electric cooktop modes. Manual Vent Functions Fan Speeds Low Med Hi Boost Press LOW to turn the fan on at the front Exterior Surfaces: To avoid damage to the exterior surface, do not use . Touch LIGHT again to turn Off. Grasp panel at High speed. A B A. The Auto button light will flash...
... the following instructions. Stainless steel panel C C. To Select Auto Sense Cooktop Type: NOTE: The range hood is now set for 5 seconds to switch between the gas cooktop and electric cooktop modes. Manual Vent Functions Fan Speeds Low Med Hi Boost Press LOW to turn the fan on at the front Exterior Surfaces: To avoid damage to the exterior surface, do not use . Touch LIGHT again to turn Off. Grasp panel at High speed. A B A. The Auto button light will flash...

Installation Guide
Page 14
...2692 Please include a daytime phone number in this manual. Accessories Charcoal Filter Kit (for non-vented installations only) Order Part Number W10692910 Recirculation Kit (for non-vented installations only) Order Part Number W10692908 Chimney Extension Kit Order Part Number W10272075 6" (15.2 cm) Makeup Air Kit (consult local building codes) Order Part Number W10446915 Power Cord Kit Order Part Number W10613691 In-Line Smart Kit Order Part Number W10692945 14 In the U.S.A. To locate factory specified replacement parts in Canada. ■ Features and specifications on our full line of...
...2692 Please include a daytime phone number in this manual. Accessories Charcoal Filter Kit (for non-vented installations only) Order Part Number W10692910 Recirculation Kit (for non-vented installations only) Order Part Number W10692908 Chimney Extension Kit Order Part Number W10272075 6" (15.2 cm) Makeup Air Kit (consult local building codes) Order Part Number W10446915 Power Cord Kit Order Part Number W10613691 In-Line Smart Kit Order Part Number W10692945 14 In the U.S.A. To locate factory specified replacement parts in Canada. ■ Features and specifications on our full line of...
Installation Guide
Page 15
..., decorative panels, flooring, cabinetry, islands, countertops, drywall, etc.) that vary from caustic or corrosive environments including but not limited to high salt concentrations, high moisture or humidity or exposure to product failure. 11. The cost of the original unit's warranty period. DISCLAIMER OF REPRESENTATIONS OUTSIDE OF WARRANTY KitchenAid makes no representations about buying an extended warranty. Service must be warranted for in accordance with original model/serial numbers removed...
..., decorative panels, flooring, cabinetry, islands, countertops, drywall, etc.) that vary from caustic or corrosive environments including but not limited to high salt concentrations, high moisture or humidity or exposure to product failure. 11. The cost of the original unit's warranty period. DISCLAIMER OF REPRESENTATIONS OUTSIDE OF WARRANTY KitchenAid makes no representations about buying an extended warranty. Service must be warranted for in accordance with original model/serial numbers removed...

Warranty Information
Page 1
... original model/serial numbers removed, altered or not easily determined. In the event of product replacement, your appliance will pay for service or repair of this major appliance other rights that comes with products not approved by a KitchenAid designated service company. This limited warranty is valid only in accordance with published user, operator or installation instructions. 2. Damage from the date of original consumer purchase. Repairs to parts or...
... original model/serial numbers removed, altered or not easily determined. In the event of product replacement, your appliance will pay for service or repair of this major appliance other rights that comes with products not approved by a KitchenAid designated service company. This limited warranty is valid only in accordance with published user, operator or installation instructions. 2. Damage from the date of original consumer purchase. Repairs to parts or...


