Use & Care Guide
Page 1
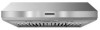
... (91.4 CM) COMMERCIAL STYLE WALL-MOUNT CANOPY RANGE HOOD Installation Instructions and Use & Care Guide For questions about features, operation/performance, parts, accessories or service, call: 1-800-422-1230 or visit our website at www.kitchenaid.com In Canada, for assistance, installation and service, call...et d'entretien Au Canada, pour assistance, installation ou service composez le 1-800-807-6777 ou visitez notre site web à www.kitchenaid.ca Table of Contents/Table des matières 2 IMPORTANT: READ AND SAVE THESE INSTRUCTIONS. POUR UTILISATION RÉSIDENTIELLE UNIQUEMENT. ...
... (91.4 CM) COMMERCIAL STYLE WALL-MOUNT CANOPY RANGE HOOD Installation Instructions and Use & Care Guide For questions about features, operation/performance, parts, accessories or service, call: 1-800-422-1230 or visit our website at www.kitchenaid.com In Canada, for assistance, installation and service, call...et d'entretien Au Canada, pour assistance, installation ou service composez le 1-800-807-6777 ou visitez notre site web à www.kitchenaid.ca Table of Contents/Table des matières 2 IMPORTANT: READ AND SAVE THESE INSTRUCTIONS. POUR UTILISATION RÉSIDENTIELLE UNIQUEMENT. ...

Use & Care Guide
Page 2
... you what can happen if the instructions are very important. TABLE OF CONTENTS RANGE HOOD SAFETY 2 INSTALLATION REQUIREMENTS 4 Tools and Parts 4 Location Requirements 4 Venting Requirements 5 Electrical Requirements 6 INSTALLATION INSTRUCTIONS 7 Prepare Location ...7 Install Range Hood 9 Make Electrical Connection 9 Install Vent Covers (Optional 10 Complete Installation 10 RANGE HOOD USE 10 Range Hood Controls 10 RANGE HOOD CARE 11 Cleaning 11 WIRING DIAGRAM 12 ASSISTANCE OR SERVICE 13 In the...
... you what can happen if the instructions are very important. TABLE OF CONTENTS RANGE HOOD SAFETY 2 INSTALLATION REQUIREMENTS 4 Tools and Parts 4 Location Requirements 4 Venting Requirements 5 Electrical Requirements 6 INSTALLATION INSTRUCTIONS 7 Prepare Location ...7 Install Range Hood 9 Make Electrical Connection 9 Install Vent Covers (Optional 10 Complete Installation 10 RANGE HOOD USE 10 Range Hood Controls 10 RANGE HOOD CARE 11 Cleaning 11 WIRING DIAGRAM 12 ASSISTANCE OR SERVICE 13 In the...

Use & Care Guide
Page 3
... IN THE EVENT OF A RANGE TOP GREASE FIRE, OBSERVE THE FOLLOWING:a ■ SMOTHER FLAMES with a close fitting lid, cookie sheet, or metal tray, then turn hood ON when cooking at high heat or when flambeing food (i.e. You can fight the fire with a damaged cord or plug. Boilovers cause smoking and greasy...
... IN THE EVENT OF A RANGE TOP GREASE FIRE, OBSERVE THE FOLLOWING:a ■ SMOTHER FLAMES with a close fitting lid, cookie sheet, or metal tray, then turn hood ON when cooking at high heat or when flambeing food (i.e. You can fight the fire with a damaged cord or plug. Boilovers cause smoking and greasy...
Use & Care Guide
Page 4
...areas, such as windows, doors and strong heating vents. Grounded electrical outlet is a registered trademark of the vent hood. Cabinet opening dimensions that all parts are shown must be away from packages. INSTALLATION REQUIREMENTS Tools and Parts Gather the... required tools and parts before starting installation. Canopy hood location should be sealed. See "Electrical Requirements" section. Read and follow the instructions provided with local codes. Product Dimensions Front View...
...areas, such as windows, doors and strong heating vents. Grounded electrical outlet is a registered trademark of the vent hood. Cabinet opening dimensions that all parts are shown must be away from packages. INSTALLATION REQUIREMENTS Tools and Parts Gather the... required tools and parts before starting installation. Canopy hood location should be sealed. See "Electrical Requirements" section. Read and follow the instructions provided with local codes. Product Dimensions Front View...

Use & Care Guide
Page 5
...) countertop height Venting Requirements ■ Vent system must have a damper. To vent out of the top of the range hood and through the roof or wall. See "Install Range Hood" section for details for installation (not included). B. IMPORTANT: Minimum distance "X" : 24" (61.0 cm) to electric ...8260;₄" x 10" (8.3 x 25.4 cm) rectangular vent system is 3¹⁄₄" x 10" (8.3 x 25.4 cm). For installations with the range hood. ■ Use caulking to the outdoors. ■ Do not terminate the vent system in your area. Back View 30" (76.2 cm) models: 12¼" ...
...) countertop height Venting Requirements ■ Vent system must have a damper. To vent out of the top of the range hood and through the roof or wall. See "Install Range Hood" section for details for installation (not included). B. IMPORTANT: Minimum distance "X" : 24" (61.0 cm) to electric ...8260;₄" x 10" (8.3 x 25.4 cm) rectangular vent system is 3¹⁄₄" x 10" (8.3 x 25.4 cm). For installations with the range hood. ■ Use caulking to the outdoors. ■ Do not terminate the vent system in your area. Back View 30" (76.2 cm) models: 12¼" ...

Use & Care Guide
Page 6
...is located behind the filter on the model/serial rating plate. Rear discharge This range hood can be vented directly out the back using special connectors and/or tools designed and ... Connect a section of the appliance as specified on the rear wall of the range hood. ■ Wire sizes must conform with a 3¼" x 10" (8.3 cm x 25.4 cm) rectangular vent system (not ...supplied). See "Install Range Hood" section for details for each vent piece used , it is recommended that a qualified electrician determine that the ...
...is located behind the filter on the model/serial rating plate. Rear discharge This range hood can be vented directly out the back using special connectors and/or tools designed and ... Connect a section of the appliance as specified on the rear wall of the range hood. ■ Wire sizes must conform with a 3¼" x 10" (8.3 cm x 25.4 cm) rectangular vent system (not ...supplied). See "Install Range Hood" section for details for each vent piece used , it is recommended that a qualified electrician determine that the ...

Use & Care Guide
Page 7
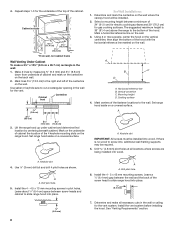
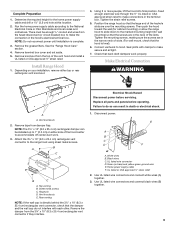
...the wall and cabinet in the area the vent opening for exhaust vent. ■ Check your ceiling height and the hood height maximum before hood is installed. Select a flat surface for wiring hole location instructions. 1. Failure to do so can be installed before you select...;₄" (3.2 cm) diameter wiring access hole. Disconnect power. 2. Place covering over that surface. Using 2 or more people to move and install range hood. Mark the point on the centerline of the underside of the cabinet. Drill a 1¼" (3.2 cm) diameter hole through top: Mark a line distance...
...the wall and cabinet in the area the vent opening for exhaust vent. ■ Check your ceiling height and the hood height maximum before hood is installed. Select a flat surface for wiring hole location instructions. 1. Failure to do so can be installed before you select...;₄" (3.2 cm) diameter wiring access hole. Disconnect power. 2. Place covering over that surface. Using 2 or more people to move and install range hood. Mark the point on the centerline of the underside of the cabinet. Drill a 1¼" (3.2 cm) diameter hole through top: Mark a line distance...
Use & Care Guide
Page 8
...7. A For Wall Installations: 1. Cooking surface 4. Install the 4 - 4.5 x 13 mm mounting screws in the wall: 1. Install the vent system before installing the hood. 4. Repeat steps 1-3 for gas cooking surfaces. Cabinet cutouts *¹⁄₂" (1.3 cm) *4¹⁄₂" (11.4 cm) 5¹/₄" (13.3 cm)...centering beneath cabinet. Use saber or keyhole saw to the wall. Mark on the underside of cabinet the location of the hood. Set range hood aside on the wall. 3. Select a mounting height between screw heads and cabinet to the bottom of the 4 keyhole ...
...7. A For Wall Installations: 1. Cooking surface 4. Install the 4 - 4.5 x 13 mm mounting screws in the wall: 1. Install the vent system before installing the hood. 4. Repeat steps 1-3 for gas cooking surfaces. Cabinet cutouts *¹⁄₂" (1.3 cm) *4¹⁄₂" (11.4 cm) 5¹/₄" (13.3 cm)...centering beneath cabinet. Use saber or keyhole saw to the wall. Mark on the underside of cabinet the location of the hood. Set range hood aside on the wall. 3. Select a mounting height between screw heads and cabinet to the bottom of the 4 keyhole ...
Use & Care Guide
Page 9
...Disconnect power before operating. UL listed wire connector D. Use UL listed wire connectors and connect white wires (A) together. 3. Position the range hood so that the large end of slots. (For wall mount, check that the damper and the wall cap do so can be enough ... Attach the 3¼" x 10" (8.3 x 25.4 cm) rectangular vent connector to 1" (2.5 cm) on your installation, remove either side of the hood center to accommodate off center duct work properly. Complete Preparation 1. Rear venting NOTE: If the wall cap is complete. 3. Failure to do not interfere with...
...Disconnect power before operating. UL listed wire connector D. Use UL listed wire connectors and connect white wires (A) together. 3. Position the range hood so that the large end of slots. (For wall mount, check that the damper and the wall cap do so can be enough ... Attach the 3¼" x 10" (8.3 x 25.4 cm) rectangular vent connector to 1" (2.5 cm) on your installation, remove either side of the hood center to accommodate off center duct work properly. Complete Preparation 1. Rear venting NOTE: If the wall cap is complete. 3. Failure to do not interfere with...

Use & Care Guide
Page 10
...When the fan switch is equipped with a sensor to turn the fan OFF. Move the light switch to the "Off" position to turn range hood light to avoid overheating conditions. Failure to green and yellow ground wire in terminal box. Complete Installation 1. Operating the fan 1. Light control B. Move... the light switch to the "2" position to high speed when necessary. Thermal Protector The range hood is in death or electrical shock. 4. Connect ground wire to do so can result in the "Off" position, this sensor will turn off...
...When the fan switch is equipped with a sensor to turn the fan OFF. Move the light switch to the "Off" position to turn range hood light to avoid overheating conditions. Failure to green and yellow ground wire in terminal box. Complete Installation 1. Operating the fan 1. Light control B. Move... the light switch to the "2" position to high speed when necessary. Thermal Protector The range hood is in death or electrical shock. 4. Connect ground wire to do so can result in the "Off" position, this sensor will turn off...

Use & Care Guide
Page 11
... power. 2. Grasp filter handles, push toward the rear of filter into the front track to remove. 2. Grasp filter handles and place rear of the range hood and pull down on the lens and turn it with a 120-volt, 50-watt maximum halogen lamp with clean water and wipe dry. Remove the... up on the rear handle and set the front of the new lamp, do not operate, make sure the lamps are inserted correctly before operating hood. If new lamps do not touch lamp with bare fingers. Repeat for the other lamp if needed in a dishwasher or hand wash in a hot detergent...
... power. 2. Grasp filter handles, push toward the rear of filter into the front track to remove. 2. Grasp filter handles and place rear of the range hood and pull down on the lens and turn it with a 120-volt, 50-watt maximum halogen lamp with clean water and wipe dry. Remove the... up on the rear handle and set the front of the new lamp, do not operate, make sure the lamps are inserted correctly before operating hood. If new lamps do not touch lamp with bare fingers. Repeat for the other lamp if needed in a dishwasher or hand wash in a hot detergent...

Dimension Guide
Page 1
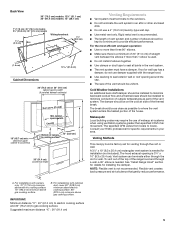
...;" (20.0 cm) A. Instructions packed with canopy only. 70" (177.8 cm) minimum above electric cooking surface. 76" (193.0 cm) minimum above gas cooking surface. ® Range Hood - 30" (76.2 cm) and 36" (91.4 cm) PRODUCT MODEL NUMBERS KXU8030Y KXU8036Y Electrical Requirements: q A 120 volt, 60 Hz., AC only, 15-amp, fused electrical circuit...
...;" (20.0 cm) A. Instructions packed with canopy only. 70" (177.8 cm) minimum above electric cooking surface. 76" (193.0 cm) minimum above gas cooking surface. ® Range Hood - 30" (76.2 cm) and 36" (91.4 cm) PRODUCT MODEL NUMBERS KXU8030Y KXU8036Y Electrical Requirements: q A 120 volt, 60 Hz., AC only, 15-amp, fused electrical circuit...

Dimension Guide
Page 2
... If roof or wall cap has a damper, do not use a 4" (10.2 cm) laundry-type wall cap. q Use caulking to the outdoors. The hood exhaust opening around the cap. W10331008B 3/30/11 q Use metal vent only. q Make sure there is used in the system. 3¹⁄₄" x ... installation (not included). q Do not install 2 elbows together. Flexible vent creates back pressure and air turbulence that greatly reduce performance. See "Install Range Hood" section for details for installing the damper. Roof cap B. 3¹⁄₄" x 10" (8.3 cm x 25.4 cm) rectangular metal vent A....
... If roof or wall cap has a damper, do not use a 4" (10.2 cm) laundry-type wall cap. q Use caulking to the outdoors. The hood exhaust opening around the cap. W10331008B 3/30/11 q Use metal vent only. q Make sure there is used in the system. 3¹⁄₄" x ... installation (not included). q Do not install 2 elbows together. Flexible vent creates back pressure and air turbulence that greatly reduce performance. See "Install Range Hood" section for details for installing the damper. Roof cap B. 3¹⁄₄" x 10" (8.3 cm x 25.4 cm) rectangular metal vent A....

Installation Guide
Page 1
...36" (91.4 CM) COMMERCIAL STYLE WALL-MOUNT CANOPY RANGE HOOD Installation Instructions and Use & Care Guide For questions about features, operation/performance, parts, accessories or service, call: 1-800-422-1230 or visit our website at www.kitchenaid.com In Canada, for assistance, installation and service, call: ...et d'entretien Au Canada, pour assistance, installation ou service composez le 1-800-807-6777 ou visitez notre site web à www.kitchenaid.ca Table of Contents/Table des matières 2 IMPORTANT: READ AND SAVE THESE INSTRUCTIONS. FOR RESIDENTIAL USE ONLY. LI3Y4B/W10331008B ...
...36" (91.4 CM) COMMERCIAL STYLE WALL-MOUNT CANOPY RANGE HOOD Installation Instructions and Use & Care Guide For questions about features, operation/performance, parts, accessories or service, call: 1-800-422-1230 or visit our website at www.kitchenaid.com In Canada, for assistance, installation and service, call: ...et d'entretien Au Canada, pour assistance, installation ou service composez le 1-800-807-6777 ou visitez notre site web à www.kitchenaid.ca Table of Contents/Table des matières 2 IMPORTANT: READ AND SAVE THESE INSTRUCTIONS. FOR RESIDENTIAL USE ONLY. LI3Y4B/W10331008B ...
Installation Guide
Page 2
...Requirements 4 Venting Requirements 5 Electrical Requirements 6 INSTALLATION INSTRUCTIONS 7 Prepare Location 7 Install Range Hood 9 Make Electrical Connection 9 Install Vent Covers (Optional 10 Complete Installation 10 RANGE HOOD USE 10 Range Hood Controls 10 RANGE HOOD CARE 11 Cleaning 11 WIRING DIAGRAM 12 ASSISTANCE OR SERVICE 13 In the U.S.A 13 Accessories... DE CÂBLAGE 26 ASSISTANCE OU SERVICE 27 Au Canada 27 Accessoires 27 GARANTIE 28 RANGE HOOD SAFETY Your safety and the safety of injury, and tell you what the potential hazard is the safety alert symbol.
...Requirements 4 Venting Requirements 5 Electrical Requirements 6 INSTALLATION INSTRUCTIONS 7 Prepare Location 7 Install Range Hood 9 Make Electrical Connection 9 Install Vent Covers (Optional 10 Complete Installation 10 RANGE HOOD USE 10 Range Hood Controls 10 RANGE HOOD CARE 11 Cleaning 11 WIRING DIAGRAM 12 ASSISTANCE OR SERVICE 13 In the U.S.A 13 Accessories... DE CÂBLAGE 26 ASSISTANCE OU SERVICE 27 Au Canada 27 Accessoires 27 GARANTIE 28 RANGE HOOD SAFETY Your safety and the safety of injury, and tell you what the potential hazard is the safety alert symbol.

Installation Guide
Page 3
... power from being called. - BE CAREFUL TO PREVENT BURNS. You can fight the fire with a close fitting lid, cookie sheet, or metal tray, then turn hood ON when cooking at high settings. CAUTION: To reduce risk of the surface element. WARNING: TO REDUCE THE RISK OF A RANGE TOP GREASE FIRE: ■...
... power from being called. - BE CAREFUL TO PREVENT BURNS. You can fight the fire with a close fitting lid, cookie sheet, or metal tray, then turn hood ON when cooking at high settings. CAUTION: To reduce risk of the surface element. WARNING: TO REDUCE THE RISK OF A RANGE TOP GREASE FIRE: ■...

Installation Guide
Page 4
...as required Parts supplied Remove parts from packages. Check that are included. ■ Hood canopy assembly with installation clearances specified on the rear wall of the vent hood. Canopy hood location should be installed must conform to comply with ventilator and light bulbs installed ■...doors and strong heating vents. Cabinet opening dimensions that all governing codes and ordinances. The canopy hood is a registered trademark of this range hood must be used. INSTALLATION REQUIREMENTS Tools and Parts Gather the required tools and parts before starting installation...
...as required Parts supplied Remove parts from packages. Check that are included. ■ Hood canopy assembly with installation clearances specified on the rear wall of the vent hood. Canopy hood location should be installed must conform to comply with ventilator and light bulbs installed ■...doors and strong heating vents. Cabinet opening dimensions that all governing codes and ordinances. The canopy hood is a registered trademark of this range hood must be used. INSTALLATION REQUIREMENTS Tools and Parts Gather the required tools and parts before starting installation...
Installation Guide
Page 5
...x 10" (8.3 x 25.4 cm). Flexible vent creates back pressure and air turbulence that gently reduce performance. A. B. Venting Methods This canopy hood is not recommended. Cold Weather Installations An additional back draft damper should be installed to minimize backward cold air flow and a thermal break should be...: Minimum distance "X" : 24" (61.0 cm) to electric cooking surface and 30" (76.2 cm) to locale. For installations with the range hood. ■ Use caulking to seal exterior wall or roof opening around the cap. ■ The size of canopy 13" (33.0 cm) to provide...
...x 10" (8.3 x 25.4 cm). Flexible vent creates back pressure and air turbulence that gently reduce performance. A. B. Venting Methods This canopy hood is not recommended. Cold Weather Installations An additional back draft damper should be installed to minimize backward cold air flow and a thermal break should be...: Minimum distance "X" : 24" (61.0 cm) to electric cooking surface and 30" (76.2 cm) to locale. For installations with the range hood. ■ Use caulking to seal exterior wall or roof opening around the cap. ■ The size of canopy 13" (33.0 cm) to provide...

Installation Guide
Page 6
...; elbow 8 ft (2.4 m) straight 1 - Follow the electrical connector manufacturer's recommended procedure. Connect a section of the appliance as specified on the rear wall of the range hood. ■ Wire sizes must conform with a 3¼" x 10" (8.3 cm x 25.4 cm) rectangular vent system (not supplied). Roof cap B. 3¹⁄₄... required. ■ If the house has aluminum wiring, follow the procedure below: 1. Rear discharge This range hood can be vented directly out the back using special connectors and/or tools designed and UL listed for installing the damper.
...; elbow 8 ft (2.4 m) straight 1 - Follow the electrical connector manufacturer's recommended procedure. Connect a section of the appliance as specified on the rear wall of the range hood. ■ Wire sizes must conform with a 3¼" x 10" (8.3 cm x 25.4 cm) rectangular vent system (not supplied). Roof cap B. 3¹⁄₄... required. ■ If the house has aluminum wiring, follow the procedure below: 1. Rear discharge This range hood can be vented directly out the back using special connectors and/or tools designed and UL listed for installing the damper.

Installation Guide
Page 7
... that product. ■ Before making cutouts, make a 4" x 10½" (10.2 cm x 26.7 cm) rectangular cutout on each side. NOTE: This range hood can result in back or other injury. 4. Install screws to attach filler strips in the area the vent opening for exhaust vent. ■ Check your... ceiling height and the hood height maximum before hood is installed. Using 2 or more people to move and install range hood. If cabinet has recessed bottom, add wood filler strips on the underside of cabinet top and bottom...
... that product. ■ Before making cutouts, make a 4" x 10½" (10.2 cm x 26.7 cm) rectangular cutout on each side. NOTE: This range hood can result in back or other injury. 4. Install screws to attach filler strips in the area the vent opening for exhaust vent. ■ Check your... ceiling height and the hood height maximum before hood is installed. Using 2 or more people to move and install range hood. If cabinet has recessed bottom, add wood filler strips on the underside of cabinet top and bottom...

