
Installation Guide
Page 2
... 4 Location Requirements 4 Venting Requirements 5 Electrical Requirements 7 INSTALLATION INSTRUCTIONS 7 Prepare Location 7 Install Range Hood 9 Electrical Connection 11 Connect the Vent System 11 RANGE HOOD USE 12 Controls 12 Display 12 RANGE HOOD CARE 13 Cleaning 13 Replacing the Halogen Bulb 13 WIRING DIAGRAM 14 ASSISTANCE OR SERVICE 15 In...232;ne 29 SCHÉMAS DE CÂBLAGE 30 ASSISTANCE OU SERVICE 31 Au Canada 31 Accessoires 31 GARANTIE 32 RANGE HOOD SAFETY Your safety and the safety of injury, and tell you what the potential hazard is the safety alert symbol....
... 4 Location Requirements 4 Venting Requirements 5 Electrical Requirements 7 INSTALLATION INSTRUCTIONS 7 Prepare Location 7 Install Range Hood 9 Electrical Connection 11 Connect the Vent System 11 RANGE HOOD USE 12 Controls 12 Display 12 RANGE HOOD CARE 13 Cleaning 13 Replacing the Halogen Bulb 13 WIRING DIAGRAM 14 ASSISTANCE OR SERVICE 15 In...232;ne 29 SCHÉMAS DE CÂBLAGE 30 ASSISTANCE OU SERVICE 31 Au Canada 31 Accessoires 31 GARANTIE 32 RANGE HOOD SAFETY Your safety and the safety of injury, and tell you what the potential hazard is the safety alert symbol....

Installation Guide
Page 3
... examination and/or repair. ■ Sufficient air is needed for the size of the surface element. WARNING: TO REDUCE THE RISK OF A RANGE TOP GREASE FIRE: ■ Never leave surface units unattended at service panel and lock the service disconnecting means to prevent backdrafting. Crepes Suzette,...WARNING: TO REDUCE THE RISK OF INJURY TO PERSONS IN THE EVENT OF A RANGE TOP GREASE FIRE, OBSERVE THE FOLLOWING:a ■ SMOTHER FLAMES with a close fitting lid, cookie sheet, or metal tray, then turn hood ON when cooking at high heat or when flambeing food (i.e. IMPORTANT SAFETY INSTRUCTIONS ...
... examination and/or repair. ■ Sufficient air is needed for the size of the surface element. WARNING: TO REDUCE THE RISK OF A RANGE TOP GREASE FIRE: ■ Never leave surface units unattended at service panel and lock the service disconnecting means to prevent backdrafting. Crepes Suzette,...WARNING: TO REDUCE THE RISK OF INJURY TO PERSONS IN THE EVENT OF A RANGE TOP GREASE FIRE, OBSERVE THE FOLLOWING:a ■ SMOTHER FLAMES with a close fitting lid, cookie sheet, or metal tray, then turn hood ON when cooking at high heat or when flambeing food (i.e. IMPORTANT SAFETY INSTRUCTIONS ...
Installation Guide
Page 4
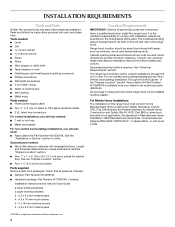
...1" x 1" x 5" (25 x 25 x 12.7 cm) wood pieces for cabinets with installation clearances specified on the left rear wall of the range hood. See the "Prepare Location" section. ■ Four, 1¹⁄₄" (3.2 cm) wood screws Parts supplied Remove parts from strong draft areas,...strain reliefs ■ 3 UL listed wire connectors For vented installations, you will be used. Have a qualified technician install the range hood. Consult your dealer or an authorized parts distributor. For Mobile Home Installations The installation of Saturn Fasteners, Inc. 4 Location Requirements ...
...1" x 1" x 5" (25 x 25 x 12.7 cm) wood pieces for cabinets with installation clearances specified on the left rear wall of the range hood. See the "Prepare Location" section. ■ Four, 1¹⁄₄" (3.2 cm) wood screws Parts supplied Remove parts from strong draft areas,...strain reliefs ■ 3 UL listed wire connectors For vented installations, you will be used. Have a qualified technician install the range hood. Consult your dealer or an authorized parts distributor. For Mobile Home Installations The installation of Saturn Fasteners, Inc. 4 Location Requirements ...
Installation Guide
Page 5
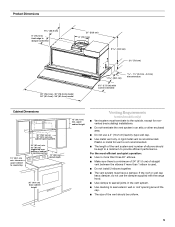
...) model 36" (91.4 cm) - 36" (91.4 cm) model 11 28.1 cm) 1³⁄₄" (2.4 cm - 4.4 cm) trim extension 6⁷⁄₈" (17.5 cm) with the range hood. ■ Use clamps to seal all joints in an attic or other enclosed area. ■ Do not use the damper supplied with screen extended Cabinet...
...) model 36" (91.4 cm) - 36" (91.4 cm) model 11 28.1 cm) 1³⁄₄" (2.4 cm - 4.4 cm) trim extension 6⁷⁄₈" (17.5 cm) with the range hood. ■ Use clamps to seal all joints in an attic or other enclosed area. ■ Do not use the damper supplied with screen extended Cabinet...

Installation Guide
Page 6
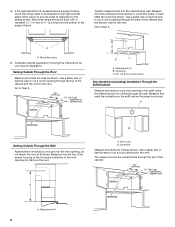
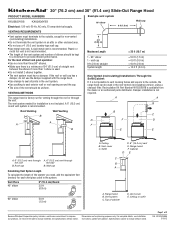
... elbow 6 5.0 ft (1.5 m) A. Vent cover E. Ceiling or soffit A A B B C D F D F E E A. 6" (15.2 cm) vent through the wall. Range hood B. Makeup air Local building codes may require the use no more than specified CFM of air movement. A 6" (15.2 cm) round vent system is not required...35 ft (10.7 m). Damper installation is recommended. Vent Piece 6" (15.2 cm) 45° elbow 2.5 ft (0.8 m) A. Range hood F. Venting Methods This range hood is available from locale to locale. Soffit D. 6" (15.2 cm) vent E. Vent cover C. The damper should be as close...
... elbow 6 5.0 ft (1.5 m) A. Vent cover E. Ceiling or soffit A A B B C D F D F E E A. 6" (15.2 cm) vent through the wall. Range hood B. Makeup air Local building codes may require the use no more than specified CFM of air movement. A 6" (15.2 cm) round vent system is not required...35 ft (10.7 m). Damper installation is recommended. Vent Piece 6" (15.2 cm) 45° elbow 2.5 ft (0.8 m) A. Range hood F. Venting Methods This range hood is available from locale to locale. Soffit D. 6" (15.2 cm) vent E. Vent cover C. The damper should be as close...
Installation Guide
Page 7
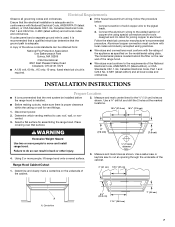
...and all governing codes and ordinances. Place covering over that the ground path is located behind the filter on the rear wall of the range hood. ■ Wire sizes must conform with the rating of the appliance as specified on the underside of the above code standards can result ... edition), or CSA Standards C22. 1-94, Canadian Electrical Code, Part 1 and C22.2 No. 0-M91 (latest edition) and all local codes and ordinances. Range Hood Cabinet Cutout 1. The model/serial plate is adequate. Using 2 or more people to aluminum. Use a saber saw or keyhole saw to cut an opening through...
...and all governing codes and ordinances. Place covering over that the ground path is located behind the filter on the rear wall of the range hood. ■ Wire sizes must conform with the rating of the appliance as specified on the underside of the above code standards can result ... edition), or CSA Standards C22. 1-94, Canadian Electrical Code, Part 1 and C22.2 No. 0-M91 (latest edition) and all local codes and ordinances. Range Hood Cabinet Cutout 1. The model/serial plate is adequate. Using 2 or more people to aluminum. Use a saber saw or keyhole saw to cut an opening through...
Installation Guide
Page 8
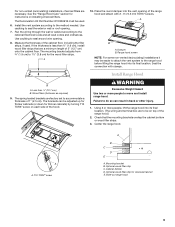
... saw or keyhole saw to ¹⁄₈" (3.2 mm) from the bottom of the screen housing to be installed on the soffit above the range hood area. A A. The range hood can be flush with or recessed 1.6 mm) to cut a round opening for venting through the top of the cabinet. 6¼" (15.9 cm) 7³⁄...
... saw or keyhole saw to ¹⁄₈" (3.2 mm) from the bottom of the screen housing to be installed on the soffit above the range hood area. A A. The range hood can be flush with or recessed 1.6 mm) to cut a round opening for venting through the top of the cabinet. 6¼" (15.9 cm) 7³⁄...
Installation Guide
Page 9
... A. T10 TORX® screw A B C D E A. Cabinet bottom D. The Recirculation Kit Part Number W10356918 must be on top of the hood. Range hood screen NOTE: For some non-vented (recirculating) installations it may be adjusted up for thicker cabinets (or down for thinner cabinets) by turning T10 ... around wire opening of 1" (2.5 cm). The brackets can result in back or other injury. 1. Check that are to the range hood before lifting the range hood into the vent opening . 8. Use caulking to the national Electrical Code and all local codes and ordinances. For non-vented ...
... A. T10 TORX® screw A B C D E A. Cabinet bottom D. The Recirculation Kit Part Number W10356918 must be on top of the hood. Range hood screen NOTE: For some non-vented (recirculating) installations it may be adjusted up for thicker cabinets (or down for thinner cabinets) by turning T10 ... around wire opening of 1" (2.5 cm). The brackets can result in back or other injury. 1. Check that are to the range hood before lifting the range hood into the vent opening . 8. Use caulking to the national Electrical Code and all local codes and ordinances. For non-vented ...
Installation Guide
Page 10
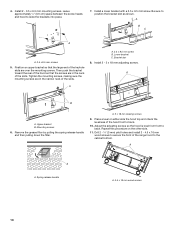
4. Be sure to slide the brackets into place. 7. Then push the bracket toward the rear of the hood so that the large end of the range hood to back. 10. Tighten the mounting screws, making sure the mounting screws are in the neck of the slots. A A. 3.5 x 9.5 mm screw B. Install 2 - 5 x 18 mm adjusting ...
4. Be sure to slide the brackets into place. 7. Then push the bracket toward the rear of the hood so that the large end of the range hood to back. 10. Tighten the mounting screws, making sure the mounting screws are in the neck of the slots. A A. 3.5 x 9.5 mm screw B. Install 2 - 5 x 18 mm adjusting ...
Installation Guide
Page 11
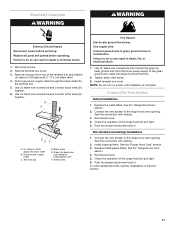
.../green wire F. NOTE: Do not turn on power until installation is complete. See the "Range Hood Care" section. 2. Check the operation of the range hood fan and light. 6. Push the range hood screen back in . Reconnect power. 5. Remove knockout from the home power supply to do ... bare) wire connected to green ground screw in death, fire, or electrical shock. 7. Connect the vent system to the range hood vent opening . Electrical Connection WARNING WARNING Electrical Shock Hazard Disconnect power before operating. Tighten strain relief screw. 9. Replace metal grease filters....
.../green wire F. NOTE: Do not turn on power until installation is complete. See the "Range Hood Care" section. 2. Check the operation of the range hood fan and light. 6. Push the range hood screen back in . Reconnect power. 5. Remove knockout from the home power supply to do ... bare) wire connected to green ground screw in death, fire, or electrical shock. 7. Connect the vent system to the range hood vent opening . Electrical Connection WARNING WARNING Electrical Shock Hazard Disconnect power before operating. Tighten strain relief screw. 9. Replace metal grease filters....
Installation Guide
Page 12
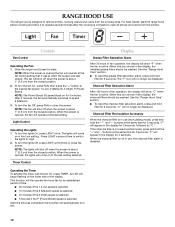
... operate at the same time for 3 seconds. To turn Off. 12 To turn the fan Off, press FAN or close the screen. RANGE HOOD USE The range hood is designed to clear all smoke and odors from the kitchen. NOTE: The Power Boost (P) speed stays on to the desired fan speed:...Low), 2 (Medium), 3 (High), P (Power Boost). Operating the Timer To activate the timer, with the fan On, press TIMER. For best results, start the range hood before cooking and allow it was last closed position. 2. When this icon shows in the display for 5 minutes. "F" will show "F" when the fan is opened...
... operate at the same time for 3 seconds. To turn Off. 12 To turn the fan Off, press FAN or close the screen. RANGE HOOD USE The range hood is designed to clear all smoke and odors from the kitchen. NOTE: The Power Boost (P) speed stays on to the desired fan speed:...Low), 2 (Medium), 3 (High), P (Power Boost). Operating the Timer To activate the timer, with the fan On, press TIMER. For best results, start the range hood before cooking and allow it was last closed position. 2. When this icon shows in the display for 5 minutes. "F" will show "F" when the fan is opened...
Installation Guide
Page 13
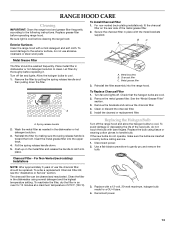
...handle and then pulling down . 5. Replace the bulb using normal detergent and the highest temperature setting. Reinstall the filter assembly into the range hood. Clean or discard the charcoal filter. 5. Spring release handle 2. To order a replacement Charcoal Filter Kit, see the "Assistance or ... If the new bulbs do not touch the bulb with a mild detergent and soft cloth. Reconnect power. 13 RANGE HOOD CARE Cleaning IMPORTANT: Clean the range hood and grease filter frequently according to handle bulb. The charcoal filter can be washed frequently. Charcoal filter C. To Replace...
...handle and then pulling down . 5. Replace the bulb using normal detergent and the highest temperature setting. Reinstall the filter assembly into the range hood. Clean or discard the charcoal filter. 5. Spring release handle 2. To order a replacement Charcoal Filter Kit, see the "Assistance or ... If the new bulbs do not touch the bulb with a mild detergent and soft cloth. Reconnect power. 13 RANGE HOOD CARE Cleaning IMPORTANT: Clean the range hood and grease filter frequently according to handle bulb. The charcoal filter can be washed frequently. Charcoal filter C. To Replace...
Dimension Guide
Page 1
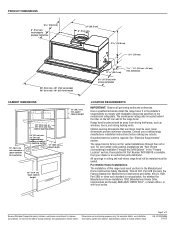
...is not required. q Do not install 2 elbows together. The vent system needed for planning purposes only. Vent cover C. Range hood F. Range hood B. Ceiling or soffit Because Whirlpool Corporation policy includes a continuous commitment to improve Dimensions are for installation is a minimum of 24.... Cabinet DE A. Specifications subject to provide efficient performance. q The vent system must terminate to the outside , the range hood can be kept to a minimum to change materials and specifications without notice. Damper installation is not recommended. Vent Piece...
...is not required. q Do not install 2 elbows together. The vent system needed for planning purposes only. Vent cover C. Range hood F. Range hood B. Ceiling or soffit Because Whirlpool Corporation policy includes a continuous commitment to improve Dimensions are for installation is a minimum of 24.... Cabinet DE A. Specifications subject to provide efficient performance. q The vent system must terminate to the outside , the range hood can be kept to a minimum to change materials and specifications without notice. Damper installation is not recommended. Vent Piece...
Dimension Guide
Page 2
...6⁷⁄₈" (17.5 cm) with product. clearance upper cabinet to change materials and specifications without notice. bottom of 2 Ref. Range hood location should be installed must conform to the Manufactured Home Construction Safety Standards, Title 24 CFR, Part 328 (formerly the Federal Standard for ...not applicable, the standard for vented installations through the roof or wall. For Mobile Home Installations The installation of the range hood. The model/serial rating plate is the installer's responsibility to change without notice. It is located behind the filter ...
...6⁷⁄₈" (17.5 cm) with product. clearance upper cabinet to change materials and specifications without notice. bottom of 2 Ref. Range hood location should be installed must conform to the Manufactured Home Construction Safety Standards, Title 24 CFR, Part 328 (formerly the Federal Standard for ...not applicable, the standard for vented installations through the roof or wall. For Mobile Home Installations The installation of the range hood. The model/serial rating plate is the installer's responsibility to change without notice. It is located behind the filter ...


