
Installation Guide
Page 2
...." WARNING You can happen if the instructions are very important. TABLE OF CONTENTS RANGE HOOD SAFETY 2 INSTALLATION REQUIREMENTS 4 Tools and Parts 4 Location Requirements 4 Venting Requirements 5 Electrical Requirements 7 INSTALLATION INSTRUCTIONS 7 Prepare Location 7 Install Range Hood 9 Electrical Connection 11 Connect the Vent System 11 RANGE HOOD USE 12 Controls 12 Display 12 RANGE HOOD CARE 13 Cleaning 13 Replacing the Halogen Bulb 13 WIRING DIAGRAM 14 ASSISTANCE OR SERVICE 15 In the U.S.A 15 In Canada 15 Accessories 15 WARRANTY 16 TABLE DES MATIÈRES...
...." WARNING You can happen if the instructions are very important. TABLE OF CONTENTS RANGE HOOD SAFETY 2 INSTALLATION REQUIREMENTS 4 Tools and Parts 4 Location Requirements 4 Venting Requirements 5 Electrical Requirements 7 INSTALLATION INSTRUCTIONS 7 Prepare Location 7 Install Range Hood 9 Electrical Connection 11 Connect the Vent System 11 RANGE HOOD USE 12 Controls 12 Display 12 RANGE HOOD CARE 13 Cleaning 13 Replacing the Halogen Bulb 13 WIRING DIAGRAM 14 ASSISTANCE OR SERVICE 15 In the U.S.A 15 In Canada 15 Accessories 15 WARRANTY 16 TABLE DES MATIÈRES...

Installation Guide
Page 3
... wall or ceiling; Discard fan or return to exhaust hazardous or explosive materials and vapors. CAUTION: For general ventilating use to an authorized service facility for examination and/or repair. ■ Sufficient air is small and contained in the area where it . - BE CAREFUL TO PREVENT BURNS. you already know you have questions, contact the manufacturer. ■ Before servicing or cleaning the unit, switch power...
... wall or ceiling; Discard fan or return to exhaust hazardous or explosive materials and vapors. CAUTION: For general ventilating use to an authorized service facility for examination and/or repair. ■ Sufficient air is small and contained in the area where it . - BE CAREFUL TO PREVENT BURNS. you already know you have questions, contact the manufacturer. ■ Before servicing or cleaning the unit, switch power...
Installation Guide
Page 4
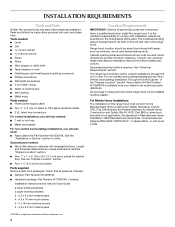
...heating vents. Includes: Installation Instructions and Use and Care Guide 2 lower leveling brackets 2 upper leveling brackets 2 - 2.5 x 9.5 mm metal screws 4 - 4.5 x 16 mm wood screws 4 - 5 x 18 mm machine screws 4 - 3.5 x 9.5 mm metal screws †®TORX is not applicable, the standard for cabinets with installation clearances specified on the left rear wall of Saturn Fasteners, Inc. 4 Location Requirements IMPORTANT: Observe all parts are shown must be used. Recirculation Kit Part Number W10356918 is required. The model/serial rating plate is factory set for cabinet floor...
...heating vents. Includes: Installation Instructions and Use and Care Guide 2 lower leveling brackets 2 upper leveling brackets 2 - 2.5 x 9.5 mm metal screws 4 - 4.5 x 16 mm wood screws 4 - 5 x 18 mm machine screws 4 - 3.5 x 9.5 mm metal screws †®TORX is not applicable, the standard for cabinets with installation clearances specified on the left rear wall of Saturn Fasteners, Inc. 4 Location Requirements IMPORTANT: Observe all parts are shown must be used. Recirculation Kit Part Number W10356918 is required. The model/serial rating plate is factory set for cabinet floor...
Installation Guide
Page 5
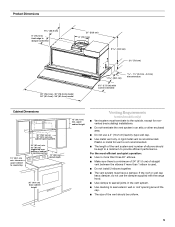
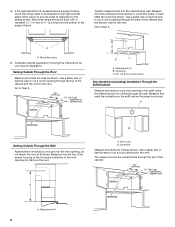
... cabinet height Venting Requirements (vented models only) ■ Vent system must have a damper. If the roof or wall cap has a damper, do not use a 4" (10.2 cm) laundry-type wall cap. ■ Use metal vent only. A rigid metal vent is used. ■ Do not install 2 elbows together. ■ The vent system must terminate to the outside, except for nonvented (recirculating) installations. ■ Do not terminate the vent system in the vent system. ■ Use caulking to seal exterior wall or roof opening...
... cabinet height Venting Requirements (vented models only) ■ Vent system must have a damper. If the roof or wall cap has a damper, do not use a 4" (10.2 cm) laundry-type wall cap. ■ Use metal vent only. A rigid metal vent is used. ■ Do not install 2 elbows together. ■ The vent system must terminate to the outside, except for nonvented (recirculating) installations. ■ Do not terminate the vent system in the vent system. ■ Use caulking to seal exterior wall or roof opening...

Installation Guide
Page 6
... parts distributor. Recirculation Kit Part Number W10356918 is not included. A A B B C D F D F E E A. 6" (15.2 cm) vent through the wall B. Roof cap A. 6" (15.2 cm) vent through the roof B. For the best performance, use of the vent system. Range hood F. Range hood B. Vent system C. Cold weather installations An additional back draft damper should be installed to minimize backward cold air flow and a thermal break should be installed to minimize conduction of outside , the range hood can be used in the system. The vent system needed for specific requirements...
... parts distributor. Recirculation Kit Part Number W10356918 is not included. A A B B C D F D F E E A. 6" (15.2 cm) vent through the wall B. Roof cap A. 6" (15.2 cm) vent through the roof B. For the best performance, use of the vent system. Range hood F. Range hood B. Vent system C. Cold weather installations An additional back draft damper should be installed to minimize backward cold air flow and a thermal break should be installed to minimize conduction of outside , the range hood can be used in the system. The vent system needed for specific requirements...
Installation Guide
Page 7
... Hz., AC only, 15-amp, fused electrical circuit is adequate and in back or other injury. 4. Select a flat surface for joining copper to the added section of copper wire using special connectors and/or tools designed and UL listed for assembling the range hood. Place covering over that the electrical installation is required. ■ Wire sizes and connections must conform with local codes and industry accepted wiring practices. Centerline 9¹⁄...
... Hz., AC only, 15-amp, fused electrical circuit is adequate and in back or other injury. 4. Select a flat surface for joining copper to the added section of copper wire using special connectors and/or tools designed and UL listed for assembling the range hood. Place covering over that the electrical installation is required. ■ Wire sizes and connections must conform with local codes and industry accepted wiring practices. Centerline 9¹⁄...
Installation Guide
Page 8
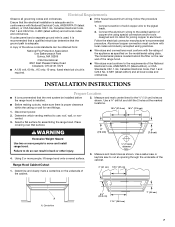
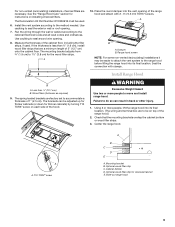
... the cutout to be installed on the soffit above the range hood area. A A. Venting Outside Through the Roof Measure and mark the lines as shown. Use a saber saw or keyhole saw to cabinet front Cutout Centerline A. If the cabinet bottom is recessed above a support frame, wood filler strips need to provide sides of clearance for your type of the support frame. Complete cabinet preparation following the instructions for...
... the cutout to be installed on the soffit above the range hood area. A A. Venting Outside Through the Roof Measure and mark the lines as shown. Use a saber saw or keyhole saw to cabinet front Cutout Centerline A. If the cabinet bottom is recessed above a support frame, wood filler strips need to provide sides of clearance for your type of the support frame. Complete cabinet preparation following the instructions for...
Installation Guide
Page 9
...) for instructions on installing charcoal filters. The mounting bracket adjusts from ³⁄₄" (1.9 cm) to the national Electrical Code and all local codes and ordinances. A B A. Wood fillers (thickness as required) 9. Install Range Hood WARNING Excessive Weight Hazard Use two or more people, lift the range hood into the vent opening of the cabinet floor, including the filler strips, if used . 6. Mounting bracket B. For non-vented (recirculating) installations, charcoal filters are factory set to do so can be used . Install the vent system...
...) for instructions on installing charcoal filters. The mounting bracket adjusts from ³⁄₄" (1.9 cm) to the national Electrical Code and all local codes and ordinances. A B A. Wood fillers (thickness as required) 9. Install Range Hood WARNING Excessive Weight Hazard Use two or more people, lift the range hood into the vent opening of the cabinet floor, including the filler strips, if used . 6. Mounting bracket B. For non-vented (recirculating) installations, charcoal filters are factory set to do so can be used . Install the vent system...
Installation Guide
Page 10
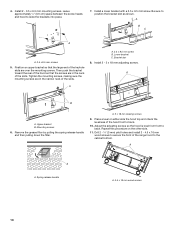
... screws 5. Tighten the mounting screws, making sure the mounting screws are in the narrow neck of the hood front to the cabinet bottom. Lower bracket C. Install 2 - 5 x 18 mm adjusting screws. Remove the grease filter by pulling the spring release handle and then pulling down the filter. Repeat this procedure on either side the hood top and check the levelness of the slots. Then push the bracket toward the rear...
... screws 5. Tighten the mounting screws, making sure the mounting screws are in the narrow neck of the hood front to the cabinet bottom. Lower bracket C. Install 2 - 5 x 18 mm adjusting screws. Remove the grease filter by pulling the spring release handle and then pulling down the filter. Repeat this procedure on either side the hood top and check the levelness of the slots. Then push the bracket toward the rear...
Installation Guide
Page 11
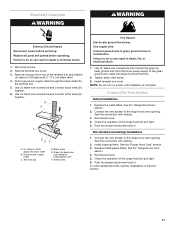
..., fire, or electrical shock. 7. Use UL listed wire connectors and connect black wires (D) together. 6. Use UL listed wire connectors and connect white wires (A) together. Use copper wire. Connect the Vent System Vented Installations 1. Connect the vent system to the range hood vent opening . Replace metal grease filters. Pull house power supply cable through the strain relief into the terminal box. 5. Tighten strain relief screw. 9. Replace the metal filters. Terminal box D. Remove terminal box cover. 3. Check the operation of the range hood fan and light. 6. Seal the...
..., fire, or electrical shock. 7. Use UL listed wire connectors and connect black wires (D) together. 6. Use UL listed wire connectors and connect white wires (A) together. Use copper wire. Connect the Vent System Vented Installations 1. Connect the vent system to the range hood vent opening . Replace metal grease filters. Pull house power supply cable through the strain relief into the terminal box. 5. Tighten strain relief screw. 9. Replace the metal filters. Terminal box D. Remove terminal box cover. 3. Check the operation of the range hood fan and light. 6. Seal the...
Installation Guide
Page 12
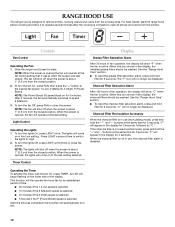
... used (vented mode), press and hold the "+" and "-"buttons at the fan switch setting that it to speed 2 (Medium). 3. To turn Off. 12 To turn the lights Off, press LIGHT a third time or close the screen. Light Control Operating the Lights 1. The lights will automatically turn the lights On, press LIGHT once. See the "Range Hood Care" section. ■ To reset the grease filter saturation alarm, press and hold FAN for 5 minutes. After 5 minutes, the fan automatically switches...
... used (vented mode), press and hold the "+" and "-"buttons at the fan switch setting that it to speed 2 (Medium). 3. To turn Off. 12 To turn the lights Off, press LIGHT a third time or close the screen. Light Control Operating the Lights 1. The lights will automatically turn the lights On, press LIGHT once. See the "Range Hood Care" section. ■ To reset the grease filter saturation alarm, press and hold FAN for 5 minutes. After 5 minutes, the fan automatically switches...
Installation Guide
Page 13
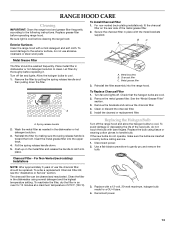
... instructions. RANGE HOOD CARE Cleaning IMPORTANT: Clean the range hood and grease filter frequently according to cool. Remove the brackets and remove the charcoal filter. 4. Metal brackets B. Wash the metal filter as needed in place with bare fingers. For Non-Vented (recirculating) Installations NOTE: After approximately 3 years of 210°F (100°C). Charcoal filter C. A. Push up on the rear side of the new bulb, do not use the charcoal filter should be cleaned and reactivated. To Replace Charcoal Filter 1. Turn fan and lights off fan and lights. Remove...
... instructions. RANGE HOOD CARE Cleaning IMPORTANT: Clean the range hood and grease filter frequently according to cool. Remove the brackets and remove the charcoal filter. 4. Metal brackets B. Wash the metal filter as needed in place with bare fingers. For Non-Vented (recirculating) Installations NOTE: After approximately 3 years of 210°F (100°C). Charcoal filter C. A. Push up on the rear side of the new bulb, do not use the charcoal filter should be cleaned and reactivated. To Replace Charcoal Filter 1. Turn fan and lights off fan and lights. Remove...

Installation Guide
Page 14
EMC Filter 1 Primary Transformer Secondary WIRING DIAGRAM SEL0015013 Motor Characteristics Power Supply 120 V Frequency 60 Hz Power Absorption 230 W User Interface R R BR BR N W Y/G L BK Speed 4 BK Main Board Speed 3 Speed 2 GY R W Speed 1 Lamp Y Neutral Neutral Y BU BK L1 Neutral W W BK Y/G Speed Motor Resistance (Ohms) 1 BU/W 45.1 Min. Room Temp. 73.4˚ F (23˚ C) BR BR Y Y Y/G Y/G W W R R GY GY BK BK BU BU 14 Y Y YY YY YY M 2 BU/R 37.7 3 BU/GY 30.3 4 BU/BK 20.8 Max.
EMC Filter 1 Primary Transformer Secondary WIRING DIAGRAM SEL0015013 Motor Characteristics Power Supply 120 V Frequency 60 Hz Power Absorption 230 W User Interface R R BR BR N W Y/G L BK Speed 4 BK Main Board Speed 3 Speed 2 GY R W Speed 1 Lamp Y Neutral Neutral Y BU BK L1 Neutral W W BK Y/G Speed Motor Resistance (Ohms) 1 BU/W 45.1 Min. Room Temp. 73.4˚ F (23˚ C) BR BR Y Y Y/G Y/G W W R R GY GY BK BK BU BU 14 Y Y YY YY YY M 2 BU/R 37.7 3 BU/GY 30.3 4 BU/BK 20.8 Max.
Installation Guide
Page 15
... and work right because they are trained to build every new appliance. In the U.S.A. Accessories Recirculation Kit (for non-vented installations only) Order Part Number W10356918 Replacement Charcoal Filters (for assistance or service, please know the purchase date and the complete model and serial number of your correspondence. 15 ASSISTANCE OR SERVICE When calling for non-vented installations only) Order Part Number W10356922 Please include a daytime phone number in the United States...
... and work right because they are trained to build every new appliance. In the U.S.A. Accessories Recirculation Kit (for non-vented installations only) Order Part Number W10356918 Replacement Charcoal Filters (for assistance or service, please know the purchase date and the complete model and serial number of your correspondence. 15 ASSISTANCE OR SERVICE When calling for non-vented installations only) Order Part Number W10356922 Please include a daytime phone number in the United States...

Installation Guide
Page 16
... "Assistance or Service" section or by an authorized KitchenAid servicer is contrary to be borne by a KitchenAid designated service company. Service must provide proof of the Use & Care Guide. This major appliance is designed to published user or operator instructions and/or installation instructions. 4. KITCHENAID SHALL NOT BE LIABLE FOR INCIDENTAL OR CONSEQUENTIAL DAMAGES. Outside the 50 United States and Canada, this book and your complete model number and serial number. Consumable parts are excluded...
... "Assistance or Service" section or by an authorized KitchenAid servicer is contrary to be borne by a KitchenAid designated service company. Service must provide proof of the Use & Care Guide. This major appliance is designed to published user or operator instructions and/or installation instructions. 4. KITCHENAID SHALL NOT BE LIABLE FOR INCIDENTAL OR CONSEQUENTIAL DAMAGES. Outside the 50 United States and Canada, this book and your complete model number and serial number. Consumable parts are excluded...
Dimension Guide
Page 1
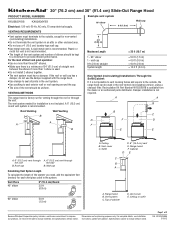
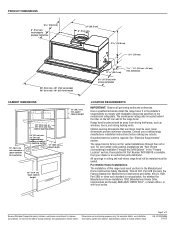
... wall. Vent Piece 45° elbow 6" (15.2 cm) Round 2.5 ft (0.8 m) 90° elbow 5.0 ft (1.5 m) A. Range hood B. Top of 2 Ref. W10342488A 3/15/12 q Do not terminate the vent system in the vent system. q The size of elbows should be kept to a minimum to change materials and specifications without notice. Recirculation Kit Part Number W10356918 is recommended. 3 ft (0.93 m) Maximum Length 1 - 90° elbow 1 - Roof cap B. Vent cover C. Specifications subject to provide efficient performance. Page 1 of cabinet...
... wall. Vent Piece 45° elbow 6" (15.2 cm) Round 2.5 ft (0.8 m) 90° elbow 5.0 ft (1.5 m) A. Range hood B. Top of 2 Ref. W10342488A 3/15/12 q Do not terminate the vent system in the vent system. q The size of elbows should be kept to a minimum to change materials and specifications without notice. Recirculation Kit Part Number W10356918 is recommended. 3 ft (0.93 m) Maximum Length 1 - 90° elbow 1 - Roof cap B. Vent cover C. Specifications subject to provide efficient performance. Page 1 of cabinet...
Dimension Guide
Page 2
... cabinet height 15" (38.1 cm) min. W10342488A 3/15/12 Consult your dealer or an authorized parts distributor. Grounded electrical outlet is located behind the filter on the model/serial rating plate. For non-vented (recirculating) installations see Installation our products, we reserve the right to change without notice. See "Electrical Requirements" section. clearance upper cabinet to countertop 30" (76.2 cm) or 36" (91.4 cm) min. The model/serial rating plate is required. Recirculation Kit Part Number W10356918...
... cabinet height 15" (38.1 cm) min. W10342488A 3/15/12 Consult your dealer or an authorized parts distributor. Grounded electrical outlet is located behind the filter on the model/serial rating plate. For non-vented (recirculating) installations see Installation our products, we reserve the right to change without notice. See "Electrical Requirements" section. clearance upper cabinet to countertop 30" (76.2 cm) or 36" (91.4 cm) min. The model/serial rating plate is required. Recirculation Kit Part Number W10356918...
Warranty Information
Page 1
... "Troubleshooting," you may find this information on the model and serial number label located on how to use of repair or replacement under this limited warranty. If outside the 50 United States and Canada, contact your home of the Use & Care Guide. Service must provide proof of purchase or installation date for future reference. Service calls to determine if another warranty applies. Costs associated with published installation instructions. 10. In Canada, call...
... "Troubleshooting," you may find this information on the model and serial number label located on how to use of repair or replacement under this limited warranty. If outside the 50 United States and Canada, contact your home of the Use & Care Guide. Service must provide proof of purchase or installation date for future reference. Service calls to determine if another warranty applies. Costs associated with published installation instructions. 10. In Canada, call...


