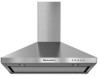
Use & Care Guide
Page 3
... "WARNING." These words mean: DANGER You can kill or hurt you how to cause cancer. WARNING You can happen if the instructions are very important. RANGE HOOD SAFETY Your safety and the safety of others . Always read and obey all safety messages. This is , tell you and others are not followed. All...
... "WARNING." These words mean: DANGER You can kill or hurt you how to cause cancer. WARNING You can happen if the instructions are very important. RANGE HOOD SAFETY Your safety and the safety of others . Always read and obey all safety messages. This is , tell you and others are not followed. All...

Use & Care Guide
Page 4
...solid-state speed control device. Always use to prevent power from being called. - aBased on accidentally. WARNING: TO REDUCE THE RISK OF A RANGE TOP GREASE FIRE: ■ Never leave surface units unattended at service panel and lock the service disconnecting means to exhaust hazardous or explosive materials..., OBSERVE THE FOLLOWING: ■ Use this fan with any fan with a close fitting lid, cookie sheet, or metal tray, then turn hood ON when cooking at high heat or when flambeing food (i.e. CAUTION: For general ventilating use this unit only in the area where it . -
...solid-state speed control device. Always use to prevent power from being called. - aBased on accidentally. WARNING: TO REDUCE THE RISK OF A RANGE TOP GREASE FIRE: ■ Never leave surface units unattended at service panel and lock the service disconnecting means to exhaust hazardous or explosive materials..., OBSERVE THE FOLLOWING: ■ Use this fan with any fan with a close fitting lid, cookie sheet, or metal tray, then turn hood ON when cooking at high heat or when flambeing food (i.e. CAUTION: For general ventilating use this unit only in the area where it . -

Use & Care Guide
Page 5
...required tools and parts before starting installation. See "Assistance or Service" section to order. Have a qualified technician install the range hood. It is recommended for non-vented (recirculating) installations only. Read and follow the instructions provided with a maximum total ...rating of Acument Intellectual Properties, LLC. length required is required. Cabinet opening dimensions that all governing codes and ordinances. This range hood is the installer's responsibility to comply with 1¼" (3.0 cm 9.5 mm), and 7.9 mm) drill bits ■ Pencil ■...
...required tools and parts before starting installation. See "Assistance or Service" section to order. Have a qualified technician install the range hood. It is recommended for non-vented (recirculating) installations only. Read and follow the instructions provided with a maximum total ...rating of Acument Intellectual Properties, LLC. length required is required. Cabinet opening dimensions that all governing codes and ordinances. This range hood is the installer's responsibility to comply with 1¼" (3.0 cm 9.5 mm), and 7.9 mm) drill bits ■ Pencil ■...
Use & Care Guide
Page 6
...a Stainless Steel Chimney Extension Kit Part Number W10337357 is a minimum of 24" (61 cm) of straight vent between the bottom of the range hood and the cooking surface. Venting Requirements (vented models only) ■ Vent system must terminate to the outdoors, except for specific requirements in the... temperatures as possible to where the vent system enters the heated portion of the house. The chimney extension replaces the upper chimney shipped with the range hood. ■ Use caulking to seal exterior wall or roof opening is needed . A 6" (15.2 cm) round vent system is 6" (15.2 ...
...a Stainless Steel Chimney Extension Kit Part Number W10337357 is a minimum of 24" (61 cm) of straight vent between the bottom of the range hood and the cooking surface. Venting Requirements (vented models only) ■ Vent system must terminate to the outdoors, except for specific requirements in the... temperatures as possible to where the vent system enters the heated portion of the house. The chimney extension replaces the upper chimney shipped with the range hood. ■ Use caulking to seal exterior wall or roof opening is needed . A 6" (15.2 cm) round vent system is 6" (15.2 ...

Use & Care Guide
Page 7
... a qualified electrician determine that the electrical installation is used in conformance with the rating of the appliance as specified on the rear wall of the range hood. ■ Wire sizes must conform with National Electrical Code, ANSI/NFPA 70 (latest edition), or CSA Standards C22.1-94, Canadian Electrical Code, Part 1 and C22...
... a qualified electrician determine that the electrical installation is used in conformance with the rating of the appliance as specified on the rear wall of the range hood. ■ Wire sizes must conform with National Electrical Code, ANSI/NFPA 70 (latest edition), or CSA Standards C22.1-94, Canadian Electrical Code, Part 1 and C22...

Use & Care Guide
Page 8
...(3.2 cm) hole at all necessary cuts in place, aligning the template centerline and bottom of fire and electric shock, install this range hood only with the centerline marked on the wall. Centerline B. Attach vent cover support bracket to order. 8 Determine the required height... D. 5 x 45 mm screws 4. Determine which venting method to seal all openings. Drill ³⁄₈" (9.5 mm) holes for assembling the range hood. Determine and mark the centerline on wall C. Place covering over that comes with either an internal or an inline (external) blower motor system. B ...
...(3.2 cm) hole at all necessary cuts in place, aligning the template centerline and bottom of fire and electric shock, install this range hood only with the centerline marked on the wall. Centerline B. Attach vent cover support bracket to order. 8 Determine the required height... D. 5 x 45 mm screws 4. Determine which venting method to seal all openings. Drill ³⁄₈" (9.5 mm) holes for assembling the range hood. Determine and mark the centerline on wall C. Place covering over that comes with either an internal or an inline (external) blower motor system. B ...

Use & Care Guide
Page 9
...mm screws D. 4 - 3.5 x 6.5 mm screws 2. B A C A. A B X C D E A. Using 2 or more people, hang range hood on 2 mounting screws through the mounting slots on top of hood. Lower mounting screws 2. Check that back draft dampers work properly. Vent cover bracket B. 2.9 x 6.5 mm screws C. Vent duct E. Mounting slots C.... Deflector 2. Spacer B. X = length to the bottom of the hood outlet. Install Range Hood 1. A B For vented installations only: 1. Fit vent system over the exhaust outlet from the bottom of the ...
...mm screws D. 4 - 3.5 x 6.5 mm screws 2. B A C A. A B X C D E A. Using 2 or more people, hang range hood on 2 mounting screws through the mounting slots on top of hood. Lower mounting screws 2. Check that back draft dampers work properly. Vent cover bracket B. 2.9 x 6.5 mm screws C. Vent duct E. Mounting slots C.... Deflector 2. Spacer B. X = length to the bottom of the hood outlet. Install Range Hood 1. A B For vented installations only: 1. Fit vent system over the exhaust outlet from the bottom of the ...

Use & Care Guide
Page 10
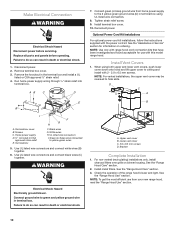
... listed or CSA approved ¹⁄₂" strain relief. 4. Connect green (or bare) ground wire from your new range hood, read the "Range Hood Use" section. 10 When using UL listed wire connectors. 8. NOTE: For vented installations, the upper vent cover may ...Shock Hazard Electrically ground blower. Optional Power Cord Kit Installations For optional power cord kit installations, follow the instructions supplied with this model range hood. See the "Range Hood Care" section. 2. Install metal filters. AB C D E B I . Use UL listed wire connectors and connect black wires (C)...
... listed or CSA approved ¹⁄₂" strain relief. 4. Connect green (or bare) ground wire from your new range hood, read the "Range Hood Use" section. 10 When using UL listed wire connectors. 8. NOTE: For vented installations, the upper vent cover may ...Shock Hazard Electrically ground blower. Optional Power Cord Kit Installations For optional power cord kit installations, follow the instructions supplied with this model range hood. See the "Range Hood Care" section. 2. Install metal filters. AB C D E B I . Use UL listed wire connectors and connect black wires (C)...

Use & Care Guide
Page 11
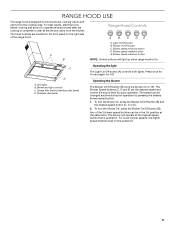
... On and again for quiet operation. Operating the blower The Blower On/Off button (B) turns the blower On or Off. Any of the range hood. Blower speed maximum button NOTE: Control buttons will operate at the same time. C D A. To turn the blower Off, press the Blower On/...Off button (B). RANGE HOOD USE The range hood is complete to remove smoke, cooking vapors and odors from the kitchen. The hood controls are located on the front panel on the right side of the 3 blower speed buttons can be...
... On and again for quiet operation. Operating the blower The Blower On/Off button (B) turns the blower On or Off. Any of the range hood. Blower speed maximum button NOTE: Control buttons will operate at the same time. C D A. To turn the blower Off, press the Blower On/...Off button (B). RANGE HOOD USE The range hood is complete to remove smoke, cooking vapors and odors from the kitchen. The hood controls are located on the front panel on the right side of the 3 blower speed buttons can be...
Use & Care Guide
Page 12
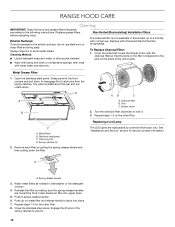
... marks. Reinstall the filter by a service technician only. Push up to latch into upper track. 5. RANGE HOOD CARE Cleaning IMPORTANT: Clean the hood and grease filters frequently according to secure. 12 Replace with normal use steel wool or soap-filled scouring ...Insert aluminum filter into place. 7. Blower motor 2. Wash metal filters as needed in spring release handle. 6. Replace grease filters before operating hood. Catch pins (2) D. Remove each filter by pulling the spring release handle and then pulling down . Repeat steps 1-2 on the other ...
... marks. Reinstall the filter by a service technician only. Push up to latch into upper track. 5. RANGE HOOD CARE Cleaning IMPORTANT: Clean the hood and grease filters frequently according to secure. 12 Replace with normal use steel wool or soap-filled scouring ...Insert aluminum filter into place. 7. Blower motor 2. Wash metal filters as needed in spring release handle. 6. Replace grease filters before operating hood. Catch pins (2) D. Remove each filter by pulling the spring release handle and then pulling down . Repeat steps 1-2 on the other ...

Installation Guide
Page 3
... California to cause birth defects or other reproductive harm. 3 This symbol alerts you to potential hazards that can happen if the instructions are very important. RANGE HOOD SAFETY Your safety and the safety of others . All safety messages will tell you what can kill or hurt you what the potential hazard is...
... California to cause birth defects or other reproductive harm. 3 This symbol alerts you to potential hazards that can happen if the instructions are very important. RANGE HOOD SAFETY Your safety and the safety of others . All safety messages will tell you what can kill or hurt you what the potential hazard is...

Installation Guide
Page 4
.... WARNING: TO REDUCE THE RISK OF INJURY TO PERSONS IN THE EVENT OF A RANGE TOP GREASE FIRE, OBSERVE THE FOLLOWING:a ■ SMOTHER FLAMES with a close fitting lid, cookie sheet, or metal tray, then turn hood ON when cooking at high heat or when flambeing food (i.e. You can fight the... burning equipment to accumulate on low or medium settings. ■ Always turn off at high settings. WARNING: TO REDUCE THE RISK OF A RANGE TOP GREASE FIRE: ■ Never leave surface units unattended at service panel and lock the service disconnecting means to exhaust hazardous or explosive materials ...
.... WARNING: TO REDUCE THE RISK OF INJURY TO PERSONS IN THE EVENT OF A RANGE TOP GREASE FIRE, OBSERVE THE FOLLOWING:a ■ SMOTHER FLAMES with a close fitting lid, cookie sheet, or metal tray, then turn hood ON when cooking at high heat or when flambeing food (i.e. You can fight the... burning equipment to accumulate on low or medium settings. ■ Always turn off at high settings. WARNING: TO REDUCE THE RISK OF A RANGE TOP GREASE FIRE: ■ Never leave surface units unattended at service panel and lock the service disconnecting means to exhaust hazardous or explosive materials ...

Installation Guide
Page 5
... the "Assistance or Service" section to order. ■ 6" (15.2 cm) diameter round metal vent duct - Canopy hood location should be used. This range hood is recommended for Manufactured Home Installation 1982 (Manufactured Home Sites, Communities and Setups) ANSI A225.1/NFPA 501A, or latest edition,.... Parts supplied Remove parts from strong draft areas, such as windows, doors and strong heating vents. Have a qualified technician install the range hood. Tools needed ■ Home power supply cable ■ ½" (12.7 mm) UL listed or CSA approved strain relief ■...
... the "Assistance or Service" section to order. ■ 6" (15.2 cm) diameter round metal vent duct - Canopy hood location should be used. This range hood is recommended for Manufactured Home Installation 1982 (Manufactured Home Sites, Communities and Setups) ANSI A225.1/NFPA 501A, or latest edition,.... Parts supplied Remove parts from strong draft areas, such as windows, doors and strong heating vents. Have a qualified technician install the range hood. Tools needed ■ Home power supply cable ■ ½" (12.7 mm) UL listed or CSA approved strain relief ■...

Installation Guide
Page 6
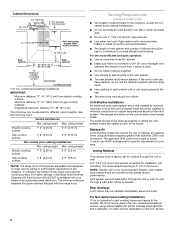
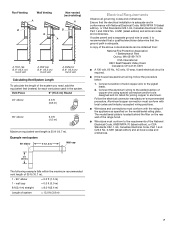
... Make sure there is used in an attic or other enclosed area. ■ Do not use the damper supplied with the range hood. Cold Weather Installations An additional back draft damper should be installed to minimize backward cold air flow and a thermal break should...reduce performance. ceiling height Electric cooking surface 7' 5" (2.26 m) 9' 6" (2.9 m) Gas cooking surface 7' 8" (2.34 m) 9' 6" (2.9 m) *NOTE: The range hood chimneys are adjustable and designed to the outside temperatures as part of the vent system. To vent through the roof or wall. ceiling height Electric...
... Make sure there is used in an attic or other enclosed area. ■ Do not use the damper supplied with the range hood. Cold Weather Installations An additional back draft damper should be installed to minimize backward cold air flow and a thermal break should...reduce performance. ceiling height Electric cooking surface 7' 5" (2.26 m) 9' 6" (2.9 m) Gas cooking surface 7' 8" (2.34 m) 9' 6" (2.9 m) *NOTE: The range hood chimneys are adjustable and designed to the outside temperatures as part of the vent system. To vent through the roof or wall. ceiling height Electric...
Installation Guide
Page 7
... section of system = 13.0 ft (3.9 m) 7 Roof Venting Wall Venting A Non-vented (recirculating) A B B B A A. Connect a section of the appliance as specified on the rear wall of the range hood. ■ Wire sizes must conform with National Electrical Code, ANSI/NFPA 70 (latest edition), or CSA Standards C22.1-94, Canadian Electrical Code, Part 1 and C22...
... section of system = 13.0 ft (3.9 m) 7 Roof Venting Wall Venting A Non-vented (recirculating) A B B B A A. Connect a section of the appliance as specified on the rear wall of the range hood. ■ Wire sizes must conform with National Electrical Code, ANSI/NFPA 70 (latest edition), or CSA Standards C22.1-94, Canadian Electrical Code, Part 1 and C22...
Installation Guide
Page 8
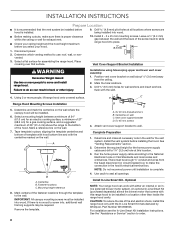
...wall anchors and insert anchors flush with the wall. Vent Cover Support Bracket Installation WARNING Excessive Weight Hazard Use two or more people, lift range hood onto covered surface. Position vent cover bracket on wall about ¹⁄₈" (3.0 mm) away from the fused disconnect (or circuit ...between a minimum of 24" (61.0 cm) for an electric cooking surface, a minimum of the screw head to do so can work with this range hood to make all openings. Place covering over that comes with either an internal or an inline (external) blower motor system. Mark a reference line on...
...wall anchors and insert anchors flush with the wall. Vent Cover Support Bracket Installation WARNING Excessive Weight Hazard Use two or more people, lift range hood onto covered surface. Position vent cover bracket on wall about ¹⁄₈" (3.0 mm) away from the fused disconnect (or circuit ...between a minimum of 24" (61.0 cm) for an electric cooking surface, a minimum of the screw head to do so can work with this range hood to make all openings. Place covering over that comes with either an internal or an inline (external) blower motor system. Mark a reference line on...
Installation Guide
Page 9
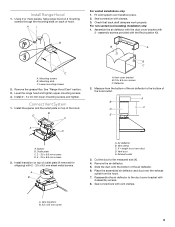
...Check that back draft dampers work properly. For non-vented (recirculating) installation only: 1. B A C A. Remove the grease filter. Level the range hood and tighten upper mounting screws. 4. Deflector 2. A B X C D E A. Vent duct E. Cut the duct to the duct cover ... the spacer and the outlet plate on top of the hood outlet. Exhaust outlet 3. Vent transition B. 3.5 x 9.5 mm screw 9 Measure from the hood. 7. Seal connections with clamps. 3. Install Range Hood 1. Seal connection with vent clamps. See "Range Hood Care" section. 3. Spacer B. A. Lower mounting screws ...
...Check that back draft dampers work properly. For non-vented (recirculating) installation only: 1. B A C A. Remove the grease filter. Level the range hood and tighten upper mounting screws. 4. Deflector 2. A B X C D E A. Vent duct E. Cut the duct to the duct cover ... the spacer and the outlet plate on top of the hood outlet. Exhaust outlet 3. Vent transition B. 3.5 x 9.5 mm screw 9 Measure from the hood. 7. Seal connections with clamps. 3. Install Range Hood 1. Seal connection with vent clamps. See "Range Hood Care" section. 3. Spacer B. A. Lower mounting screws ...
Installation Guide
Page 10
.... 8. Upper vent cover B. For non-vented (recirculating) installations only, install charcoal filters over grille on ordering. See the "Range Hood Care" section. 2. See the "Range Hood Use" section. NOTE: To get the most efficient use with 2 - 2.9 x 6.5 mm screws. Run home power supply ... the "Assistance or Service" section for use from home power supply to ceiling and install with this model range hood. Install metal filters. Check the operation of the range hood blower and light. Screws C. White wires H. NOTE: Use only with the power cord kit. Bracket Complete...
.... 8. Upper vent cover B. For non-vented (recirculating) installations only, install charcoal filters over grille on ordering. See the "Range Hood Care" section. 2. See the "Range Hood Use" section. NOTE: To get the most efficient use with 2 - 2.9 x 6.5 mm screws. Run home power supply ... the "Assistance or Service" section for use from home power supply to ceiling and install with this model range hood. Install metal filters. Check the operation of the range hood blower and light. Screws C. White wires H. NOTE: Use only with the power cord kit. Bracket Complete...
Installation Guide
Page 11
... C. Press once for On and again for quiet operation. The speed can be changed anytime during fan operation by pressing the desired blower speed button. 1. Range Hood Controls A B C DE A B A. Blower speed maximum button NOTE: Control buttons will operate at the same time. LED lights B. To turn the ... pushed in . 11 The Blower Speed buttons (C, D and E) set the desired speed and control the sound level for Off. Any of the range hood. Blower On/Off button C. Operating the blower The Blower On/Off button (B) turns the blower On or Off. To turn the blower On,...
... C. Press once for On and again for quiet operation. The speed can be changed anytime during fan operation by pressing the desired blower speed button. 1. Range Hood Controls A B C DE A B A. Blower speed maximum button NOTE: Control buttons will operate at the same time. LED lights B. To turn the ... pushed in . 11 The Blower Speed buttons (C, D and E) set the desired speed and control the sound level for Off. Any of the range hood. Blower On/Off button C. Operating the blower The Blower On/Off button (B) turns the blower On or Off. To turn the blower On,...

Installation Guide
Page 12
... Charcoal Filter Kit Number W10272068. Spring catches (2) 2. Blower motor 2. Push in dishwasher or hot detergent solution. 4. RANGE HOOD CARE Cleaning IMPORTANT: Clean the hood and grease filters frequently according to lock it. 3. Replace grease filters before operating hood. Cleaning Method: ■ Liquid detergent soap and water, or all-purpose cleanser Non-Vented (Recirculating) Installation...
... Charcoal Filter Kit Number W10272068. Spring catches (2) 2. Blower motor 2. Push in dishwasher or hot detergent solution. 4. RANGE HOOD CARE Cleaning IMPORTANT: Clean the hood and grease filters frequently according to lock it. 3. Replace grease filters before operating hood. Cleaning Method: ■ Liquid detergent soap and water, or all-purpose cleanser Non-Vented (Recirculating) Installation...


