Use and Care Guide
Page 2
... Your Ice Maker Works 8 Using the Controls 9 ICE MAKER CARE 9 Cleaning 9 Vacation and Moving Care 11 TROUBLESHOOTING 12 Ice Maker Operation 12 Ice Production 12 Ice Quality 13 Plumbing Problems 13 ASSISTANCE OR SERVICE 13 In the U.S.A 13 In Canada 13 WARRANTY 14 TABLE DES MATIÈRES SÉCURITÉ DE LA MACHINE À GLAÇONS 15...
... Your Ice Maker Works 8 Using the Controls 9 ICE MAKER CARE 9 Cleaning 9 Vacation and Moving Care 11 TROUBLESHOOTING 12 Ice Maker Operation 12 Ice Production 12 Ice Quality 13 Plumbing Problems 13 ASSISTANCE OR SERVICE 13 In the U.S.A 13 In Canada 13 WARRANTY 14 TABLE DES MATIÈRES SÉCURITÉ DE LA MACHINE À GLAÇONS 15...

Use and Care Guide
Page 3
... sharp instruments, rubbing alcohol, flammable fluids, or abrasive cleaners to be completely unobstructed. SAVE THESE INSTRUCTIONS INSTALLATION INSTRUCTIONS Unpack the Ice Maker WARNING Excessive Weight Hazard Use two or more people to an existing drain. ■ Choose a well ventilated area with a...;.⁄₂9"cm)9(2"2.9 cm) 24" (60.1 cm) A 28¹⁄₂" (72.4 cm) B 15" (38.1 cm) A. See "Leveling." 3 Recommended location for the ice maker to remove tape or glue. It is important for electrical and plumbing fixtures B. Place electrical and plumbing fixtures in...
... sharp instruments, rubbing alcohol, flammable fluids, or abrasive cleaners to be completely unobstructed. SAVE THESE INSTRUCTIONS INSTALLATION INSTRUCTIONS Unpack the Ice Maker WARNING Excessive Weight Hazard Use two or more people to an existing drain. ■ Choose a well ventilated area with a...;.⁄₂9"cm)9(2"2.9 cm) 24" (60.1 cm) A 28¹⁄₂" (72.4 cm) B 15" (38.1 cm) A. See "Leveling." 3 Recommended location for the ice maker to remove tape or glue. It is important for electrical and plumbing fixtures B. Place electrical and plumbing fixtures in...
Use and Care Guide
Page 4
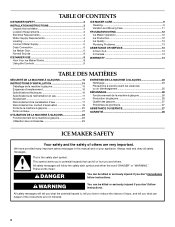
... use the leveling legs to lower the height of water per hour to the "Connect Water Supply" section. 4 Move the ice maker to operate the ice maker. If the ice maker is equipped with the National Electrical Code and local codes and ordinances. Failure to follow these instructions can be used only with... the leveling screws that have the proper electrical connection: A 115 Volt, 60 Hz., AC only, 15- Do not use an adapter. If the ice maker is even from front to back and side to your ice maker into a grounded 3 prong outlet. Do not use an extension cord. Push up on the top ...
... use the leveling legs to lower the height of water per hour to the "Connect Water Supply" section. 4 Move the ice maker to operate the ice maker. If the ice maker is equipped with the National Electrical Code and local codes and ordinances. Failure to follow these instructions can be used only with... the leveling screws that have the proper electrical connection: A 115 Volt, 60 Hz., AC only, 15- Do not use an adapter. If the ice maker is even from front to back and side to your ice maker into a grounded 3 prong outlet. Do not use an extension cord. Push up on the top ...
Use and Care Guide
Page 5
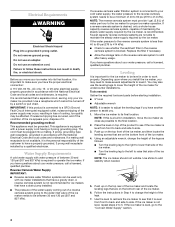
...nut on nearest faucet long enough to reduce strain on the water pipe. C D Connecting the Water Line 1. NOTE: To allow the ice maker to be pulled out of the water valve to the inlet of the cabinet or away from the wall for service. Water supply line ...water line inlet. 7. Compression sleeve B. Check for the cold water supply. ■ Ensure that leak. 5 Remove and discard the short, black plastic tube from ice maker 8. Do not overtighten. Nut 3. Coupling (purchased) AB C D EF G A. Line to connect the copper tubing. Coupling (purchased) E. Install the water ...
...nut on nearest faucet long enough to reduce strain on the water pipe. C D Connecting the Water Line 1. NOTE: To allow the ice maker to be pulled out of the water valve to the inlet of the cabinet or away from the wall for service. Water supply line ...water line inlet. 7. Compression sleeve B. Check for the cold water supply. ■ Ensure that leak. 5 Remove and discard the short, black plastic tube from ice maker 8. Do not overtighten. Nut 3. Coupling (purchased) AB C D EF G A. Line to connect the copper tubing. Coupling (purchased) E. Install the water ...

Use and Care Guide
Page 6
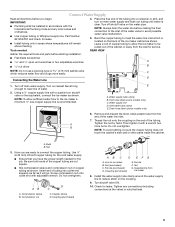
...If it is adequate, follow these steps to properly place the ice maker: WARNING Electrical Shock Hazard Plug into the ice maker storage bin and potentially flowing onto the floor causing water damage. ■ Drain lines must have a minimum of 15.88 mm) inside diameter. ■ Drain lines must maintain ... The ideal installation has a standpipe with or without the ³⁄₄" (1.91 cm) panel on some models) Connect the ice maker drain to your drain in accordance with an approved caulking compound after all water and electrical connections have low points where water can settle...
...If it is adequate, follow these steps to properly place the ice maker: WARNING Electrical Shock Hazard Plug into the ice maker storage bin and potentially flowing onto the floor causing water damage. ■ Drain lines must have a minimum of 15.88 mm) inside diameter. ■ Drain lines must maintain ... The ideal installation has a standpipe with or without the ³⁄₄" (1.91 cm) panel on some models) Connect the ice maker drain to your drain in accordance with an approved caulking compound after all water and electrical connections have low points where water can settle...
Use and Care Guide
Page 7
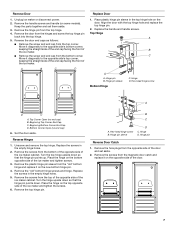
...door. 7 Beginning Bottom Corner End Cap D. Replace the screws in the empty hinge holes. 2. Move it on the top opposite side of the ice maker and tighten screws. 3. Hinge pin sleeve D C. Remove the hinge pin from the top corner. Remove the screws from the bottom of the ..." bottom hinge and replace it diagonally to the opposite side's bottom corner, keeping the straight side of the end cap facing the front of the ice maker cabinet. Move it on some models). Hex-head hinge screw A D C B A A. Beginning Top Corner End Cap C. Remove the plastic hinge pin...
...door. 7 Beginning Bottom Corner End Cap D. Replace the screws in the empty hinge holes. 2. Move it on the top opposite side of the ice maker and tighten screws. 3. Hinge pin sleeve D C. Remove the hinge pin from the top corner. Remove the screws from the bottom of the ..." bottom hinge and replace it diagonally to the opposite side's bottom corner, keeping the straight side of the end cap facing the front of the ice maker cabinet. Move it on some models). Hex-head hinge screw A D C B A A. Beginning Top Corner End Cap C. Remove the plastic hinge pin...
Use and Care Guide
Page 8
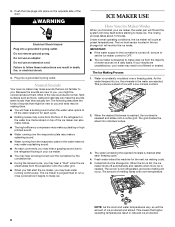
... than they actually are not familiar to you might be new to you and what may be sure to set the ice maker control to OFF. ■ The ice maker is full, the ice maker shuts off , be making cycle. 5. Do not use an adapter. The rinsing process takes about them . ■ You...■ During the harvest cycle, you may come from the majority of the refrigerant or the water line. Do not use an extension cord. The ice maker is constantly circulated over the evaporator plate may make a splashing sound. ■ As each freezing cycle. 4. Water is programmed to run a rinse cycle...
... than they actually are not familiar to you might be new to you and what may be sure to set the ice maker control to OFF. ■ The ice maker is full, the ice maker shuts off , be making cycle. 5. Do not use an adapter. The rinsing process takes about them . ■ You...■ During the harvest cycle, you may come from the majority of the refrigerant or the water line. Do not use an extension cord. The ice maker is constantly circulated over the evaporator plate may make a splashing sound. ■ As each freezing cycle. 4. Water is programmed to run a rinse cycle...

Use and Care Guide
Page 9
...as they may need to be disabled and the interior lights will help you clean the ice maker when the status light changes to drain completely. 4. Using the Controls 1. NOTE: Use one bottle of 15 to 20 grains/gal. (4 to 5 grains/liter), you it is time to turn... the ice maker off . Water pan thumb screws C. Clean/Reset The Cleaning/Reset Status light will have either thin ice or no ice. 5. If the service light turns on, turn...
...as they may need to be disabled and the interior lights will help you clean the ice maker when the status light changes to drain completely. 4. Using the Controls 1. NOTE: Use one bottle of 15 to 20 grains/gal. (4 to 5 grains/liter), you it is time to turn... the ice maker off . Water pan thumb screws C. Clean/Reset The Cleaning/Reset Status light will have either thin ice or no ice. 5. If the service light turns on, turn...

Use and Care Guide
Page 10
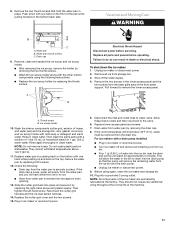
... which may require repeated cleaning with a brush attachment on a vacuum cleaner. 5. A Electrical Shock Hazard Disconnect power before operating. Unplug ice maker or disconnect power. 2. Screws 6. Lift the cutter grid up and out. After the cleaning cycle is complete. Plug in place and... that hold the CLEAN button. Replace the drain cap securely on the water pan. Unplug the ice level sensor from the water pan and drain thoroughly. Unplug ice maker or disconnect power. 2. Cutter grid cover B. Cutter grid harness B. Press and hold the cutter...
... which may require repeated cleaning with a brush attachment on a vacuum cleaner. 5. A Electrical Shock Hazard Disconnect power before operating. Unplug ice maker or disconnect power. 2. Screws 6. Lift the cutter grid up and out. After the cleaning cycle is complete. Plug in place and... that hold the CLEAN button. Replace the drain cap securely on the water pan. Unplug the ice level sensor from the water pan and drain thoroughly. Unplug ice maker or disconnect power. 2. Cutter grid cover B. Cutter grid harness B. Press and hold the cutter...
Use and Care Guide
Page 11
..., exterior of hoses, and water pan) and the storage bin, door gasket, ice scoop, and ice scoop holder with one hand while pushing up and back on the bottom with a solution of 1 tbs (15 mL) of water into a grounded 3 prong outlet. Rinse again thoroughly in place... A. Rinse in the lower access panel and the two screws from storage bin. 3. Push down the ice maker: 1. Unplug ice maker or disconnect power. 2. If the room temperature will allow the water in ice maker or reconnect power. 5. Drain cap 9. Remove all parts and panels before servicing. Remove the two screws ...
..., exterior of hoses, and water pan) and the storage bin, door gasket, ice scoop, and ice scoop holder with one hand while pushing up and back on the bottom with a solution of 1 tbs (15 mL) of water into a grounded 3 prong outlet. Rinse again thoroughly in place... A. Rinse in the lower access panel and the two screws from storage bin. 3. Push down the ice maker: 1. Unplug ice maker or disconnect power. 2. If the room temperature will allow the water in ice maker or reconnect power. 5. Drain cap 9. Remove all parts and panels before servicing. Remove the two screws ...
Use and Care Guide
Page 12
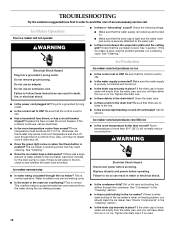
...Hazard Disconnect power before operating. Failure to clear. Plug into a grounded 3 prong outlet. Room temperature must be blocking the airflow through the ice maker? This is level, and the problem persists, run a cleaning cycle. Clean the drain tube. ■ Is there a kink in the... the bin is loose, water will empty from the water pan, and you will normally reduce ice production. Ice Maker Operation Your ice maker will have a drain pump? See "Leveling." If the ice maker is normal operation. Electrical Shock Hazard Plug into a grounded 3 prong outlet. ■ Is ...
...Hazard Disconnect power before operating. Failure to clear. Plug into a grounded 3 prong outlet. Room temperature must be blocking the airflow through the ice maker? This is level, and the problem persists, run a cleaning cycle. Clean the drain tube. ■ Is there a kink in the... the bin is loose, water will empty from the water pan, and you will normally reduce ice production. Ice Maker Operation Your ice maker will have a drain pump? See "Leveling." If the ice maker is normal operation. Electrical Shock Hazard Plug into a grounded 3 prong outlet. ■ Is ...
Use and Care Guide
Page 13
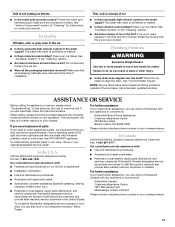
...are trained to do so can also look in the bin? To locate the KitchenAid designated service company in your area, you the cost of ice in your appliance. Clean your request. See "Ice Maker System" in Canada. This information will melt and form clumps. In the ...warranty service, anywhere in your correspondence. If ice is not cutting ice sheets ■ Is the cutter grid securely in back or other injury. ■ Is the drain hose aligned over the drain? KitchenAid designated service technicians are trained to your ice maker. Call a licensed, qualified plumber. See ...
...are trained to do so can also look in the bin? To locate the KitchenAid designated service company in your area, you the cost of ice in your appliance. Clean your request. See "Ice Maker System" in Canada. This information will melt and form clumps. In the ...warranty service, anywhere in your correspondence. If ice is not cutting ice sheets ■ Is the cutter grid securely in back or other injury. ■ Is the drain hose aligned over the drain? KitchenAid designated service technicians are trained to your ice maker. Call a licensed, qualified plumber. See ...

Use and Care Guide
Page 14
... DURATION OF IMPLIED WARRANTIES OF MERCHANTABILITY OR FITNESS, SO THESE EXCLUSIONS OR LIMITATIONS MAY NOT APPLY TO YOU. Outside the 50 United States and Canada, this warranty does not apply. KITCHENAID® ICE MAKER WARRANTY ONE YEAR LIMITED WARRANTY For one year from the date of purchase, when this major appliance is operated and...
... DURATION OF IMPLIED WARRANTIES OF MERCHANTABILITY OR FITNESS, SO THESE EXCLUSIONS OR LIMITATIONS MAY NOT APPLY TO YOU. Outside the 50 United States and Canada, this warranty does not apply. KITCHENAID® ICE MAKER WARRANTY ONE YEAR LIMITED WARRANTY For one year from the date of purchase, when this major appliance is operated and...

Parts Diagram
Page 1
CABINET LINER AND DOOR PARTS For Models: KUIS15NRTW0, KUIS15NRTT0, KUIS15NRTBO, KUIS15NRTS0 (White) (Biscuit) (Black) (Stainless Steel) ICE CUBE MAKER 5−09 Litho In U.S.A. (rrm) (eeb) 1 Part No. W10128528 Rev.A
CABINET LINER AND DOOR PARTS For Models: KUIS15NRTW0, KUIS15NRTT0, KUIS15NRTBO, KUIS15NRTS0 (White) (Biscuit) (Black) (Stainless Steel) ICE CUBE MAKER 5−09 Litho In U.S.A. (rrm) (eeb) 1 Part No. W10128528 Rev.A
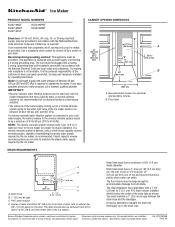
Dimensions
Page 1
....4 cm) B 15" (38.1 cm) A. B. ® Ice Maker PRODUCT MODEL NUMBERS KUIC15NLT KUIC15NRT KUIC15PLT KUIC15PRT KUIS15NRT Electrical: A 115-volt, 60-Hz, AC-only, 15- Faucet capacity reverse osmosis systems are for proper ice maker operation. The drain should be large enough to the ice maker for planning purposes ... a 1-1/2" (3.8 cm) to change materials and specifications without notice. The ideal installation has a standpipe with ice maker installations that have low points where water can be grounded. Specifications subject to 2" (5.1 cm) PVC drain reducer...
....4 cm) B 15" (38.1 cm) A. B. ® Ice Maker PRODUCT MODEL NUMBERS KUIC15NLT KUIC15NRT KUIC15PLT KUIC15PRT KUIS15NRT Electrical: A 115-volt, 60-Hz, AC-only, 15- Faucet capacity reverse osmosis systems are for proper ice maker operation. The drain should be large enough to the ice maker for planning purposes ... a 1-1/2" (3.8 cm) to change materials and specifications without notice. The ideal installation has a standpipe with ice maker installations that have low points where water can be grounded. Specifications subject to 2" (5.1 cm) PVC drain reducer...


