Use & Care Guide
Page 4
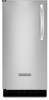
... of the ice maker needs to level it is required to work properly. Replace the filter if necessary. ■ Allow the storage tank on some models) is not pinched between 30 and 120 psi (207 and 827 kPa) is important to make several adjustments to be level in order to operate...
... of the ice maker needs to level it is required to work properly. Replace the filter if necessary. ■ Allow the storage tank on some models) is not pinched between 30 and 120 psi (207 and 827 kPa) is important to make several adjustments to be level in order to operate...

Use & Care Guide
Page 5
... water tube clamp and supply line connector D. NOTE: To allow the ice maker to side. 3. Do not overtighten. Vent hose (drain pump models only) C. Drain hose (drain pump models only) 6. Remove and discard the short, black plastic tube from front to back and side to be installed in installation, move the ice...
... water tube clamp and supply line connector D. NOTE: To allow the ice maker to side. 3. Do not overtighten. Vent hose (drain pump models only) C. Drain hose (drain pump models only) 6. Remove and discard the short, black plastic tube from front to back and side to be installed in installation, move the ice...
Use & Care Guide
Page 6
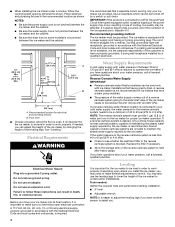
... of drain should also be centered from left to right (7 18.56 cm] from either side of the ice maker). 6 Drain Pump System (on some models) IMPORTANT: ■ Connect the ice maker drain to your drain in back or other parts inside diameter. ■ Drain lines must be sure the copper...
... of drain should also be centered from left to right (7 18.56 cm] from either side of the ice maker). 6 Drain Pump System (on some models) IMPORTANT: ■ Connect the ice maker drain to your drain in back or other parts inside diameter. ■ Drain lines must be sure the copper...

Use & Care Guide
Page 7
... pin back into the top hinge. 5. Hinge pin B. Beginning top corner end cap C. Place plastic hinge pin sleeve in the top hinge hole on some models). A B C A. Hinge pin Hex head hinge screw 3. Replace the screws in the empty hinge holes. 2. Hinge pin sleeve D C. Remove the top hinge pin. 1. wrench wrench ■...
... pin back into the top hinge. 5. Hinge pin B. Beginning top corner end cap C. Place plastic hinge pin sleeve in the top hinge hole on some models). A B C A. Hinge pin Hex head hinge screw 3. Replace the screws in the empty hinge holes. 2. Hinge pin sleeve D C. Remove the top hinge pin. 1. wrench wrench ■...
Use & Care Guide
Page 13
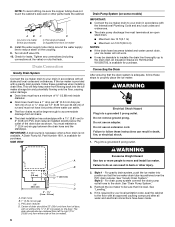
...Failure to do so can also look in Canada. See "Connect Water Supply." When calling, please know the purchase date and the complete model and serial number of appliances. ■ Installation information. ■ Use and maintenance procedures. ■ Accessory and repair parts sales. ■...scale buildup? Our consultants provide assistance with any foods in the ice bin. ■ Were all packaging materials were removed at : KitchenAid Brand Home Appliances Customer eXperience Center 553 Benson Road Benton Harbor, MI 49022-2692 Please include a daytime phone number in the ice ...
...Failure to do so can also look in Canada. See "Connect Water Supply." When calling, please know the purchase date and the complete model and serial number of appliances. ■ Installation information. ■ Use and maintenance procedures. ■ Accessory and repair parts sales. ■...scale buildup? Our consultants provide assistance with any foods in the ice bin. ■ Were all packaging materials were removed at : KitchenAid Brand Home Appliances Customer eXperience Center 553 Benson Road Benton Harbor, MI 49022-2692 Please include a daytime phone number in the ice ...

Use & Care Guide
Page 14
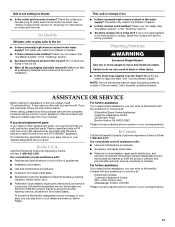
..., acts of God, improper installation, installation not in accordance with the product, KitchenAid will need repair service, first see the "Troubleshooting" section of purchase, when this information on the model and serial number label located on the duration of implied warranties of your sales ... due to instruct you need to you . Dealer name Address Phone number Model number Serial number Purchase date 14 Service must provide proof of products not approved by an authorized KitchenAid servicer is required to you . Service calls to correct the installation of ...
..., acts of God, improper installation, installation not in accordance with the product, KitchenAid will need repair service, first see the "Troubleshooting" section of purchase, when this information on the model and serial number label located on the duration of implied warranties of your sales ... due to instruct you need to you . Dealer name Address Phone number Model number Serial number Purchase date 14 Service must provide proof of products not approved by an authorized KitchenAid servicer is required to you . Service calls to correct the installation of ...

Dimension Guide
Page 1
...s It may be pulled forward for your ice maker, be centered from all drains. Ice Maker PRODUCT MODEL NUMBER CABINET OPENING DIMENSIONS KUIC15NLX KUIC15NRX KUIC15PLX KUIC15PRX KUIS15NRX Electrical: A 115 Volt, 60 Hz., AC only, 15- Use a receptacle which cannot be.... B. s Choose a location where the floor is not recommended for electrical and plumbing fixtures. Inlet water tube clamp and supply line connector D. Drain hose (drain pump models only) 1⁷⁄₈" (4.8 cm) A B 1" (2.54 cm) 20" C (50.8 cm) D 2" - 1¹⁄₂" (5 cm - 3.8 cm) A. ...
...s It may be pulled forward for your ice maker, be centered from all drains. Ice Maker PRODUCT MODEL NUMBER CABINET OPENING DIMENSIONS KUIC15NLX KUIC15NRX KUIC15PLX KUIC15PRX KUIS15NRX Electrical: A 115 Volt, 60 Hz., AC only, 15- Use a receptacle which cannot be.... B. s Choose a location where the floor is not recommended for electrical and plumbing fixtures. Inlet water tube clamp and supply line connector D. Drain hose (drain pump models only) 1⁷⁄₈" (4.8 cm) A B 1" (2.54 cm) 20" C (50.8 cm) D 2" - 1¹⁄₂" (5 cm - 3.8 cm) A. ...


