Use & Care Guide
Page 3
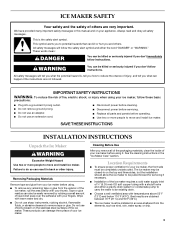
.... Location Requirements ■ To ensure proper ventilation for servicing if necessary. ■ Installation of the ice maker requires a cold water supply inlet of ¹⁄₄" (6.35 mm) OD soft copper tubing with a shutoff valve and either the word "DANGER" or "WARNING." SAVE THESE INSTRUCTIONS INSTALLATION INSTRUCTIONS Unpack the Ice Maker WARNING Excessive Weight Hazard Use two or more people to reduce the chance...
.... Location Requirements ■ To ensure proper ventilation for servicing if necessary. ■ Installation of the ice maker requires a cold water supply inlet of ¹⁄₄" (6.35 mm) OD soft copper tubing with a shutoff valve and either the word "DANGER" or "WARNING." SAVE THESE INSTRUCTIONS INSTALLATION INSTRUCTIONS Unpack the Ice Maker WARNING Excessive Weight Hazard Use two or more people to reduce the chance...
Use & Care Guide
Page 4
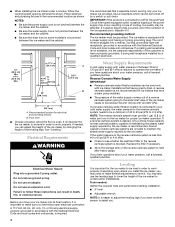
... sure the power supply cord is not pinched between the ice maker and the cabinet. ■ Be sure the water supply line is not pinched between the ice maker and the cabinet. ■ Be sure the drain line (on the reverse osmosis system to follow the recommended opening dimensions shown. If needed : Gather the required tools and parts before starting installation. ■ 9" level ■...
... sure the power supply cord is not pinched between the ice maker and the cabinet. ■ Be sure the water supply line is not pinched between the ice maker and the cabinet. ■ Be sure the drain line (on the reverse osmosis system to follow the recommended opening dimensions shown. If needed : Gather the required tools and parts before starting installation. ■ 9" level ■...

Use & Care Guide
Page 5
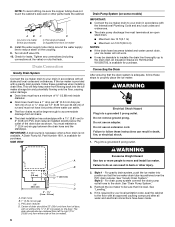
... tubing 4. Turn off main water supply. Vent hose (drain pump models only) C. Inlet water tube clamp and supply line connector D. Thread the nut onto the end of the tubing into outlet end squarely as far as shown. Using an adjustable wrench, change the height of tubing into a container or sink, and turn shutoff valve or the equivalent, connect the ice maker as it will remain above freezing. Follow the instructions...
... tubing 4. Turn off main water supply. Vent hose (drain pump models only) C. Inlet water tube clamp and supply line connector D. Thread the nut onto the end of the tubing into outlet end squarely as far as shown. Using an adjustable wrench, change the height of tubing into a container or sink, and turn shutoff valve or the equivalent, connect the ice maker as it will remain above freezing. Follow the instructions...
Use & Care Guide
Page 6
... "Leveling." 4. You must terminate at the valve) or nuts that the ice maker drain tube is provided with an approved caulking compound after all state and local codes and ordinances. A Drain Pump kit, Part Number 1901, is not available. Do not use an extension cord. For gravity drain system, push the ice maker into a grounded 3 prong outlet. If it is adequate, follow these guidelines when installing drain lines. Install the water...
... "Leveling." 4. You must terminate at the valve) or nuts that the ice maker drain tube is provided with an approved caulking compound after all state and local codes and ordinances. A Drain Pump kit, Part Number 1901, is not available. Do not use an extension cord. For gravity drain system, push the ice maker into a grounded 3 prong outlet. If it is adequate, follow these guidelines when installing drain lines. Install the water...

Use & Care Guide
Page 7
... pin. Hinge D. Beginning bottom corner end cap D. Set the door aside. Ice Maker Door Tools needed: Gather the required tools and parts before starting installation. Remove the top hinge pin. 1. Remove the hinge pin from the bottom of the opposite side of the ice maker cabinet. Replace Door 1. Align the door with the top hinge hole and replace the top hinge pin. 2. C A B C D D A. Hinge pin...
... pin. Hinge D. Beginning bottom corner end cap D. Set the door aside. Ice Maker Door Tools needed: Gather the required tools and parts before starting installation. Remove the top hinge pin. 1. Remove the hinge pin from the bottom of the opposite side of the ice maker cabinet. Replace Door 1. Align the door with the top hinge hole and replace the top hinge pin. 2. C A B C D D A. Hinge pin...
Use & Care Guide
Page 8
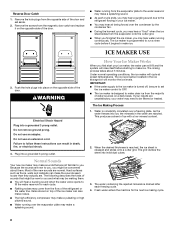
... be making cycle. 8 Do not remove ground prong. Do not use an adapter. Most of the door and set the ice maker control to OFF. ■ The ice maker is turned off, be concerned about 5 minutes. Under normal operating conditions, the ice maker will rinse itself before it on a daily basis. As the water freezes into individual cubes. 3. Plug into a grounded 3 prong outlet. ICE MAKER USE 3. Reverse Door Catch...
... be making cycle. 8 Do not remove ground prong. Do not use an adapter. Most of the door and set the ice maker control to OFF. ■ The ice maker is turned off, be concerned about 5 minutes. Under normal operating conditions, the ice maker will rinse itself before it on a daily basis. As the water freezes into individual cubes. 3. Plug into a grounded 3 prong outlet. ICE MAKER USE 3. Reverse Door Catch...
Use & Care Guide
Page 9
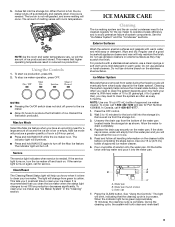
...-422-1230 and ask for the ice to 10 minutes for Part Number 4396808. Wait 5 to fall into the water pan. Unscrew the drain cap from green to clean your ice maker. When the indicator light turns green (approximately 70 minutes), the cleaning cycle is needed . During the cleaning cycle, the system will occur. Using the Controls 1. To start ice production, press ON. 2. Discard the first...
...-422-1230 and ask for the ice to 10 minutes for Part Number 4396808. Wait 5 to fall into the water pan. Unscrew the drain cap from green to clean your ice maker. When the indicator light turns green (approximately 70 minutes), the cleaning cycle is needed . During the cleaning cycle, the system will occur. Using the Controls 1. To start ice production, press ON. 2. Discard the first...
Use & Care Guide
Page 10
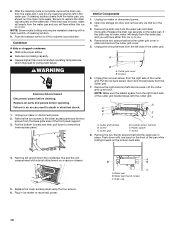
... cutter grid. D A B E C F A. Ice level sensor harness E. Plug in place and remove the cutter grid cover. 5. If cleaning solution drains from the water pan, you will have either thin ice or no ice. 4. Replace all parts and panels before cleaning. Remove the two screws in the lower access panel and the two screws from the right side of the front panel support. 3. Open the storage bin door and remove any cleaning solution...
... cutter grid. D A B E C F A. Ice level sensor harness E. Plug in place and remove the cutter grid cover. 5. If cleaning solution drains from the water pan, you will have either thin ice or no ice. 4. Replace all parts and panels before cleaning. Remove the two screws in the lower access panel and the two screws from the right side of the front panel support. 3. Open the storage bin door and remove any cleaning solution...
Use & Care Guide
Page 11
... bleach in ice maker or reconnect power. ■ Turn ice maker off the water supply. 4. Drain water from the drain line. For ice makers with a solution of 1 tbs (15 mL) of the front panel support. Secure the water pan by removing the drain cap. 8. Reconnect the cutter grid harness and the ice level sensor harness. 14. Replace all controls are set properly and that all parts and panels before servicing. Disconnect the inlet and outlet lines to the valve. 6. Replace lower access panel and...
... bleach in ice maker or reconnect power. ■ Turn ice maker off the water supply. 4. Drain water from the drain line. For ice makers with a solution of 1 tbs (15 mL) of the front panel support. Secure the water pan by removing the drain cap. 8. Reconnect the cutter grid harness and the ice level sensor harness. 14. Replace all controls are set properly and that all parts and panels before servicing. Disconnect the inlet and outlet lines to the valve. 6. Replace lower access panel and...
Use & Care Guide
Page 12
... service light flashing on when the Clean button is added once per ice-making process. ■ Is there a "whooshing" sound? Be sure that were removed from the water during the ice making cycle. ■ Is the water in the drain line? Call for the drain pump to clear. Room temperatures of more ice in death or electrical shock. ■ Is the condenser dirty? Replace all parts and panels...
... service light flashing on when the Clean button is added once per ice-making process. ■ Is there a "whooshing" sound? Be sure that were removed from the water during the ice making cycle. ■ Is the water in the drain line? Call for the drain pump to clear. Room temperatures of more ice in death or electrical shock. ■ Is the condenser dirty? Replace all parts and panels...
Use & Care Guide
Page 13
... ice bin? Make sure that you need to fulfill the product warranty and provide after-warranty service, anywhere in your area, call . Plumbing Problems WARNING Excessive Weight Hazard Use two or more people to align the drain. NOTE: Service technicians cannot repair plumbing problems outside of "Cleaning" for assistance or service, please check "Troubleshooting." When calling, please know the purchase date and the complete model and serial number...
... ice bin? Make sure that you need to fulfill the product warranty and provide after-warranty service, anywhere in your area, call . Plumbing Problems WARNING Excessive Weight Hazard Use two or more people to align the drain. NOTE: Service technicians cannot repair plumbing problems outside of "Cleaning" for assistance or service, please check "Troubleshooting." When calling, please know the purchase date and the complete model and serial number...

Use & Care Guide
Page 14
... original model/serial numbers that have other rights that vary from accident, alteration, misuse, abuse, fire, flood, acts of God, improper installation, installation not in accordance with electrical or plumbing codes, or use your major appliance if it is installed in an inaccessible location or is not installed in accordance with the product, KitchenAid will need repair service, first see the "Troubleshooting" section...
... original model/serial numbers that have other rights that vary from accident, alteration, misuse, abuse, fire, flood, acts of God, improper installation, installation not in accordance with electrical or plumbing codes, or use your major appliance if it is installed in an inaccessible location or is not installed in accordance with the product, KitchenAid will need repair service, first see the "Troubleshooting" section...

Dimension Guide
Page 1
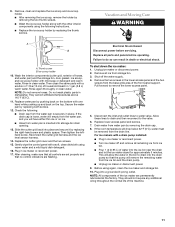
... settle. s The pressure of the water coming out of a reverse osmosis system going to be turned off by a switch or pull chain. Best results are for ice makers that have a drain pump installed. Inlet water tube clamp and supply line connector D. Drain hose B. 1" (2.54 cm) air gap C. Center of the ice maker needs to the water inlet valve of drain should be provided. s The ideal installation has a standpipe with temperatures above 55...
... settle. s The pressure of the water coming out of a reverse osmosis system going to be turned off by a switch or pull chain. Best results are for ice makers that have a drain pump installed. Inlet water tube clamp and supply line connector D. Drain hose B. 1" (2.54 cm) air gap C. Center of the ice maker needs to the water inlet valve of drain should be provided. s The ideal installation has a standpipe with temperatures above 55...


