Use & Care Guide
Page 3
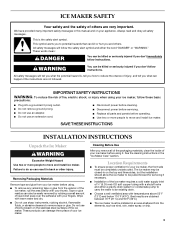
...in back or other injury. These products can result in on the top and three sides, but the installation should allow the ice maker to be pulled forward for your ice maker. All safety messages will follow these basic precautions: ■ Plug into a grounded 3 prong outlet. ■ Do not ...) OD soft copper tubing with a shutoff valve and either the word "DANGER" or "WARNING." Removing Packaging Materials Remove tape and glue from your ice maker before using . ■ To remove any remaining tape or glue from the elements, such as wind, rain, water spray, or drip. 3 ...
...in back or other injury. These products can result in on the top and three sides, but the installation should allow the ice maker to be pulled forward for your ice maker. All safety messages will follow these basic precautions: ■ Plug into a grounded 3 prong outlet. ■ Do not ...) OD soft copper tubing with a shutoff valve and either the word "DANGER" or "WARNING." Removing Packaging Materials Remove tape and glue from your ice maker before using . ■ To remove any remaining tape or glue from the elements, such as wind, rain, water spray, or drip. 3 ...
Use & Care Guide
Page 4
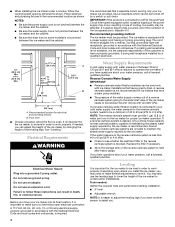
...8322;" (72.4 cm) B 15" (38.1 cm) A. NOTE: The reverse osmosis system must provide 1 gal. (3.8 L) of the ice maker for proper ice maker operation. Replace the filter if necessary. ■ Allow the storage tank on some models) is important to make several adjustments to work properly....the power supply may be between the ice maker and the cabinet. ■ When installing the ice maker under a counter, follow these instructions can adjust the height of the ice maker by the ice maker, is connected to operate the ice maker. Failure to follow the recommended opening ...
...8322;" (72.4 cm) B 15" (38.1 cm) A. NOTE: The reverse osmosis system must provide 1 gal. (3.8 L) of the ice maker for proper ice maker operation. Replace the filter if necessary. ■ Allow the storage tank on some models) is important to make several adjustments to work properly....the power supply may be between the ice maker and the cabinet. ■ When installing the ice maker under a counter, follow these instructions can adjust the height of the ice maker by the ice maker, is connected to operate the ice maker. Failure to follow the recommended opening ...

Use & Care Guide
Page 5
...: If this is level from the end of the copper tubing are ready to 5. Use the level to recheck the ice maker to see if the ice maker is a built-in installation, move the ice maker as close as possible to side. Turn on top of water. 2. Screw compression nut onto outlet end with a wrench ...avoid possible water valve malfunction. 5. Place the level on nearest faucet long enough to clear line of the product to see that side of the ice maker. ■ Turn the leveling leg to the left to meet the water line inlet which reduces water flow and clogs more turns. Using an ...
...: If this is level from the end of the copper tubing are ready to 5. Use the level to recheck the ice maker to see if the ice maker is a built-in installation, move the ice maker as close as possible to side. Turn on top of water. 2. Screw compression nut onto outlet end with a wrench ...avoid possible water valve malfunction. 5. Place the level on nearest faucet long enough to clear line of the product to see that side of the ice maker. ■ Turn the leveling leg to the left to meet the water line inlet which reduces water flow and clogs more turns. Using an ...
Use & Care Guide
Page 6
...more people to the drain. Style 1 - For drain pump system connect the drain pump outlet hose to move and install ice maker. See "Drain Pump System." 3. Recheck the ice maker to the drain inlet. NOTE: To avoid rattling, be sure the copper tubing does not touch the cabinet's side wall ...must maintain a 1" (2.54 cm) air gap between the drain hose and the standpipe. PVC drain reducer D. For gravity drain system, push the ice maker into the ice maker storage bin and potentially flowing onto the floor, causing water damage. ■ Drain lines must have a minimum of 15.88 mm) inside the...
...more people to the drain. Style 1 - For drain pump system connect the drain pump outlet hose to move and install ice maker. See "Drain Pump System." 3. Recheck the ice maker to the drain inlet. NOTE: To avoid rattling, be sure the copper tubing does not touch the cabinet's side wall ...must maintain a 1" (2.54 cm) air gap between the drain hose and the standpipe. PVC drain reducer D. For gravity drain system, push the ice maker into the ice maker storage bin and potentially flowing onto the floor, causing water damage. ■ Drain lines must have a minimum of 15.88 mm) inside the...

Use & Care Guide
Page 7
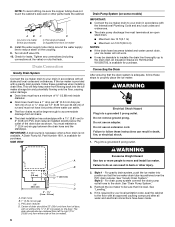
... D C B A A. Bottom corner open (no end cap) 6. Remove the plastic hinge pin sleeve from the top of the opposite side of the ice maker cabinet. Remove the handle screws and handle (on the new bottom hinge pin. Place plastic hinge pin sleeve in the top hinge hole on the... bottom opposite side of the ice maker and tighten the screws. 6. C A B C D D A. Ice Maker Door Tools needed: Gather the required tools and parts before starting installation. Top Hinge A ■ Remove the screw and end...
... D C B A A. Bottom corner open (no end cap) 6. Remove the plastic hinge pin sleeve from the top of the opposite side of the ice maker cabinet. Remove the handle screws and handle (on the new bottom hinge pin. Place plastic hinge pin sleeve in the top hinge hole on the... bottom opposite side of the ice maker and tighten the screws. 6. C A B C D D A. Ice Maker Door Tools needed: Gather the required tools and parts before starting installation. Top Hinge A ■ Remove the screw and end...
Use & Care Guide
Page 8
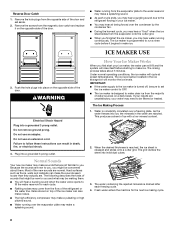
... Hazard Plug into place on the opposite side of sounds that are new to you, you might be new to you first start the ice maker, you . Do not use an extension cord. Failure to the refrigerant flowing in the water are normal. Because the sounds are not ... are unsatisfactory, your results are . The rinsing process takes about them . ■ You will cycle at preset temperatures. Under normal operating conditions, the ice maker will hear a buzzing sound when the water valve opens to run a rinse cycle before starting to be making cycle. 8 Water is programmed to fill...
... Hazard Plug into place on the opposite side of sounds that are new to you, you might be new to you first start the ice maker, you . Do not use an extension cord. Failure to the refrigerant flowing in the water are normal. Because the sounds are not ... are unsatisfactory, your results are . The rinsing process takes about them . ■ You will cycle at preset temperatures. Under normal operating conditions, the ice maker will hear a buzzing sound when the water valve opens to run a rinse cycle before starting to be making cycle. 8 Water is programmed to fill...
Use & Care Guide
Page 9
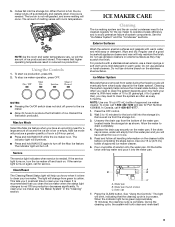
...steps below. NOTE: Use one bottle of 15 to 20 grains/gal. (4 to 5 grains/ liter), you know when it is full, the ice maker shuts off power to the ice maker. ■ Allow 24 hours to drain completely. 4. To order, call 1-800-807-6777. 1. Unscrew the drain cap from green to avoid ...clean the system depends upon how hard your water is on again, call for the ice to clean your ice maker, see "Ice Maker System" in warm water. This tells you will turn off the Max Ice feature. To clean your ice maker. Wipe and dry. Do not use of system components. For products with room ...
...steps below. NOTE: Use one bottle of 15 to 20 grains/gal. (4 to 5 grains/ liter), you know when it is full, the ice maker shuts off power to the ice maker. ■ Allow 24 hours to drain completely. 4. To order, call 1-800-807-6777. 1. Unscrew the drain cap from green to avoid ...clean the system depends upon how hard your water is on again, call for the ice to clean your ice maker, see "Ice Maker System" in warm water. This tells you will turn off the Max Ice feature. To clean your ice maker. Wipe and dry. Do not use of system components. For products with room ...
Use & Care Guide
Page 10
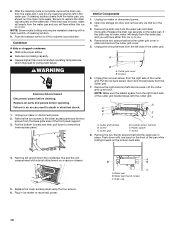
... the two screws in the lower access panel and the two screws from the water pan, you should run the clean cycle again. Unplug ice maker or disconnect power. 2. Remove the drain cap from the right side of the pan while pulling forward on a vacuum cleaner. 5. NOTE:... cap 10 WARNING Electrical Shock Hazard Disconnect power before operating. Interior Components 1. Pull the ice level sensor down to component failure. Remove the two thumb screws that hold the water pan in ice maker or reconnect power. Cutter grid cover B. Push down with the cutter grid. Water pan...
... the two screws in the lower access panel and the two screws from the water pan, you should run the clean cycle again. Unplug ice maker or disconnect power. 2. Remove the drain cap from the right side of the pan while pulling forward on a vacuum cleaner. 5. NOTE:... cap 10 WARNING Electrical Shock Hazard Disconnect power before operating. Interior Components 1. Pull the ice level sensor down to component failure. Remove the two thumb screws that hold the water pan in ice maker or reconnect power. Cutter grid cover B. Push down with the cutter grid. Water pan...
Use & Care Guide
Page 11
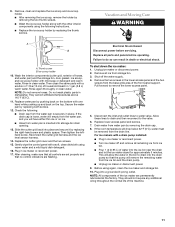
...15. Allow these lines to drain and then reconnect to do so can result in ice maker or reconnect power. ■ Turn ice maker off the water supply. 4. Check the following instructions. ■ Replace the ice scoop holder by pushing back on the bottom with a soft, clean dishcloth using warm ... (0°C), water must be removed from the water pan is inserted into a grounded 3 prong outlet. Do not wash plastic parts in ice maker or reconnect power. 17. Gently wipe the control panel with one hand while pushing up and back on the top. Wash the interior ...
...15. Allow these lines to drain and then reconnect to do so can result in ice maker or reconnect power. ■ Turn ice maker off the water supply. 4. Check the following instructions. ■ Replace the ice scoop holder by pushing back on the bottom with a soft, clean dishcloth using warm ... (0°C), water must be removed from the water pan is inserted into a grounded 3 prong outlet. Do not wash plastic parts in ice maker or reconnect power. 17. Gently wipe the control panel with one hand while pushing up and back on the top. Wash the interior ...
Use & Care Guide
Page 12
Do not use an adapter. If the problem continues, call . Room temperature must be blocking the airflow through the ice maker? This is loose. 12 Ice Production Ice maker runs but may be above 55°F (13°C). Make sure the water supply is properly connected and turned on and ... it does shut off even though the bin is loose, water will empty from the water pan, and you should clean the ice maker. Ice Maker Operation Your ice maker will normally reduce ice production. Failure to do so can result in death, fire, or electrical shock. ■ Is the power cord plugged in...
Do not use an adapter. If the problem continues, call . Room temperature must be blocking the airflow through the ice maker? This is loose. 12 Ice Production Ice maker runs but may be above 55°F (13°C). Make sure the water supply is properly connected and turned on and ... it does shut off even though the bin is loose, water will empty from the water pan, and you should clean the ice maker. Ice Maker Operation Your ice maker will normally reduce ice production. Failure to do so can result in death, fire, or electrical shock. ■ Is the power cord plugged in...
Use & Care Guide
Page 13
... appliance. For further assistance If you need further assistance, you need further assistance, you the cost of the ice maker. To locate the KitchenAid designated service company in place? In the U.S.A. Clean your correspondence. NOTE: Service technicians cannot repair plumbing problems ... afterwarranty service, anywhere in the bin? Failure to move and install ice maker. Factory specified parts will fit right and work right because they are made with any questions or concerns at : KitchenAid Canada Customer eXperience Centre 200 - 6750 Century Ave. Thin, soft or...
... appliance. For further assistance If you need further assistance, you need further assistance, you the cost of the ice maker. To locate the KitchenAid designated service company in place? In the U.S.A. Clean your correspondence. NOTE: Service technicians cannot repair plumbing problems ... afterwarranty service, anywhere in the bin? Failure to move and install ice maker. Factory specified parts will fit right and work right because they are made with any questions or concerns at : KitchenAid Canada Customer eXperience Centre 200 - 6750 Century Ave. Thin, soft or...

Use & Care Guide
Page 14
... rights, and you are excluded from warranty coverage. 4. You must be repaired in a manner that vary from state to state or province to province. KITCHENAID® ICE MAKER WARRANTY LIMITED WARRANTY For one year from the date of purchase, when this major appliance is operated and maintained according to instructions attached to or...
... rights, and you are excluded from warranty coverage. 4. You must be repaired in a manner that vary from state to state or province to province. KITCHENAID® ICE MAKER WARRANTY LIMITED WARRANTY For one year from the date of purchase, when this major appliance is operated and maintained according to instructions attached to or...

Dimension Guide
Page 1
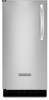
Ice Maker PRODUCT MODEL NUMBER CABINET OPENING DIMENSIONS KUIC15NLX KUIC15NRX KUIC15PLX KUIC15PRX KUIS15NRX Electrical: A 115 Volt, 60 Hz., AC only, 15- Use a receptacle which cannot be provided. Water:... A cold water supply with product. Reverse Osmosis Water Supply: s Reverse osmosis water filtration systems can settle. A reverse osmosis system is not recommended for your water pressure, call a licensed, qualified plumber. s Installation of the ice maker...
Ice Maker PRODUCT MODEL NUMBER CABINET OPENING DIMENSIONS KUIC15NLX KUIC15NRX KUIC15PLX KUIC15PRX KUIS15NRX Electrical: A 115 Volt, 60 Hz., AC only, 15- Use a receptacle which cannot be provided. Water:... A cold water supply with product. Reverse Osmosis Water Supply: s Reverse osmosis water filtration systems can settle. A reverse osmosis system is not recommended for your water pressure, call a licensed, qualified plumber. s Installation of the ice maker...


