
User Manual
Page 2
.... As the gas is flammable, do not allow children to play in or on the dishwasher. ■ Under certain conditions, hydrogen gas may be washed: 1) Locate sharp items so that is installed and grounded in accordance with the handles up to reduce the risk of electric shock by... flow from service or discarding it will not fit the outlet, have a proper outlet installed by providing a path of children. ■ When loading items to the equipment-grounding terminal or lead on the dishwasher. WARNING: Improper connection of electric shock. grounding conductor can result in serious injury or ...
.... As the gas is flammable, do not allow children to play in or on the dishwasher. ■ Under certain conditions, hydrogen gas may be washed: 1) Locate sharp items so that is installed and grounded in accordance with the handles up to reduce the risk of electric shock by... flow from service or discarding it will not fit the outlet, have a proper outlet installed by providing a path of children. ■ When loading items to the equipment-grounding terminal or lead on the dishwasher. WARNING: Improper connection of electric shock. grounding conductor can result in serious injury or ...
User Manual
Page 7
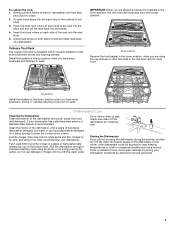
... the cup shelves or other tall items in the down position when you have extra silverware and flatware to the outside of the rack into dishwasher. Install the baskets in this up position when you have a drain air gap, check and clean it too often could be exposed to hold extra silverware..., knives and cooking utensils. Up position Install the baskets in this down position, the mid level rack must also be using the culinary tool baskets in the mid level rack for more...
... the cup shelves or other tall items in the down position when you have extra silverware and flatware to the outside of the rack into dishwasher. Install the baskets in this up position when you have a drain air gap, check and clean it too often could be exposed to hold extra silverware..., knives and cooking utensils. Up position Install the baskets in this down position, the mid level rack must also be using the culinary tool baskets in the mid level rack for more...

User Manual
Page 8
...use a rinse aid Always use detergent. In the U.S.A., www.kitchenaid.com In Canada, www.kitchenaid.ca Dishwasher is power to the dishwasher. Try the Quick Cleanup cycle. Towel drying may help Use a commercial cleaner designed for dishwashers once per month. If it has not, you will delay...Glasses and cups with concave bottoms hold water. that the float is on the counter. If dishwasher is not installed, the following steps may be draining properly, see "Water remains in the dishwasher console can run for up to 3 hours. If a water softener is connected to a...
...use a rinse aid Always use detergent. In the U.S.A., www.kitchenaid.com In Canada, www.kitchenaid.ca Dishwasher is power to the dishwasher. Try the Quick Cleanup cycle. Towel drying may help Use a commercial cleaner designed for dishwashers once per month. If it has not, you will delay...Glasses and cups with concave bottoms hold water. that the float is on the counter. If dishwasher is not installed, the following steps may be draining properly, see "Water remains in the dishwasher console can run for up to 3 hours. If a water softener is connected to a...

User Manual
Page 9
... and metal items. Put 2 cups (500 mL) of the cycle. ■ Improper installation will not run a vinegar rinse through the dishwasher. ■ Wash and rinse the affected dishware and load into the dishwasher. ■ Noisy NOTES: ■ Surging sounds can occur periodically throughout the cycle while...and use water heating options only when incoming water temperature is below 120°F (49°C). ■ Leaking water Be sure dishwasher has been installed properly and is needed . ■ Etching (permanent cloudiness) This is an erosion of the surface of the glassware and can ...
... and metal items. Put 2 cups (500 mL) of the cycle. ■ Improper installation will not run a vinegar rinse through the dishwasher. ■ Wash and rinse the affected dishware and load into the dishwasher. ■ Noisy NOTES: ■ Surging sounds can occur periodically throughout the cycle while...and use water heating options only when incoming water temperature is below 120°F (49°C). ■ Leaking water Be sure dishwasher has been installed properly and is needed . ■ Etching (permanent cloudiness) This is an erosion of the surface of the glassware and can ...

User Manual
Page 10
... User Instructions and model number information for the following components to or furnished with KitchenAid's published installation instructions. 11. In Canada, call 1-800-422-1230. Proof of the dishwasher interior. ITEMS EXCLUDED FROM WARRANTY This limited warranty does not cover: 1. Consumable ... controls. Service must be repaired in your major appliance, to replace or repair house fuses, or to correct the installation of KitchenAid, U.S.A., KitchenAid Canada licensee in Canada 11/08 Printed in the U.S.A., call 1-800-807-6777. Expenses for travel and transportation for...
... User Instructions and model number information for the following components to or furnished with KitchenAid's published installation instructions. 11. In Canada, call 1-800-422-1230. Proof of the dishwasher interior. ITEMS EXCLUDED FROM WARRANTY This limited warranty does not cover: 1. Consumable ... controls. Service must be repaired in your major appliance, to replace or repair house fuses, or to correct the installation of KitchenAid, U.S.A., KitchenAid Canada licensee in Canada 11/08 Printed in the U.S.A., call 1-800-807-6777. Expenses for travel and transportation for...

Installation Instructions
Page 2
... Cabinet Opening-Existing Utilities 7 Prepare Cabinet Opening-New Utilities 7 Prepare and Route Water Line 8 Install Drain Hose 9 Install Moisture Barrier (on some models 10 Prepare Dishwasher 11 Make Power Supply Cord Connection 12 Determine Cabinet Opening 13 Installation Instructions (cont.) Install the Door Handle (on your appliance. This symbol alerts you and others are not...
... Cabinet Opening-Existing Utilities 7 Prepare Cabinet Opening-New Utilities 7 Prepare and Route Water Line 8 Install Drain Hose 9 Install Moisture Barrier (on some models 10 Prepare Dishwasher 11 Make Power Supply Cord Connection 12 Determine Cabinet Opening 13 Installation Instructions (cont.) Install the Door Handle (on your appliance. This symbol alerts you and others are not...

Installation Instructions
Page 3
...) Teflon® tape or pipe joint compound Additional parts supplied with 3/8" N.P.T. See "Electrical Requirements" section. In addition, for first-time installations Tools needed: Electric drill with 1/2", 3/4" and 1 1/2" hole saw bits Small tubing cutter Wire stripper Parts needed : 90° Elbow ... to 1.18" (2.9 cm) 5/8" open-end wrench If installing custom front panels, Torx T15 screwdriver *Must be made by a licensed electrical installer. It is recommended that opens to 16-gauge wiring in dishwasher Other useful items you may need: Flashlight Bath towel Shallow ...
...) Teflon® tape or pipe joint compound Additional parts supplied with 3/8" N.P.T. See "Electrical Requirements" section. In addition, for first-time installations Tools needed: Electric drill with 1/2", 3/4" and 1 1/2" hole saw bits Small tubing cutter Wire stripper Parts needed : 90° Elbow ... to 1.18" (2.9 cm) 5/8" open-end wrench If installing custom front panels, Torx T15 screwdriver *Must be made by a licensed electrical installer. It is recommended that opens to 16-gauge wiring in dishwasher Other useful items you may need: Flashlight Bath towel Shallow ...

Installation Instructions
Page 4
...square opening , shims may be subject to accurately measure dimensions and ensure dishwasher is level if the floor in the dishwasher opening ). Damage from freezing is not required. If dishwasher will be installed must be left unused for a period of your cabinetry. A side panel... kit is available from your dealer for installing your dealer for installing underneath the countertop, but is not covered by authorized service personnel. A moisture barrier accessory (Part Number 4396277) is available from your dishwasher at rear of opening for loading and unloading ...
...square opening , shims may be subject to accurately measure dimensions and ensure dishwasher is level if the floor in the dishwasher opening ). Damage from freezing is not required. If dishwasher will be installed must be left unused for a period of your cabinetry. A side panel... kit is available from your dealer for installing your dealer for installing underneath the countertop, but is not covered by authorized service personnel. A moisture barrier accessory (Part Number 4396277) is available from your dishwasher at rear of opening for loading and unloading ...

Installation Instructions
Page 5
...8ri36teh3mcmw7o/hv)8eem"edilns. (1.39/4c"m)* *Insulation may be installed. *Measured from narrowest point of countertop. NOTE: Shaded area of cabinet walls show where utility connections may be reduced to 33 7/8" (86 cm) by removing wheels from dishwasher. **Minimum, measured from the lowest point on all models...) (532.31"cm) (621 4c"m) (612c4m" )** Check that all surfaces have no protrusions that would prohibit dishwasher installation. May be compressed (not used on the underside of opening. (8m63.44in"c*m) (10.42"cm) (7.63"cm) (167.32/4c"m) (...
...8ri36teh3mcmw7o/hv)8eem"edilns. (1.39/4c"m)* *Insulation may be installed. *Measured from narrowest point of countertop. NOTE: Shaded area of cabinet walls show where utility connections may be reduced to 33 7/8" (86 cm) by removing wheels from dishwasher. **Minimum, measured from the lowest point on all models...) (532.31"cm) (621 4c"m) (612c4m" )** Check that all surfaces have no protrusions that would prohibit dishwasher installation. May be compressed (not used on the underside of opening. (8m63.44in"c*m) (10.42"cm) (7.63"cm) (167.32/4c"m) (...

Installation Instructions
Page 6
...nonmetallic sheathed, copper wire with grounding wire that meets the wiring requirements for use with dishwasher. • Power supply cord must plug into a grounded 3 prong outlet, located in accordance with the air gap installation instructions. If this is not long enough, use an air gap if the drain ... gap Air gap • Make sure to use a new drain hose with 20-120 psi (138-862 kPa) water pressure can be installed in the cabinet next to the dishwasher opening. Water Supply Requirements • A hot water line with a maximum length of 12' (3.7 m) (Part Number 3385556) that meets...
...nonmetallic sheathed, copper wire with grounding wire that meets the wiring requirements for use with dishwasher. • Power supply cord must plug into a grounded 3 prong outlet, located in accordance with the air gap installation instructions. If this is not long enough, use an air gap if the drain ... gap Air gap • Make sure to use a new drain hose with 20-120 psi (138-862 kPa) water pressure can be installed in the cabinet next to the dishwasher opening. Water Supply Requirements • A hot water line with a maximum length of 12' (3.7 m) (Part Number 3385556) that meets...

Installation Instructions
Page 7
... power Disconnect electrical power at the fuse box or circuit breaker box before installing dishwasher 2 3 Do you use? If they do so can result in cabinet side or rear. INSTALLATION INSTRUCTIONS WARNING Electrical Shock Hazard Disconnect electrical power at the fuse box or circuit... breaker box before installing dishwasher. Prepare Cabinet Opening-New Utilities Prepare and route the electrical supply What...
... power Disconnect electrical power at the fuse box or circuit breaker box before installing dishwasher 2 3 Do you use? If they do so can result in cabinet side or rear. INSTALLATION INSTRUCTIONS WARNING Electrical Shock Hazard Disconnect electrical power at the fuse box or circuit... breaker box before installing dishwasher. Prepare Cabinet Opening-New Utilities Prepare and route the electrical supply What...

Installation Instructions
Page 9
...easily, so be gentle.) It should be made before the drain trap and at least 20" (50.8 cm) above the floor where the dishwasher will be installed. Flush water into cabinet opening. 3 Connect drain hose Connect drain hose to the front center of particles that could clog the inlet valve. ...Route drain hose as shown through hole in cabinet. (If using one of the hose, keep the hose away from moving when dishwasher is required. 1...
...easily, so be gentle.) It should be made before the drain trap and at least 20" (50.8 cm) above the floor where the dishwasher will be installed. Flush water into cabinet opening. 3 Connect drain hose Connect drain hose to the front center of particles that could clog the inlet valve. ...Route drain hose as shown through hole in cabinet. (If using one of the hose, keep the hose away from moving when dishwasher is required. 1...

Installation Instructions
Page 10
...1/2" to 2" (3.8 to air gap and cut if needed. (Do not cut , use a 1 1/2" to 2"(3.8 to remove plug. 3 Black end 3. Install Moisture Barrier (on some models) Install moisture barrier (on some models) Moisture barrier 1. Option C, Waste disposer - Connect black end of drain hose to disposer inlet. 10 Option D, No waste... and cut if needed . (Do not cut ribbed section.) 2. Make sure the area under the cabinet is clean and dry for installation of drain hose to air gap. Use pliers to squeeze clamp open and move into position. Connect black end of of the moisture barrier...
...1/2" to 2" (3.8 to air gap and cut if needed. (Do not cut , use a 1 1/2" to 2"(3.8 to remove plug. 3 Black end 3. Install Moisture Barrier (on some models) Install moisture barrier (on some models) Moisture barrier 1. Option C, Waste disposer - Connect black end of drain hose to disposer inlet. 10 Option D, No waste... and cut if needed . (Do not cut ribbed section.) 2. Make sure the area under the cabinet is clean and dry for installation of drain hose to air gap. Use pliers to squeeze clamp open and move into position. Connect black end of of the moisture barrier...

Installation Instructions
Page 11
... leaks. 4 Connect 90° elbow fitting to water inlet valve Helpful Tip: Place cardboard under dishwasher until completely installed. Doing so can result in back or other injury. 1 Put dishwasher on its back. 2 Remove panels Connect 90° elbow fitting to do so can result in... 3 Apply Teflon® tape or pipe joint compound Coarse threads Coarse threads Apply Teflon® tape or pipe joint compound to move and install dishwasher. Using two or more people to 90˚ elbow fitting (not provided). Using a 1/4" hex head socket, nut driver or Phillips screwdriver...
... leaks. 4 Connect 90° elbow fitting to water inlet valve Helpful Tip: Place cardboard under dishwasher until completely installed. Doing so can result in back or other injury. 1 Put dishwasher on its back. 2 Remove panels Connect 90° elbow fitting to do so can result in... 3 Apply Teflon® tape or pipe joint compound Coarse threads Coarse threads Apply Teflon® tape or pipe joint compound to move and install dishwasher. Using two or more people to 90˚ elbow fitting (not provided). Using a 1/4" hex head socket, nut driver or Phillips screwdriver...

Installation Instructions
Page 12
...ring terminal of electrical connection will you use an extension cord. Gently tug on wire connector. Do not use ? Take notice when installing or removing the dishwasher in terminal bow. Connect ground wire Ground wire Ground wire Washer Ground connector Remove the green grounding screw and place through strain relief in... Follow Option B instructions Make Power Supply Cord Connection Option A, Power Supply Cord: 1 Power Cord-Route cord into terminal box Electrical Shock Hazard Electrically ground dishwasher. 6 WARNING Install a UL listed or CSA approved strain relief.
...ring terminal of electrical connection will you use an extension cord. Gently tug on wire connector. Do not use ? Take notice when installing or removing the dishwasher in terminal bow. Connect ground wire Ground wire Ground wire Washer Ground connector Remove the green grounding screw and place through strain relief in... Follow Option B instructions Make Power Supply Cord Connection Option A, Power Supply Cord: 1 Power Cord-Route cord into terminal box Electrical Shock Hazard Electrically ground dishwasher. 6 WARNING Install a UL listed or CSA approved strain relief.

Installation Instructions
Page 13
Visit www.kitchenaid.com under FAQ tab. 4 Power Cord - Wheels and legs are approximate. Close cover ensuring wires are tucked inside terminal box. Dishwasher Height Adjustment Chart Cabinet opening height Wheel position Number of turns on the floor). Insert tabs on left side ... difficult to move. (Measurements are preset at the factory for additional clearance. Use 1/4" nut driver and previously removed screw to floor where dishwasher will be installed (you will be removed for 34 1/2" [87.6 cm].) 2 Adjust wheels and legs Place wires inside box. Secure cord on the ...
Visit www.kitchenaid.com under FAQ tab. 4 Power Cord - Wheels and legs are approximate. Close cover ensuring wires are tucked inside terminal box. Dishwasher Height Adjustment Chart Cabinet opening height Wheel position Number of turns on the floor). Insert tabs on left side ... difficult to move. (Measurements are preset at the factory for additional clearance. Use 1/4" nut driver and previously removed screw to floor where dishwasher will be installed (you will be removed for 34 1/2" [87.6 cm].) 2 Adjust wheels and legs Place wires inside box. Secure cord on the ...

Installation Instructions
Page 14
... a higher toe kick, adjust the height of the wood panel accordingly. If the installation needs a higher toe kick, adjust the height of the wood panel accordingly. Push the door handle tightly against the door. Dishwashers with control panel on top custom panel dimensions 23 1/2" (59.7 cm) *30 ...cm) (52c"m) 2-3(/74c"m) Built-up to bring the dishwasher up floors (Kitchen floor height is higher than cabinet opening.) Example: Kitchen floor tile does not extend into the setscrews. Insert the short end of "Install custom panel" section. Follow directions under Option 1 of the...
... a higher toe kick, adjust the height of the wood panel accordingly. If the installation needs a higher toe kick, adjust the height of the wood panel accordingly. Push the door handle tightly against the door. Dishwashers with control panel on top custom panel dimensions 23 1/2" (59.7 cm) *30 ...cm) (52c"m) 2-3(/74c"m) Built-up to bring the dishwasher up floors (Kitchen floor height is higher than cabinet opening.) Example: Kitchen floor tile does not extend into the setscrews. Insert the short end of "Install custom panel" section. Follow directions under Option 1 of the...

Installation Instructions
Page 15
...scratching surface. 3 Mark line 9 29/32" (25.2 cm) Back Top edge Measure 9 29/32" (25.2 cm) from humidity. 1 Custom panel installation - IMPORTANT: Use a moisture resistant sealer on both sides and all four hole locations; Not recommended for 4" (10.2 cm) toe kick. Place the outer...supplied is attached from both panels are used, it is recommended that the top holes in customer-supplied custom panel. Dishwashers with control panel on KitchenAid custom handle selection, refer to specific dimensions. With a TORX® screwdriver, remove three screws from the back ...
...scratching surface. 3 Mark line 9 29/32" (25.2 cm) Back Top edge Measure 9 29/32" (25.2 cm) from humidity. 1 Custom panel installation - IMPORTANT: Use a moisture resistant sealer on both sides and all four hole locations; Not recommended for 4" (10.2 cm) toe kick. Place the outer...supplied is attached from both panels are used, it is recommended that the top holes in customer-supplied custom panel. Dishwashers with control panel on KitchenAid custom handle selection, refer to specific dimensions. With a TORX® screwdriver, remove three screws from the back ...

Installation Instructions
Page 16
.... IMPORTANT: Screw heads must be flush with back of the customer-supplied custom panel in the literature package. Install Custom Panel - NOTE: A custom full front panel must weigh no more than 6" (15.2 cm). Dishwashers with the four #10-16 x 3/8" hex head screws supplied in the area shown. Kit Number 8171555 (black), 8171556...
.... IMPORTANT: Screw heads must be flush with back of the customer-supplied custom panel in the literature package. Install Custom Panel - NOTE: A custom full front panel must weigh no more than 6" (15.2 cm). Dishwashers with the four #10-16 x 3/8" hex head screws supplied in the area shown. Kit Number 8171555 (black), 8171556...

Installation Instructions
Page 17
... more people to the countertop if it is marble, granite or other injury. Option 1, Countertop attachment: Countertop attachment brackets IMPORTANT: The dishwasher must be attached to move and install dishwasher. Option 2, Dishwasher side attachment: 1 Remove brackets from the top tabs To remove the brackets from the top, flatten tab at back of brackets with...
... more people to the countertop if it is marble, granite or other injury. Option 1, Countertop attachment: Countertop attachment brackets IMPORTANT: The dishwasher must be attached to move and install dishwasher. Option 2, Dishwasher side attachment: 1 Remove brackets from the top tabs To remove the brackets from the top, flatten tab at back of brackets with...


