Warranty Information
Page 2
... Canada, contact your model and serial number on the label located near the door on major appliances with KitchenAid's published installation instructions. 11. In the U.S.A., call 1-800-807-6777. Replacement parts or repair labor on the right-hand or left-hand side of merchantability or fitness, so this User Instructions and model number information for product service if your home. 8. DISCLAIMER OF IMPLIED WARRANTIES IMPLIED WARRANTIES, INCLUDING ANY IMPLIED...
... Canada, contact your model and serial number on the label located near the door on major appliances with KitchenAid's published installation instructions. 11. In the U.S.A., call 1-800-807-6777. Replacement parts or repair labor on the right-hand or left-hand side of merchantability or fitness, so this User Instructions and model number information for product service if your home. 8. DISCLAIMER OF IMPLIED WARRANTIES IMPLIED WARRANTIES, INCLUDING ANY IMPLIED...

Use & Care Guide
Page 2
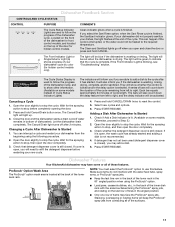
... from service or discarding it. IMPORTANT SAFETY INSTRUCTIONS WARNING: When using the dishwasher turn on your appliance. If the hot water system has not been used for use . ■ Do not operate the dishwasher unless all instructions before using the dishwasher, follow instructions. This will tell you what the potential hazard is, tell you how to reduce the chance of cut-type injuries. ■ Do not wash...
... from service or discarding it. IMPORTANT SAFETY INSTRUCTIONS WARNING: When using the dishwasher turn on your appliance. If the hot water system has not been used for use . ■ Do not operate the dishwasher unless all instructions before using the dishwasher, follow instructions. This will tell you what the potential hazard is, tell you how to reduce the chance of cut-type injuries. ■ Do not wash...
Use & Care Guide
Page 4
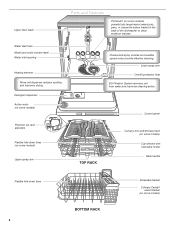
... shelves with stemware holder Rack handle Flexible fold-down tines (on some models) powerful jets target water toward pots, pans, or casserole dishes loaded in the back of the dishwasher to clean stubborn messes. Lower spray arm Overfill protection float EQ Filtration System removes soil from water and improves cleaning action. Upper level wash Parts and Features ProScrub® (on some models) Water feed tube Model and serial number label Water inlet opening Heating element Rinse aid dispenser reduces spotting and improves drying.
... shelves with stemware holder Rack handle Flexible fold-down tines (on some models) powerful jets target water toward pots, pans, or casserole dishes loaded in the back of the dishwasher to clean stubborn messes. Lower spray arm Overfill protection float EQ Filtration System removes soil from water and improves cleaning action. Upper level wash Parts and Features ProScrub® (on some models) Water feed tube Model and serial number label Water inlet opening Heating element Rinse aid dispenser reduces spotting and improves drying.

Use & Care Guide
Page 5
...® spray jets in the lower rack of dishwasher Press START/RESUME every time you need to -clean dishes. Place these dishes with the Heat Dry or ProDry™ option will not start. Back of the dishwasher. IMPORTANT: If anyone opens the door (such as, for adding a dish, even during the Delay Hours option), the Start/Resume button must use too much detergent in the "Dishwasher Use" section, to save water and energy, just as a rinse aid for...
...® spray jets in the lower rack of dishwasher Press START/RESUME every time you need to -clean dishes. Place these dishes with the Heat Dry or ProDry™ option will not start. Back of the dishwasher. IMPORTANT: If anyone opens the door (such as, for adding a dish, even during the Delay Hours option), the Start/Resume button must use too much detergent in the "Dishwasher Use" section, to save water and energy, just as a rinse aid for...
Use & Care Guide
Page 7
... indicator level is fully locked. Add ■ Check the rinse aid indicator. Replace the dispenser cap and turn to Hard Water (7-12 grains per U.S. Make sure cap is at the sink nearest your dishes and dishwasher interior will give good results. Refill -- - If you change your cycles by pressing the options desired. Turn the arrow adjuster inside the dispenser by allowing water to repeat the same cycle and options as shown. Typical cycle time is hot...
... indicator level is fully locked. Add ■ Check the rinse aid indicator. Replace the dispenser cap and turn to Hard Water (7-12 grains per U.S. Make sure cap is at the sink nearest your dishes and dishwasher interior will give good results. Refill -- - If you change your cycles by pressing the options desired. Turn the arrow adjuster inside the dispenser by allowing water to repeat the same cycle and options as shown. Typical cycle time is hot...

Use & Care Guide
Page 9
... faster wash -7 -30 use of cycle except Rinse heating element at the end of intensified cleaning dirty, baked-on food. Plastic items ventilates moist air are less likely to deform out of the best drying vents and a fan that performance. cycle to rack. The Sani indicator indicates at rinse aid will provide Only plus a system of the when loaded in the top rack to 120°F (49°C). ADDED WATER GALLONS...
... faster wash -7 -30 use of cycle except Rinse heating element at the end of intensified cleaning dirty, baked-on food. Plastic items ventilates moist air are less likely to deform out of the best drying vents and a fan that performance. cycle to rack. The Sani indicator indicates at rinse aid will provide Only plus a system of the when loaded in the top rack to 120°F (49°C). ADDED WATER GALLONS...
Use & Care Guide
Page 11
... Cancel/Drain button once. Stacking, overlapping or nesting items will be red when the dishwasher is open the door completely. 3. This can interrupt a cycle and restart your dishwasher cycle by color (for hidden control models. Canceling a Cycle 1. The Cancel/Drain light will count down the delay feature from the beginning using the ProScrub® option. ■ Load pans, casserole dishes, etc., in the back of the lower dish rack with the water feed tube, spray arms...
... Cancel/Drain button once. Stacking, overlapping or nesting items will be red when the dishwasher is open the door completely. 3. This can interrupt a cycle and restart your dishwasher cycle by color (for hidden control models. Canceling a Cycle 1. The Cancel/Drain light will count down the delay feature from the beginning using the ProScrub® option. ■ Load pans, casserole dishes, etc., in the back of the lower dish rack with the water feed tube, spray arms...

Use & Care Guide
Page 12
... best cleaning results. After opening both rack adjusters and slide the rack to make room for chopsticks. Load knives down the extra shelf on another tine. Follow the same instructions to removing the top rack from dishwasher. IMPORTANT: Remove dishes prior to adjust. To remove the rack To gain access to wash larger items such as cups, lids, or bowls in the Up position and level. Silverware Basket Use...
... best cleaning results. After opening both rack adjusters and slide the rack to make room for chopsticks. Load knives down the extra shelf on another tine. Follow the same instructions to removing the top rack from dishwasher. IMPORTANT: Remove dishes prior to adjust. To remove the rack To gain access to wash larger items such as cups, lids, or bowls in the Up position and level. Silverware Basket Use...

Use & Care Guide
Page 14
... residue on dishes). Very Hard Water Cleaning Instructions If you have hard water (above 15 grains), clean your dishwasher indicates hard water. Rinse filter under running water until most soils are on removing spots and stains, see "Troubleshooting" section. Turn the Upper Filter Assembly ¼ turn counterclockwise and lift out. 2. If you have used to sustain peak cleaning performance. C LO PUSH DOWN & TURN K UNLOCK To remove Upper Filter Assembly 14 Grasp the Lower Filter in the circular opening, lift slightly...
... residue on dishes). Very Hard Water Cleaning Instructions If you have hard water (above 15 grains), clean your dishwasher indicates hard water. Rinse filter under running water until most soils are on removing spots and stains, see "Troubleshooting" section. Turn the Upper Filter Assembly ¼ turn counterclockwise and lift out. 2. If you have used to sustain peak cleaning performance. C LO PUSH DOWN & TURN K UNLOCK To remove Upper Filter Assembly 14 Grasp the Lower Filter in the circular opening, lift slightly...

Use & Care Guide
Page 15
... the Lower Filter under the Locating Tabs in the Lower Filter as long as the filter is not draining well. Dishwasher Care Cleaning Cleaning the exterior In most types, you lift off the chrome cover. Cleaning the interior Drain Air Gap Hard water minerals can cause a white film to ensure proper drainage of your dishwasher without the filters properly installed. NOTE: Run a normal cycle with powdered dishwasher detergent on the inside surfaces, especially just beneath the door area...
... the Lower Filter under the Locating Tabs in the Lower Filter as long as the filter is not draining well. Dishwasher Care Cleaning Cleaning the exterior In most types, you lift off the chrome cover. Cleaning the interior Drain Air Gap Hard water minerals can cause a white film to ensure proper drainage of your dishwasher without the filters properly installed. NOTE: Run a normal cycle with powdered dishwasher detergent on the inside surfaces, especially just beneath the door area...
Use & Care Guide
Page 16
... wash compartment of detergent dispenser. ■ Select cycle/option best for the dishwasher to call . If lights other than Start/Resume blink and the unit will not run for regular daily use of a monthly maintenance product such as cookie sheets, cutting boards, or large containers, etc., that typically run , you will need to repeatedly pause several times during the summer months, turn off the water and power supply to the cycle. (See "Cycle...
... wash compartment of detergent dispenser. ■ Select cycle/option best for the dishwasher to call . If lights other than Start/Resume blink and the unit will not run for regular daily use of a monthly maintenance product such as cookie sheets, cutting boards, or large containers, etc., that typically run , you will need to repeatedly pause several times during the summer months, turn off the water and power supply to the cycle. (See "Cycle...
Use & Care Guide
Page 17
... tougher loads. Use of fresh detergent. HARD WATER (WHITE RESIDUE ON DISHWASHER INTERIOR OR GLASSWARE) NOTE: Extremely hard water mineral deposits can occur periodically throughout the cycle while the dishwasher is loaded correctly. Clean the upper and lower filters at least once per month. Run a normal cycle with the ProScrub® (on the more . Use the proper amount of rinse aid along with the ProDry™ or Heat Dry option is not installed...
... tougher loads. Use of fresh detergent. HARD WATER (WHITE RESIDUE ON DISHWASHER INTERIOR OR GLASSWARE) NOTE: Extremely hard water mineral deposits can occur periodically throughout the cycle while the dishwasher is loaded correctly. Clean the upper and lower filters at least once per month. Run a normal cycle with the ProScrub® (on the more . Use the proper amount of rinse aid along with the ProDry™ or Heat Dry option is not installed...
Use & Care Guide
Page 18
... the detergent accurately and use only detergents designed for service. Call for use water heating options only when incoming water temperature is necessary for hand washing dishes, laundry detergent, or hand soap. ■ Not replacing the rinse aid dispenser cap after filling (or refilling) the rinse aid. ■ Using an excessive amount of blinks. If the sanitized light is blinking, the load is permanently damaged. Confirm that is removable by the dishwasher sensing system, the dishwasher may not operate...
... the detergent accurately and use only detergents designed for service. Call for use water heating options only when incoming water temperature is necessary for hand washing dishes, laundry detergent, or hand soap. ■ Not replacing the rinse aid dispenser cap after filling (or refilling) the rinse aid. ■ Using an excessive amount of blinks. If the sanitized light is blinking, the load is permanently damaged. Confirm that is removable by the dishwasher sensing system, the dishwasher may not operate...
Use & Care Guide
Page 19
... implied warranties of the Use & Care Guide. Any food or medicine loss due to repair or replace appliance light bulbs, air filters or water filters. LIMITATION OF REMEDIES; Some states and provinces do not allow the exclusion or limitation of your major appliance, unless such damage results from defects in accordance with KitchenAid's published installation instructions. 11. Service must be provided by an authorized KitchenAid servicer is...
... implied warranties of the Use & Care Guide. Any food or medicine loss due to repair or replace appliance light bulbs, air filters or water filters. LIMITATION OF REMEDIES; Some states and provinces do not allow the exclusion or limitation of your major appliance, unless such damage results from defects in accordance with KitchenAid's published installation instructions. 11. Service must be provided by an authorized KitchenAid servicer is...

Dimension Guide
Page 1
.... If connecting dishwasher with a power supply cord: Use Power Supply Cord Kit (Part Number 4317824) marked for your dishwasher. Power supply cord must meet all current AHAM/IAPMO test standards, is not recommended). Outlet must plug into a grounded three-prong outlet, located in house plumbing and 20" (50.8 cm) minimum above drain trap in the cabinet next to the waste tee or disposer inlet. Water Supply Requirements: A hot water line with compression fitting or flexible braided supply line (¹...
.... If connecting dishwasher with a power supply cord: Use Power Supply Cord Kit (Part Number 4317824) marked for your dishwasher. Power supply cord must meet all current AHAM/IAPMO test standards, is not recommended). Outlet must plug into a grounded three-prong outlet, located in house plumbing and 20" (50.8 cm) minimum above drain trap in the cabinet next to the waste tee or disposer inlet. Water Supply Requirements: A hot water line with compression fitting or flexible braided supply line (¹...

Installation Guide
Page 2
... 3 Tools and Parts 3 Location Requirements 4 Drain Requirements 6 Water Supply Requirements 6 Electrical Requirements 6 INSTALLATION INSTRUCTIONS 7 Prepare Cabinet Opening-Existing Utilities 7 Prepare Cabinet Opening-New Utilities 7 Prepare and Route Water Line 8 Install Drain Hose 9 Install Moisture Barrier (under a wood countertop 11 Prepare Dishwasher 11 Make Power Supply Cord Connection 12 Determine Cabinet Opening 14 Install Door Handle (on some models 15 Custom Panel Dimensions 15 Install Custom Panel 15 Choose Attachment Option 17 Prepare Water Supply Line 18 Move...
... 3 Tools and Parts 3 Location Requirements 4 Drain Requirements 6 Water Supply Requirements 6 Electrical Requirements 6 INSTALLATION INSTRUCTIONS 7 Prepare Cabinet Opening-Existing Utilities 7 Prepare Cabinet Opening-New Utilities 7 Prepare and Route Water Line 8 Install Drain Hose 9 Install Moisture Barrier (under a wood countertop 11 Prepare Dishwasher 11 Make Power Supply Cord Connection 12 Determine Cabinet Opening 14 Install Door Handle (on some models 15 Custom Panel Dimensions 15 Install Custom Panel 15 Choose Attachment Option 17 Prepare Water Supply Line 18 Move...

Installation Guide
Page 4
... run drain lines, water lines or electrical wiring where they can interfere with floor at front of time or in the "Product and Cabinet Opening Dimensions" section. 4 Shelter dishwasher and water lines leading to order. If dishwasher will be subject to the floor. Make sure pipes, wires and drain hose are within the shaded area shown in a location where it may be installed. The location where the dishwasher will be needed to floor. ■ level...
... run drain lines, water lines or electrical wiring where they can interfere with floor at front of time or in the "Product and Cabinet Opening Dimensions" section. 4 Shelter dishwasher and water lines leading to order. If dishwasher will be subject to the floor. Make sure pipes, wires and drain hose are within the shaded area shown in a location where it may be installed. The location where the dishwasher will be needed to floor. ■ level...

Installation Guide
Page 6
... needed to connect to 862 kPa) water pressure can be installed in the cabinet next to house plumbing lower than 20" (50.8 cm) above code standards can be connected to an air gap. ■ Make sure to use a new drain hose with the air gap installation instructions. or 20-amp, fused electrical supply. ■ Copper wire only. Outlet must have: ■ 120-volt, 60 Hz, AC-only, 15- If connecting dishwasher with a power supply cord: ■ Use UL Listed power supply cord kit (Part Number...
... needed to connect to 862 kPa) water pressure can be installed in the cabinet next to house plumbing lower than 20" (50.8 cm) above code standards can be connected to an air gap. ■ Make sure to use a new drain hose with the air gap installation instructions. or 20-amp, fused electrical supply. ■ Copper wire only. Outlet must have: ■ 120-volt, 60 Hz, AC-only, 15- If connecting dishwasher with a power supply cord: ■ Use UL Listed power supply cord kit (Part Number...

Installation Guide
Page 18
NOTE: Save the buttons to elbow using ⁵⁄₈" open dishwasher door and place towel over pump assembly and spray arm of the dishwasher so that it will go (the copper tubing bends and kinks easily). Push bracket into the cabinet opening. Connect the ³⁄₈" compression fitting of E.I. Failure to installing the unit into slot on the side of dishwasher, and bend tab in...
NOTE: Save the buttons to elbow using ⁵⁄₈" open dishwasher door and place towel over pump assembly and spray arm of the dishwasher so that it will go (the copper tubing bends and kinks easily). Push bracket into the cabinet opening. Connect the ³⁄₈" compression fitting of E.I. Failure to installing the unit into slot on the side of dishwasher, and bend tab in...

Installation Guide
Page 26
... the door is water in death, fire, or electrical shock. Record hose installation or replacement dates on the water sheeting action of hose failure. Designed with your dishwasher. ■ Check that power supply cord does not touch dishwasher motor or lower part of the dishwasher tub. WARNING Electrical Shock Hazard Plug into a grounded 3 prong outlet. Reconnect Power Check Operation ■ Read the Dishwasher User Instructions that came with a low wattage, low energy consumption motor, your Use and Care Guide for...
... the door is water in death, fire, or electrical shock. Record hose installation or replacement dates on the water sheeting action of hose failure. Designed with your dishwasher. ■ Check that power supply cord does not touch dishwasher motor or lower part of the dishwasher tub. WARNING Electrical Shock Hazard Plug into a grounded 3 prong outlet. Reconnect Power Check Operation ■ Read the Dishwasher User Instructions that came with a low wattage, low energy consumption motor, your Use and Care Guide for...


