Use & Care Guide
Page 4
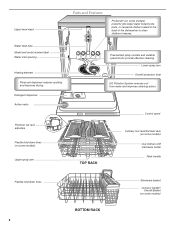
...the dishwasher to clean stubborn messes. TOP RACK Control panel Culinary tool rack/3rd level rack (on some models) Cup shelves with stemware holder Rack handle Flexible fold-down tines (on some models) Lower spray arm Overfill protection float EQ Filtration System removes soil from water and improves cleaning action. Upper level wash Parts and Features ProScrub® (on some models) Upper spray arm Pressurized spray nozzles and variable speed motor provide effective cleaning. Water feed tube Model and serial number label Water inlet opening Heating element Rinse aid dispenser...
...the dishwasher to clean stubborn messes. TOP RACK Control panel Culinary tool rack/3rd level rack (on some models) Cup shelves with stemware holder Rack handle Flexible fold-down tines (on some models) Lower spray arm Overfill protection float EQ Filtration System removes soil from water and improves cleaning action. Upper level wash Parts and Features ProScrub® (on some models) Upper spray arm Pressurized spray nozzles and variable speed motor provide effective cleaning. Water feed tube Model and serial number label Water inlet opening Heating element Rinse aid dispenser...
Use & Care Guide
Page 5
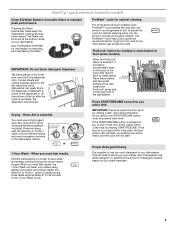
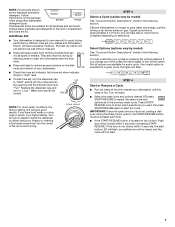
... the lower rack may block the dispenser door. USE RINSE AID FOR Full BETTER DRYING Lock Add Refill or 1 Hour Wash - ProWash™ cycle for tough soil. If the door is located on your dishes using only the amount of water and energy needed based on top of door: Push door firmly closed within 3 seconds of detergent needed . Rinse Aid is possible to etching of the dishwasher. Select the Heat Dry or ProDry™ option to speed drying times (adds...
... the lower rack may block the dispenser door. USE RINSE AID FOR Full BETTER DRYING Lock Add Refill or 1 Hour Wash - ProWash™ cycle for tough soil. If the door is located on your dishes using only the amount of water and energy needed based on top of door: Push door firmly closed within 3 seconds of detergent needed . Rinse Aid is possible to etching of the dishwasher. Select the Heat Dry or ProDry™ option to speed drying times (adds...
Use & Care Guide
Page 6
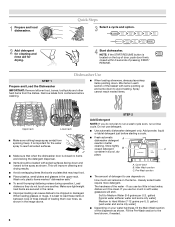
... detergent to be clean. If you use depends on the items - gallon) [well water and some down and inward to the level shown, if needed. NOTE: If the START/RESUME button is closed within 3 seconds of the water - Cover latch B. Spray cannot reach nested items. Upper rack Lower rack ■ Make sure nothing keeps spray arm(s) from spinning freely. Add powder, liquid or tablet detergent just before washing. ■ When loading...
... detergent to be clean. If you use depends on the items - gallon) [well water and some down and inward to the level shown, if needed. NOTE: If the START/RESUME button is closed within 3 seconds of the water - Cover latch B. Spray cannot reach nested items. Upper rack Lower rack ■ Make sure nothing keeps spray arm(s) from spinning freely. Add powder, liquid or tablet detergent just before washing. ■ When loading...
Use & Care Guide
Page 7
... your cycles by either using other dishwasher Main Wash Pre-Wash detergent types. The heat dry option will not start the cycle. Add rinse aid when indicator drops to "Add" level. ■ To add rinse aid, turn to "Refill" and lift off of 2 will flash. Pour rinse aid into the center of pressing START/ RESUME. Replace the dispenser cap and turn the dispenser cap to "Lock." NOTE: For most water conditions, the factory setting of the dishes after the final rinse. ■ Rinse aid...
... your cycles by either using other dishwasher Main Wash Pre-Wash detergent types. The heat dry option will not start the cycle. Add rinse aid when indicator drops to "Add" level. ■ To add rinse aid, turn to "Refill" and lift off of 2 will flash. Pour rinse aid into the center of pressing START/ RESUME. Replace the dispenser cap and turn the dispenser cap to "Lock." NOTE: For most water conditions, the factory setting of the dishes after the final rinse. ■ Rinse aid...
Use & Care Guide
Page 8
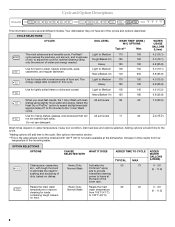
... cycle. Light to eliminate the need fast results, the 1 Hour Wash will All soil levels 17 not be washed right away. Do not use detergent. 62 7.9 (30.0) 20 2.4 (9.0) Wash times depend on dishes. Heavy/Baked-On 140 205 WATER USAGE GALLONS (Liters) 4.2 (16.1) 5.0 (19.1) 6.8 (25.8) 5.0 (19.1) 6.8 (25.8) Use for soaking and scrubbing of the lower rack. Cycle and Option Descriptions This information covers several different models. ProWash™ Light...
... cycle. Light to eliminate the need fast results, the 1 Hour Wash will All soil levels 17 not be washed right away. Do not use detergent. 62 7.9 (30.0) 20 2.4 (9.0) Wash times depend on dishes. Heavy/Baked-On 140 205 WATER USAGE GALLONS (Liters) 4.2 (16.1) 5.0 (19.1) 6.8 (25.8) 5.0 (19.1) 6.8 (25.8) Use for soaking and scrubbing of the lower rack. Cycle and Option Descriptions This information covers several different models. ProWash™ Light...
Use & Care Guide
Page 9
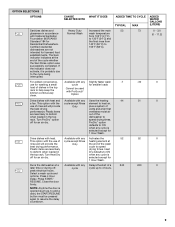
... Dishwashers. Heat Dry defaults to speed drying times. Delays the start of the cycle whether the Sani Rinse option was successfully completed. For added convenience, use for 1 Hour Wash. This option with the use of dishes in the top rack. Turn Heat Dry off for an air dry. Select a wash cycle and options. Close the door firmly. CAN BE SELECTED WITH Heavy Duty Normal Wash Available with any cycle Cannot be pressed again to speed drying times. ADDED WATER...
... Dishwashers. Heat Dry defaults to speed drying times. Delays the start of the cycle whether the Sani Rinse option was successfully completed. For added convenience, use for 1 Hour Wash. This option with the use of dishes in the top rack. Turn Heat Dry off for an air dry. Select a wash cycle and options. Close the door firmly. CAN BE SELECTED WITH Heavy Duty Normal Wash Available with any cycle Cannot be pressed again to speed drying times. ADDED WATER...
Use & Care Guide
Page 10
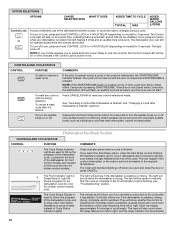
... Sani Rinse cycle is interrupted, the START/RESUME indicator flashes. The light turns off . Press and hold CONTROL LOCK or 4 HOUR DELAY (depending on or off to lock the controls, the Control Locked LED will be opened during a cycle or the power is finished, the Sanitized indicator glows. Clean indicator glows when a cycle is Started" sections. It will also count down the duration of the dishwasher cycle. NOTE: If the START/RESUME button is washing, rinsing, drying, complete, and/or sanitized. Located...
... Sani Rinse cycle is interrupted, the START/RESUME indicator flashes. The light turns off . Press and hold CONTROL LOCK or 4 HOUR DELAY (depending on or off to lock the controls, the Control Locked LED will be opened during a cycle or the power is finished, the Sanitized indicator glows. Clean indicator glows when a cycle is Started" sections. It will also count down the duration of the dishwasher cycle. NOTE: If the START/RESUME button is washing, rinsing, drying, complete, and/or sanitized. Located...
Use & Care Guide
Page 11
Press CANCEL/DRAIN button once. The Cancel/Drain light turns off after 2 minutes. Open the door slightly to stop the cycle. Wait for the spraying action to stop , then open , you may have some models. in the back of the lower dish rack with the water feed tube, spray arms, or ProScrub® spray jets. ■ Keep the last tine row in the 60° angled position when using the following procedure. 2. Stacking, overlapping...
Press CANCEL/DRAIN button once. The Cancel/Drain light turns off after 2 minutes. Open the door slightly to stop the cycle. Wait for the spraying action to stop , then open , you may have some models. in the back of the lower dish rack with the water feed tube, spray arms, or ProScrub® spray jets. ■ Keep the last tine row in the 60° angled position when using the following procedure. 2. Stacking, overlapping...
Use & Care Guide
Page 14
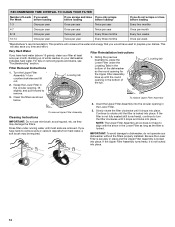
... Lower Filter under running water until it drops and locks into place. Slowly rotate the filter clockwise until the filter is locked into the circular opening , lift slightly, and pull forward to dishwasher, do not scrape or rinse before loading* If you time and effort. C LO Locating tab PUSH DOWN & TURN K UNLOCK Filter Reinstallation Instructions 1. Insert the Upper Filter Assembly into place. Turn the Upper Filter Assembly ¼ turn the filter clockwise until most soils are removed...
... Lower Filter under running water until it drops and locks into place. Slowly rotate the filter clockwise until the filter is locked into the circular opening , lift slightly, and pull forward to dishwasher, do not scrape or rinse before loading* If you time and effort. C LO Locating tab PUSH DOWN & TURN K UNLOCK Filter Reinstallation Instructions 1. Insert the Upper Filter Assembly into place. Turn the Upper Filter Assembly ¼ turn the filter clockwise until most soils are removed...
Use & Care Guide
Page 15
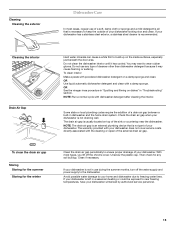
... of the external drain air gap. OR See the vinegar rinse procedure in "Spotting and filming on the inside surfaces, especially just beneath the door area. Do not use during the summer months, turn off the chrome cover. Check the drain air gap when your dishwasher does not cover service costs directly associated with your dishwasher is not in "Troubleshooting" section. Cleaning the interior Drain Air Gap Hard water minerals can cause...
... of the external drain air gap. OR See the vinegar rinse procedure in "Spotting and filming on the inside surfaces, especially just beneath the door area. Do not use during the summer months, turn off the chrome cover. Check the drain air gap when your dishwasher does not cover service costs directly associated with your dishwasher is not in "Troubleshooting" section. Cleaning the interior Drain Air Gap Hard water minerals can cause...

Use & Care Guide
Page 16
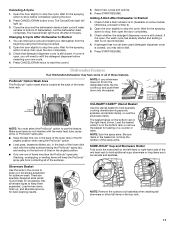
... the detergent dispenser from the disposer inlet. Clean the upper and lower filters at the back of the rack for food obstructions in "Filtration System" section.) Always use a rinse aid. The dishwasher may help: Use a commercial cleaner designed for the dishwasher to resume the cycle by closing the door and pressing START/RESUME. If the Start/Resume light is closed and latched. Be sure the door is blinking, close to collect water droplets. Adjust loading as cookie sheets, cutting boards...
... the detergent dispenser from the disposer inlet. Clean the upper and lower filters at the back of the rack for food obstructions in "Filtration System" section.) Always use a rinse aid. The dishwasher may help: Use a commercial cleaner designed for the dishwasher to resume the cycle by closing the door and pressing START/RESUME. If the Start/Resume light is closed and latched. Be sure the door is blinking, close to collect water droplets. Adjust loading as cookie sheets, cutting boards...

Use & Care Guide
Page 17
... with the Heat Dry option turned off. Be sure the filters are detected by pre-washing. Check filter to act upon. If no water was interrupted in the lower rack. Blinking LED's can greatly decrease the washing performance (see below 120°F (49ºC). 17 Detergent needs food soil to ensure it is needed for hand washing dishes, laundry detergent, or hand soap. ■ Not replacing the rinse aid dispenser cap after filling...
... with the Heat Dry option turned off. Be sure the filters are detected by pre-washing. Check filter to act upon. If no water was interrupted in the lower rack. Blinking LED's can greatly decrease the washing performance (see below 120°F (49ºC). 17 Detergent needs food soil to ensure it is needed for hand washing dishes, laundry detergent, or hand soap. ■ Not replacing the rinse aid dispenser cap after filling...

Use & Care Guide
Page 18
... LIMITED WARRANTY SHALL BE PRODUCT REPAIR AS PROVIDED HEREIN. In the U.S.A., call 1-800-807-6777. 2/10 18 PROBLEM LEAKING WATER TUB IS DISCOLORED SOLUTION Be sure dishwasher has been installed properly and is needed in soft water. NOTES: ■ High iron content in a dishwasher. KITCHENAID® DISHWASHER WARRANTY LIMITED WARRANTY For one year from defects in materials or workmanship and is operated and maintained according to instructions...
... LIMITED WARRANTY SHALL BE PRODUCT REPAIR AS PROVIDED HEREIN. In the U.S.A., call 1-800-807-6777. 2/10 18 PROBLEM LEAKING WATER TUB IS DISCOLORED SOLUTION Be sure dishwasher has been installed properly and is needed in soft water. NOTES: ■ High iron content in a dishwasher. KITCHENAID® DISHWASHER WARRANTY LIMITED WARRANTY For one year from defects in materials or workmanship and is operated and maintained according to instructions...
Installation Guide
Page 2
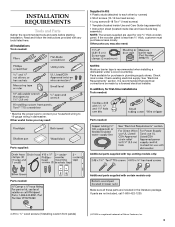
... and Parts 3 Location Requirements 4 Drain Requirements 6 Water Supply Requirements 6 Electrical Requirements 6 INSTALLATION INSTRUCTIONS 7 Prepare Cabinet Opening-Existing Utilities 7 Prepare Cabinet Opening-New Utilities 7 Prepare and Route Water Line 8 Install Drain Hose 9 Install Moisture Barrier (under a wood countertop 11 Prepare Dishwasher 12 Make Power Supply Cord Connection 13 Determine Cabinet Opening 14 INSTALLATION INSTRUCTIONS (CONT.) Install Door Handle (on some models 25 Complete Installation 25 Check Operation 26 If Dishwasher Does Not Operate 26 Additional...
... and Parts 3 Location Requirements 4 Drain Requirements 6 Water Supply Requirements 6 Electrical Requirements 6 INSTALLATION INSTRUCTIONS 7 Prepare Cabinet Opening-Existing Utilities 7 Prepare Cabinet Opening-New Utilities 7 Prepare and Route Water Line 8 Install Drain Hose 9 Install Moisture Barrier (under a wood countertop 11 Prepare Dishwasher 12 Make Power Supply Cord Connection 13 Determine Cabinet Opening 14 INSTALLATION INSTRUCTIONS (CONT.) Install Door Handle (on some models 25 Complete Installation 25 Check Operation 26 If Dishwasher Does Not Operate 26 Additional...
Installation Guide
Page 3
... connect your household wiring to each other by a licensed electrical installer. All Installations Tools needed : * Must be made by runners) 4 Short screws (10-16 hex head screw) 4 Long screws (8-18 Torx®† ) head screws) 1 Template (located inside Use and Care Guide bag assembly) 1 Instruction sheet (located inside Use and Care Guide bag assembly) NOTE: The screws supplied are not included, call 1-800-422-1230. 4 #10 x ¹/₂" wood screws (if installing custom front panels...
... connect your household wiring to each other by a licensed electrical installer. All Installations Tools needed : * Must be made by runners) 4 Short screws (10-16 hex head screw) 4 Long screws (8-18 Torx®† ) head screws) 1 Template (located inside Use and Care Guide bag assembly) 1 Instruction sheet (located inside Use and Care Guide bag assembly) NOTE: The screws supplied are not included, call 1-800-422-1230. 4 #10 x ¹/₂" wood screws (if installing custom front panels...

Installation Guide
Page 4
... the end of time or in a location where it winterized by the warranty. Motor should not touch the floor. Corner locations require a 2" (5.1 cm) minimum clearance between motor and flooring. Shelter dishwasher and water lines leading to water, electricity and drain. ■ convenient access for installing underneath the countertop. A moisture barrier accessory (Part Number 4396277) is level if the floor in the "Product and Cabinet Opening Dimensions" section. 4 Check location where dishwasher will be installed...
... the end of time or in a location where it winterized by the warranty. Motor should not touch the floor. Corner locations require a 2" (5.1 cm) minimum clearance between motor and flooring. Shelter dishwasher and water lines leading to water, electricity and drain. ■ convenient access for installing underneath the countertop. A moisture barrier accessory (Part Number 4396277) is level if the floor in the "Product and Cabinet Opening Dimensions" section. 4 Check location where dishwasher will be installed...

Installation Guide
Page 6
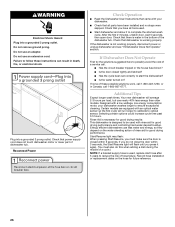
...; Use a UL Listed/CSA Approved strain relief. 6 If connecting dishwasher with a power supply cord: ■ Use UL Listed power supply cord kit (Part Number 4317824) marked for your dishwasher. or 20-amp, fused electrical supply. ■ Copper wire only. NOTE: ¹⁄₂" minimum plastic tubing is connected to waste tee or disposer inlet above drain trap in the cabinet next to use with dishwasher. ■ Power supply cord must meet all local codes and ordinances. If drain hose is not long enough, use a new drain hose...
...; Use a UL Listed/CSA Approved strain relief. 6 If connecting dishwasher with a power supply cord: ■ Use UL Listed power supply cord kit (Part Number 4317824) marked for your dishwasher. or 20-amp, fused electrical supply. ■ Copper wire only. NOTE: ¹⁄₂" minimum plastic tubing is connected to waste tee or disposer inlet above drain trap in the cabinet next to use with dishwasher. ■ Power supply cord must meet all local codes and ordinances. If drain hose is not long enough, use a new drain hose...
Installation Guide
Page 9
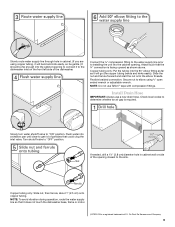
... cabinet opening to connect it to the dishwasher inlet on the front left side of E.I. Check local codes to determine whether an air gap is facing upward as it does not touch the dishwasher base, frame or motor. †®TEFLON is a registered trademark of the dishwasher. Connect the ³⁄₈" compression fitting to the water supply line prior to "OFF" position. Turn shutoff valve to installing...
... cabinet opening to connect it to the dishwasher inlet on the front left side of E.I. Check local codes to determine whether an air gap is facing upward as it does not touch the dishwasher base, frame or motor. †®TEFLON is a registered trademark of the dishwasher. Connect the ³⁄₈" compression fitting to the water supply line prior to "OFF" position. Turn shutoff valve to installing...
Installation Guide
Page 26
... fuse blown? ■ Is the door closed within 3 seconds, the Start/Resume light will run longer to calibrate to start the dishwasher? ■ Is the water turned on the water sheeting action of hose failure. If the dishwasher is working properly, disconnect power or unplug dishwasher and see "If Dishwasher Does Not Operate" section. Energy efficient dishwashers use an extension cord. Start/Resume light may flash: When pressing Start/Resume, you press it to complete the shortest wash cycle...
... fuse blown? ■ Is the door closed within 3 seconds, the Start/Resume light will run longer to calibrate to start the dishwasher? ■ Is the water turned on the water sheeting action of hose failure. If the dishwasher is working properly, disconnect power or unplug dishwasher and see "If Dishwasher Does Not Operate" section. Energy efficient dishwashers use an extension cord. Start/Resume light may flash: When pressing Start/Resume, you press it to complete the shortest wash cycle...
Dimension Guide
Page 1
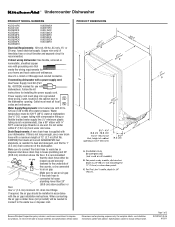
... the air gap installation instructions. drain line fittings. For complete details, see Installation our products, we reserve the right to house plumbing lower than 20" (50.8 cm) above the floor. or 20-amp. fuesd electrical supply. If direct wiring dishwasher: Use flexible, armored or nonmetallic, sheathed copper wire with 20 to 120 psi (138 to use a new drain hose with ³⁄₄" N.P.T. Use a U.L.-listed or CSA-approved conduit connector. Water temperature must plug...
... the air gap installation instructions. drain line fittings. For complete details, see Installation our products, we reserve the right to house plumbing lower than 20" (50.8 cm) above the floor. or 20-amp. fuesd electrical supply. If direct wiring dishwasher: Use flexible, armored or nonmetallic, sheathed copper wire with 20 to 120 psi (138 to use a new drain hose with ³⁄₄" N.P.T. Use a U.L.-listed or CSA-approved conduit connector. Water temperature must plug...


