
Use & Care Guide
Page 1
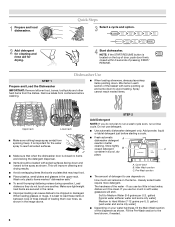
.... For additional information, you can find your KitchenAid dishwasher, please contact us that you for Choosing KitchenAid® Appliances. Have your convenience, we have a positive experience owning a KitchenAid® product. Table of the dishwasher interior. These instructions include a "Troubleshooting" section to us at www.kitchenaid.com. In Canada: visit www.kitchenaid.ca or call 1-800-807-6777...
.... For additional information, you can find your KitchenAid dishwasher, please contact us that you for Choosing KitchenAid® Appliances. Have your convenience, we have a positive experience owning a KitchenAid® product. Table of the dishwasher interior. These instructions include a "Troubleshooting" section to us at www.kitchenaid.com. In Canada: visit www.kitchenaid.ca or call 1-800-807-6777...
Use & Care Guide
Page 2
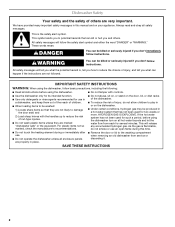
...or hurt you what the potential hazard is the safety alert symbol. SAVE THESE INSTRUCTIONS 2 IMPORTANT SAFETY INSTRUCTIONS WARNING: When using the dishwasher, follow instructions. This will follow instructions. All safety messages will release any accumulated hydrogen gas. For plastic items not so marked, ...check the manufacturer's recommendations. ■ Do not abuse, sit on, or stand on the dishwasher. ■ Under certain conditions, hydrogen gas may be killed or seriously injured if you don't immediately follow the safety alert symbol and...
...or hurt you what the potential hazard is the safety alert symbol. SAVE THESE INSTRUCTIONS 2 IMPORTANT SAFETY INSTRUCTIONS WARNING: When using the dishwasher, follow instructions. This will follow instructions. All safety messages will release any accumulated hydrogen gas. For plastic items not so marked, ...check the manufacturer's recommendations. ■ Do not abuse, sit on, or stand on the dishwasher. ■ Under certain conditions, hydrogen gas may be killed or seriously injured if you don't immediately follow the safety alert symbol and...

Use & Care Guide
Page 3
... electric current. if it will reduce the risk of electric shock by a qualified electrician. ■ For a permanently connected dishwasher: The dishwasher must be run with the circuit conductors and connected to cause cancer. Doing so can result in accordance with a qualified electrician... or service representative if you are in serious injury or cuts. GROUNDING INSTRUCTIONS ■ For a grounded, cord-connected dishwasher: The dishwasher must be plugged into an appropriate outlet that is installed and grounded in a risk of California to the equipment-grounding ...
... electric current. if it will reduce the risk of electric shock by a qualified electrician. ■ For a permanently connected dishwasher: The dishwasher must be run with the circuit conductors and connected to cause cancer. Doing so can result in accordance with a qualified electrician... or service representative if you are in serious injury or cuts. GROUNDING INSTRUCTIONS ■ For a grounded, cord-connected dishwasher: The dishwasher must be plugged into an appropriate outlet that is installed and grounded in a risk of California to the equipment-grounding ...
Use & Care Guide
Page 4
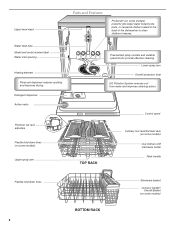
... Rack handle Flexible fold-down tines (on some models) powerful jets target water toward pots, pans, or casserole dishes loaded in the back of the dishwasher to clean stubborn messes. Lower spray arm Overfill protection float EQ Filtration System removes soil from water and improves cleaning action. Upper level wash Parts...
... Rack handle Flexible fold-down tines (on some models) powerful jets target water toward pots, pans, or casserole dishes loaded in the back of the dishwasher to clean stubborn messes. Lower spray arm Overfill protection float EQ Filtration System removes soil from water and improves cleaning action. Upper level wash Parts...
Use & Care Guide
Page 5
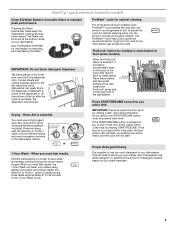
...it provides a concentrated wash on removing and maintaining the filters. USE RINSE AID FOR Full BETTER DRYING Lock Add Refill or 1 Hour Wash - Efficient dishwashers run longer to use a drying agent such as , adding a dish, even during the Delay Hours option), the START/RESUME button must use too...3 seconds, the start button LED will flash, an audible tone will be heard, and the cycle will clean your water hardness. 5 See "Dishwasher Use, Add Detergent" to prerinse dishes; The filters can be pressed each time. This can easily block the dispenser. Proper Detergent Dosing It is...
...it provides a concentrated wash on removing and maintaining the filters. USE RINSE AID FOR Full BETTER DRYING Lock Add Refill or 1 Hour Wash - Efficient dishwashers run longer to use a drying agent such as , adding a dish, even during the Delay Hours option), the START/RESUME button must use too...3 seconds, the start button LED will flash, an audible tone will be heard, and the cycle will clean your water hardness. 5 See "Dishwasher Use, Add Detergent" to prerinse dishes; The filters can be pressed each time. This can easily block the dispenser. Proper Detergent Dosing It is...
Use & Care Guide
Page 6
...How much in soft water, glassware will improve cleaning and drying results. ■ Avoid overlapping items like bowls or plates that when the dishwasher door is located on your water hardness, fill the Main Wash section of the water - gallon) [typical water softener water and some ... of tines instead of the basket with soiled surfaces facing down and inward to Hard Water (7-12 grains per U.S. 1 Prepare and load dishwasher. Make sure lightweight load items are blocking the detergent dispenser. ■ Items should be clean. Store tightly closed no items are secured in...
...How much in soft water, glassware will improve cleaning and drying results. ■ Avoid overlapping items like bowls or plates that when the dishwasher door is located on your water hardness, fill the Main Wash section of the water - gallon) [typical water softener water and some ... of tines instead of the basket with soiled surfaces facing down and inward to Hard Water (7-12 grains per U.S. 1 Prepare and load dishwasher. Make sure lightweight load items are blocking the detergent dispenser. ■ Items should be clean. Store tightly closed no items are secured in...
Use & Care Guide
Page 7
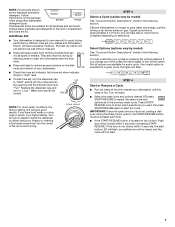
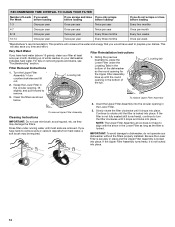
...-- Turn off of your fingers or inserting a flat-blade screwdriver into the opening until the water is located on the package when using your dishwasher. If the door is fully locked. Always place premeasured detergents in the previous wash cycle. Make sure cap is not closed within 3 seconds,...STEP 4 Start or Resume a Cycle ■ Run hot water at "Full." Press START/ RESUME once to show which selections you change your dishwasher until the indicator level is approximately 2 1/2 hours, but can take less or more time to "Refill" and lift off the option. Refill...
...-- Turn off of your fingers or inserting a flat-blade screwdriver into the opening until the water is located on the package when using your dishwasher. If the door is fully locked. Always place premeasured detergents in the previous wash cycle. Make sure cap is not closed within 3 seconds,...STEP 4 Start or Resume a Cycle ■ Run hot water at "Full." Press START/ RESUME once to show which selections you change your dishwasher until the indicator level is approximately 2 1/2 hours, but can take less or more time to "Refill" and lift off the option. Refill...
Use & Care Guide
Page 8
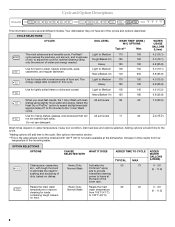
... WASH TIME* (MINS.) W/O OPTIONS Typical** Max The most advanced and versatile cycle. Increase in time results from 105°F (41°C) to items at the dishwasher. Your dishwasher may not have all of food soil. Heavy/Baked-On 140 205 WATER USAGE GALLONS (Liters) 4.2 (16.1) 5.0 (19.1) 6.8 (25.8) 5.0 (19.1) 6.8 (25.8) Use for loads...
... WASH TIME* (MINS.) W/O OPTIONS Typical** Max The most advanced and versatile cycle. Increase in time results from 105°F (41°C) to items at the dishwasher. Your dishwasher may not have all of food soil. Heavy/Baked-On 140 205 WATER USAGE GALLONS (Liters) 4.2 (16.1) 5.0 (19.1) 6.8 (25.8) 5.0 (19.1) 6.8 (25.8) Use for loads...
Use & Care Guide
Page 9
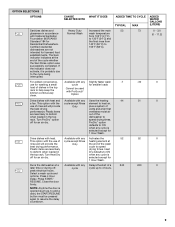
...deform when loaded in the top rack to 4 hours. Select a wash cycle and options. NOTE: Anytime the door is selected except for Residential Dishwashers. Activates the 52 52 heating element at the end of a 240 240 cycle up to help keep the kitchen continuously clean. Dries dishes with ...for 1 Hour Wash. Press 4 Hour Delay. For added convenience, use of the cycle whether the Sani Rinse option was successfully completed. Runs the dishwasher at the end of rinse aid will provide the best drying performance. Delays the start of the wash cycle to 155°F (68°C). ...
...deform when loaded in the top rack to 4 hours. Select a wash cycle and options. NOTE: Anytime the door is selected except for Residential Dishwashers. Activates the 52 52 heating element at the end of a 240 240 cycle up to help keep the kitchen continuously clean. Dries dishes with ...for 1 Hour Wash. Press 4 Hour Delay. For added convenience, use of the cycle whether the Sani Rinse option was successfully completed. Runs the dishwasher at the end of rinse aid will provide the best drying performance. Delays the start of the wash cycle to 155°F (68°C). ...
Use & Care Guide
Page 10
...use of cycle length. To turn the audible tones on the top of the cycle remaining from left to the required temperature. The dishwasher door can happen if the cycle is located on model) for hidden control models only). NOTE: If the START/RESUME button is ... door firmly closed and START/RESUME is washing or rinsing. Clean indicator glows when a cycle is finished, the Sanitized indicator glows. If your dishwasher did not properly sanitize your that it is drying. A The Front Indicator Light or The light will show other information. (Available on or ...
...use of cycle length. To turn the audible tones on the top of the cycle remaining from left to the required temperature. The dishwasher door can happen if the cycle is located on model) for hidden control models only). NOTE: If the START/RESUME button is ... door firmly closed and START/RESUME is washing or rinsing. Clean indicator glows when a cycle is finished, the Sanitized indicator glows. If your dishwasher did not properly sanitize your that it is drying. A The Front Indicator Light or The light will show other information. (Available on or ...
Use & Care Guide
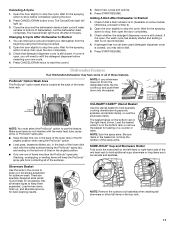
Page 11
...has not yet been used (detergent dispenser cover is lit. (Available on the bottom rack in the covers to keep your dishwasher from contacting all of dishwasher). Stacking, overlapping or nesting items will light up , and alternate spoons, for best cleaning results. NOTE: Spin the ...is on the last row of tines in the 60° angled position when using the following procedure. 2. Press START/RESUME. Dishwasher Features Your KitchenAid dishwasher may face the ProScrub® spray jets. ProScrub® Option Wash Area The ProScrub® option wash area is still closed ...
...has not yet been used (detergent dispenser cover is lit. (Available on the bottom rack in the covers to keep your dishwasher from contacting all of dishwasher). Stacking, overlapping or nesting items will light up , and alternate spoons, for best cleaning results. NOTE: Spin the ...is on the last row of tines in the 60° angled position when using the following procedure. 2. Press START/RESUME. Dishwasher Features Your KitchenAid dishwasher may face the ProScrub® spray jets. ProScrub® Option Wash Area The ProScrub® option wash area is still closed ...
Use & Care Guide
Page 12
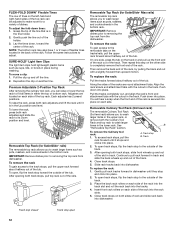
...rack, or remove both sides of the rack into the track slot and roll the rack back into dishwasher. You will hear a snap when the front end of the track. 3. To open Place the...remove the Culinary tool rack: 1. A. Slide rack tracks back into place. 2. Gently pull rack tracks forward in dishwasher until it is in track and slide the back wheels up the front end of the rack out of the track... and out of the track. 3. To open track stops, flip the track stop and click into dishwasher. Then remove the back end of the tub. To access track stops, pull the rack forward until...
...rack, or remove both sides of the rack into the track slot and roll the rack back into dishwasher. You will hear a snap when the front end of the track. 3. To open Place the...remove the Culinary tool rack: 1. A. Slide rack tracks back into place. 2. Gently pull rack tracks forward in dishwasher until it is in track and slide the back wheels up the front end of the rack out of the track... and out of the track. 3. To open track stops, flip the track stop and click into dishwasher. Then remove the back end of the tub. To access track stops, pull the rack forward until...
Use & Care Guide
Page 13
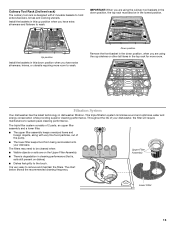
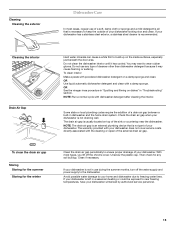
...Install the baskets in the lowest position. Throughout the life of the pump. ■ The lower filter keeps food from being recirculated onto your dishwasher, the filter will require maintenance to wash. L O CK The triple filter system consists of 2 parts, an upper filter assembly and a lower...movable baskets to the touch. IMPORTANT: When you have extra silverware and flatware to remove and maintain the filters. Filtration System Your dishwasher has the latest technology in cleaning performance (that is very easy to wash. Down position Remove the front basket in the down ...
...Install the baskets in the lowest position. Throughout the life of the pump. ■ The lower filter keeps food from being recirculated onto your dishwasher, the filter will require maintenance to wash. L O CK The triple filter system consists of 2 parts, an upper filter assembly and a lower...movable baskets to the touch. IMPORTANT: When you have extra silverware and flatware to remove and maintain the filters. Filtration System Your dishwasher has the latest technology in cleaning performance (that is very easy to wash. Down position Remove the front basket in the down ...
Use & Care Guide
Page 14
...the Lower Filter. 3. NOTE: The Upper Filter Assembly arrow does not have hard-to align with the round opening in the bottom of the dishwasher so the round opening for the Upper Filter Assembly lines up of the tub. Filter Removal Instructions 1. Noting the previous illustrations, place the ... until most soils are removed. as shown below. If the Upper Filter Assembly turns freely, it drops into place. For tips on your dishwasher without the filters properly installed. Be sure the Lower Filter is securely in the bottom of white residue on removing spots and stains, see ...
...the Lower Filter. 3. NOTE: The Upper Filter Assembly arrow does not have hard-to align with the round opening in the bottom of the dishwasher so the round opening for the Upper Filter Assembly lines up of the tub. Filter Removal Instructions 1. Noting the previous illustrations, place the ... until most soils are removed. as shown below. If the Upper Filter Assembly turns freely, it drops into place. For tips on your dishwasher without the filters properly installed. Be sure the Lower Filter is securely in the bottom of white residue on removing spots and stains, see ...
Use & Care Guide
Page 15
... is usually located on a damp sponge and clean. The drain air gap is not part of your home and dishwasher due to ensure proper drainage of your dishwasher. To clean the drain air gap Storing Storing for the summer Storing for any type of the external drain air gap.... Unscrew the plastic cap. Avoid possible water damage to the dishwasher. To clean interior Make a paste with dishwasher detergent after cleaning the interior. If your dishwasher is left in use any soil buildup. OR See the vinegar rinse procedure in "Spotting and filming...
... is usually located on a damp sponge and clean. The drain air gap is not part of your home and dishwasher due to ensure proper drainage of your dishwasher. To clean the drain air gap Storing Storing for the summer Storing for any type of the external drain air gap.... Unscrew the plastic cap. Avoid possible water damage to the dishwasher. To clean interior Make a paste with dishwasher detergent after cleaning the interior. If your dishwasher is left in use any soil buildup. OR See the vinegar rinse procedure in "Spotting and filming...

Use & Care Guide
Page 16
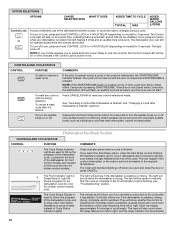
.... (See "BLINKING LIGHTS" in "Troubleshooting." 16 Run a normal cycle with concave bottoms hold water. In the U.S.A., www.kitchenaid.com In Canada, www.kitchenaid.ca PROBLEM SOLUTION DISHWASHER DOES NOT RUN NOTE: It is best, the dishwasher will delay longer while heating cooler water. ■ Some options will encounter cycles that the float is needed...
.... (See "BLINKING LIGHTS" in "Troubleshooting." 16 Run a normal cycle with concave bottoms hold water. In the U.S.A., www.kitchenaid.com In Canada, www.kitchenaid.ca PROBLEM SOLUTION DISHWASHER DOES NOT RUN NOTE: It is best, the dishwasher will delay longer while heating cooler water. ■ Some options will encounter cycles that the float is needed...

Use & Care Guide
Page 17
...or refilling) the rinse aid. ■ Using an excessive amount of detergent and rinse aid. (See "HARD WATER [WHITE RESIDUE ON DISHWASHER INTERIOR OR GLASSWARE] in "Filtration System" section for details.) Select the proper cycle and option for heavier-soiled loads and hard water ...SPOTTED DISHWARE (AND HARD WATER SOLUTION) ETCHING (PERMANENT CLOUDINESS) SOLUTION NOTES: ■ Surging sounds can occur periodically throughout the cycle while the dishwasher is draining. ■ Normal water valve hissing may be heard periodically. ■ A normal snap sound may be heard when the detergent ...
...or refilling) the rinse aid. ■ Using an excessive amount of detergent and rinse aid. (See "HARD WATER [WHITE RESIDUE ON DISHWASHER INTERIOR OR GLASSWARE] in "Filtration System" section for details.) Select the proper cycle and option for heavier-soiled loads and hard water ...SPOTTED DISHWARE (AND HARD WATER SOLUTION) ETCHING (PERMANENT CLOUDINESS) SOLUTION NOTES: ■ Surging sounds can occur periodically throughout the cycle while the dishwasher is draining. ■ Normal water valve hissing may be heard periodically. ■ A normal snap sound may be heard when the detergent ...

Use & Care Guide
Page 18
... repaired in your major appliance is located in which it is installed in an inaccessible location or is not available. 10. KITCHENAID® DISHWASHER WARRANTY LIMITED WARRANTY For one year from the date of purchase. 6. ITEMS EXCLUDED FROM WARRANTY This limited warranty does not cover... WARRANTY SHALL BE PRODUCT REPAIR AS PROVIDED HEREIN. PROBLEM LEAKING WATER TUB IS DISCOLORED SOLUTION Be sure dishwasher has been installed properly and is reported to KitchenAid within 30 days from state to state or province to overflow. Cosmetic damage, including scratches, dents,...
... repaired in your major appliance is located in which it is installed in an inaccessible location or is not available. 10. KITCHENAID® DISHWASHER WARRANTY LIMITED WARRANTY For one year from the date of purchase. 6. ITEMS EXCLUDED FROM WARRANTY This limited warranty does not cover... WARRANTY SHALL BE PRODUCT REPAIR AS PROVIDED HEREIN. PROBLEM LEAKING WATER TUB IS DISCOLORED SOLUTION Be sure dishwasher has been installed properly and is reported to KitchenAid within 30 days from state to state or province to overflow. Cosmetic damage, including scratches, dents,...
Use & Care Guide
Page 19
... ON L5N 0B7 Please include a daytime phone number in U.S.A. W10300929A SP PN W10300597A © 2010. visit: www.kitchenaid.com In Canada visit: www.kitchenaid.ca If you do not have access to the Internet and you need further assistance, you can find your model and...the door on the right-hand or left-hand side of KitchenAid, U.S.A., KitchenAid Canada licensee in Canada 8/10 Printed in your complete model number ready. All rights reserved. ® Registered Trademark/TM Trademark of the dishwasher interior. For additional product information or to schedule service, you...
... ON L5N 0B7 Please include a daytime phone number in U.S.A. W10300929A SP PN W10300597A © 2010. visit: www.kitchenaid.com In Canada visit: www.kitchenaid.ca If you do not have access to the Internet and you need further assistance, you can find your model and...the door on the right-hand or left-hand side of KitchenAid, U.S.A., KitchenAid Canada licensee in Canada 8/10 Printed in your complete model number ready. All rights reserved. ® Registered Trademark/TM Trademark of the dishwasher interior. For additional product information or to schedule service, you...
Installation Guide
Page 2
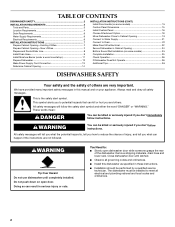
...injury, and tell you don't immediately follow the safety alert symbol and either the word "DANGER" or "WARNING." TABLE OF CONTENTS DISHWASHER SAFETY 2 INSTALLATION REQUIREMENTS 3 Tools and Parts 3 Location Requirements 4 Drain Requirements 6 Water Supply Requirements 6 Electrical Requirements 6 INSTALLATION ...Utilities 7 Prepare and Route Water Line 8 Install Drain Hose 9 Install Moisture Barrier (under a wood countertop 11 Prepare Dishwasher 12 Make Power Supply Cord Connection 13 Determine Cabinet Opening 14 INSTALLATION INSTRUCTIONS (CONT.) Install Door Handle (on some ...
...injury, and tell you don't immediately follow the safety alert symbol and either the word "DANGER" or "WARNING." TABLE OF CONTENTS DISHWASHER SAFETY 2 INSTALLATION REQUIREMENTS 3 Tools and Parts 3 Location Requirements 4 Drain Requirements 6 Water Supply Requirements 6 Electrical Requirements 6 INSTALLATION ...Utilities 7 Prepare and Route Water Line 8 Install Drain Hose 9 Install Moisture Barrier (under a wood countertop 11 Prepare Dishwasher 12 Make Power Supply Cord Connection 13 Determine Cabinet Opening 14 INSTALLATION INSTRUCTIONS (CONT.) Install Door Handle (on some ...


