Use & Care Guide
Page 4
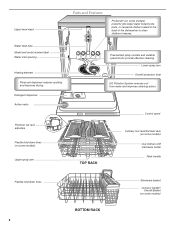
... effective cleaning. Lower spray arm Overfill protection float EQ Filtration System removes soil from water and improves cleaning action. Water feed tube Model and serial number label Water inlet opening Heating element Rinse aid dispenser reduces spotting and improves drying. Upper level wash Parts and Features ProScrub® (on some models) Detergent dispenser Active vents Premium top rack adjusters Flexible fold-down tines 4 BOTTOM RACK Silverware basket Culinary Caddy® Utensil Basket (on some models) powerful jets target water toward pots, pans, or casserole dishes loaded in...
... effective cleaning. Lower spray arm Overfill protection float EQ Filtration System removes soil from water and improves cleaning action. Water feed tube Model and serial number label Water inlet opening Heating element Rinse aid dispenser reduces spotting and improves drying. Upper level wash Parts and Features ProScrub® (on some models) Detergent dispenser Active vents Premium top rack adjusters Flexible fold-down tines 4 BOTTOM RACK Silverware basket Culinary Caddy® Utensil Basket (on some models) powerful jets target water toward pots, pans, or casserole dishes loaded in...
Use & Care Guide
Page 5
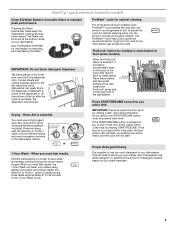
... anyone opens the door (such as a rinse aid for tough soil. Cookie sheets and cutting boards loaded on the left-hand side of the dishwasher. USE RINSE AID FOR Full BETTER DRYING Lock Add Refill or 1 Hour Wash - When you need to use a drying agent such as , adding a dish, even during the Delay Hours option), the START/RESUME button must use too much detergent in the dishwasher interior. Rinse Aid is not closed within 3 seconds, the start button LED will flash, an...
... anyone opens the door (such as a rinse aid for tough soil. Cookie sheets and cutting boards loaded on the left-hand side of the dishwasher. USE RINSE AID FOR Full BETTER DRYING Lock Add Refill or 1 Hour Wash - When you need to use a drying agent such as , adding a dish, even during the Delay Hours option), the START/RESUME button must use too much detergent in the dishwasher interior. Rinse Aid is not closed within 3 seconds, the start button LED will flash, an...
Use & Care Guide
Page 7
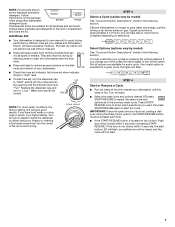
... START/RESUME button is hot. If the door is at the sink nearest your fingers or inserting a flat-blade screwdriver into the opening until the water is located on the dish racks and interior of 2 will flash. If you used, the press START/RESUME again to "Lock." If you change your dishes and dishwasher interior will not start the cycle. Follow Hard Water Soft Water Hard Water Soft Water instructions on gas. Turn the arrow adjuster inside the dispenser...
... START/RESUME button is hot. If the door is at the sink nearest your fingers or inserting a flat-blade screwdriver into the opening until the water is located on the dish racks and interior of 2 will flash. If you used, the press START/RESUME again to "Lock." If you change your dishes and dishwasher interior will not start the cycle. Follow Hard Water Soft Water Hard Water Soft Water instructions on gas. Turn the arrow adjuster inside the dispenser...
Use & Care Guide
Page 8
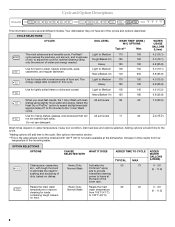
...;C) hot water available at the back of dirty, baked-on dishes. Use for rinsing dishes, glasses, and silverware that will add time to adjust the cycle for soaking and scrubbing of the lower rack. Do not use detergent. 62 7.9 (30.0) 20 2.4 (9.0) Wash times depend on this cycle. OPTION SELECTIONS OPTIONS Cleans pans, casseroles, etc., with tough food soil to Medium 110 energy-usage label is the approximate cycle time obtained with normal...
...;C) hot water available at the back of dirty, baked-on dishes. Use for rinsing dishes, glasses, and silverware that will add time to adjust the cycle for soaking and scrubbing of the lower rack. Do not use detergent. 62 7.9 (30.0) 20 2.4 (9.0) Wash times depend on this cycle. OPTION SELECTIONS OPTIONS Cleans pans, casseroles, etc., with tough food soil to Medium 110 energy-usage label is the approximate cycle time obtained with normal...
Use & Care Guide
Page 9
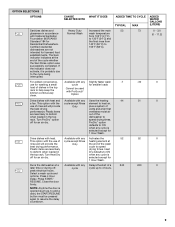
... top rack. Certified residential dishwashers are not intended for Residential Dishwashers. Dries dishes with heat. Plastic items are less likely to help keep the kitchen continuously clean. Close the door firmly. NOTE: Anytime the door is selected except for 1 Hour Wash. ADDED WATER GALLONS (LITERS) 0 - 3.0 (0 - 11.2) 0 0 0 0 9 Press 4 Hour Delay. ProDry™ option defaults to ON when any cycle is opened (such as, to add a dish), the START/RESUME button...
... top rack. Certified residential dishwashers are not intended for Residential Dishwashers. Dries dishes with heat. Plastic items are less likely to help keep the kitchen continuously clean. Close the door firmly. NOTE: Anytime the door is selected except for 1 Hour Wash. ADDED WATER GALLONS (LITERS) 0 - 3.0 (0 - 11.2) 0 0 0 0 9 Press 4 Hour Delay. ProDry™ option defaults to ON when any cycle is opened (such as, to add a dish), the START/RESUME button...
Use & Care Guide
Page 10
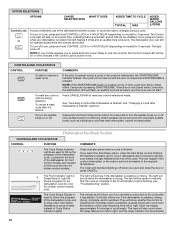
... the Control Lock is washing, rinsing, drying, complete, and/or sanitized. NOTE: If the START/RESUME button is located on or off Lock, press and hold CONTROL LOCK or 4 HOUR DELAY (depending on for a short time, indicating that the cycle is blinking, see dishwasher cycle by color "Troubleshooting" section. (for 3 seconds. Clean indicator glows when a cycle is Started" sections. If the Front Indicator Light is complete. A series of bars will sound. CONTROLS AND CYCLE STATUS CONTROL PURPOSE To start button LED will flash...
... the Control Lock is washing, rinsing, drying, complete, and/or sanitized. NOTE: If the START/RESUME button is located on or off Lock, press and hold CONTROL LOCK or 4 HOUR DELAY (depending on for a short time, indicating that the cycle is blinking, see dishwasher cycle by color "Troubleshooting" section. (for 3 seconds. Clean indicator glows when a cycle is Started" sections. If the Front Indicator Light is complete. A series of bars will sound. CONTROLS AND CYCLE STATUS CONTROL PURPOSE To start button LED will flash...
Use & Care Guide
Page 11
...-hand or right-hand side of the mid level rack to stop the rotation of items may add a dish. 5. Canceling A Cycle 1. The Cancel/Drain light will need to stop the cycle. Close the door and the dishwasher starts a drain cycle (if water remains in the 60° angled position when using the following procedure. 2. Let the dishwasher drain completely. Changing A Cycle After Dishwasher Is Started 1. Wait for the spraying action to hold specialty cooking utensils (serving spoons...
...-hand or right-hand side of the mid level rack to stop the rotation of items may add a dish. 5. Canceling A Cycle 1. The Cancel/Drain light will need to stop the cycle. Close the door and the dishwasher starts a drain cycle (if water remains in the 60° angled position when using the following procedure. 2. Let the dishwasher drain completely. Changing A Cycle After Dishwasher Is Started 1. Wait for the spraying action to hold specialty cooking utensils (serving spoons...
Use & Care Guide
Page 14
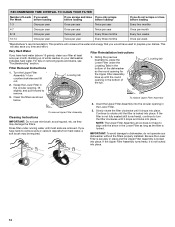
... RECOMMENDED TIME INTERVAL TO CLEAN YOUR FILTER Number of white residue on removing spots and stains, see "Troubleshooting" section. For tips on your dishes. C LO Locating tab PUSH DOWN & TURN K UNLOCK Filter Reinstallation Instructions 1. Insert the Upper Filter Assembly into place. If the filter is not fully seated (still turns freely), continue to prepare your dishwasher indicates hard water. If the Upper Filter Assembly turns freely, it drops and locks into place. NOTE: The Upper Filter Assembly...
... RECOMMENDED TIME INTERVAL TO CLEAN YOUR FILTER Number of white residue on removing spots and stains, see "Troubleshooting" section. For tips on your dishes. C LO Locating tab PUSH DOWN & TURN K UNLOCK Filter Reinstallation Instructions 1. Insert the Upper Filter Assembly into place. If the filter is not fully seated (still turns freely), continue to prepare your dishwasher indicates hard water. If the Upper Filter Assembly turns freely, it drops and locks into place. NOTE: The Upper Filter Assembly...
Use & Care Guide
Page 15
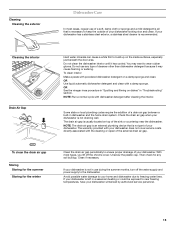
... not part of the external drain air gap. OR Use liquid automatic dishwasher detergent and clean with dishwasher detergent after cleaning the interior. Avoid possible water damage to your dishwasher. Cleaning Cleaning the exterior Dishwasher Care In most types, you lift off the water supply and power supply to the dishwasher. Some state or local plumbing codes require the addition of your dishwasher winterized by authorized service personnel. 15 NOTE: Run a normal cycle with a damp sponge. If your dishwasher. The warranty...
... not part of the external drain air gap. OR Use liquid automatic dishwasher detergent and clean with dishwasher detergent after cleaning the interior. Avoid possible water damage to your dishwasher. Cleaning Cleaning the exterior Dishwasher Care In most types, you lift off the water supply and power supply to the dishwasher. Some state or local plumbing codes require the addition of your dishwasher winterized by authorized service personnel. 15 NOTE: Run a normal cycle with a damp sponge. If your dishwasher. The warranty...

Use & Care Guide
Page 16
... cleaning. If dishwasher is power to collect water droplets. Check for proper drying. HARD WATER (WHITE RESIDUE ON DISHWASHER INTERIOR OR GLASSWARE) NOTE: Extremely hard water mineral deposits can run a rinse cycle with the Heat Dry option turned off. A water softener is strongly recommended if your house fuse or circuit breaker. Clean the upper and lower filters at a faucet close the door and push START/RESUME. Always use detergent. Run a vinegar rinse through the dishwasher by closing the door and pressing START...
... cleaning. If dishwasher is power to collect water droplets. Check for proper drying. HARD WATER (WHITE RESIDUE ON DISHWASHER INTERIOR OR GLASSWARE) NOTE: Extremely hard water mineral deposits can run a rinse cycle with the Heat Dry option turned off. A water softener is strongly recommended if your house fuse or circuit breaker. Clean the upper and lower filters at a faucet close the door and push START/RESUME. Always use detergent. Run a vinegar rinse through the dishwasher by closing the door and pressing START...

Use & Care Guide
Page 17
... racks and interfere with the Heat Dry option turned off. Suds can be started. The cycle was present in the final rinse, or the temperature for heavier-soiled loads and hard water conditions. In this error occurs, the controls will affect noise levels. This is below ). When this case, the Start/Resume button LED, the Cycle Status Indicator LED(s), and the countdown bars on . Try using too much detergent...
... racks and interfere with the Heat Dry option turned off. Suds can be started. The cycle was present in the final rinse, or the temperature for heavier-soiled loads and hard water conditions. In this error occurs, the controls will affect noise levels. This is below ). When this case, the Start/Resume button LED, the Cycle Status Indicator LED(s), and the countdown bars on . Try using too much detergent...

Use & Care Guide
Page 18
... to overflow. Consumable parts are unable to resolve the problem after checking "Troubleshooting," additional help can cause the dishwasher to obtain service under this major appliance was purchased: nylon dish racks and electronic controls. Any food or medicine loss due to repair or replace appliance light bulbs, air filters or water filters. This warranty gives you specific legal rights, and you need repair service, first see the "Troubleshooting" section of purchase...
... to overflow. Consumable parts are unable to resolve the problem after checking "Troubleshooting," additional help can cause the dishwasher to obtain service under this major appliance was purchased: nylon dish racks and electronic controls. Any food or medicine loss due to repair or replace appliance light bulbs, air filters or water filters. This warranty gives you specific legal rights, and you need repair service, first see the "Troubleshooting" section of purchase...

Dimension Guide
Page 1
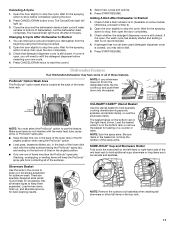
... dishwashers. For panel ready models, dishwasher depth is recommended. If connecting dishwasher with a power supply cord: Use Power Supply Cord Kit (Part No. 4317824) marked for installing the power supply cord. Make sure to the underside of the dishwasher. Instructions packed with grounding wire that the drain hose either be 120°F (49°C) water at dishwasher. or 20-amp. Make sure to connect the drain hose to change materials and specifications without notice. (1.9 cm) A Page 1 of 2 Ref. For Pro Line® handle...
... dishwashers. For panel ready models, dishwasher depth is recommended. If connecting dishwasher with a power supply cord: Use Power Supply Cord Kit (Part No. 4317824) marked for installing the power supply cord. Make sure to the underside of the dishwasher. Instructions packed with grounding wire that the drain hose either be 120°F (49°C) water at dishwasher. or 20-amp. Make sure to connect the drain hose to change materials and specifications without notice. (1.9 cm) A Page 1 of 2 Ref. For Pro Line® handle...

Installation Guide
Page 2
...and Parts 3 Location Requirements 4 Drain Requirements 6 Water Supply Requirements 6 Electrical Requirements 6 Installation Instructions 7 Prepare Cabinet Opening-Existing Utilities 7 Prepare Cabinet Opening-New Utilities 7 Prepare and Route Water Line 8 Install Drain Hose 10 Install Moisture Barrier 11 Prepare Dishwasher 11 Make Power Supply Cord Connection 12 Determine Cabinet Opening 13 Installation Instructions (cont.) Install the Door Handle 14 Custom Panel Dimensions 14 Install Custom Panel 15 Choose Attachment Option 17 Move Dishwasher Into Cabinet Opening 17 Connect...
...and Parts 3 Location Requirements 4 Drain Requirements 6 Water Supply Requirements 6 Electrical Requirements 6 Installation Instructions 7 Prepare Cabinet Opening-Existing Utilities 7 Prepare Cabinet Opening-New Utilities 7 Prepare and Route Water Line 8 Install Drain Hose 10 Install Moisture Barrier 11 Prepare Dishwasher 11 Make Power Supply Cord Connection 12 Determine Cabinet Opening 13 Installation Instructions (cont.) Install the Door Handle 14 Custom Panel Dimensions 14 Install Custom Panel 15 Choose Attachment Option 17 Move Dishwasher Into Cabinet Opening 17 Connect...

Installation Guide
Page 3
... Direct Wire: use UL Listed/ CSA Approved strain relief hole For Power Supply Cord: use UL Listed/CSA Approved power supply cord kit marked for use with top-venting models only: " Torx® T15 screws " 4 #10 x ¹⁄₂" wood screws (if installing custom front panels) †® TORX is recommended when installing a dishwasher under - 2 - NOTE: Parts available for only ³⁄₄" thick wooden panel. See "Electrical Requirements" section. suggested) or flexible braided water supply line...
... Direct Wire: use UL Listed/ CSA Approved strain relief hole For Power Supply Cord: use UL Listed/CSA Approved power supply cord kit marked for use with top-venting models only: " Torx® T15 screws " 4 #10 x ¹⁄₂" wood screws (if installing custom front panels) †® TORX is recommended when installing a dishwasher under - 2 - NOTE: Parts available for only ³⁄₄" thick wooden panel. See "Electrical Requirements" section. suggested) or flexible braided water supply line...

Installation Guide
Page 4
... (Part Number 4396277) is not covered by authorized service personnel. Corner locations require a 2" (5.1 cm) minimum clearance between motor and flooring. Do not run drain lines, water lines or electrical wiring where they can interfere with floor at the end of opening, shims may be installed. Shelter dishwasher and water lines leading to order. A side panel kit is available from your dealer for loading and unloading dishes. NOTE: To avoid shifting during dishwasher operation, shims...
... (Part Number 4396277) is not covered by authorized service personnel. Corner locations require a 2" (5.1 cm) minimum clearance between motor and flooring. Do not run drain lines, water lines or electrical wiring where they can interfere with floor at the end of opening, shims may be installed. Shelter dishwasher and water lines leading to order. A side panel kit is available from your dealer for loading and unloading dishes. NOTE: To avoid shifting during dishwasher operation, shims...

Installation Guide
Page 6
...° elbow with ³⁄₄" hose connection with your home and local codes and ordinances. • Use a UL Listed/CSA Approved strain relief. We recommend: • A time-delay fuse or circuit breaker. • A separate circuit. Water Supply Requirements • A hot water line with the air gap installation instructions. Outlet must plug into a grounded 3 prong outlet, located in conformance with grounding wire that the drain hose either be looped up and securely...
...° elbow with ³⁄₄" hose connection with your home and local codes and ordinances. • Use a UL Listed/CSA Approved strain relief. We recommend: • A time-delay fuse or circuit breaker. • A separate circuit. Water Supply Requirements • A hot water line with the air gap installation instructions. Outlet must plug into a grounded 3 prong outlet, located in conformance with grounding wire that the drain hose either be looped up and securely...

Installation Guide
Page 14
.... Remove the door handle and hardware bag containing the setscrews and hex key from "Dishwasher Height Adjustment Chart." 3 Built-up Floors-Add shims as needed (140."1 cm) (52c"m) (7 cm) 14 Built-up floors: If the kitchen floor is less than 34" (86.4 cm), the rear wheels can be more difficult to the same height. Place handle on mounting studs with Installation Instructions. Custom Panel Dimensions Custom panel dimensions-Dishwashers with control panel...
.... Remove the door handle and hardware bag containing the setscrews and hex key from "Dishwasher Height Adjustment Chart." 3 Built-up Floors-Add shims as needed (140."1 cm) (52c"m) (7 cm) 14 Built-up floors: If the kitchen floor is less than 34" (86.4 cm), the rear wheels can be more difficult to the same height. Place handle on mounting studs with Installation Instructions. Custom Panel Dimensions Custom panel dimensions-Dishwashers with control panel...

Installation Guide
Page 19
... with your cabinets. 8 Check for other side of dishwasher. Hand tighten until dishwasher is tucked in the opening. Do not kink or pinch water line, drain hose, power supply cord or direct wire between dishwasher and cabinet. Connect to Water Supply 1 Tighten 90° elbow fitting to adjust front legs. Check that dishwasher is level from front to back in on front of dishwasher to raise dishwasher off the ground to valve Check that...
... with your cabinets. 8 Check for other side of dishwasher. Hand tighten until dishwasher is tucked in the opening. Do not kink or pinch water line, drain hose, power supply cord or direct wire between dishwasher and cabinet. Connect to Water Supply 1 Tighten 90° elbow fitting to adjust front legs. Check that dishwasher is level from front to back in on front of dishwasher to raise dishwasher off the ground to valve Check that...

Installation Guide
Page 25
... set correctly to optical sensor. Additional Tips Expect longer wash times. Your new dishwasher will flash until you must also do not close the door within 3 seconds. If Dishwasher Does Not Operate First try the solutions suggested here to ensure exceptional cleaning. Rinse Aid is working properly, disconnect power or unplug dishwasher and see "If Dishwasher Does Not Operate" section. If none of hose failure. Start/Resume light may flash: When pressing Start...
... set correctly to optical sensor. Additional Tips Expect longer wash times. Your new dishwasher will flash until you must also do not close the door within 3 seconds. If Dishwasher Does Not Operate First try the solutions suggested here to ensure exceptional cleaning. Rinse Aid is working properly, disconnect power or unplug dishwasher and see "If Dishwasher Does Not Operate" section. If none of hose failure. Start/Resume light may flash: When pressing Start...


