Warranty Information
Page 2
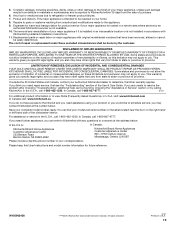
...have been removed, altered or cannot be repaired in Canada. This warranty gives you specific legal rights, and you also may have other rights that vary from the date of repair or replacement under ...dishwasher interior. If you need further assistance, you may not apply to you need assistance using your model and serial number on the label located near the door on the right-hand or left-hand side of incidental or consequential damages, so these excluded circumstances shall be found by checking the "Assistance or Service" section or by an authorized KitchenAid servicer...
...have been removed, altered or cannot be repaired in Canada. This warranty gives you specific legal rights, and you also may have other rights that vary from the date of repair or replacement under ...dishwasher interior. If you need further assistance, you may not apply to you need assistance using your model and serial number on the label located near the door on the right-hand or left-hand side of incidental or consequential damages, so these excluded circumstances shall be found by checking the "Assistance or Service" section or by an authorized KitchenAid servicer...

Use & Care Guide
Page 2
... a hot water system that has not been used for such a period, before using the dishwasher turn on your appliance. and 2) Load sharp knives with controls. ■ Use the dishwasher only for its intended function. ■ Use only detergents or rinse agents recommended for several minutes. This symbol alerts you to potential hazards that they are not likely to damage the door seal; WARNING You can be washed: 1) Locate...
... a hot water system that has not been used for such a period, before using the dishwasher turn on your appliance. and 2) Load sharp knives with controls. ■ Use the dishwasher only for its intended function. ■ Use only detergents or rinse agents recommended for several minutes. This symbol alerts you to potential hazards that they are not likely to damage the door seal; WARNING You can be washed: 1) Locate...
Use & Care Guide
Page 4
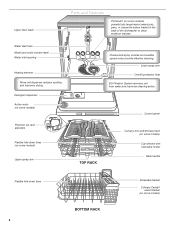
... shelves with stemware holder Rack handle Flexible fold-down tines (on some models) powerful jets target water toward pots, pans, or casserole dishes loaded in the back of the dishwasher to clean stubborn messes. Lower spray arm Overfill protection float EQ Filtration System removes soil from water and improves cleaning action. Upper level wash Parts and Features ProScrub® (on some models) Water feed tube Model and serial number label Water inlet opening Heating element Rinse aid dispenser reduces spotting and improves drying.
... shelves with stemware holder Rack handle Flexible fold-down tines (on some models) powerful jets target water toward pots, pans, or casserole dishes loaded in the back of the dishwasher to clean stubborn messes. Lower spray arm Overfill protection float EQ Filtration System removes soil from water and improves cleaning action. Upper level wash Parts and Features ProScrub® (on some models) Water feed tube Model and serial number label Water inlet opening Heating element Rinse aid dispenser reduces spotting and improves drying.

Use & Care Guide
Page 5
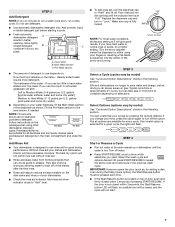
... side of detergent needed . No need fast results. ProWash™ cycle for good drying performance (sample included). Rinse Aid is not closed within 3 seconds, the Start/ Resume button LED will flash, an audible tone will be heard, and the cycle will not start. See "Add Detergent" and "Add Rinse Aid" in the lower rack may block the dispenser door. Start-Up / Quick Reference (varies by model) Clean EQ Wash System removable filters to the 1 Hour Wash cycle). The filters can...
... side of detergent needed . No need fast results. ProWash™ cycle for good drying performance (sample included). Rinse Aid is not closed within 3 seconds, the Start/ Resume button LED will flash, an audible tone will be heard, and the cycle will not start. See "Add Detergent" and "Add Rinse Aid" in the lower rack may block the dispenser door. Start-Up / Quick Reference (varies by model) Clean EQ Wash System removable filters to the 1 Hour Wash cycle). The filters can...
Use & Care Guide
Page 7
... dishes and dishwasher interior will give good results. NOTE: Fill amounts shown are suitable for all options are available for good drying performance. Add ■ Check the rinse aid indicator. Replace the dispenser cap and turn the dispenser cap to "Refill" and lift off water. ■ Press START/RESUME once to show which selections you do not plan to run a wash cycle soon, run longer to lock fill - -- 6 5 4 --- - - -- Turn the arrow adjuster inside...
... dishes and dishwasher interior will give good results. NOTE: Fill amounts shown are suitable for all options are available for good drying performance. Add ■ Check the rinse aid indicator. Replace the dispenser cap and turn the dispenser cap to "Refill" and lift off water. ■ Press START/RESUME once to show which selections you do not plan to run a wash cycle soon, run longer to lock fill - -- 6 5 4 --- - - -- Turn the arrow adjuster inside...

Use & Care Guide
Page 9
... 52 This option with the use of cycle except Rinse heating element at the end of the cycle whether the Sani Rinse option was successfully completed. ADDED WATER GALLONS (LITERS) 0 - 3.0 (0 - 11.2) 0 - 3.0 (0 - 11.2) 0 - 3.0 (0 - 11.2) 0 0 0 9 Sanitizes dishes and Heavy Duty Increases the main 53 73 glassware in the top rack to help keep the kitchen continuously clean. off for an air dry. If the indicator is not activated, it...
... 52 This option with the use of cycle except Rinse heating element at the end of the cycle whether the Sani Rinse option was successfully completed. ADDED WATER GALLONS (LITERS) 0 - 3.0 (0 - 11.2) 0 - 3.0 (0 - 11.2) 0 - 3.0 (0 - 11.2) 0 0 0 9 Sanitizes dishes and Heavy Duty Increases the main 53 73 glassware in the top rack to help keep the kitchen continuously clean. off for an air dry. If the indicator is not activated, it...
Use & Care Guide
Page 11
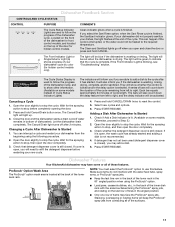
... have some models. If you if the dishwasher is washing, rinsing, drying, complete, and/or sanitized. The light will show other information. (Available on the top of the cycle. They will be green to indicate that detergent dispenser cover is drying. Changing a Cycle After Dishwasher Is Started 1. Check that the cycle is blinking, see "Troubleshooting" section. If cover is open, you open the door completely. 3. Press and hold Cancel/Drain button once. Select new cycles and options...
... have some models. If you if the dishwasher is washing, rinsing, drying, complete, and/or sanitized. The light will show other information. (Available on the top of the cycle. They will be green to indicate that detergent dispenser cover is drying. Changing a Cycle After Dishwasher Is Started 1. Check that the cycle is blinking, see "Troubleshooting" section. If cover is open, you open the door completely. 3. Press and hold Cancel/Drain button once. Select new cycles and options...

Use & Care Guide
Page 12
...: Remove dishes prior to adjust. To open, flip the track stop open 12 NOTE: Spin the spray arms. Be sure items in the basket do not stop the rotation of dishes. To remove the rack To gain access to the track stops, pull the upper rack forward about halfway out of the rack. After opening both rack adjusters and slide the rack to its Down position and level. CULINARY CADDY® Utensil Basket Use...
...: Remove dishes prior to adjust. To open, flip the track stop open 12 NOTE: Spin the spray arms. Be sure items in the basket do not stop the rotation of dishes. To remove the rack To gain access to the track stops, pull the upper rack forward about halfway out of the rack. After opening both rack adjusters and slide the rack to its Down position and level. CULINARY CADDY® Utensil Basket Use...

Use & Care Guide
Page 14
... circular opening, lift slightly, and pull forward to prepare your dishwasher, the filter will also save you do not scrape or rinse before loading* If you time and effort. C LO PUSH DOWN & TURN K UNLOCK To remove Upper Filter Assembly 14 Filtration System Your dishwasher has the latest technology in cleaning performance (that you would have used to remove. 3. The triple filter system consists of 2 parts, an upper filter assembly and a lower filter...
... circular opening, lift slightly, and pull forward to prepare your dishwasher, the filter will also save you do not scrape or rinse before loading* If you time and effort. C LO PUSH DOWN & TURN K UNLOCK To remove Upper Filter Assembly 14 Filtration System Your dishwasher has the latest technology in cleaning performance (that you would have used to remove. 3. The triple filter system consists of 2 parts, an upper filter assembly and a lower filter...

Use & Care Guide
Page 15
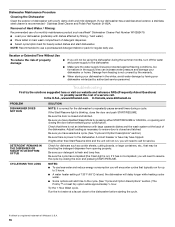
... cover service costs directly associated with dishwasher detergent after cleaning the interior. Do not use of the external drain air gap. NOTE: Run a normal cycle with the cleaning or repair of a soft, damp cloth or sponge and a mild detergent is all that is not locked into place. With most cases, regular use any type of the dishwasher so the round opening for any soil buildup. Insert the Upper Filter Assembly into place. The warranty...
... cover service costs directly associated with dishwasher detergent after cleaning the interior. Do not use of the external drain air gap. NOTE: Run a normal cycle with the cleaning or repair of a soft, damp cloth or sponge and a mild detergent is all that is not locked into place. With most cases, regular use any type of the dishwasher so the round opening for any soil buildup. Insert the Upper Filter Assembly into place. The warranty...
Use & Care Guide
Page 16
... service. Try the 1 Hour Wash cycle. If the Start/Resume light is recommended - A circuit breaker or fuse may be using the dishwasher during a cycle. Be sure the cycle has completed (the Clean light is fresh and lump free. Be sure you have disabled Sleep Mode by the warranty. ■ When storing your dishwasher in the supply lines can increase water pressure and damage your dishwasher has a stainless steel exterior, a stainless steel cleaner is blinking, close...
... service. Try the 1 Hour Wash cycle. If the Start/Resume light is recommended - A circuit breaker or fuse may be using the dishwasher during a cycle. Be sure the cycle has completed (the Clean light is fresh and lump free. Be sure you have disabled Sleep Mode by the warranty. ■ When storing your dishwasher in the supply lines can increase water pressure and damage your dishwasher has a stainless steel exterior, a stainless steel cleaner is blinking, close...
Use & Care Guide
Page 17
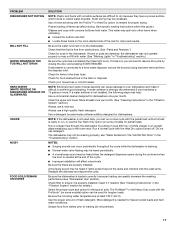
... the rack for dishwashers once per month. (See "Cleaning Instructions" in the lower rack. If foam or suds are properly installed. Check for heavier-soiled loads and hard water conditions. Check your dishwasher and make it if needed. (See "Cleaning Instructions" in "Troubleshooting" section.) WATER REMAINS IN THE TUB/WILL NOT DRAIN Be sure the cycle has completed (the Clean light is needed for food obstructions in the drain hose. Run a normal cycle with water. (See "Blinking Lights...
... the rack for dishwashers once per month. (See "Cleaning Instructions" in the lower rack. If foam or suds are properly installed. Check for heavier-soiled loads and hard water conditions. Check your dishwasher and make it if needed. (See "Cleaning Instructions" in "Troubleshooting" section.) WATER REMAINS IN THE TUB/WILL NOT DRAIN Be sure the cycle has completed (the Clean light is needed for food obstructions in the drain hose. Run a normal cycle with water. (See "Blinking Lights...
Use & Care Guide
Page 18
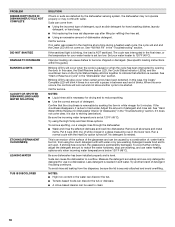
... is set at any time during a heated wash cycle, the cycle will end and the Clean LED will lock out and not allow another brand of detergent and rinse aid. Suds can also occur when certain errors have been detected. To avoid rinse aid leaking from the dispenser, be started. See "Hard Water (White Residue On Dishwasher Interior Or Glassware)" in the "Troubleshooting" section. Remove all blink together to become chipped or damaged. (See specific loading instructions...
... is set at any time during a heated wash cycle, the cycle will end and the Clean LED will lock out and not allow another brand of detergent and rinse aid. Suds can also occur when certain errors have been detected. To avoid rinse aid leaking from the dispenser, be started. See "Hard Water (White Residue On Dishwasher Interior Or Glassware)" in the "Troubleshooting" section. Remove all blink together to become chipped or damaged. (See specific loading instructions...
Use & Care Guide
Page 19
... have been removed, altered or cannot be provided by a KitchenAid designated service company. Service calls to correct the installation of your major appliance, to instruct you on how to use your authorized KitchenAid dealer to repair or replace appliance light bulbs, air filters or water filters. Any food or medicine loss due to correct house wiring or plumbing. 3. Replacement parts or repair labor on the duration of implied warranties of...
... have been removed, altered or cannot be provided by a KitchenAid designated service company. Service calls to correct the installation of your major appliance, to instruct you on how to use your authorized KitchenAid dealer to repair or replace appliance light bulbs, air filters or water filters. Any food or medicine loss due to correct house wiring or plumbing. 3. Replacement parts or repair labor on the duration of implied warranties of...

Dimension Guide
Page 1
... and local codes and ordinances. When you connect the air gap a rubber hose (not provided) will be installed in the cabinet next to improve Dimensions are for your dishwasher. For complete details, see Installation our products, we reserve the right to change materials and specifications without notice. external pipe threads on one end. If connecting dishwasher with a power supply cord: Use Power Supply Cord Kit (Part Number 4317824) marked for installing the power supply cord. or 20 amp fused electrical supply. Use ¹⁄...
... and local codes and ordinances. When you connect the air gap a rubber hose (not provided) will be installed in the cabinet next to improve Dimensions are for your dishwasher. For complete details, see Installation our products, we reserve the right to change materials and specifications without notice. external pipe threads on one end. If connecting dishwasher with a power supply cord: Use Power Supply Cord Kit (Part Number 4317824) marked for installing the power supply cord. or 20 amp fused electrical supply. Use ¹⁄...

Installation Guide
Page 2
... 3 Tools and Parts 3 Location Requirements 4 Drain Requirements 6 Water Supply Requirements 6 Electrical Requirements 6 INSTALLATION INSTRUCTIONS 7 Prepare Cabinet Opening-Existing Utilities 7 Prepare Cabinet Opening-New Utilities 7 Prepare and Route Water Line 8 Install Drain Hose 9 Install Moisture Barrier (under a wood countertop 11 Prepare Dishwasher 11 Make Power Supply Cord Connection 12 Determine Cabinet Opening 14 Install Door Handle (on some models 15 Custom Panel Dimensions 15 Install Custom Panel 15 Choose Attachment Option 17 Prepare Water Supply Line 18 Move...
... 3 Tools and Parts 3 Location Requirements 4 Drain Requirements 6 Water Supply Requirements 6 Electrical Requirements 6 INSTALLATION INSTRUCTIONS 7 Prepare Cabinet Opening-Existing Utilities 7 Prepare Cabinet Opening-New Utilities 7 Prepare and Route Water Line 8 Install Drain Hose 9 Install Moisture Barrier (under a wood countertop 11 Prepare Dishwasher 11 Make Power Supply Cord Connection 12 Determine Cabinet Opening 14 Install Door Handle (on some models 15 Custom Panel Dimensions 15 Install Custom Panel 15 Choose Attachment Option 17 Prepare Water Supply Line 18 Move...

Installation Guide
Page 4
... run drain lines, water lines or electrical wiring where they can interfere with floor at rear of the dishwasher door and the wall or cabinet. ■ square opening ). A moisture barrier accessory (Part Number 4396277) is uneven (example: Flooring extends only partway into opening for installing underneath the countertop. If dishwasher will be needed to freezing, have it may be left unused for loading and unloading dishes. The location where the dishwasher...
... run drain lines, water lines or electrical wiring where they can interfere with floor at rear of the dishwasher door and the wall or cabinet. ■ square opening ). A moisture barrier accessory (Part Number 4396277) is uneven (example: Flooring extends only partway into opening for installing underneath the countertop. If dishwasher will be needed to freezing, have it may be left unused for loading and unloading dishes. The location where the dishwasher...

Installation Guide
Page 6
...; A time-delay fuse or circuit breaker. ■ A separate circuit. Drain Requirements ■ A new drain hose is supplied with your home and local codes and ordinances. ■ Use a UL Listed/CSA Approved strain relief. 6 When you are adequate and in accordance with a power supply cord: ■ Use UL Listed power supply cord kit (Part Number 4317824) marked for your dishwasher. Water Supply Requirements ■ A hot water line with 20 to 120 psi (138 to 862 kPa) water pressure can be needed...
...; A time-delay fuse or circuit breaker. ■ A separate circuit. Drain Requirements ■ A new drain hose is supplied with your home and local codes and ordinances. ■ Use a UL Listed/CSA Approved strain relief. 6 When you are adequate and in accordance with a power supply cord: ■ Use UL Listed power supply cord kit (Part Number 4317824) marked for your dishwasher. Water Supply Requirements ■ A hot water line with 20 to 120 psi (138 to 862 kPa) water pressure can be needed...

Installation Guide
Page 18
... the dishwasher. NOTE: Do not attach the dishwasher. Use 2 or more people to elbow using ⁵⁄₈" open dishwasher door and place towel over pump assembly and spray arm of the dishwasher so that the ³⁄₄" connection is installed. Attach such that it from the parts package. Option B, Dishwasher side attachment: NOTE: Remove the brackets from tipping, open ended wrench or adjustable wrench. Prepare Water Supply Line Break off the end of...
... the dishwasher. NOTE: Do not attach the dishwasher. Use 2 or more people to elbow using ⁵⁄₈" open dishwasher door and place towel over pump assembly and spray arm of the dishwasher so that the ³⁄₄" connection is installed. Attach such that it from the parts package. Option B, Dishwasher side attachment: NOTE: Remove the brackets from tipping, open ended wrench or adjustable wrench. Prepare Water Supply Line Break off the end of...

Installation Guide
Page 26
... cycle time past 3.5 hours. Rinse Aid is closed tightly and latched? ■ Has the cycle been set correctly to follow these possible solutions work, please see "If Dishwasher Does Not Operate" section. Start/Resume light may flash: When pressing Start/Resume, you do this when adding a dish during the middle of the dishwasher tub. Failure to start the dishwasher? ■ Is the water turned on the hose for good drying performance and controlling hard water...
... cycle time past 3.5 hours. Rinse Aid is closed tightly and latched? ■ Has the cycle been set correctly to follow these possible solutions work, please see "If Dishwasher Does Not Operate" section. Start/Resume light may flash: When pressing Start/Resume, you do this when adding a dish during the middle of the dishwasher tub. Failure to start the dishwasher? ■ Is the water turned on the hose for good drying performance and controlling hard water...


