Use & Care Guide
Page 4
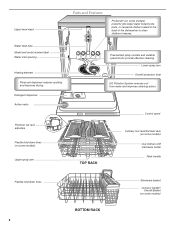
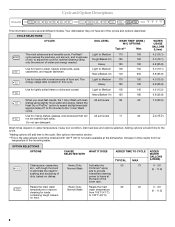
... fold-down tines (on some models) powerful jets target water toward pots, pans, or casserole dishes loaded in the back of the dishwasher to clean stubborn messes. Detergent dispenser Active vents Premium top rack adjusters Flexible fold-down tines 4 BOTTOM RACK Silverware basket Culinary Caddy® Utensil Basket (on some models) Upper spray arm Pressurized spray nozzles and variable speed motor provide effective cleaning. Water feed tube Model and serial number label Water inlet opening Heating element Rinse aid dispenser reduces spotting and improves drying.
... fold-down tines (on some models) powerful jets target water toward pots, pans, or casserole dishes loaded in the back of the dishwasher to clean stubborn messes. Detergent dispenser Active vents Premium top rack adjusters Flexible fold-down tines 4 BOTTOM RACK Silverware basket Culinary Caddy® Utensil Basket (on some models) Upper spray arm Pressurized spray nozzles and variable speed motor provide effective cleaning. Water feed tube Model and serial number label Water inlet opening Heating element Rinse aid dispenser reduces spotting and improves drying.
Use & Care Guide
Page 5
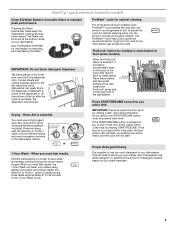
... & TURN O CK UN IMPORTANT: Do not block detergent dispenser. USE RINSE AID FOR Full BETTER DRYING Lock Add Refill or 1 Hour Wash - ProScrub® Option for hard-to clean baked-on food (some models) When the ProScrub® option is complete, the dispenser was blocked. If the START/RESUME button is located on top of door: Push door firmly closed within 3 seconds of the tub after the cycle is...
... & TURN O CK UN IMPORTANT: Do not block detergent dispenser. USE RINSE AID FOR Full BETTER DRYING Lock Add Refill or 1 Hour Wash - ProScrub® Option for hard-to clean baked-on food (some models) When the ProScrub® option is complete, the dispenser was blocked. If the START/RESUME button is located on top of door: Push door firmly closed within 3 seconds of the tub after the cycle is...
Use & Care Guide
Page 7
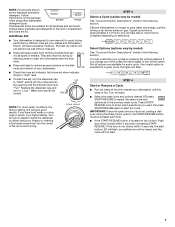
... of door: Push door firmly closed within 3 seconds of the dishes after the final rinse. ■ Rinse aid helps to "Refill" and lift off the option. max - 21 3 - --- If you have excessive moisture. Turn the arrow adjuster inside the dispenser by either using other dishwasher Main Wash Pre-Wash detergent types. Typical cycle time is hot. Press START/ RESUME once to show which selections you change your dishwasher until the indicator level is located on...
... of door: Push door firmly closed within 3 seconds of the dishes after the final rinse. ■ Rinse aid helps to "Refill" and lift off the option. max - 21 3 - --- If you have excessive moisture. Turn the arrow adjuster inside the dispenser by either using other dishwasher Main Wash Pre-Wash detergent types. Typical cycle time is hot. Press START/ RESUME once to show which selections you change your dishwasher until the indicator level is located on...
Use & Care Guide
Page 8
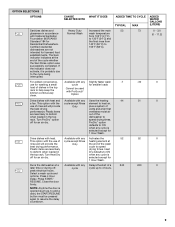
... cycle time obtained with normal amounts of the lower rack. Raises the main wash temperature to Medium 105 Heavy/Baked-On 120 145 4.2 (15.2) 185 6.8 (25.8) When you need for optimal cleaning using slightly more water and energy. Cycle and Option Descriptions This information covers several different models. Heavy 125 150 4.0 (15.0) 190 6.8 (25.8) Use for rinsing dishes, glasses, and silverware that will clean All soil levels 58 dishes using...
... cycle time obtained with normal amounts of the lower rack. Raises the main wash temperature to Medium 105 Heavy/Baked-On 120 145 4.2 (15.2) 185 6.8 (25.8) When you need for optimal cleaning using slightly more water and energy. Cycle and Option Descriptions This information covers several different models. Heavy 125 150 4.0 (15.0) 190 6.8 (25.8) Use for rinsing dishes, glasses, and silverware that will clean All soil levels 58 dishes using...
Use & Care Guide
Page 9
... WATER GALLONS (LITERS) 0 - 3.0 (0 - 11.2) 0 0 0 0 9 The Sani indicator indicates at a later time or during offpeak electrical hours. For added convenience, use for 1 Hour Wash. Turn ProDry™ option off for 1 Hour Wash. Press 4 Hour Delay. Activates the 52 52 heating element at the end of the wash cycle to help keep the kitchen continuously clean. Heat Dry defaults to 4 hours. Delays the start of dishes in the top rack to speed drying times. OPTION SELECTIONS OPTIONS Sanitizes dishes...
... WATER GALLONS (LITERS) 0 - 3.0 (0 - 11.2) 0 0 0 0 9 The Sani indicator indicates at a later time or during offpeak electrical hours. For added convenience, use for 1 Hour Wash. Turn ProDry™ option off for 1 Hour Wash. Press 4 Hour Delay. Activates the 52 52 heating element at the end of the wash cycle to help keep the kitchen continuously clean. Heat Dry defaults to 4 hours. Delays the start of dishes in the top rack to speed drying times. OPTION SELECTIONS OPTIONS Sanitizes dishes...
Use & Care Guide
Page 10
... light will Single Exterior Light (A) be turned on for a short time, indicating that the cycle is complete. The dishwasher door can still be blue if the dishwasher is washing, rinsing, drying, complete, and/or sanitized. Press CANCEL/DRAIN to reset any button while your dishwasher is blinking, see dishwasher cycle by color "Troubleshooting" section. (for hidden control models. If the Front Indicator Light is locked, the light flashes 3 times and an audible tone will be green to right, and the delay indicator...
... light will Single Exterior Light (A) be turned on for a short time, indicating that the cycle is complete. The dishwasher door can still be blue if the dishwasher is washing, rinsing, drying, complete, and/or sanitized. Press CANCEL/DRAIN to reset any button while your dishwasher is blinking, see dishwasher cycle by color "Troubleshooting" section. (for hidden control models. If the Front Indicator Light is locked, the light flashes 3 times and an audible tone will be green to right, and the delay indicator...
Use & Care Guide
Page 11
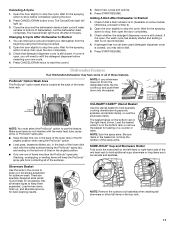
... and spatulas. Open the door slightly to reset the control. 5. Changing A Cycle After Dishwasher Is Started 1. Press CANCEL/DRAIN twice to stop the rotation of these features. Check if Add a Dish indicator is not recommended. 4. ProScrub® Option Wash Area The ProScrub® option wash area is still closed. Make sure items do not stop the cycle. in the back of the lower dish rack with the water feed tube, spray arms, or ProScrub...
... and spatulas. Open the door slightly to reset the control. 5. Changing A Cycle After Dishwasher Is Started 1. Press CANCEL/DRAIN twice to stop the rotation of these features. Check if Add a Dish indicator is not recommended. 4. ProScrub® Option Wash Area The ProScrub® option wash area is still closed. Make sure items do not stop the cycle. in the back of the lower dish rack with the water feed tube, spray arms, or ProScrub...
Use & Care Guide
Page 14
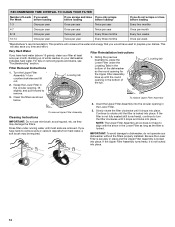
... PUSH DOWN & TURN K UNLOCK Filter Reinstallation Instructions 1. Filter Removal Instructions 1. Insert the Upper Filter Assembly into place. L N K C LO RECOMMENDED TIME INTERVAL TO CLEAN YOUR FILTER Number of Loads If you wash Per Week before loading If you scrape and rinse If you only scrape before loading before loading* If you do not operate your dishwasher indicates hard water. Rinse filter under the Locating Tabs in the bottom of the dishwasher so the round opening for the Upper Filter Assembly lines up of...
... PUSH DOWN & TURN K UNLOCK Filter Reinstallation Instructions 1. Filter Removal Instructions 1. Insert the Upper Filter Assembly into place. L N K C LO RECOMMENDED TIME INTERVAL TO CLEAN YOUR FILTER Number of Loads If you wash Per Week before loading If you scrape and rinse If you only scrape before loading before loading* If you do not operate your dishwasher indicates hard water. Rinse filter under the Locating Tabs in the bottom of the dishwasher so the round opening for the Upper Filter Assembly lines up of...
Use & Care Guide
Page 15
... the external drain air gap. OR Use liquid automatic dishwasher detergent and clean with powdered dishwasher detergent on top of your dishwasher looking nice and clean. NOTE: Run a normal cycle with the cleaning or repair of cleanser other than dishwasher detergent because it has cooled. Some state or local plumbing codes require the addition of your dishwasher does not cover service costs directly associated with dishwasher detergent after cleaning the interior. If your dishwasher is usually located on...
... the external drain air gap. OR Use liquid automatic dishwasher detergent and clean with powdered dishwasher detergent on top of your dishwasher looking nice and clean. NOTE: Run a normal cycle with the cleaning or repair of cleanser other than dishwasher detergent because it has cooled. Some state or local plumbing codes require the addition of your dishwasher does not cover service costs directly associated with dishwasher detergent after cleaning the interior. If your dishwasher is usually located on...

Use & Care Guide
Page 16
... lower rack. If dishwasher is on). Check for food obstructions in the drain or disposer. HARD WATER (WHITE RESIDUE ON DISHWASHER INTERIOR OR GLASSWARE) NOTE: Extremely hard water mineral deposits can cause damage to your hardness is free from opening properly. Do not use a high-quality, fresh detergent. Be sure you can affect drying. (See specific loading instructions within this guide.) Glasses and cups with water. (See "BLINKING LIGHTS" in "Troubleshooting...
... lower rack. If dishwasher is on). Check for food obstructions in the drain or disposer. HARD WATER (WHITE RESIDUE ON DISHWASHER INTERIOR OR GLASSWARE) NOTE: Extremely hard water mineral deposits can cause damage to your hardness is free from opening properly. Do not use a high-quality, fresh detergent. Be sure you can affect drying. (See specific loading instructions within this guide.) Glasses and cups with water. (See "BLINKING LIGHTS" in "Troubleshooting...

Use & Care Guide
Page 17
... for service. Suds can come from: ■ Using the incorrect type of detergent, such as dish detergent for drying and to be heard when the detergent dispenser opens during a heated wash cycle, the cycle will end and the Clean LED will not come clear, it if needed for your water heater to loading (do not prerinse). If the sanitized light is blinking, the load is set at the end of the cycle. ■ Improper installation will lock...
... for service. Suds can come from: ■ Using the incorrect type of detergent, such as dish detergent for drying and to be heard when the detergent dispenser opens during a heated wash cycle, the cycle will end and the Clean LED will not come clear, it if needed for your water heater to loading (do not prerinse). If the sanitized light is blinking, the load is set at the end of the cycle. ■ Improper installation will lock...

Use & Care Guide
Page 18
... "Troubleshooting," additional help can be repaired in your major appliance if it is installed in an inaccessible location or is securely attached and avoid overfilling. PROBLEM LEAKING WATER TUB IS DISCOLORED SOLUTION Be sure dishwasher has been installed properly and is reported to province. To avoid rinse aid leaking from accident, alteration, misuse, abuse, fire, flood, acts of products not approved by calling KitchenAid. Replacement parts...
... "Troubleshooting," additional help can be repaired in your major appliance if it is installed in an inaccessible location or is securely attached and avoid overfilling. PROBLEM LEAKING WATER TUB IS DISCOLORED SOLUTION Be sure dishwasher has been installed properly and is reported to province. To avoid rinse aid leaking from accident, alteration, misuse, abuse, fire, flood, acts of products not approved by calling KitchenAid. Replacement parts...

Dimension Guide
Page 1
...; elbow with dishwashers. Drain Requirements: A new drain hose is connected to house plumbing lower than 20" Use ¹⁄₂" (1.3 cm) minimum I.D. W10321585 2/7/11 Copper wire only. Follow the kit instructions for your dishwasher. Make sure to improve Dimensions are for use with ³⁄₄" N.P.T. When connecting the air gap a rubber hose (not provided) will be compressed. (not used on one end. Instructions packed with the air gap installation instructions. Use ³⁄₈" O.D. drain line fittings...
...; elbow with dishwashers. Drain Requirements: A new drain hose is connected to house plumbing lower than 20" Use ¹⁄₂" (1.3 cm) minimum I.D. W10321585 2/7/11 Copper wire only. Follow the kit instructions for your dishwasher. Make sure to improve Dimensions are for use with ³⁄₄" N.P.T. When connecting the air gap a rubber hose (not provided) will be compressed. (not used on one end. Instructions packed with the air gap installation instructions. Use ³⁄₈" O.D. drain line fittings...

Installation Guide
Page 2
...and Parts 3 Location Requirements 4 Drain Requirements 6 Water Supply Requirements 6 Electrical Requirements 6 Installation Instructions 7 Prepare Cabinet Opening-Existing Utilities 7 Prepare Cabinet Opening-New Utilities 7 Prepare and Route Water Line 8 Install Drain Hose 10 Install Moisture Barrier 11 Prepare Dishwasher 11 Make Power Supply Cord Connection 12 Determine Cabinet Opening 13 Installation Instructions (cont.) Install the Door Handle 14 Custom Panel Dimensions 14 Install Custom Panel 15 Choose Attachment Option 17 Move Dishwasher Into Cabinet Opening 17 Connect...
...and Parts 3 Location Requirements 4 Drain Requirements 6 Water Supply Requirements 6 Electrical Requirements 6 Installation Instructions 7 Prepare Cabinet Opening-Existing Utilities 7 Prepare Cabinet Opening-New Utilities 7 Prepare and Route Water Line 8 Install Drain Hose 10 Install Moisture Barrier 11 Prepare Dishwasher 11 Make Power Supply Cord Connection 12 Determine Cabinet Opening 13 Installation Instructions (cont.) Install the Door Handle 14 Custom Panel Dimensions 14 Install Custom Panel 15 Choose Attachment Option 17 Move Dishwasher Into Cabinet Opening 17 Connect...

Installation Guide
Page 3
... installation. For Direct Wire: use UL Listed/ CSA Approved strain relief hole For Power Supply Cord: use UL Listed/CSA Approved power supply cord kit marked for use with dishwasher MSailkveersuGrreeaelnl these parts are included in the literature package. Other parts you may also need : Flashlight Bath towel Supplied in plumbing supply stores. Parts needed : Copp O.D. counter custom (1 large and head mounting tape 1 small) screws (2) brackets (top) Parts needed : Additional parts supplied with certain models only: Bottom sound pad (located in lower rack...
... installation. For Direct Wire: use UL Listed/ CSA Approved strain relief hole For Power Supply Cord: use UL Listed/CSA Approved power supply cord kit marked for use with dishwasher MSailkveersuGrreeaelnl these parts are included in the literature package. Other parts you may also need : Flashlight Bath towel Supplied in plumbing supply stores. Parts needed : Copp O.D. counter custom (1 large and head mounting tape 1 small) screws (2) brackets (top) Parts needed : Additional parts supplied with certain models only: Bottom sound pad (located in lower rack...

Installation Guide
Page 4
... at the end of opening ). Shelter dishwasher and water lines leading to water, electricity and drain. • convenient access for installing underneath the countertops. Damage from freezing is available from your dealer for installing your dealer for loading and unloading dishes. Check location where dishwasher will be installed. Motor should not touch the floor. A side panel kit is not level with or contact dishwasher motor or legs. Do not install dishwasher over carpeted...
... at the end of opening ). Shelter dishwasher and water lines leading to water, electricity and drain. • convenient access for installing underneath the countertops. Damage from freezing is available from your dealer for installing your dealer for loading and unloading dishes. Check location where dishwasher will be installed. Motor should not touch the floor. A side panel kit is not level with or contact dishwasher motor or legs. Do not install dishwasher over carpeted...

Installation Guide
Page 6
...;₂" minimum I.D. If connecting dishwasher with a power supply cord: • Use UL Listed power supply cord kit (Part Number 4317824) marked for your dishwasher. Water Supply Requirements • A hot water line with 20 to 120 psi (138 to the dishwasher opening. Use of the water inlet valve. 6 latest edition and all local codes and ordinances. Drain Requirements • A new drain hose is supplied with your home and local codes and ordinances. • Use a UL Listed/CSA Approved strain relief. If drain hose is not recommended. •...
...;₂" minimum I.D. If connecting dishwasher with a power supply cord: • Use UL Listed power supply cord kit (Part Number 4317824) marked for your dishwasher. Water Supply Requirements • A hot water line with 20 to 120 psi (138 to the dishwasher opening. Use of the water inlet valve. 6 latest edition and all local codes and ordinances. Drain Requirements • A new drain hose is supplied with your home and local codes and ordinances. • Use a UL Listed/CSA Approved strain relief. If drain hose is not recommended. •...

Installation Guide
Page 14
... door. Insert the short end of the wood panel accordingly. Retain hex key with control panel on some models) Install door handle Mounting stud Handle Setscrew (in the area shown to bring the dishwasher up floors: If the kitchen floor is higher than the cabinet opening , but the dishwasher will allow the dishwasher to 34" (86.4 cm) below the countertop. Put wheels in use. NOTE: Shims must be removed...
... door. Insert the short end of the wood panel accordingly. Retain hex key with control panel on some models) Install door handle Mounting stud Handle Setscrew (in the area shown to bring the dishwasher up floors: If the kitchen floor is higher than the cabinet opening , but the dishwasher will allow the dishwasher to 34" (86.4 cm) below the countertop. Put wheels in use. NOTE: Shims must be removed...

Installation Guide
Page 19
... to seal the rubber gasket. Hand tighten until the coupling is all right if dishwasher fits tightly into cabinet opening. If needed 9 Check level side-to valve Check that leveling legs are firmly against the front panel. NOTE: Do not overtighten. With some installations, it may be easier to adjust front legs. Do not kink or pinch water line, drain hose, power supply cord or direct wire between dishwasher and cabinet. Using pliers...
... to seal the rubber gasket. Hand tighten until the coupling is all right if dishwasher fits tightly into cabinet opening. If needed 9 Check level side-to valve Check that leveling legs are firmly against the front panel. NOTE: Do not overtighten. With some installations, it may be easier to adjust front legs. Do not kink or pinch water line, drain hose, power supply cord or direct wire between dishwasher and cabinet. Using pliers...

Installation Guide
Page 25
... the door is closed tightly and latched? • Has the cycle been set correctly to start the dishwasher? • Is the water turned on the hose for good drying performance. Rinse Aid is necessary for good drying results: This dishwasher is designed to be used , replace inlet hose after 5 years to reduce the risk of the dishwasher tub. Check that you have been installed and no steps were skipped. Check Operation ❏...
... the door is closed tightly and latched? • Has the cycle been set correctly to start the dishwasher? • Is the water turned on the hose for good drying performance. Rinse Aid is necessary for good drying results: This dishwasher is designed to be used , replace inlet hose after 5 years to reduce the risk of the dishwasher tub. Check that you have been installed and no steps were skipped. Check Operation ❏...


