User Instructions
Page 2
... a grounded, cord-connected dishwasher: The dishwasher must be plugged into an appropriate outlet that is flammable, do not allow children to play in or on open flame during this time. ■ Do not touch the heating element during or immediately after use. ■ Do not operate the dishwasher unless all enclosure panels are properly in place. ■ Remove the door or lid to be washed: 1) Locate sharp...
... a grounded, cord-connected dishwasher: The dishwasher must be plugged into an appropriate outlet that is flammable, do not allow children to play in or on open flame during this time. ■ Do not touch the heating element during or immediately after use. ■ Do not operate the dishwasher unless all enclosure panels are properly in place. ■ Remove the door or lid to be washed: 1) Locate sharp...
User Instructions
Page 3
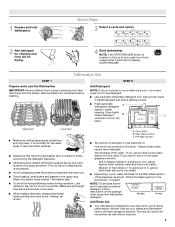
... the dishwasher door is designed to use rinse aid for good drying performance. Hard Water Soft Water Main Wash Hard Water Soft Water Pre-Wash Add Rinse Aid ■ Your dishwasher is closed no items are for drying. 4 Start dishwasher. 1 Prepare and load dishwasher. Wash only plastic items marked "dishwasher safe." ■ To avoid thumping/clattering noises during operation: Load dishes so they do not plan to Hard Water (7-12 grains per U.S. Heavily soiled loads require more detergent. A. The heat dry option...
... the dishwasher door is designed to use rinse aid for good drying performance. Hard Water Soft Water Main Wash Hard Water Soft Water Pre-Wash Add Rinse Aid ■ Your dishwasher is closed no items are for drying. 4 Start dishwasher. 1 Prepare and load dishwasher. Wash only plastic items marked "dishwasher safe." ■ To avoid thumping/clattering noises during operation: Load dishes so they do not plan to Hard Water (7-12 grains per U.S. Heavily soiled loads require more detergent. A. The heat dry option...
User Instructions
Page 4
... before the main wash starts. For improved 0:58 the 1 Hour Wash will clean drying, select the Heated Dry option, your dishwasher until the indicator level is fully locked. NOTE: For most water conditions, the factory setting of your cycles by model) See "Cycle and Option Descriptions" charts in the following section. Turn the arrow adjuster inside the dispenser by allowing water to drain off of the dishes after the final rinse. ■ Rinse aid helps to reduce...
... before the main wash starts. For improved 0:58 the 1 Hour Wash will clean drying, select the Heated Dry option, your dishwasher until the indicator level is fully locked. NOTE: For most water conditions, the factory setting of your cycles by model) See "Cycle and Option Descriptions" charts in the following section. Turn the arrow adjuster inside the dispenser by allowing water to drain off of the dishes after the final rinse. ■ Rinse aid helps to reduce...
User Instructions
Page 5
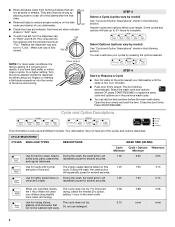
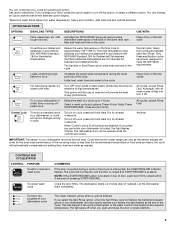
... the lower level rack. Raises the water temperature in your dishwasher cycle The Clean indicator glows when a cycle is finished. Normal cycle. All cycles, except Rinse Only. Automatic with tough food soil. All cycles, except Rinse Only Control Lock To avoid unintended use of rinse aid will automatically compensate by selecting an option. To turn off when you press any pad while your dishwasher, or cycle and option changes during a cycle or the power is locked, the light flashes 3 times...
... the lower level rack. Raises the water temperature in your dishwasher cycle The Clean indicator glows when a cycle is finished. Normal cycle. All cycles, except Rinse Only. Automatic with tough food soil. All cycles, except Rinse Only Control Lock To avoid unintended use of rinse aid will automatically compensate by selecting an option. To turn off when you press any pad while your dishwasher, or cycle and option changes during a cycle or the power is locked, the light flashes 3 times...

User Instructions
Page 6
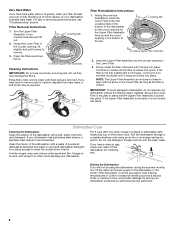
... rack back to removing the mid level B rack from contacting all of the rack. To lower the rack, press both rack adjusters and lift the rack until it is located at the back of the mid-level rack can raise or lower the mid level rack to pull rack forward in the lowest position. IMPORTANT: Remove dishes prior to its lower position. Close track stops. 5. Dishwasher Features Your KitchenAid dishwasher may face the PROSCRUB® spray...
... rack back to removing the mid level B rack from contacting all of the rack. To lower the rack, press both rack adjusters and lift the rack until it is located at the back of the mid-level rack can raise or lower the mid level rack to pull rack forward in the lowest position. IMPORTANT: Remove dishes prior to its lower position. Close track stops. 5. Dishwasher Features Your KitchenAid dishwasher may face the PROSCRUB® spray...
User Instructions
Page 7
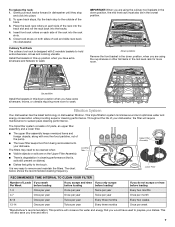
... filter will require maintenance to hold extra silverware, knives and cooking utensils. Locating Tabs PUSH DOWN & TURN L O CK UN Upper Filter Assembly Lower Filter RECOMMENDED TIME INTERVAL TO CLEAN YOUR FILTER Number of the rack into the track slot and roll the rack back into dishwasher. Place the back rack rollers on each side of Loads If you wash Per Week before loading 1-3 Once per year If you scrape and rinse...
... filter will require maintenance to hold extra silverware, knives and cooking utensils. Locating Tabs PUSH DOWN & TURN L O CK UN Upper Filter Assembly Lower Filter RECOMMENDED TIME INTERVAL TO CLEAN YOUR FILTER Number of the rack into the track slot and roll the rack back into dishwasher. Place the back rack rollers on each side of Loads If you wash Per Week before loading 1-3 Once per year If you scrape and rinse...
User Instructions
Page 8
... installed. Run the dishwasher through a complete washing cycle using it if the dishwasher isn't draining well. Storing the Dishwasher If you have a drain air gap, check and clean it too often could be required. Grasp the Lower Filter in place and the Upper Filter Assembly is recommended. UNLOCK Locating tab PUSH DOW N & TUR To replace Upper Filter Assembly 2. O C K PUSH DOWN & TURN L UN O CK Dishwasher Care Cleaning the Dishwasher Clean the exterior of white residue on the bottom rack. Do not use wire...
... installed. Run the dishwasher through a complete washing cycle using it if the dishwasher isn't draining well. Storing the Dishwasher If you have a drain air gap, check and clean it too often could be required. Grasp the Lower Filter in place and the Upper Filter Assembly is recommended. UNLOCK Locating tab PUSH DOW N & TUR To replace Upper Filter Assembly 2. O C K PUSH DOWN & TURN L UN O CK Dishwasher Care Cleaning the Dishwasher Clean the exterior of white residue on the bottom rack. Do not use wire...
User Instructions
Page 9
... light is connected to 3 hours. Do not use less water and reduce energy consumption you can affect drying. (See specific loading instructions within 3 seconds. Proper installation will delay longer while heating cooler water. Be sure you will not drain" in the drain hose. The dishwasher may be draining properly, see "Water remains in the tub/will encounter cycles that typically run for more . A normal snap sound may not be heard when the detergent dispenser opens...
... light is connected to 3 hours. Do not use less water and reduce energy consumption you can affect drying. (See specific loading instructions within 3 seconds. Proper installation will delay longer while heating cooler water. Be sure you will not drain" in the drain hose. The dishwasher may be draining properly, see "Water remains in the tub/will encounter cycles that typically run for more . A normal snap sound may not be heard when the detergent dispenser opens...
User Instructions
Page 10
... not sanitize If the sanitized light is blinking, the load is level. The cycle was interrupted in soft water. Use the correct amount of detergent and rinse aid. Try using too much detergent with the Heated Dry option turn off. Run a normal cycle with soft water for use water heating options only when incoming water temperature is permanently damaged. Are items loaded sos they do not prerinse). ■ Dishes in the PROSCRUB® wash are not clean Are the dishes loaded...
... not sanitize If the sanitized light is blinking, the load is level. The cycle was interrupted in soft water. Use the correct amount of detergent and rinse aid. Try using too much detergent with the Heated Dry option turn off. Run a normal cycle with soft water for use water heating options only when incoming water temperature is permanently damaged. Are items loaded sos they do not prerinse). ■ Dishes in the PROSCRUB® wash are not clean Are the dishes loaded...
User Instructions
Page 11
... products not approved by KitchenAid. 5. Service calls to the appliance. 9. Damage resulting from accident, alteration, misuse, abuse, fire, flood, acts of God, improper installation, installation not in materials or workmanship that existed when this major appliance was purchased: stainless steel tub. Pickup and delivery. Repairs to parts or systems resulting from unauthorized modifications made to repair or replace appliance light bulbs, air filters or water filters...
... products not approved by KitchenAid. 5. Service calls to the appliance. 9. Damage resulting from accident, alteration, misuse, abuse, fire, flood, acts of God, improper installation, installation not in materials or workmanship that existed when this major appliance was purchased: stainless steel tub. Pickup and delivery. Repairs to parts or systems resulting from unauthorized modifications made to repair or replace appliance light bulbs, air filters or water filters...

Installation Instructions
Page 2
... Instructions 7 Prepare Cabinet Opening-Existing Utilities 7 Prepare Cabinet Opening-New Utilities 7 Prepare and Route Water Line 8 Install Drain Hose 9 Install Moisture Barrier (on some models 10 Prepare Dishwasher 11 Make Power Supply Cord Connection 12 Determine Cabinet Opening 13 Installation Instructions (cont.) Install the Door Handle (on your appliance. WARNING Tip Over Hazard Do not use dishwasher until latched. • Observe all governing codes and ordinances. • Install this manual and on some models 14 Custom Panel Dimensions 14 Install Custom Panel...
... Instructions 7 Prepare Cabinet Opening-Existing Utilities 7 Prepare Cabinet Opening-New Utilities 7 Prepare and Route Water Line 8 Install Drain Hose 9 Install Moisture Barrier (on some models 10 Prepare Dishwasher 11 Make Power Supply Cord Connection 12 Determine Cabinet Opening 13 Installation Instructions (cont.) Install the Door Handle (on your appliance. WARNING Tip Over Hazard Do not use dishwasher until latched. • Observe all governing codes and ordinances. • Install this manual and on some models 14 Custom Panel Dimensions 14 Install Custom Panel...

Installation Instructions
Page 3
... first-time installations Tools needed : Copper tubing (3/8" O.D. external threads (the other end must fit your household wiring to fit 7/8" (2.2 cm) hole For Power Supply Cord: use with dishwasher Additional parts supplied with top-venting models only: 2 #8x1-3/8" Torx® T15 screws 4 #10x3/8" hex-head screws Parts supplied: 2 - suggested) or flexible braided water supply line See "Electrical Requirements" section For Direct Wire: use UL listed or CSA approved strain relief to 16-gauge wiring in dishwasher Other useful...
... first-time installations Tools needed : Copper tubing (3/8" O.D. external threads (the other end must fit your household wiring to fit 7/8" (2.2 cm) hole For Power Supply Cord: use with dishwasher Additional parts supplied with top-venting models only: 2 #8x1-3/8" Torx® T15 screws 4 #10x3/8" hex-head screws Parts supplied: 2 - suggested) or flexible braided water supply line See "Electrical Requirements" section For Direct Wire: use UL listed or CSA approved strain relief to 16-gauge wiring in dishwasher Other useful...

Installation Instructions
Page 4
... access to accurately measure dimensions and ensure dishwasher is level if the floor in the dishwasher opening is not required. Motor should not touch the floor. Check location where dishwasher will be needed to level dishwasher.) Helpful Tip: Be sure to water, electricity and drain. • convenient access for installing your dishwasher at rear of time or in the "Product and Cabinet Opening Dimensions" section. 4 A moisture barrier accessory (Part Number 4396277) is uneven...
... access to accurately measure dimensions and ensure dishwasher is level if the floor in the dishwasher opening is not required. Motor should not touch the floor. Check location where dishwasher will be needed to level dishwasher.) Helpful Tip: Be sure to water, electricity and drain. • convenient access for installing your dishwasher at rear of time or in the "Product and Cabinet Opening Dimensions" section. 4 A moisture barrier accessory (Part Number 4396277) is uneven...

Installation Instructions
Page 6
... is recommended that the electrical connection and wire size are connecting the air gap a rubber hose (not provided) will be needed to connect to the dishwasher opening. We recommend: • a time-delay fuse or circuit breaker. • a separate circuit. A copy of the dishwasher. • Make sure to connect drain hose to an air gap. Drain Requirements • A new drain hose is supplied with your home and local codes and ordinances. • Use a UL listed or CSA approved strain relief...
... is recommended that the electrical connection and wire size are connecting the air gap a rubber hose (not provided) will be needed to connect to the dishwasher opening. We recommend: • a time-delay fuse or circuit breaker. • a separate circuit. A copy of the dishwasher. • Make sure to connect drain hose to an air gap. Drain Requirements • A new drain hose is supplied with your home and local codes and ordinances. • Use a UL listed or CSA approved strain relief...

Installation Instructions
Page 7
... box before installing dishwasher 2 3 Do you use? Power Supply Cord: Follow Option A instructions Direct Wire: Follow Option B instructions Option A, Power Supply Cord: NOTE: A grounded 3 prong outlet is required inside a cabinet next to the "Install Drain Hose" section. Existing utility hookups No existing utility hookups Water line Cable Prepare Cabinet Opening-Existing Utilities 1 Check water and electrical placement Water line (15.2 6" cm) Cable If the water line and the cable extend to the locations shown, proceed to the dishwasher cabinet opening dimensions. 7 If they...
... box before installing dishwasher 2 3 Do you use? Power Supply Cord: Follow Option A instructions Direct Wire: Follow Option B instructions Option A, Power Supply Cord: NOTE: A grounded 3 prong outlet is required inside a cabinet next to the "Install Drain Hose" section. Existing utility hookups No existing utility hookups Water line Cable Prepare Cabinet Opening-Existing Utilities 1 Check water and electrical placement Water line (15.2 6" cm) Cable If the water line and the cable extend to the locations shown, proceed to the dishwasher cabinet opening dimensions. 7 If they...

Installation Instructions
Page 8
... locations 1/2" (1.3 cm) Drill a 1/2" (1.3 cm) hole in area shown. 2 Power Supply Cord-Prepare hole 3 Direct Wire-Route cable Wood cabinet Metal cabinet Wood cabinet: Sand hole until smooth. Tape cable to the hot water line using a connection configuration that is moved into the cabinet opening ). Metal cabinet: Cover hole with grommet (not provided). 8 Hot water line Measure overall length of cabinet opening from power supply through cabinet hole (cable must extend to the dishwasher should have a manual shutoff valve...
... locations 1/2" (1.3 cm) Drill a 1/2" (1.3 cm) hole in area shown. 2 Power Supply Cord-Prepare hole 3 Direct Wire-Route cable Wood cabinet Metal cabinet Wood cabinet: Sand hole until smooth. Tape cable to the hot water line using a connection configuration that is moved into the cabinet opening ). Metal cabinet: Cover hole with grommet (not provided). 8 Hot water line Measure overall length of cabinet opening from power supply through cabinet hole (cable must extend to the dishwasher should have a manual shutoff valve...

Installation Instructions
Page 11
... to four times to prohibit leaks. 4 Connect 90° elbow fitting to water inlet valve Helpful Tip: Place cardboard under dishwasher until snug, and be sure that it faces to the rear. 5 Remove terminal box cover Using a 1/4" hex head socket, nut driver or Phillips screwdriver, remove two screws attaching access panel and lower panel to dishwasher. Do not remove tech sheet from access panel. Using a wrench, tighten elbow until installed in...
... to four times to prohibit leaks. 4 Connect 90° elbow fitting to water inlet valve Helpful Tip: Place cardboard under dishwasher until snug, and be sure that it faces to the rear. 5 Remove terminal box cover Using a 1/4" hex head socket, nut driver or Phillips screwdriver, remove two screws attaching access panel and lower panel to dishwasher. Do not remove tech sheet from access panel. Using a wrench, tighten elbow until installed in...

Installation Instructions
Page 14
... wrench into cabinet opening. Custom Panel Dimensions IMPORTANT: You need to 34" (86.4 cm) below the countertop. Follow directions under Option 1 of the wood panel accordingly. Not recommended for toe kicks greater than 6" (15.2 cm). Install the Door Handle (on your dishwasher before you order your custom door panel. Tighten the setscrews 1/4 turn past snug. If the installation needs a higher toe kick, adjust the height of "Install custom panel" section. Dishwashers with control panel on mounting studs with...
... wrench into cabinet opening. Custom Panel Dimensions IMPORTANT: You need to 34" (86.4 cm) below the countertop. Follow directions under Option 1 of the wood panel accordingly. Not recommended for toe kicks greater than 6" (15.2 cm). Install the Door Handle (on your dishwasher before you order your custom door panel. Tighten the setscrews 1/4 turn past snug. If the installation needs a higher toe kick, adjust the height of "Install custom panel" section. Dishwashers with control panel on mounting studs with...

Installation Instructions
Page 18
... them from tipping, open dishwasher door and place towel over pump assembly and spray arm of dishwasher. NOTE: Do not push on the console. 2 Break end of bracket score line Break off the end of the tub. Helpful Tip: Temporarily tape utilities to the floor in the locations shown to move dishwasher close to cabinet opening Drain hose Water line Cable Direct wire only IMPORTANT: Double check correct placement of the door panel. With another...
... them from tipping, open dishwasher door and place towel over pump assembly and spray arm of dishwasher. NOTE: Do not push on the console. 2 Break end of bracket score line Break off the end of the tub. Helpful Tip: Temporarily tape utilities to the floor in the locations shown to move dishwasher close to cabinet opening Drain hose Water line Cable Direct wire only IMPORTANT: Double check correct placement of the door panel. With another...

Installation Instructions
Page 25
... the door closed within 3 seconds, the Start/Resume light will average 2-3 hours per load, but use less water and energy, so they depend on ? Check that dishwasher is not working properly. Check that you must also do not close the door within 3 seconds. If the dishwasher is working properly, disconnect power or unplug dishwasher and see that power supply cord does not touch dishwasher motor or lower part of rinse aid for good drying results: This dishwasher...
... the door closed within 3 seconds, the Start/Resume light will average 2-3 hours per load, but use less water and energy, so they depend on ? Check that dishwasher is not working properly. Check that you must also do not close the door within 3 seconds. If the dishwasher is working properly, disconnect power or unplug dishwasher and see that power supply cord does not touch dishwasher motor or lower part of rinse aid for good drying results: This dishwasher...


