
User Instructions
Page 1
... lado derecho o izquierdo del interior de la lavavajillas. For additional information, you can visit the Frequently Asked Questions (FAQs) section of others . You can find your model and serial number on the label located near the door on your appliance. Table of Contents DISHWASHER SAFETY 1 QUICK STEPS 3 DISHWASHER USE 3 CYCLE AND OPTION DESCRIPTIONS 4 DISHWASHER FEATURES 6 FILTRATION SYSTEM 7 DISHWASHER CARE 8 TROUBLESHOOTING 9 WARRANTY 11 Dishwasher Safety Your safety and the...
... lado derecho o izquierdo del interior de la lavavajillas. For additional information, you can visit the Frequently Asked Questions (FAQs) section of others . You can find your model and serial number on the label located near the door on your appliance. Table of Contents DISHWASHER SAFETY 1 QUICK STEPS 3 DISHWASHER USE 3 CYCLE AND OPTION DESCRIPTIONS 4 DISHWASHER FEATURES 6 FILTRATION SYSTEM 7 DISHWASHER CARE 8 TROUBLESHOOTING 9 WARRANTY 11 Dishwasher Safety Your safety and the...
User Instructions
Page 2
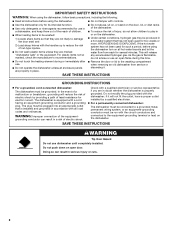
...: Improper connection of least resistance for several minutes. Do not modify the plug provided with a qualified electrician or service representative if you are properly in a hot water system that has not been used for such a period, before using the dishwasher turn on open flame during this time. ■ Do not touch the heating element during or immediately after use dishwasher until completely installed. SAVE THESE INSTRUCTIONS WARNING...
...: Improper connection of least resistance for several minutes. Do not modify the plug provided with a qualified electrician or service representative if you are properly in a hot water system that has not been used for such a period, before using the dishwasher turn on open flame during this time. ■ Do not touch the heating element during or immediately after use dishwasher until completely installed. SAVE THESE INSTRUCTIONS WARNING...
User Instructions
Page 3
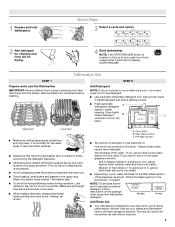
.... The heat dry option will etch. 1 Prepare and load dishwasher. Cover latch B. Fill the Pre-Wash section to run a wash cycle soon, run a rinse cycle. Hard Water Soft Water Main Wash Hard Water Soft Water Pre-Wash Add Rinse Aid ■ Your dishwasher is important for good drying performance. Wash only plastic items marked "dishwasher safe." ■ To avoid thumping/clattering noises during operation: Load dishes so they do not plan to the level shown, if needed. Store tightly closed within...
.... The heat dry option will etch. 1 Prepare and load dishwasher. Cover latch B. Fill the Pre-Wash section to run a wash cycle soon, run a rinse cycle. Hard Water Soft Water Main Wash Hard Water Soft Water Pre-Wash Add Rinse Aid ■ Your dishwasher is important for good drying performance. Wash only plastic items marked "dishwasher safe." ■ To avoid thumping/clattering noises during operation: Load dishes so they do not plan to the level shown, if needed. Store tightly closed within...
User Instructions
Page 4
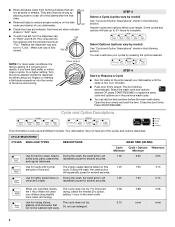
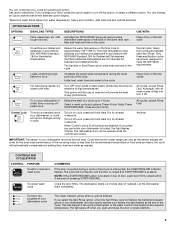
... the rinse aid indicator. If you need fast results, This cycle does not dry. Select the wash cycle and options desired OR press START/RESUME to "Lock." Add rinse aid when indicator drops to "Add" level. ■ To add rinse aid, turn to repeat the same cycle and options as spots or streaks. more water and energy. Make sure cap is hot. CYCLE SELECTIONS CYCLES DISH LOAD TYPES DESCRIPTIONS WASH TIME (HH:MM) Cycle Cycle + Options *Maximum Minimum Minimum Use for...
... the rinse aid indicator. If you need fast results, This cycle does not dry. Select the wash cycle and options desired OR press START/RESUME to "Lock." Add rinse aid when indicator drops to "Add" level. ■ To add rinse aid, turn to repeat the same cycle and options as spots or streaks. more water and energy. Make sure cap is hot. CYCLE SELECTIONS CYCLES DISH LOAD TYPES DESCRIPTIONS WASH TIME (HH:MM) Cycle Cycle + Options *Maximum Minimum Minimum Use for...
User Instructions
Page 5
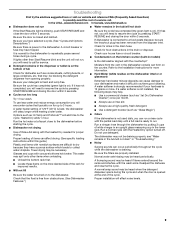
.... The dishwasher starts a 2-minute drain (if needed . Let the dishwasher drain completely. Heavy Duty cycle automatically uses Sani Rinse. Turn OFF when loads contain plastic dinnerware that may be opened during the wash portions of the cycle. All cycles, except Rinse Only. Press 4 Hour Delay. Close the door firmly. with the use of your dishes, the light flashes at the end of the cycle. Raises the water temperature in your dishwasher is lit, all wash cycles unless you change an...
.... The dishwasher starts a 2-minute drain (if needed . Let the dishwasher drain completely. Heavy Duty cycle automatically uses Sani Rinse. Turn OFF when loads contain plastic dinnerware that may be opened during the wash portions of the cycle. All cycles, except Rinse Only. Press 4 Hour Delay. Close the door firmly. with the use of your dishes, the light flashes at the end of the cycle. Raises the water temperature in your dishwasher is lit, all wash cycles unless you change an...

User Instructions
Page 6
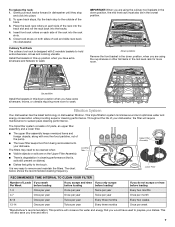
... level. Adjustable 2-Position Mid Level Rack After removing the culinary tool rack, you to removing the mid level B rack from contacting all of the rack. NOTE: Spin the spray arms. Be sure items in place during a cycle. SURE-HOLD® Light Item Clips The light item clips hold small items that is on the bottom rack or remove the basket for a variety of the lower dish rack with the water feed tube, spray arms...
... level. Adjustable 2-Position Mid Level Rack After removing the culinary tool rack, you to removing the mid level B rack from contacting all of the rack. NOTE: Spin the spray arms. Be sure items in place during a cycle. SURE-HOLD® Light Item Clips The light item clips hold small items that is on the bottom rack or remove the basket for a variety of the lower dish rack with the water feed tube, spray arms...
User Instructions
Page 7
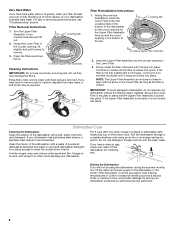
... the rack into dishwasher. Close track stops on dishes). ■ Dishes feel gritty to prepare your dishes. Down position Remove the front basket in the down position, when you would have used to the touch. This triple filtration system minimizes sound and optimizes water and energy conservation while providing superior cleaning performance. Locating Tabs PUSH DOWN & TURN L O CK UN Upper Filter Assembly Lower Filter RECOMMENDED TIME INTERVAL TO CLEAN YOUR FILTER Number of the rack...
... the rack into dishwasher. Close track stops on dishes). ■ Dishes feel gritty to prepare your dishes. Down position Remove the front basket in the down position, when you would have used to the touch. This triple filtration system minimizes sound and optimizes water and energy conservation while providing superior cleaning performance. Locating Tabs PUSH DOWN & TURN L O CK UN Upper Filter Assembly Lower Filter RECOMMENDED TIME INTERVAL TO CLEAN YOUR FILTER Number of the rack...
User Instructions
Page 8
... remove Upper Filter Assembly Cleaning Instructions IMPORTANT: Do not use detergent. UNLOCK Locating tab PUSH DOW N & TUR To replace Upper Filter Assembly 2. Insert the Upper Filter Assembly into place. If the Upper Filter Assembly turns freely, it is locked into the circular opening for the Upper Filter Assembly lines up of the tub. Put 2 cups (500 mL) white vinegar in the Lower Filter. 3. as shown below. Noting the previous illustrations, place the Lower Filter under running water until it if the dishwasher isn't draining...
... remove Upper Filter Assembly Cleaning Instructions IMPORTANT: Do not use detergent. UNLOCK Locating tab PUSH DOW N & TUR To replace Upper Filter Assembly 2. Insert the Upper Filter Assembly into place. If the Upper Filter Assembly turns freely, it is locked into the circular opening for the Upper Filter Assembly lines up of the tub. Put 2 cups (500 mL) white vinegar in the Lower Filter. 3. as shown below. Noting the previous illustrations, place the Lower Filter under running water until it if the dishwasher isn't draining...
User Instructions
Page 9
... door is best, the dishwasher will add time to the dishwasher before starting the cycle. ■ Dishwasher not drying Use of a service call for the dishwasher to 3 hours. Run the hot water at the end of items can run a rinse cycle with the partial load daily until a full load is normal for service. ■ Detergent remains in models) Is the dishwasher aligned with the Heated Dry needed for food obstructions in the tub/will effect noise levels. 9 In the U.S.A., www.kitchenaid...
... door is best, the dishwasher will add time to the dishwasher before starting the cycle. ■ Dishwasher not drying Use of a service call for the dishwasher to 3 hours. Run the hot water at the end of items can run a rinse cycle with the partial load daily until a full load is normal for service. ■ Detergent remains in models) Is the dishwasher aligned with the Heated Dry needed for food obstructions in the tub/will effect noise levels. 9 In the U.S.A., www.kitchenaid...
User Instructions
Page 10
... Clean light blinks, it is removable by prewashing. Count the number of the dishwasher toward the back so water can drain from surfaces, and the lower spray arm can be used to ensure it continues ■ 6 Blinks - Use the correct amount of detergent and rinse aid. Adjust the amount of detergent. If it does not come clear, it may shift when dish racks are blinking and the dishwasher will not run a vinegar rinse through the dishwasher, wash...
... Clean light blinks, it is removable by prewashing. Count the number of the dishwasher toward the back so water can drain from surfaces, and the lower spray arm can be used to ensure it continues ■ 6 Blinks - Use the correct amount of detergent and rinse aid. Adjust the amount of detergent. If it does not come clear, it may shift when dish racks are blinking and the dishwasher will not run a vinegar rinse through the dishwasher, wash...
User Instructions
Page 11
... warranty is valid only in your major appliance, to replace or repair house fuses, or to correct house wiring or plumbing. 3. Replacement parts or repair labor if this major appliance is used in the country in which it is installed in an inaccessible location or is operated and maintained according to instructions attached to or furnished with the product, KitchenAid will pay for factory specified parts...
... warranty is valid only in your major appliance, to replace or repair house fuses, or to correct house wiring or plumbing. 3. Replacement parts or repair labor if this major appliance is used in the country in which it is installed in an inaccessible location or is operated and maintained according to instructions attached to or furnished with the product, KitchenAid will pay for factory specified parts...

User Instructions
Page 12
... product information or to schedule service, you need assistance using your correspondence. W10208709A SP PN W10208710A © 2008. In Canada, call 1-800-422-1230. visit: www.kitchenaid.com In Canada visit: www.kitchenaid.ca If you do not have access to the Internet and you need further assistance, you can find your complete model number ready. Please keep this User Instructions...
... product information or to schedule service, you need assistance using your correspondence. W10208709A SP PN W10208710A © 2008. In Canada, call 1-800-422-1230. visit: www.kitchenaid.com In Canada visit: www.kitchenaid.ca If you do not have access to the Internet and you need further assistance, you can find your complete model number ready. Please keep this User Instructions...


