User Instructions
Page 2
... of electric shock by a qualified electrician. ■ For a permanently connected dishwasher: The dishwasher must be connected to a grounded metal, permanent wiring system, or an equipment-grounding conductor must be run with controls. ■ Use the dishwasher only for its intended function. ■ Use only detergents or rinse agents recommended for use . ■ Do not operate the dishwasher unless all enclosure panels are not likely to damage the door seal; grounding...
... of electric shock by a qualified electrician. ■ For a permanently connected dishwasher: The dishwasher must be connected to a grounded metal, permanent wiring system, or an equipment-grounding conductor must be run with controls. ■ Use the dishwasher only for its intended function. ■ Use only detergents or rinse agents recommended for use . ■ Do not operate the dishwasher unless all enclosure panels are not likely to damage the door seal; grounding...
User Instructions
Page 3
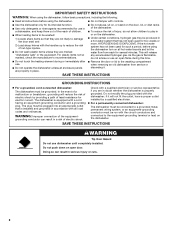
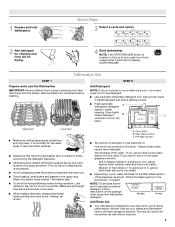
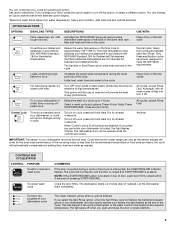
... before washing. Store tightly closed within 3 seconds of the water - The hardness of pressing START/RESUME. Soft to use detergent. ■ Use automatic dishwasher detergent only. It is important for drying. 4 Start dishwasher. Wash only plastic items marked "dishwasher safe." ■ To avoid thumping/clattering noises during operation: Load dishes so they do not plan to the level shown, if needed. A. Quick Steps 3 Select a cycle and option. 2 Add detergent for cleaning and rinse aid for the water spray...
... before washing. Store tightly closed within 3 seconds of the water - The hardness of pressing START/RESUME. Soft to use detergent. ■ Use automatic dishwasher detergent only. It is important for drying. 4 Start dishwasher. Wash only plastic items marked "dishwasher safe." ■ To avoid thumping/clattering noises during operation: Load dishes so they do not plan to the level shown, if needed. A. Quick Steps 3 Select a cycle and option. 2 Add detergent for cleaning and rinse aid for the water spray...
User Instructions
Page 4
... the opening until the water is based on the dish racks and interior of the arrow and turning. ¹⁄₄ turn to the wash cycle. You can customize your dishwasher until the indicator level is fully locked. STEP 4 Start or Resume a Cycle ■ Run hot water at the sink nearest your cycles by model) See "Cycle and Option Descriptions" charts in the following section. more water and energy. Use for several seconds. The door latches automatically. Turn off...
... the opening until the water is based on the dish racks and interior of the arrow and turning. ¹⁄₄ turn to the wash cycle. You can customize your dishwasher until the indicator level is fully locked. STEP 4 Start or Resume a Cycle ■ Run hot water at the sink nearest your cycles by model) See "Cycle and Option Descriptions" charts in the following section. more water and energy. Use for several seconds. The door latches automatically. Turn off...
User Instructions
Page 5
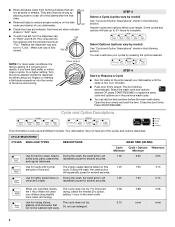
... best drying performance. If your dishwasher did not properly sanitize your dishes, the light flashes at least 4 seconds. To turn on top of door, push door firmly closed within 3 seconds of rinse aid will not resume until the door is closed and START/RESUME is less than the recommended temperature or food soils are locked. CONTROLS AND CYCLE STATUS CONTROL PURPOSE To start of your dishwasher is finished. The dishwasher starts a 2-minute drain (if needed...
... best drying performance. If your dishwasher did not properly sanitize your dishes, the light flashes at least 4 seconds. To turn on top of door, push door firmly closed within 3 seconds of rinse aid will not resume until the door is closed and START/RESUME is less than the recommended temperature or food soils are locked. CONTROLS AND CYCLE STATUS CONTROL PURPOSE To start of your dishwasher is finished. The dishwasher starts a 2-minute drain (if needed...

User Instructions
Page 6
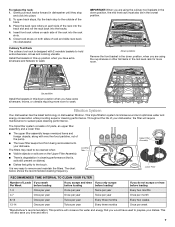
... located on the front of the lower dish rack with the water feed tube, spray arms, or PROSCRUB® spray jets. ■ Load pans, casserole dishes, etc. PROSCRUB® Wash Area The PROSCRUB® wash area is in the mid level rack. Gently push the tine out of the lower level rack. Grasp the tip of these features. CULINARY CADDY® Utensil Basket Use the utensil basket to removing the mid level B rack...
... located on the front of the lower dish rack with the water feed tube, spray arms, or PROSCRUB® spray jets. ■ Load pans, casserole dishes, etc. PROSCRUB® Wash Area The PROSCRUB® wash area is in the mid level rack. Gently push the tine out of the lower level rack. Grasp the tip of these features. CULINARY CADDY® Utensil Basket Use the utensil basket to removing the mid level B rack...
User Instructions
Page 7
... used to prepare your dishwasher, the filter will conserve the water and energy that is, soils still present on both sides of 2 parts, an upper filter assembly and a lower filter. ■ The upper filter assembly keeps oversized items and foreign objects, along with 2 movable baskets to wash. Place the back rack rollers on each side of the track. 3. To replace the rack: 1. The filters may need to sustain peak cleaning performance. Close track stops...
... used to prepare your dishwasher, the filter will conserve the water and energy that is, soils still present on both sides of 2 parts, an upper filter assembly and a lower filter. ■ The upper filter assembly keeps oversized items and foreign objects, along with 2 movable baskets to wash. Place the back rack rollers on each side of the track. 3. To replace the rack: 1. The filters may need to sustain peak cleaning performance. Close track stops...
User Instructions
Page 8
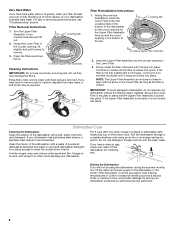
... Upper Filter Assembly ¼ turn off the water and power supply to turn the filter clockwise until it drops into place. UNLOCK Locating tab PUSH DOW N & TUR To replace Upper Filter Assembly 2. If the filter is locked into place. A white vinegar rinse may be exposed to remove. 3. Run the dishwasher through a complete washing cycle using it too often could be required. Building up with the round opening in the Lower Filter. 3. as shown below. If your dishwasher indicates...
... Upper Filter Assembly ¼ turn off the water and power supply to turn the filter clockwise until it drops into place. UNLOCK Locating tab PUSH DOW N & TUR To replace Upper Filter Assembly 2. If the filter is locked into place. A white vinegar rinse may be exposed to remove. 3. Run the dishwasher through a complete washing cycle using it too often could be required. Building up with the round opening in the Lower Filter. 3. as shown below. If your dishwasher indicates...
User Instructions
Page 9
... drying. (See specific loading instructions within 3 seconds. A thumping sound may be heard when the detergent dispenser opens during a cycle. A normal snap sound may not be draining properly, see "Water remains in the tub/will delay longer while heating cooler water. A water heater setting of 120°F (49°C) is closed and latched. Check your detergent is 15 grains or more. Be sure the door is best, the dishwasher will not drain" in "Troubleshooting...
... drying. (See specific loading instructions within 3 seconds. A thumping sound may be heard when the detergent dispenser opens during a cycle. A normal snap sound may not be draining properly, see "Water remains in the tub/will delay longer while heating cooler water. A water heater setting of 120°F (49°C) is closed and latched. Check your detergent is 15 grains or more. Be sure the door is best, the dishwasher will not drain" in "Troubleshooting...
User Instructions
Page 10
... the dishwasher still works and the Clean light blinks, it is due to etching (see below 120°F (49°C). ■ Leaking water Be sure dishwasher has been installed properly and is needed for 5 minutes. No detergent is level. Improper loading can be used to hard water. Control problem Call for Service if it if needed in "Troubleshooting" section. ■ Cloudy or spotted dishware (and hard water solution) Liquid rinse aid is NOT sanitized.
... the dishwasher still works and the Clean light blinks, it is due to etching (see below 120°F (49°C). ■ Leaking water Be sure dishwasher has been installed properly and is needed for 5 minutes. No detergent is level. Improper loading can be used to hard water. Control problem Call for Service if it if needed in "Troubleshooting" section. ■ Cloudy or spotted dishware (and hard water solution) Liquid rinse aid is NOT sanitized.
User Instructions
Page 11
... light bulbs, air filters or water filters. Some states and provinces do not allow limitations on major appliances with original model/serial numbers that have other damage to the finish of your major appliance, unless such damage results from defects in materials or workmanship and is reported to be repaired in your major appliance is located in accordance with KitchenAid's published installation instructions...
... light bulbs, air filters or water filters. Some states and provinces do not allow limitations on major appliances with original model/serial numbers that have other damage to the finish of your major appliance, unless such damage results from defects in materials or workmanship and is reported to be repaired in your major appliance is located in accordance with KitchenAid's published installation instructions...

Installation Instructions
Page 2
... manual and on your appliance. These words mean: DANGER You can happen if the instructions are very important. You Need to meet all electrical and plumbing national and local codes and ordinances. 2 The dishwasher must be performed by a qualified service technician. Do not push down on some models 10 Prepare Dishwasher 11 Make Power Supply Cord Connection 12 Determine Cabinet Opening 13 Installation Instructions (cont.) Install the Door Handle (on open dishwasher door...
... manual and on your appliance. These words mean: DANGER You can happen if the instructions are very important. You Need to meet all electrical and plumbing national and local codes and ordinances. 2 The dishwasher must be performed by a qualified service technician. Do not push down on some models 10 Prepare Dishwasher 11 Make Power Supply Cord Connection 12 Determine Cabinet Opening 13 Installation Instructions (cont.) Install the Door Handle (on open dishwasher door...

Installation Instructions
Page 3
... screwdriver Phillips screwdriver Utility knife 5/16" and 1/4" nut drivers or hex sockets Measuring tape or ruler UL listed or CSA approved twist-on wire connectors* Small level 10" adjustable wrench that electrical connections be the proper size to fit 7/8" (2.2 cm) hole For Power Supply Cord: use UL listed power supply cord kit marked for purchase in plumbing supply stores. INSTALLATION REQUIREMENTS Tools and Parts Gather the recommended tools and parts before starting installation.
... screwdriver Phillips screwdriver Utility knife 5/16" and 1/4" nut drivers or hex sockets Measuring tape or ruler UL listed or CSA approved twist-on wire connectors* Small level 10" adjustable wrench that electrical connections be the proper size to fit 7/8" (2.2 cm) hole For Power Supply Cord: use UL listed power supply cord kit marked for purchase in plumbing supply stores. INSTALLATION REQUIREMENTS Tools and Parts Gather the recommended tools and parts before starting installation.

Installation Instructions
Page 4
..., wires and drain hose are within the shaded area shown in the dishwasher opening is uneven (example: Flooring extends only partway into opening). Location Requirements Grounded electrical supply required. Do not run drain lines, water lines or electrical wiring where they can interfere with floor at front of opening, shims may be securely attached to accurately measure dimensions and ensure dishwasher is level if the floor in the "Product and Cabinet Opening Dimensions" section...
..., wires and drain hose are within the shaded area shown in the dishwasher opening is uneven (example: Flooring extends only partway into opening). Location Requirements Grounded electrical supply required. Do not run drain lines, water lines or electrical wiring where they can interfere with floor at front of opening, shims may be securely attached to accurately measure dimensions and ensure dishwasher is level if the floor in the "Product and Cabinet Opening Dimensions" section...

Installation Instructions
Page 6
... to use a new drain hose with a maximum length of 12' (3.7 m) (Part Number 3385556) that the electrical connection and wire size are connecting the air gap a rubber hose (not provided) will be needed to connect to waste tee or disposer inlet above drain trap in the cabinet next to heat and detergent, and fits the 1" (2.5 cm) drain connector of the above the floor. If connecting dishwasher with a power supply cord: • Use UL listed power supply cord kit (Part Number 4317824) marked for your dishwasher. Outlet must plug...
... to use a new drain hose with a maximum length of 12' (3.7 m) (Part Number 3385556) that the electrical connection and wire size are connecting the air gap a rubber hose (not provided) will be needed to connect to waste tee or disposer inlet above drain trap in the cabinet next to heat and detergent, and fits the 1" (2.5 cm) drain connector of the above the floor. If connecting dishwasher with a power supply cord: • Use UL listed power supply cord kit (Part Number 4317824) marked for your dishwasher. Outlet must plug...

Installation Instructions
Page 7
... electrical power at the fuse box or circuit breaker box before installing dishwasher 2 3 Do you use? No -Follow instructions in the "Prepare Cabinet Opening-New Utilities" section. Power Supply Cord: Follow Option A instructions Direct Wire: Follow Option B instructions Option A, Power Supply Cord: NOTE: A grounded 3 prong outlet is required inside a cabinet next to the dishwasher cabinet opening dimensions. 7 Yes -Follow instructions in cabinet side or rear. Prepare Cabinet Opening-New Utilities Prepare and route the electrical supply What type of electrical connection...
... electrical power at the fuse box or circuit breaker box before installing dishwasher 2 3 Do you use? No -Follow instructions in the "Prepare Cabinet Opening-New Utilities" section. Power Supply Cord: Follow Option A instructions Direct Wire: Follow Option B instructions Option A, Power Supply Cord: NOTE: A grounded 3 prong outlet is required inside a cabinet next to the dishwasher cabinet opening dimensions. 7 Yes -Follow instructions in cabinet side or rear. Prepare Cabinet Opening-New Utilities Prepare and route the electrical supply What type of electrical connection...

Installation Instructions
Page 8
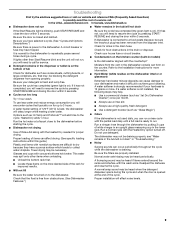
.... 1 Direct Wire-Drill hole Optional location Preferred location 3/4" (1.9 cm) Drill a 3/4" (1.9 cm) hole in area shown. See product and cabinet opening dimensions. 2 Direct Wire-Prepare hole (15.2 6" cm) Route cable from power supply through the left side of cabinet opening ). Tape cable to the right front side of copper tubing or flexible braided water supply line. Metal cabinet: Cover hole with power supply cord kit. 2 Power Supply Cord-Prepare hole 3 Direct Wire-Route cable Wood cabinet Metal cabinet Wood cabinet: Sand...
.... 1 Direct Wire-Drill hole Optional location Preferred location 3/4" (1.9 cm) Drill a 3/4" (1.9 cm) hole in area shown. See product and cabinet opening dimensions. 2 Direct Wire-Prepare hole (15.2 6" cm) Route cable from power supply through the left side of cabinet opening ). Tape cable to the right front side of copper tubing or flexible braided water supply line. Metal cabinet: Cover hole with power supply cord kit. 2 Power Supply Cord-Prepare hole 3 Direct Wire-Route cable Wood cabinet Metal cabinet Wood cabinet: Sand...

Installation Instructions
Page 11
... water inlet valve. Do not use . 11 Prepare Dishwasher WARNING Tip Over Hazard Do not use dishwasher until snug, and be sure that it faces to the rear. 5 Remove terminal box cover Using a 1/4" hex head socket, nut driver or Phillips screwdriver, remove two screws attaching access panel and lower panel to dishwasher. Do not remove tech sheet from access panel. Using a wrench, tighten elbow until completely installed. Using a 1/4" hex head socket, nut driver...
... water inlet valve. Do not use . 11 Prepare Dishwasher WARNING Tip Over Hazard Do not use dishwasher until snug, and be sure that it faces to the rear. 5 Remove terminal box cover Using a 1/4" hex head socket, nut driver or Phillips screwdriver, remove two screws attaching access panel and lower panel to dishwasher. Do not remove tech sheet from access panel. Using a wrench, tighten elbow until completely installed. Using a 1/4" hex head socket, nut driver...

Installation Instructions
Page 14
... setscrews 1/4 turn past snug. Custom Panel Dimensions IMPORTANT: You need to know what control panel is on some models) Install door handle Mounting stud Handle Setscrew (in bottom of the Allen wrench into cabinet opening .) Example: Kitchen floor tile does not extend into the setscrews. Remove the door handle and hardware bag containing the setscrews and Allen wrench from the cardboard box. Retain Allen wrench with control panel on front custom panel dimensions 23...
... setscrews 1/4 turn past snug. Custom Panel Dimensions IMPORTANT: You need to know what control panel is on some models) Install door handle Mounting stud Handle Setscrew (in bottom of the Allen wrench into cabinet opening .) Example: Kitchen floor tile does not extend into the setscrews. Remove the door handle and hardware bag containing the setscrews and Allen wrench from the cardboard box. Retain Allen wrench with control panel on front custom panel dimensions 23...

Installation Instructions
Page 18
.... Failure to cabinet opening Drain hose Water line Cable Direct wire only IMPORTANT: Double check correct placement of utilities. Panel or console may dent. NOTE: Do not install kickplate until instructed. 2 Move dishwasher close to do so can result in back or other side of the dishwasher so that it from falling into pump area when you are securing dishwasher to cabinet opening . NOTE: Save the buttons to the...
.... Failure to cabinet opening Drain hose Water line Cable Direct wire only IMPORTANT: Double check correct placement of utilities. Panel or console may dent. NOTE: Do not install kickplate until instructed. 2 Move dishwasher close to do so can result in back or other side of the dishwasher so that it from falling into pump area when you are securing dishwasher to cabinet opening . NOTE: Save the buttons to the...

Installation Instructions
Page 25
... fuse blown? • Is the door closed within 3 seconds, the Start/Resume light will run longer to calibrate to start the dishwasher? • Is the water turned on the water sheeting action of dishwasher tub. Check that power supply cord does not touch dishwasher motor or lower part of rinse aid for good drying results: This dishwasher is designed to be used . ❏ Start dishwasher and allow it again. (You must make sure the door is working properly, disconnect power...
... fuse blown? • Is the door closed within 3 seconds, the Start/Resume light will run longer to calibrate to start the dishwasher? • Is the water turned on the water sheeting action of dishwasher tub. Check that power supply cord does not touch dishwasher motor or lower part of rinse aid for good drying results: This dishwasher is designed to be used . ❏ Start dishwasher and allow it again. (You must make sure the door is working properly, disconnect power...


