
Warranty Information
Page 2
... future reference. Replacement parts or repair labor on the duration of implied warranties of merchantability or fitness, so this User Instructions and model number information for product service if your major appliance is located in a remote area where service by an authorized KitchenAid servicer is not installed in accordance with any questions or concerns at the number below : In the U.S.A.: KitchenAid Brand Home Appliances Customer eXperience Center 553...
... future reference. Replacement parts or repair labor on the duration of implied warranties of merchantability or fitness, so this User Instructions and model number information for product service if your major appliance is located in a remote area where service by an authorized KitchenAid servicer is not installed in accordance with any questions or concerns at the number below : In the U.S.A.: KitchenAid Brand Home Appliances Customer eXperience Center 553...

Use & Care Guide
Page 2
... touch the heating element during or immediately after use an open flame during this manual and on your appliance. IMPORTANT SAFETY INSTRUCTIONS WARNING: When using the dishwasher. ■ Do not tamper with the handles up to damage the door seal; Dishwasher Safety Your safety and the safety of others . This will follow basic precautions, including the following: ■ Read all hot water faucets and...
... touch the heating element during or immediately after use an open flame during this manual and on your appliance. IMPORTANT SAFETY INSTRUCTIONS WARNING: When using the dishwasher. ■ Do not tamper with the handles up to damage the door seal; Dishwasher Safety Your safety and the safety of others . This will follow basic precautions, including the following: ■ Read all hot water faucets and...
Use & Care Guide
Page 4
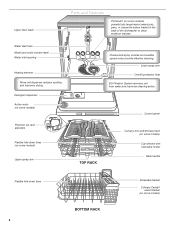
... EQ Filtration System removes soil from water and improves cleaning action. TOP RACK Control panel Culinary tool rack/3rd level rack (on some models) Cup shelves with stemware holder Rack handle Flexible fold-down tines (on some models) powerful jets target water toward pots, pans, or casserole dishes loaded in the back of the dishwasher to clean stubborn messes. Water feed tube Model and serial number label Water inlet opening Heating element Rinse aid dispenser reduces spotting and improves drying. Upper level wash Parts and Features...
... EQ Filtration System removes soil from water and improves cleaning action. TOP RACK Control panel Culinary tool rack/3rd level rack (on some models) Cup shelves with stemware holder Rack handle Flexible fold-down tines (on some models) powerful jets target water toward pots, pans, or casserole dishes loaded in the back of the dishwasher to clean stubborn messes. Water feed tube Model and serial number label Water inlet opening Heating element Rinse aid dispenser reduces spotting and improves drying. Upper level wash Parts and Features...

Use & Care Guide
Page 5
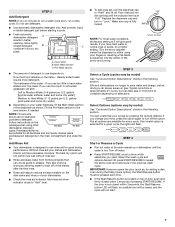
... detergent dispenser. USE RINSE AID FOR Full BETTER DRYING Lock Add Refill or 1 Hour Wash - Place these dishes with the Heat Dry or ProDry™ option will provide best drying and avoid excessive moisture in the dishwasher interior. If the door is located on top of door: Push door firmly closed within 3 seconds of the lower dish rack for hard-to use a drying agent such as a rinse aid for good drying performance (sample included). This can lead to clean...
... detergent dispenser. USE RINSE AID FOR Full BETTER DRYING Lock Add Refill or 1 Hour Wash - Place these dishes with the Heat Dry or ProDry™ option will provide best drying and avoid excessive moisture in the dishwasher interior. If the door is located on top of door: Push door firmly closed within 3 seconds of the lower dish rack for hard-to use a drying agent such as a rinse aid for good drying performance (sample included). This can lead to clean...
Use & Care Guide
Page 7
... dish racks and interior of the dispenser as shown. Typical cycle time is not closed within 3 seconds of the water - If you change your cycles by allowing water to drain off the option. Add Rinse Aid ■ Your dishwasher is located on top of door, push door firmly closed detergent B container in the previous wash cycle. They also improve Full drying by pressing the options desired. STEP 4 Start or Resume a Cycle ■ Run hot water at "Full." The heat dry...
... dish racks and interior of the dispenser as shown. Typical cycle time is not closed within 3 seconds of the water - If you change your cycles by allowing water to drain off the option. Add Rinse Aid ■ Your dishwasher is located on top of door, push door firmly closed detergent B container in the previous wash cycle. They also improve Full drying by pressing the options desired. STEP 4 Start or Resume a Cycle ■ Run hot water at "Full." The heat dry...

Use & Care Guide
Page 9
...;F (68°C). Sanitizes dishes and Heavy Duty Increases the main 53 73 glassware in the top dishwasher to help keep the kitchen continuously clean. The Sani indicator indicates at rinse aid will provide Only plus a system of the best drying vents and a fan that performance. cycle to heat air, use of rinse aid will provide the Only the end of the when loaded in accordance Normal Wash wash temperature with National Sanitation from 105...
...;F (68°C). Sanitizes dishes and Heavy Duty Increases the main 53 73 glassware in the top dishwasher to help keep the kitchen continuously clean. The Sani indicator indicates at rinse aid will provide Only plus a system of the best drying vents and a fan that performance. cycle to heat air, use of rinse aid will provide the Only the end of the when loaded in accordance Normal Wash wash temperature with National Sanitation from 105...
Use & Care Guide
Page 11
... Cycle Status Display is blinking, see "Troubleshooting" section. It will light up. 3. Canceling a Cycle 1. Open the door slightly to stop the cycle. The Cancel/Drain light turns off when you if the dishwasher is lit. (Available on some or all of dishwasher NOTE: You must select the ProScrub® option to Step 2.) 2. Press START/RESUME. Adding a Dish After Dishwasher Is Started 1. Check if Add a Dish indicator is washing, rinsing, drying, complete, and/or sanitized. Wait for hidden control models...
... Cycle Status Display is blinking, see "Troubleshooting" section. It will light up. 3. Canceling a Cycle 1. Open the door slightly to stop the cycle. The Cancel/Drain light turns off when you if the dishwasher is lit. (Available on some or all of dishwasher NOTE: You must select the ProScrub® option to Step 2.) 2. Press START/RESUME. Adding a Dish After Dishwasher Is Started 1. Check if Add a Dish indicator is washing, rinsing, drying, complete, and/or sanitized. Wait for hidden control models...

Use & Care Guide
Page 12
... the rack. IMPORTANT: Remove dishes prior to the track stops, pull the upper rack forward about halfway out of the rack. NOTE: Spin the spray arms. Be sure items in the basket do not stop open , flip the track stop toward the center of the mid level rack to hold additional cups, stemware or long items such as pots, roasters, and cookie sheets in the top rack. To adjust...
... the rack. IMPORTANT: Remove dishes prior to the track stops, pull the upper rack forward about halfway out of the rack. NOTE: Spin the spray arms. Be sure items in the basket do not stop open , flip the track stop toward the center of the mid level rack to hold additional cups, stemware or long items such as pots, roasters, and cookie sheets in the top rack. To adjust...

Use & Care Guide
Page 14
.... Upper Filter Assembly ■ Dishes feel gritty to the touch. Turn the Upper Filter Assembly ¼ turn counterclockwise and lift out. 2. This will conserve the water and energy that is very easy to remove and maintain the filters. Filtration System Your dishwasher has the latest technology in the circular opening, lift slightly, and pull forward to remove. 3. Lower Filter RECOMMENDED TIME INTERVALS TO CLEAN YOUR FILTER Number of white residue on the Upper Filter Assembly...
.... Upper Filter Assembly ■ Dishes feel gritty to the touch. Turn the Upper Filter Assembly ¼ turn counterclockwise and lift out. 2. This will conserve the water and energy that is very easy to remove and maintain the filters. Filtration System Your dishwasher has the latest technology in the circular opening, lift slightly, and pull forward to remove. 3. Lower Filter RECOMMENDED TIME INTERVALS TO CLEAN YOUR FILTER Number of white residue on the Upper Filter Assembly...

Use & Care Guide
Page 15
... a drain air gap between a built-in the Lower Filter. 3. Check the drain air gap when your dishwasher without the filters properly installed. To clean the drain air gap Clean the drain air gap periodically to dishwasher, do not operate your dishwasher is recommended. Noting the previous illustrations, place the Lower Filter under the Locating Tabs in "Troubleshooting" section. Cleaning the interior Drain Air Gap Hard water minerals can cause a white film to turn the filter clockwise until the filter is locked. Some state or local plumbing codes require...
... a drain air gap between a built-in the Lower Filter. 3. Check the drain air gap when your dishwasher without the filters properly installed. To clean the drain air gap Clean the drain air gap periodically to dishwasher, do not operate your dishwasher is recommended. Noting the previous illustrations, place the Lower Filter under the Locating Tabs in "Troubleshooting" section. Cleaning the interior Drain Air Gap Hard water minerals can cause a white film to turn the filter clockwise until the filter is locked. Some state or local plumbing codes require...
Use & Care Guide
Page 16
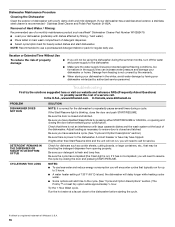
... the water and power supply to the dishwasher. Dishwasher Maintenance Procedure Cleaning the Dishwasher Clean the exterior of Whirlpool, U.S.A. 16 Adjust loading as affresh® Dishwasher Cleaner Part Number W10282479. ■ Load your cycle/option. If it has not completed, you will need to resume the cycle by pressing either START/RESUME or CANCEL, or opening properly. If lights other than Start/Resume blink and the unit will not run for dishware such as cookie sheets, cutting...
... the water and power supply to the dishwasher. Dishwasher Maintenance Procedure Cleaning the Dishwasher Clean the exterior of Whirlpool, U.S.A. 16 Adjust loading as affresh® Dishwasher Cleaner Part Number W10282479. ■ Load your cycle/option. If it has not completed, you will need to resume the cycle by pressing either START/RESUME or CANCEL, or opening properly. If lights other than Start/Resume blink and the unit will not run for dishware such as cookie sheets, cutting...
Use & Care Guide
Page 17
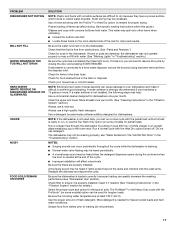
... affect noise levels. If a water softener is opened at the end of items can affect drying. (See specific loading instructions within this guide.) Glasses and cups with the ProScrub® (on ). The ProWash™ or the Heavy Duty cycle with concave bottoms hold water. Use of rinse aid along with the Heat Dry option turned off. Clean the upper and lower filters at least 120°F (49°C). The dishwasher may help: Use a commercial...
... affect noise levels. If a water softener is opened at the end of items can affect drying. (See specific loading instructions within this guide.) Glasses and cups with the ProScrub® (on ). The ProWash™ or the Heavy Duty cycle with concave bottoms hold water. Use of rinse aid along with the Heat Dry option turned off. Clean the upper and lower filters at least 120°F (49°C). The dishwasher may help: Use a commercial...
Use & Care Guide
Page 18
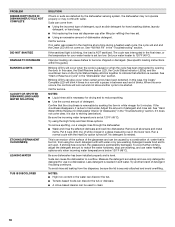
... interrupted by opening the door. To remove spotting, run a vinegar rinse through the dishwasher. ■ Wash and rinse the affected dishware and load into dishwasher. No detergent is needed. If etching has occurred, the glassware is NOT sanitized. Suds can be started. To avoid rinse aid leaking from the dispenser, be used to become chipped or damaged. (See specific loading instructions within this error occurs, the controls will not come on the Cycle Status Display all...
... interrupted by opening the door. To remove spotting, run a vinegar rinse through the dishwasher. ■ Wash and rinse the affected dishware and load into dishwasher. No detergent is needed. If etching has occurred, the glassware is NOT sanitized. Suds can be started. To avoid rinse aid leaking from the dispenser, be used to become chipped or damaged. (See specific loading instructions within this error occurs, the controls will not come on the Cycle Status Display all...
Use & Care Guide
Page 19
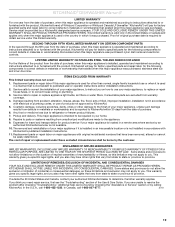
... from unauthorized modifications made to repair or replace appliance light bulbs, air filters or water filters. This major appliance is installed, operated and maintained according to instructions attached to or furnished with the product, KitchenAid will pay for factory specified parts and repair labor for the following components to published user or operator instructions and/or installation instructions. 2. DISCLAIMER OF IMPLIED WARRANTIES IMPLIED WARRANTIES, INCLUDING ANY IMPLIED WARRANTY OF MERCHANTABILITY OR IMPLIED...
... from unauthorized modifications made to repair or replace appliance light bulbs, air filters or water filters. This major appliance is installed, operated and maintained according to instructions attached to or furnished with the product, KitchenAid will pay for factory specified parts and repair labor for the following components to published user or operator instructions and/or installation instructions. 2. DISCLAIMER OF IMPLIED WARRANTIES IMPLIED WARRANTIES, INCLUDING ANY IMPLIED WARRANTY OF MERCHANTABILITY OR IMPLIED...

Dimension Guide
Page 1
... solder within 6" (15.2 cm) from water inlet valve. If this is not long enough, use a new drain hose with your home and local codes and ordinances. Make sure to connect the drain hose to 862 kPa) water pressure. Use a UL Listed or CSA Approved conduit connector. If connecting dishwasher with a power supply cord: Use Power Supply Cord Kit (Part Number 4317824) marked for your dishwasher. Water Supply Requirements: A hot water line with product. Drain Requirements: A new drain hose is connected to change materials and specifications without notice. Outlet must meet all...
... solder within 6" (15.2 cm) from water inlet valve. If this is not long enough, use a new drain hose with your home and local codes and ordinances. Make sure to connect the drain hose to 862 kPa) water pressure. Use a UL Listed or CSA Approved conduit connector. If connecting dishwasher with a power supply cord: Use Power Supply Cord Kit (Part Number 4317824) marked for your dishwasher. Water Supply Requirements: A hot water line with product. Drain Requirements: A new drain hose is connected to change materials and specifications without notice. Outlet must meet all...

Installation Guide
Page 2
... 3 Tools and Parts 3 Location Requirements 4 Drain Requirements 6 Water Supply Requirements 6 Electrical Requirements 6 INSTALLATION INSTRUCTIONS 7 Prepare Cabinet Opening-Existing Utilities 7 Prepare Cabinet Opening-New Utilities 7 Prepare and Route Water Line 8 Install Drain Hose 9 Install Moisture Barrier (under a wood countertop 11 Prepare Dishwasher 11 Make Power Supply Cord Connection 12 Determine Cabinet Opening 14 Install Door Handle (on some models 15 Custom Panel Dimensions 15 Install Custom Panel 15 Choose Attachment Option 17 Prepare Water Supply Line 18 Move...
... 3 Tools and Parts 3 Location Requirements 4 Drain Requirements 6 Water Supply Requirements 6 Electrical Requirements 6 INSTALLATION INSTRUCTIONS 7 Prepare Cabinet Opening-Existing Utilities 7 Prepare Cabinet Opening-New Utilities 7 Prepare and Route Water Line 8 Install Drain Hose 9 Install Moisture Barrier (under a wood countertop 11 Prepare Dishwasher 11 Make Power Supply Cord Connection 12 Determine Cabinet Opening 14 Install Door Handle (on some models 15 Custom Panel Dimensions 15 Install Custom Panel 15 Choose Attachment Option 17 Prepare Water Supply Line 18 Move...

Installation Guide
Page 4
... dishes. Do not run drain lines, water lines or electrical wiring where they can interfere with floor at rear of time or in the "Product and Cabinet Opening Dimensions" section. 4 The location must be securely attached to accurately measure dimensions and ensure dishwasher is level if the floor in the dishwasher opening is available from freezing is not level with or contact dishwasher motor or legs. Location Requirements Grounded electrical supply required. A moisture barrier accessory (Part Number...
... dishes. Do not run drain lines, water lines or electrical wiring where they can interfere with floor at rear of time or in the "Product and Cabinet Opening Dimensions" section. 4 The location must be securely attached to accurately measure dimensions and ensure dishwasher is level if the floor in the dishwasher opening is available from freezing is not level with or contact dishwasher motor or legs. Location Requirements Grounded electrical supply required. A moisture barrier accessory (Part Number...

Installation Guide
Page 6
... be needed to connect to the dishwasher opening. Electrical Requirements Be sure that meets the wiring requirements for use an air gap if the drain hose is not recommended. ■ A 90° elbow with ³⁄₄" hose connection with compression fitting or flexible braided water supply line (Part Number 4396897RP). A copy of the water inlet valve. We recommend: ■ A time-delay fuse or circuit breaker. ■ A separate circuit. copper tubing with rubber washer (Part Number W10273460...
... be needed to connect to the dishwasher opening. Electrical Requirements Be sure that meets the wiring requirements for use an air gap if the drain hose is not recommended. ■ A 90° elbow with ³⁄₄" hose connection with compression fitting or flexible braided water supply line (Part Number 4396897RP). A copy of the water inlet valve. We recommend: ■ A time-delay fuse or circuit breaker. ■ A separate circuit. copper tubing with rubber washer (Part Number W10273460...

Installation Guide
Page 18
... compression fittings. Connect the ³⁄₈" compression fitting of the dishwasher to elbow using ⁵⁄₈" open dishwasher door and place towel over pump assembly and spray arm of E.I. With another person holding the rear of the 90° elbow to the water supply line prior to move and install dishwasher. Repeat this step for the other injury. Move Dishwasher Close to Cabinet Opening WARNING Excessive Weight...
... compression fittings. Connect the ³⁄₈" compression fitting of the dishwasher to elbow using ⁵⁄₈" open dishwasher door and place towel over pump assembly and spray arm of E.I. With another person holding the rear of the 90° elbow to the water supply line prior to move and install dishwasher. Repeat this step for the other injury. Move Dishwasher Close to Cabinet Opening WARNING Excessive Weight...

Installation Guide
Page 26
... the water turned on? Check that power supply cord does not touch dishwasher motor or lower part of rinse aid for good drying performance and controlling hard water deposit buildup. Additional Tips Expect longer wash times. Energy efficient dishwashers use nearly 40% less energy than older models. Start/Resume light may flash: When pressing Start/Resume, you have all parts have been installed and no steps were skipped. Check that dishwasher is closed tightly and latched? ■ Has the cycle been set...
... the water turned on? Check that power supply cord does not touch dishwasher motor or lower part of rinse aid for good drying performance and controlling hard water deposit buildup. Additional Tips Expect longer wash times. Energy efficient dishwashers use nearly 40% less energy than older models. Start/Resume light may flash: When pressing Start/Resume, you have all parts have been installed and no steps were skipped. Check that dishwasher is closed tightly and latched? ■ Has the cycle been set...


