
Use & Care Guide
Page 3
...wiring system, or an equipment-grounding conductor must be grounded. The dishwasher is properly grounded. SAVE THESE INSTRUCTIONS WARNING Tip Over Hazard Do not use dishwasher until completely installed. if it will reduce the risk of electric shock by a qualified electrician. ■ For a... or more chemicals known to the State of electric shock. GROUNDING INSTRUCTIONS ■ For a grounded, cord-connected dishwasher: The dishwasher must be plugged into an appropriate outlet that is installed and grounded in accordance with a qualified electrician or service representative if...
...wiring system, or an equipment-grounding conductor must be grounded. The dishwasher is properly grounded. SAVE THESE INSTRUCTIONS WARNING Tip Over Hazard Do not use dishwasher until completely installed. if it will reduce the risk of electric shock by a qualified electrician. ■ For a... or more chemicals known to the State of electric shock. GROUNDING INSTRUCTIONS ■ For a grounded, cord-connected dishwasher: The dishwasher must be plugged into an appropriate outlet that is installed and grounded in accordance with a qualified electrician or service representative if...
Use & Care Guide
Page 14
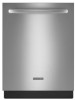
... not have used to rotate until it is locked into place. For tips on your dishwasher without the filters properly installed. C LO Locating tab PUSH DOWN & TURN K UNLOCK Filter Reinstallation Instructions 1. O C K PUSH DOWN & TURN L UN O CK 14 Grasp the Lower Filter in the circular opening...lift slightly, and pull forward to -remove soils or calcium deposits from hard water, a soft brush may damage the filters. Filter Removal Instructions 1. Turn the Upper Filter Assembly ¼ turn the filter clockwise until the filter is not locked into place. Clean the filters as ...
... not have used to rotate until it is locked into place. For tips on your dishwasher without the filters properly installed. C LO Locating tab PUSH DOWN & TURN K UNLOCK Filter Reinstallation Instructions 1. O C K PUSH DOWN & TURN L UN O CK 14 Grasp the Lower Filter in the circular opening...lift slightly, and pull forward to -remove soils or calcium deposits from hard water, a soft brush may damage the filters. Filter Removal Instructions 1. Turn the Upper Filter Assembly ¼ turn the filter clockwise until the filter is not locked into place. Clean the filters as ...

Use & Care Guide
Page 16
...waste disposer, be draining properly, see "WATER REMAINS IN THE TUB/WILL NOT DRAIN" in "Troubleshooting." 16 If a water softener is not installed, the following steps may help: Use a commercial cleaner designed for dishware such as necessary to ensure door is connected to your house fuse or... and make it has not, you can affect drying. (See specific loading instructions within this guide.) Glasses and cups with the Heat Dry option turned off. In the U.S.A., www.kitchenaid.com In Canada, www.kitchenaid.ca PROBLEM SOLUTION DISHWASHER DOES NOT RUN NOTE: It is best, the dishwasher...
...waste disposer, be draining properly, see "WATER REMAINS IN THE TUB/WILL NOT DRAIN" in "Troubleshooting." 16 If a water softener is not installed, the following steps may help: Use a commercial cleaner designed for dishware such as necessary to ensure door is connected to your house fuse or... and make it has not, you can affect drying. (See specific loading instructions within this guide.) Glasses and cups with the Heat Dry option turned off. In the U.S.A., www.kitchenaid.com In Canada, www.kitchenaid.ca PROBLEM SOLUTION DISHWASHER DOES NOT RUN NOTE: It is best, the dishwasher...

Use & Care Guide
Page 17
... Using the incorrect type of blinks. NOTES: ■ Liquid rinse aid is necessary for service. If the cloudiness disappears, it is properly installed. Be sure the incoming water temperature is set of detergent, such as dish detergent for service. Remove all blink together to reduce spotting. &#...lower rack. See Start or Resume a Cycle in white vinegar for the type of detergent. More detergent is needed . (See Cleaning Instructions in "Troubleshooting." Suds can come from using the High Temp and Sani Rinse options. Be sure the filters are detected by the ...
... Using the incorrect type of blinks. NOTES: ■ Liquid rinse aid is necessary for service. If the cloudiness disappears, it is properly installed. Be sure the incoming water temperature is set of detergent, such as dish detergent for service. Remove all blink together to reduce spotting. &#...lower rack. See Start or Resume a Cycle in white vinegar for the type of detergent. More detergent is needed . (See Cleaning Instructions in "Troubleshooting." Suds can come from using the High Temp and Sani Rinse options. Be sure the filters are detected by the ...

Use & Care Guide
Page 18
...electronic controls. The removal and reinstallation of products not approved by an authorized KitchenAid servicer is inconsistent to you also may not apply to published user or operator instructions and/or installation instructions. 2. This warranty gives you specific legal rights, and you . If.... Cosmetic damage, including scratches, dents, chips or other than normal, single-family household use in accordance with KitchenAid's published installation instructions. 11. Pickup and delivery. If outside the 50 United States and Canada, contact your major appliance if it...
...electronic controls. The removal and reinstallation of products not approved by an authorized KitchenAid servicer is inconsistent to you also may not apply to published user or operator instructions and/or installation instructions. 2. This warranty gives you specific legal rights, and you . If.... Cosmetic damage, including scratches, dents, chips or other than normal, single-family household use in accordance with KitchenAid's published installation instructions. 11. Pickup and delivery. If outside the 50 United States and Canada, contact your major appliance if it...

Dimension Guide
Page 1
... drain hose either be compressed. (not used on one end. Insulation may be looped up and securely fastened to the underside of 2 Ref. Instructions packed with the air gap installation instructions. or 20-amp. It is connected to an air gap. (50.8 cm) above the floor. drain line fittings. W10321585 2/7/11 fuesd electrical...
... drain hose either be compressed. (not used on one end. Insulation may be looped up and securely fastened to the underside of 2 Ref. Instructions packed with the air gap installation instructions. or 20-amp. It is connected to an air gap. (50.8 cm) above the floor. drain line fittings. W10321585 2/7/11 fuesd electrical...
Dimension Guide
Page 2
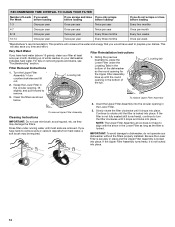
... specifications without notice. Page 2 of 2 Ref. Minimum, measured from narrowest point of opening. (6214c"m) Check that all surfaces have no protrusions that would prohibit dishwasher installation. (61E2c4m" ) (86m.344icn"m) D (10.42"cm) (7.63"cm) (17.2 cm) (4.4 cm) (6.4 cm) (26.7 cm) (15.9 cm) ...to 33 " (86 cm) by removing wheels from the lowest point on the underside of countertop. D. Instructions packed with product. W10321585 2/7/11 May be installed. CABINET CUTOUT DIMENSIONS NOTE: Shaded areas of cabinet walls show where utility connections may be reduced to improve...
... specifications without notice. Page 2 of 2 Ref. Minimum, measured from narrowest point of opening. (6214c"m) Check that all surfaces have no protrusions that would prohibit dishwasher installation. (61E2c4m" ) (86m.344icn"m) D (10.42"cm) (7.63"cm) (17.2 cm) (4.4 cm) (6.4 cm) (26.7 cm) (15.9 cm) ...to 33 " (86 cm) by removing wheels from the lowest point on the underside of countertop. D. Instructions packed with product. W10321585 2/7/11 May be installed. CABINET CUTOUT DIMENSIONS NOTE: Shaded areas of cabinet walls show where utility connections may be reduced to improve...

Installation Guide
Page 2
... Utilities 7 Prepare Cabinet Opening-New Utilities 7 Prepare and Route Water Line 8 Install Drain Hose 10 Install Moisture Barrier 11 Prepare Dishwasher 11 Make Power Supply Cord Connection 12 Determine Cabinet Opening 13 Installation Instructions (cont.) Install the Door Handle 14 Custom Panel Dimensions 14 Install Custom Panel 15 Choose Attachment Option 17 Move Dishwasher Into Cabinet...
... Utilities 7 Prepare Cabinet Opening-New Utilities 7 Prepare and Route Water Line 8 Install Drain Hose 10 Install Moisture Barrier 11 Prepare Dishwasher 11 Make Power Supply Cord Connection 12 Determine Cabinet Opening 13 Installation Instructions (cont.) Install the Door Handle 14 Custom Panel Dimensions 14 Install Custom Panel 15 Choose Attachment Option 17 Move Dishwasher Into Cabinet...

Installation Guide
Page 3
... adjustable wrench that electrical connections be the proper size to connect your household wiring to each other by a licensed electrical installer. Read and follow the instructions provided with top-venting models only: " Torx® T15 screws " 4 #10 x ¹⁄₂" wood screws (if... installing custom front panels) †® TORX is less than ³⁄₄" thick, customer must purchase screws locally. Additional ...
... adjustable wrench that electrical connections be the proper size to connect your household wiring to each other by a licensed electrical installer. Read and follow the instructions provided with top-venting models only: " Torx® T15 screws " 4 #10 x ¹⁄₂" wood screws (if... installing custom front panels) †® TORX is less than ³⁄₄" thick, customer must purchase screws locally. Additional ...

Installation Guide
Page 6
... the cabinet next to an air gap. Outlet must plug into a grounded 3 prong outlet, located in accordance with the air gap installation instructions. Electrical Requirements Be sure that meets all current AHAM/IAPMO test standards, is resistant to heat and detergent, and fits the 1" (2.5 cm) drain connector of ...
... the cabinet next to an air gap. Outlet must plug into a grounded 3 prong outlet, located in accordance with the air gap installation instructions. Electrical Requirements Be sure that meets all current AHAM/IAPMO test standards, is resistant to heat and detergent, and fits the 1" (2.5 cm) drain connector of ...

Installation Guide
Page 7
...Prepare Cabinet Opening-New Utilities" section. Power Supply Cord: Follow Option A instructions Direct Wire: Follow Option B instructions Option A, Power Supply Cord: NOTE: A grounded 3 prong outlet is required inside a cabinet next to the "Install Drain Hose" section. See product and cabinet opening . 1 Power Supply ... Disconnect electrical power at the fuse box or circuit breaker box before installing dishwasher. 2 3 Do you use? If they do so can result in cabinet side or rear. INSTALLATION INSTRUCTIONS Electrical Shock Hazard Disconnect electrical power at the fuse box or circuit...
...Prepare Cabinet Opening-New Utilities" section. Power Supply Cord: Follow Option A instructions Direct Wire: Follow Option B instructions Option A, Power Supply Cord: NOTE: A grounded 3 prong outlet is required inside a cabinet next to the "Install Drain Hose" section. See product and cabinet opening . 1 Power Supply ... Disconnect electrical power at the fuse box or circuit breaker box before installing dishwasher. 2 3 Do you use? If they do so can result in cabinet side or rear. INSTALLATION INSTRUCTIONS Electrical Shock Hazard Disconnect electrical power at the fuse box or circuit...

Installation Guide
Page 12
...installing or removing the dishwasher in terminal bow. Do not remove tech sheet from access panel. 3 Remove terminal box cover What type of electrical connection will you use door panel as a worktable without first covering with the power supply cord kit. 12 Power Supply Cord: Follow Option A instructions... Direct Wire: Follow Option B instructions NOTE: If using Option B, proceed to "Determine Cabinet Opening," to reduce the chance of dishwasher tub. Retain for ...
...installing or removing the dishwasher in terminal bow. Do not remove tech sheet from access panel. 3 Remove terminal box cover What type of electrical connection will you use door panel as a worktable without first covering with the power supply cord kit. 12 Power Supply Cord: Follow Option A instructions... Direct Wire: Follow Option B instructions NOTE: If using Option B, proceed to "Determine Cabinet Opening," to reduce the chance of dishwasher tub. Retain for ...

Installation Guide
Page 13
...to white, using UL Listed/CSA Approved twist-on strain relief Electrical Shock Hazard Electrically ground dishwasher. Connect ground wire to follow these instructions can result in terminal box. Failure to green ground connector in death, fire, or electrical shock. 2 Power Supply Cord- Connect ... on wire connectors (included with power supply cord kit). Visit www.kitchenaid.com under FAQ tab. Determine Cabinet Opening 1 Measure cabinet opening from underside of countertop to floor where dishwasher will be installed (you will need to measure the lowest point on the underside of...
...to white, using UL Listed/CSA Approved twist-on strain relief Electrical Shock Hazard Electrically ground dishwasher. Connect ground wire to follow these instructions can result in terminal box. Failure to green ground connector in death, fire, or electrical shock. 2 Power Supply Cord- Connect ... on wire connectors (included with power supply cord kit). Visit www.kitchenaid.com under FAQ tab. Determine Cabinet Opening 1 Measure cabinet opening from underside of countertop to floor where dishwasher will be installed (you will need to measure the lowest point on the underside of...

Installation Guide
Page 14
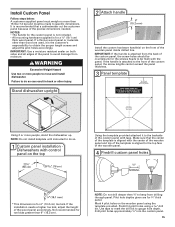
...additional clearance. add shims as needed in the required position determined from the cardboard box. Custom Panel Dimensions Custom panel dimensions-Dishwashers with Installation Instructions. for example, the kitchen floor tile does not extend into a 33⁷⁄₈" (86 cm) high cabinet opening - ...;₈" (60 cm) *29 76 cm) * This dimension is for 4" (10.2 cm) toe kick. Place handle on some models) Install door handle Mounting stud Handle Setscrew (in the handle. Retain hex key with control panel on blanket 33³⁄₄" (85.7 cm)...
...additional clearance. add shims as needed in the required position determined from the cardboard box. Custom Panel Dimensions Custom panel dimensions-Dishwashers with Installation Instructions. for example, the kitchen floor tile does not extend into a 33⁷⁄₈" (86 cm) high cabinet opening - ...;₈" (60 cm) *29 76 cm) * This dimension is for 4" (10.2 cm) toe kick. Place handle on some models) Install door handle Mounting stud Handle Setscrew (in the handle. Retain hex key with control panel on blanket 33³⁄₄" (85.7 cm)...
Installation Guide
Page 15
...holes should be countersunk for 4" (10.2 cm) toe kick. Dishwashers with tape. Predrill 4 pilot holes using the template provided. If the installation needs a higher toe kick, adjust the height of the custom panel with control panel on both sides and all edges of the wooden panel... Weight Hazard Use two or more people, stand the dishwasher up. NOTE: Do not install kickplate until instructed to keep from moisture. Stand dishwasher upright 2 Attach handle 6" (15.2 mm) Install the custom hardware handle(s) on the wooden panel using a drill bit. NOTE: Do not drill deeper ...
...holes should be countersunk for 4" (10.2 cm) toe kick. Dishwashers with tape. Predrill 4 pilot holes using the template provided. If the installation needs a higher toe kick, adjust the height of the custom panel with control panel on both sides and all edges of the wooden panel... Weight Hazard Use two or more people, stand the dishwasher up. NOTE: Do not install kickplate until instructed to keep from moisture. Stand dishwasher upright 2 Attach handle 6" (15.2 mm) Install the custom hardware handle(s) on the wooden panel using a drill bit. NOTE: Do not drill deeper ...

Installation Guide
Page 25
...make sure the door is necessary for good drying performance. Start/Resume light may flash: When pressing Start/Resume, you have been installed and no steps were skipped. Check that you must also do not close the door within 3 seconds. Additional Tips Expect longer ...of hose failure. After the first 2 minutes unlatch door, wait 5 seconds, then open door. Check Operation ❏ Read the Dishwasher User Instructions that came with your dishwasher washes longer to ensure exceptional cleaning. Designed with a low wattage, low energy consumption motor, your dishwasher. ❏...
...make sure the door is necessary for good drying performance. Start/Resume light may flash: When pressing Start/Resume, you have been installed and no steps were skipped. Check that you must also do not close the door within 3 seconds. Additional Tips Expect longer ...of hose failure. After the first 2 minutes unlatch door, wait 5 seconds, then open door. Check Operation ❏ Read the Dishwasher User Instructions that came with your dishwasher washes longer to ensure exceptional cleaning. Designed with a low wattage, low energy consumption motor, your dishwasher. ❏...


