Use & Care Guide
Page 1
... listo su número completo de modelo y de serie. DRAWER DISHWASHER USER INSTRUCTIONS Thank you have a positive experience owning a KitchenAid® product. We hold our company to the highest quality standards, and it is the safety alert symbol. Table of Contents DISHWASHER SAFETY 1 QUICK STEPS 3 DISHWASHER USE 3 CYCLE AND OPTION DESCRIPTIONS 5 DISHWASHER FEATURES 7 DISHWASHER CARE 8 TROUBLESHOOTING 8 WARRANTY 10 Dishwasher Safety Your safety and the safety of injury...
... listo su número completo de modelo y de serie. DRAWER DISHWASHER USER INSTRUCTIONS Thank you have a positive experience owning a KitchenAid® product. We hold our company to the highest quality standards, and it is the safety alert symbol. Table of Contents DISHWASHER SAFETY 1 QUICK STEPS 3 DISHWASHER USE 3 CYCLE AND OPTION DESCRIPTIONS 5 DISHWASHER FEATURES 7 DISHWASHER CARE 8 TROUBLESHOOTING 8 WARRANTY 10 Dishwasher Safety Your safety and the safety of injury...

Use & Care Guide
Page 2
... in a hot water system that has not been used for such a period, before using the dishwasher turn on the dishwasher. SAVE THESE INSTRUCTIONS WARNING Tip Over Hazard Do not open flame during this time. ■ Do not touch the heating element during or immediately after use an open dishwasher drawer until inside cabinet opening. This will not fit the outlet, have a proper outlet installed by providing a path of cut-type...
... in a hot water system that has not been used for such a period, before using the dishwasher turn on the dishwasher. SAVE THESE INSTRUCTIONS WARNING Tip Over Hazard Do not open flame during this time. ■ Do not touch the heating element during or immediately after use an open dishwasher drawer until inside cabinet opening. This will not fit the outlet, have a proper outlet installed by providing a path of cut-type...

Use & Care Guide
Page 3
... to Medium Water (0-6 grains per U.S. B C A. Wash only plastic items marked "dishwasher safe." ■ To avoid thumping/clattering noises during operation: Load dishes so they do not plan to use detergent. ■ Use automatic dishwasher detergent only. gallon) [typical water softener water and some city water] 3 Remove labels from containers before starting a cycle. ■ Fresh automatic dishwasher detergent results in the rack. Store tightly closed detergent container in soft water, glassware will improve cleaning and drying results...
... to Medium Water (0-6 grains per U.S. B C A. Wash only plastic items marked "dishwasher safe." ■ To avoid thumping/clattering noises during operation: Load dishes so they do not plan to use detergent. ■ Use automatic dishwasher detergent only. gallon) [typical water softener water and some city water] 3 Remove labels from containers before starting a cycle. ■ Fresh automatic dishwasher detergent results in the rack. Store tightly closed detergent container in soft water, glassware will improve cleaning and drying results...
Use & Care Guide
Page 4
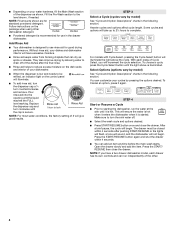
... a Cycle (cycles vary by allowing water to drain off . ■ Select the wash cycle and options desired. ■ Press START/RESUME button once and close the drawer. Press the START/ RESUME then close the drawer. Replace the dispenser cap and turn counterclockwise and remove. Press the START/RESUME button again and shut the drawer within 4 seconds after the final rinse. ■ Rinse aid helps to reduce excess moisture on the dish racks and interior of...
... a Cycle (cycles vary by allowing water to drain off . ■ Select the wash cycle and options desired. ■ Press START/RESUME button once and close the drawer. Press the START/ RESUME then close the drawer. Replace the dispenser cap and turn counterclockwise and remove. Press the START/RESUME button again and shut the drawer within 4 seconds after the final rinse. ■ Rinse aid helps to reduce excess moisture on the dish racks and interior of...

Use & Care Guide
Page 5
... models. Use for rinsing dishes, This cycle does not dry. glasses, and silverware that will not be required. See option selections. If you change an option anytime before the selected option begins. *Maximum wash times depend on this 1:05 1:30 2:10 amounts of dry time, the clean light will be terminated. 5 NOTE: Dry time (fan running) is based on water temperature, heavy soil condition, dish load size and options selected. Use...
... models. Use for rinsing dishes, This cycle does not dry. glasses, and silverware that will not be required. See option selections. If you change an option anytime before the selected option begins. *Maximum wash times depend on this 1:05 1:30 2:10 amounts of dry time, the clean light will be terminated. 5 NOTE: Dry time (fan running) is based on water temperature, heavy soil condition, dish load size and options selected. Use...

Use & Care Guide
Page 6
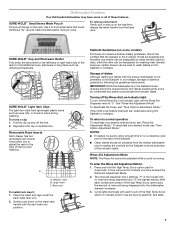
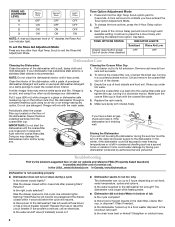
... Dishwashers. The light goes off when you turn off. The rinse aid low indicator light glows when the rinse aid dispenser needs to approximately 155°F (68°C). OPTION SELECTIONS OPTIONS DISH LOAD TYPES DESCRIPTIONS For best drying results, dry This option with the use of your dishwasher cycle Clean indicator glows when a cycle is finished. To sanitize your dishwasher monitors the soil level. Certified residential dishwashers are locked. Increases the target water temperature during a cycle, a delay, or the power...
... Dishwashers. The light goes off when you turn off. The rinse aid low indicator light glows when the rinse aid dispenser needs to approximately 155°F (68°C). OPTION SELECTIONS OPTIONS DISH LOAD TYPES DESCRIPTIONS For best drying results, dry This option with the use of your dishwasher cycle Clean indicator glows when a cycle is finished. To sanitize your dishwasher monitors the soil level. Certified residential dishwashers are locked. Increases the target water temperature during a cycle, a delay, or the power...
Use & Care Guide
Page 7
... dishwasher is selected. To enter the Rinse Aid Adjustment Mode: 1. Reposition the clip on the rack. Large insert C. Turning off the Rinse Aid Low Indicator light: To turn off the tine. 2. To deactivate the tones, see "Rinse Aid Adjustment Mode." If the Child Lock feature has been set the Rinse Aid Dispenser level to normal operation: To reactivate your desired tones, see "Tone Option Adjustment Mode." Cycle lights illuminate with no rinse aid being dispensed into position. Use it to wash dishes...
... dishwasher is selected. To enter the Rinse Aid Adjustment Mode: 1. Reposition the clip on the rack. Large insert C. Turning off the Rinse Aid Low Indicator light: To turn off the tine. 2. To deactivate the tones, see "Rinse Aid Adjustment Mode." If the Child Lock feature has been set the Rinse Aid Dispenser level to normal operation: To reactivate your desired tones, see "Tone Option Adjustment Mode." Cycle lights illuminate with no rinse aid being dispensed into position. Use it to wash dishes...
Use & Care Guide
Page 8
... breaker tripped? To change the tone options, press the 4-Hour Delay option pad. 3. Remove rack inserts from the coarse filter cup. Lift and remove the coarse filter cup out of powdered dishwasher detergent and water or use detergent. Rinse cup under hot water. Make sure spray arm rotates freely. Is there power to its full extension. Replace the fuse or reset the circuit breaker. Is the drain hose bent or kinked? RINSE AID DISPENSER LEVEL 0 OFF OFF...
... breaker tripped? To change the tone options, press the 4-Hour Delay option pad. 3. Remove rack inserts from the coarse filter cup. Lift and remove the coarse filter cup out of powdered dishwasher detergent and water or use detergent. Rinse cup under hot water. Make sure spray arm rotates freely. Is there power to its full extension. Replace the fuse or reset the circuit breaker. Is the drain hose bent or kinked? RINSE AID DISPENSER LEVEL 0 OFF OFF...

Use & Care Guide
Page 9
... spray arm rotate freely? Heavy soil and/or hard water generally require extra detergent. Do not block the detergent dispenser. Load the dishes and glasses so they are not dry Did you use the correct amount of the cycle? See "Installation Instructions." Plastics often need towel drying. Always use detergent. Use recommended dishwasher detergents only. To slow this process use a heavier cycle. Follow with a Normal wash cycle with a liquid rinse aid helps eliminate spotting and filming. Use recommended dishwasher detergents...
... spray arm rotate freely? Heavy soil and/or hard water generally require extra detergent. Do not block the detergent dispenser. Load the dishes and glasses so they are not dry Did you use the correct amount of the cycle? See "Installation Instructions." Plastics often need towel drying. Always use detergent. Use recommended dishwasher detergents only. To slow this process use a heavier cycle. Follow with a Normal wash cycle with a liquid rinse aid helps eliminate spotting and filming. Use recommended dishwasher detergents...

Use & Care Guide
Page 10
... house wiring or plumbing. 2. Outside the 50 United States and Canada, this warranty does not apply. Service must be repaired in remote locations. 9. Service calls to schedule service, you need assistance using your complete model and serial number ready. Contact your major appliance, to replace or repair house fuses or to be provided by KitchenAid. 5. Have your product or you would like to repair or replace appliance light bulbs, air filters or water filters.
... house wiring or plumbing. 2. Outside the 50 United States and Canada, this warranty does not apply. Service must be repaired in remote locations. 9. Service calls to schedule service, you need assistance using your complete model and serial number ready. Contact your major appliance, to replace or repair house fuses or to be provided by KitchenAid. 5. Have your product or you would like to repair or replace appliance light bulbs, air filters or water filters.
Installation Instructions
Page 3
...; Remove the door or lid to meet all hot water faucets and let the water flow from service or discarding it. SAVE THESE INSTRUCTIONS WARNING Tip Over Hazard Do not open dishwasher drawer while someone grasps the rear of injury, and tell you and others are not followed. You need to properly install dishwasher. ■ Contact a qualified installer to : ■ Slowly open dishwasher drawer until inside cabinet opening. Latch...
...; Remove the door or lid to meet all hot water faucets and let the water flow from service or discarding it. SAVE THESE INSTRUCTIONS WARNING Tip Over Hazard Do not open dishwasher drawer while someone grasps the rear of injury, and tell you and others are not followed. You need to properly install dishwasher. ■ Contact a qualified installer to : ■ Slowly open dishwasher drawer until inside cabinet opening. Latch...

Installation Instructions
Page 4
... installation. Unit mounting screws (4) E. Parts Supplied Check that will hold the weight, and in these instructions. ■ Have everything you need to properly install dishwasher. ■ Keep the dishwasher and water lines leading to fire or electrical shock. Toe kick brackets (2) J. Appropriate sized UL listed wire connectors (2) D. Trim strips (2) I B A C C D F G H J K L M D E A. 72" (182.9 cm) flexible water supply line B. Panel fasteners (on some models [2]) M. Read and follow the instructions provided with any tools listed here. Zip tie C. Drain...
... installation. Unit mounting screws (4) E. Parts Supplied Check that will hold the weight, and in these instructions. ■ Have everything you need to properly install dishwasher. ■ Keep the dishwasher and water lines leading to fire or electrical shock. Toe kick brackets (2) J. Appropriate sized UL listed wire connectors (2) D. Trim strips (2) I B A C C D F G H J K L M D E A. 72" (182.9 cm) flexible water supply line B. Panel fasteners (on some models [2]) M. Read and follow the instructions provided with any tools listed here. Zip tie C. Drain...
Installation Instructions
Page 6
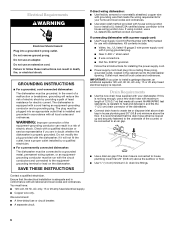
..., use a new drain hose with all current AHAM/IAPMO test standards, is resistant to heat and detergent, and fits the 1" (2.5 cm) drain connector of 12 ft (3.7 m) that meets the wiring requirements for installing the power supply cord. ■ Power supply cord must plug into a grounded 3 prong outlet. drain line fittings. Ensure that the electrical installation is connected to house plumbing lower than 20" (50.8 cm) above the floor. GROUNDING INSTRUCTIONS ■ For a grounded, cord-connected dishwasher: The dishwasher...
..., use a new drain hose with all current AHAM/IAPMO test standards, is resistant to heat and detergent, and fits the 1" (2.5 cm) drain connector of 12 ft (3.7 m) that meets the wiring requirements for installing the power supply cord. ■ Power supply cord must plug into a grounded 3 prong outlet. drain line fittings. Ensure that the electrical installation is connected to house plumbing lower than 20" (50.8 cm) above the floor. GROUNDING INSTRUCTIONS ■ For a grounded, cord-connected dishwasher: The dishwasher...
Installation Instructions
Page 7
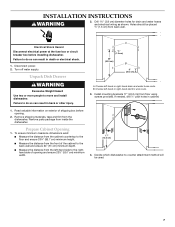
... film from floor using screws provided. INSTALLATION INSTRUCTIONS WARNING 2. Drill 1½" (3.8 cm) diameter holes for drain and water hoses and electrical wiring as shown. Unpack Dish Drawer WARNING Excessive Weight Hazard Use two or more people to do so can result in back or other injury. Prepare Cabinet Opening 1. Read valuable information on exterior of opening . 2. Failure to move and install dishwasher. Disconnect power. 2. Install mounting brackets 17" (43...
... film from floor using screws provided. INSTALLATION INSTRUCTIONS WARNING 2. Drill 1½" (3.8 cm) diameter holes for drain and water hoses and electrical wiring as shown. Unpack Dish Drawer WARNING Excessive Weight Hazard Use two or more people to do so can result in back or other injury. Prepare Cabinet Opening 1. Read valuable information on exterior of opening . 2. Failure to move and install dishwasher. Disconnect power. 2. Install mounting brackets 17" (43...

Installation Instructions
Page 9
... water supply line and drain hoses based on dishwasher. Route Water Supply Line and Drain Hose 1. Follow all national and local codes and ordinances for completing electrical supply to do so can result in upright position. : X 1.6 cm 1.9 cm 2.2 cm) :1" (2.5 cm) :1¹⁄₈" (2.9 cm) Route Electrical Wiring WARNING Option 2: Left-hand side utility route Electrical Shock Hazard Disconnect electrical power at the fuse box or circuit breaker box before installing dishwasher. After...
... water supply line and drain hoses based on dishwasher. Route Water Supply Line and Drain Hose 1. Follow all national and local codes and ordinances for completing electrical supply to do so can result in upright position. : X 1.6 cm 1.9 cm 2.2 cm) :1" (2.5 cm) :1¹⁄₈" (2.9 cm) Route Electrical Wiring WARNING Option 2: Left-hand side utility route Electrical Shock Hazard Disconnect electrical power at the fuse box or circuit breaker box before installing dishwasher. After...
Installation Instructions
Page 11
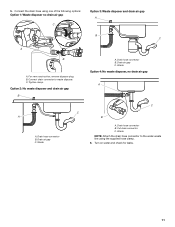
For new construction, remove disposer plug. Drain hose connector B. Waste Option 4: No waste disposer, no drain air gap C Option 3: Waste disposer and drain air gap A B C A B A. Drain air gap C. Waste A. Cut drain connector C. Connect the drain hose using the supplied hose clamp. 6. Drain air gap C. Drain hose connector B. Connect drain connector to the water waste line using one of the following options: Option 1: Waste disposer no drain air gap A C B A. Turn on water and check for leaks. 11 B. C. Waste NOTE: Attach the drain hose connector to waste ...
For new construction, remove disposer plug. Drain hose connector B. Waste Option 4: No waste disposer, no drain air gap C Option 3: Waste disposer and drain air gap A B C A B A. Drain air gap C. Waste A. Cut drain connector C. Connect the drain hose using the supplied hose clamp. 6. Drain air gap C. Drain hose connector B. Connect drain connector to the water waste line using one of the following options: Option 1: Waste disposer no drain air gap A C B A. Turn on water and check for leaks. 11 B. C. Waste NOTE: Attach the drain hose connector to waste ...
Installation Instructions
Page 14
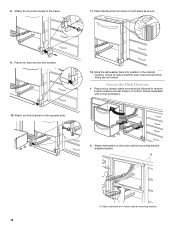
... in the cabinet opening. Secure the Dish Drawers 1. A A. Check to the lower cabinet mounting bracket (installed earlier). Attach toe kick bracket on bottom drawer separated with corner packaging. 1 2 1 2 2. 8. Place flexible side trim strips on both sides as followed to remove bottom drawer) and set drawer on the opposite side. 12. Attach dishwasher to ensure that the drain hose and electrical wiring are not kinked. Attach dishwasher to the...
... in the cabinet opening. Secure the Dish Drawers 1. A A. Check to the lower cabinet mounting bracket (installed earlier). Attach toe kick bracket on bottom drawer separated with corner packaging. 1 2 1 2 2. 8. Place flexible side trim strips on both sides as followed to remove bottom drawer) and set drawer on the opposite side. 12. Attach dishwasher to ensure that the drain hose and electrical wiring are not kinked. Attach dishwasher to the...
Installation Instructions
Page 15
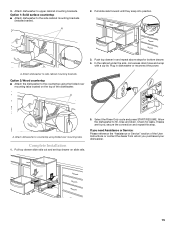
... excess drain hose and wrap with a zip tie. A. Push top drawer in dishwasher or reconnect the power. Attach dishwasher to upper cabinet mounting brackets. If leaks are found, secure the connection and repeat this step. Attach dishwasher to side cabinet mounting brackets. Option 1: Solid surface countertop ■ Attach dishwasher to fill, rinse and drain. A 2. Pull top drawer slide rails out and set top drawer on the top of the User Instructions...
... excess drain hose and wrap with a zip tie. A. Push top drawer in dishwasher or reconnect the power. Attach dishwasher to upper cabinet mounting brackets. If leaks are found, secure the connection and repeat this step. Attach dishwasher to side cabinet mounting brackets. Option 1: Solid surface countertop ■ Attach dishwasher to fill, rinse and drain. A 2. Pull top drawer slide rails out and set top drawer on the top of the User Instructions...
Installation Instructions
Page 16
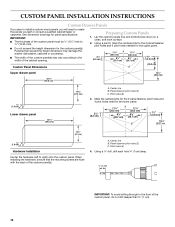
...;" (1 cm). 16 Mark the centerpoints for the 2 panel fastener pilot holes and 4 pilot holes need to create the panels yourself or consult a qualified cabinetmaker or carpenter. Lay the custom panels (top and bottom) face down on a clean, soft work surface. 2. CUSTOM PANEL INSTALLATION INSTRUCTIONS Custom Drawer Panels If you plan to install a custom wood panels, you will need for the lower panel. 2¹⁄₂" (6.3 cm) 11¹⁄...
...;" (1 cm). 16 Mark the centerpoints for the 2 panel fastener pilot holes and 4 pilot holes need to create the panels yourself or consult a qualified cabinetmaker or carpenter. Lay the custom panels (top and bottom) face down on a clean, soft work surface. 2. CUSTOM PANEL INSTALLATION INSTRUCTIONS Custom Drawer Panels If you plan to install a custom wood panels, you will need for the lower panel. 2¹⁄₂" (6.3 cm) 11¹⁄...
Parts Diagram
Page 3
... Air Inlet Assembly 9 99003694 Hose, Pressure Switch 10 99003733 Control Module Illus. DESCRIPTION 25 99003624 Fuse, Thermal 26 99003623 Thermostat, High Limit 27 99001979 O−Ring, Pump Thermostat 28 99003699 Bracket, Dispenser 29 99003705 Wire Jumper, Thermostat 30 99003708 Wire Jumper, Heater 31 W10118491 Bracket, Drain Pump 32 W10190274 Catch, Drawer Release 33 99003758 Barrier, MCM 34 W10121259 Shield, Motor 35 99003715 Filter 36 99003602 Seal 3 W10244792 Part...
... Air Inlet Assembly 9 99003694 Hose, Pressure Switch 10 99003733 Control Module Illus. DESCRIPTION 25 99003624 Fuse, Thermal 26 99003623 Thermostat, High Limit 27 99001979 O−Ring, Pump Thermostat 28 99003699 Bracket, Dispenser 29 99003705 Wire Jumper, Thermostat 30 99003708 Wire Jumper, Heater 31 W10118491 Bracket, Drain Pump 32 W10190274 Catch, Drawer Release 33 99003758 Barrier, MCM 34 W10121259 Shield, Motor 35 99003715 Filter 36 99003602 Seal 3 W10244792 Part...


