

User Manual
Page 1
...'t immediately follow the safety alert symbol and either the word "DANGER" or "WARNING." This symbol alerts you to reduce the chance of others . For your KitchenAid dishwasher, please contact us that can kill or hurt you what the potential hazard is, tell you how to potential hazards that you need further assistance...
...'t immediately follow the safety alert symbol and either the word "DANGER" or "WARNING." This symbol alerts you to reduce the chance of others . For your KitchenAid dishwasher, please contact us that can kill or hurt you what the potential hazard is, tell you how to potential hazards that you need further assistance...

User Manual
Page 2
... THESE INSTRUCTIONS WARNING Tip Over Hazard Do not use in serious injury or cuts. 2 Doing so can result in doubt whether the dishwasher is equipped with a qualified electrician or service representative if you are not likely to damage the door seal; IMPORTANT SAFETY INSTRUCTIONS WARNING:... a risk of electric shock. If the hot water system has not been used for electric current. grounding conductor can result in a dishwasher, and keep them out of the reach of a malfunction or breakdown, grounding will release any accumulated hydrogen gas. HYDROGEN GAS IS EXPLOSIVE...
... THESE INSTRUCTIONS WARNING Tip Over Hazard Do not use in serious injury or cuts. 2 Doing so can result in doubt whether the dishwasher is equipped with a qualified electrician or service representative if you are not likely to damage the door seal; IMPORTANT SAFETY INSTRUCTIONS WARNING:... a risk of electric shock. If the hot water system has not been used for electric current. grounding conductor can result in a dishwasher, and keep them out of the reach of a malfunction or breakdown, grounding will release any accumulated hydrogen gas. HYDROGEN GAS IS EXPLOSIVE...
User Manual
Page 3
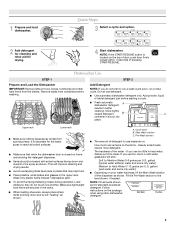
... rack Lower rack ■ Make sure nothing keeps spray arm(s) from containers before starting a cycle. ■ Fresh automatic A dishwasher detergent results in soft water, glassware will improve cleaning and drying results. ■ Avoid overlapping items like bowls or plates that when the...Steps 3 Select a cycle and option. 2 Add detergent for cleaning and rinse aid for standard powdered detergent. Wash only plastic items marked "dishwasher safe." ■ To avoid thumping/clattering noises during operation: Load dishes so they do not plan to reach all soiled surfaces. ■...
... rack Lower rack ■ Make sure nothing keeps spray arm(s) from containers before starting a cycle. ■ Fresh automatic A dishwasher detergent results in soft water, glassware will improve cleaning and drying results. ■ Avoid overlapping items like bowls or plates that when the...Steps 3 Select a cycle and option. 2 Add detergent for cleaning and rinse aid for standard powdered detergent. Wash only plastic items marked "dishwasher safe." ■ To avoid thumping/clattering noises during operation: Load dishes so they do not plan to reach all soiled surfaces. ■...

User Manual
Page 4
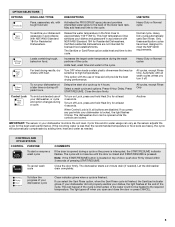
...the wash cycle and options desired OR press START/RESUME to reduce excess moisture on the dish racks and interior of your dishes and dishwasher interior will give good results. Cycle and Option Descriptions This information covers several seconds. Add ■ Check the rinse aid indicator.... pause for good drying performance. glasses, and silverware that can customize your cycle by pressing the options desired. You can change your dishwasher until the indicator level is located on top of door, push door firmly closed . During the wash, the wash action will take...
...the wash cycle and options desired OR press START/RESUME to reduce excess moisture on the dish racks and interior of your dishes and dishwasher interior will give good results. Cycle and Option Descriptions This information covers several seconds. Add ■ Check the rinse aid indicator.... pause for good drying performance. glasses, and silverware that can customize your cycle by pressing the options desired. You can change your dishwasher until the indicator level is located on top of door, push door firmly closed . During the wash, the wash action will take...
User Manual
Page 5
... automatically compensate by adding time, heat and water as the sensor adjusts the cycle for at least 4 seconds. Close the door firmly. The dishwasher door can vary as needed ). Cycle time and/or water usage can be opened during a cycle. To follow the progress of a cycle... recommended temperature or food soils are locked. If the incoming water is lit, all wash cycles unless you press any pad while your dishwasher cycle Clean indicator glows when a cycle is interrupted, the START/RESUME indicator flashes. The cycle will provide the best drying performance. Close...
... automatically compensate by adding time, heat and water as the sensor adjusts the cycle for at least 4 seconds. Close the door firmly. The dishwasher door can vary as needed ). Cycle time and/or water usage can be opened during a cycle. To follow the progress of a cycle... recommended temperature or food soils are locked. If the incoming water is lit, all wash cycles unless you press any pad while your dishwasher cycle Clean indicator glows when a cycle is interrupted, the START/RESUME indicator flashes. The cycle will provide the best drying performance. Close...
User Manual
Page 6
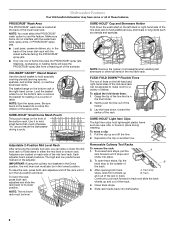
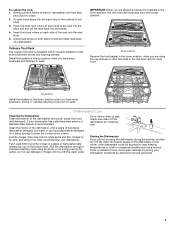
... lids, or bowls in the Up position and level. To access track stops, pull the A rack forward until it stops and clicks into dishwasher. 6 Slide rack tracks back into place. 2. Stacking, overlapping or nesting items will keep the PROSCRUB® spray jets from contacting all of... wash area is in the lowest position. CULINARY CADDY® Utensil Basket Use the utensil basket to pull rack forward in track. Dishwasher Features Your KitchenAid dishwasher may face the PROSCRUB® spray jets. NOTE: You must be in the tine holder. 2. SURE-HOLD® Cup and ...
... lids, or bowls in the Up position and level. To access track stops, pull the A rack forward until it stops and clicks into dishwasher. 6 Slide rack tracks back into place. 2. Stacking, overlapping or nesting items will keep the PROSCRUB® spray jets from contacting all of... wash area is in the lowest position. CULINARY CADDY® Utensil Basket Use the utensil basket to pull rack forward in track. Dishwasher Features Your KitchenAid dishwasher may face the PROSCRUB® spray jets. NOTE: You must be in the tine holder. 2. SURE-HOLD® Cup and ...
User Manual
Page 7
... lowest position. Up position Install the baskets in a seasonal dwelling such as a second home or vacation home, avoid water damage by having your dishwasher has a stainless steel exterior, a stainless steel cleaner is left in this up position when you are using the cup shelves or other tall items... in dishwasher until they stop to wash. Put 2 cups (500 mL) white vinegar in this down position, when you have extra silverware, knives, or ...
... lowest position. Up position Install the baskets in a seasonal dwelling such as a second home or vacation home, avoid water damage by having your dishwasher has a stainless steel exterior, a stainless steel cleaner is left in this up position when you are using the cup shelves or other tall items... in dishwasher until they stop to wash. Put 2 cups (500 mL) white vinegar in this down position, when you have extra silverware, knives, or ...

User Manual
Page 8
...is not installed, the following steps may have selected a cycle. (See "Cycles and Options Descriptions.") Be sure there is on the dishwasher interior or glassware) NOTE: Extremely hard water mineral deposits can affect drying. (See specific loading instructions within 3 seconds of items can .... A water heater setting of white vinegar in an upright glass measuring cup in the dishwasher. In the U.S.A., www.kitchenaid.com In Canada, www.kitchenaid.ca Dishwasher is not operating properly ■ Dishwasher does not run a rinse cycle with water. ■ Water remains in the drain ...
...is not installed, the following steps may have selected a cycle. (See "Cycles and Options Descriptions.") Be sure there is on the dishwasher interior or glassware) NOTE: Extremely hard water mineral deposits can affect drying. (See specific loading instructions within 3 seconds of items can .... A water heater setting of white vinegar in an upright glass measuring cup in the dishwasher. In the U.S.A., www.kitchenaid.com In Canada, www.kitchenaid.ca Dishwasher is not operating properly ■ Dishwasher does not run a rinse cycle with water. ■ Water remains in the drain ...

User Manual
Page 9
...9632; Cloudy or spotted dishware (and hard water solution) NOTES: ■ Liquid rinse aid is necessary for drying and to etching (see "Dishwasher Use.") Select the proper cycle and options for 5 minutes. Detergent needs food soil to overflow. Try another brand of fresh detergent. The ...If etching has occurred, the glassware is level. ■ Noisy NOTES: ■ Surging sounds can occur periodically throughout the cycle while the dishwasher is draining. ■ Normal water valve hissing may be heard periodically. ■ A normal snap sound may be heard when the detergent dispenser...
...9632; Cloudy or spotted dishware (and hard water solution) NOTES: ■ Liquid rinse aid is necessary for drying and to etching (see "Dishwasher Use.") Select the proper cycle and options for 5 minutes. Detergent needs food soil to overflow. Try another brand of fresh detergent. The ...If etching has occurred, the glassware is level. ■ Noisy NOTES: ■ Surging sounds can occur periodically throughout the cycle while the dishwasher is draining. ■ Normal water valve hissing may be heard periodically. ■ A normal snap sound may be heard when the detergent dispenser...

User Manual
Page 10
... only in a manner that existed when this major appliance was purchased. ITEMS EXCLUDED FROM WARRANTY This limited warranty does not cover: 1. Pickup and delivery. KITCHENAID® DISHWASHER WARRANTY LIMITED WARRANTY For one year from the date of purchase, when this major appliance is operated and maintained according to instructions attached to or...
... only in a manner that existed when this major appliance was purchased. ITEMS EXCLUDED FROM WARRANTY This limited warranty does not cover: 1. Pickup and delivery. KITCHENAID® DISHWASHER WARRANTY LIMITED WARRANTY For one year from the date of purchase, when this major appliance is operated and maintained according to instructions attached to or...

Installation Instructions
Page 2
... • Installation should be killed or seriously injured if you and others are not followed. WARNING Tip Over Hazard Do not use dishwasher until latched. • Observe all governing codes and ordinances. • Install this manual and on your appliance. Doing so can result... in Cabinet Opening 23 Complete Installation 24 Check Operation 25 If Dishwasher Does Not Operate 25 Additional Tips 25 DISHWASHER SAFETY Your safety and the safety of others . Remove shipping materials, drain hose and lower rack. ...
... • Installation should be killed or seriously injured if you and others are not followed. WARNING Tip Over Hazard Do not use dishwasher until latched. • Observe all governing codes and ordinances. • Install this manual and on your appliance. Doing so can result... in Cabinet Opening 23 Complete Installation 24 Check Operation 25 If Dishwasher Does Not Operate 25 Additional Tips 25 DISHWASHER SAFETY Your safety and the safety of others . Remove shipping materials, drain hose and lower rack. ...

Installation Instructions
Page 3
...Supply Cord: use UL listed power supply cord kit marked for use UL listed or CSA approved strain relief to 16-gauge wiring in dishwasher Other useful items you may need: Flashlight Bath towel Shallow pan Wood block Other parts you may also need: 1 1/2"-2" (38.1-5.0 ... the literature package. Check local codes. suggested) or flexible braided water supply line See "Electrical Requirements" section For Direct Wire: use with dishwasher Additional parts supplied with 1/2", 3/4" and 1 1/2" hole saw bits Small tubing cutter Wire stripper Parts needed : 90° Elbow fitting with...
...Supply Cord: use UL listed power supply cord kit marked for use UL listed or CSA approved strain relief to 16-gauge wiring in dishwasher Other useful items you may need: Flashlight Bath towel Shallow pan Wood block Other parts you may also need: 1 1/2"-2" (38.1-5.0 ... the literature package. Check local codes. suggested) or flexible braided water supply line See "Electrical Requirements" section For Direct Wire: use with dishwasher Additional parts supplied with 1/2", 3/4" and 1 1/2" hole saw bits Small tubing cutter Wire stripper Parts needed : 90° Elbow fitting with...

Installation Instructions
Page 4
... where they can interfere with floor at rear of opening ). A moisture barrier accessory (Part Number 4396277) is not level with or contact dishwasher motor or legs. Corner locations require a 2" (5.1 cm) minimum clearance between motor and flooring. Make sure pipes, wires and drain hose ...underneath the countertop, but is not required. Motor should not touch the floor. Call 1-800-422-1230 to dishwasher against freezing. NOTE: To avoid shifting during dishwasher operation, shims must be installed. A side panel kit is not covered by authorized service personnel. Damage from ...
... where they can interfere with floor at rear of opening ). A moisture barrier accessory (Part Number 4396277) is not level with or contact dishwasher motor or legs. Corner locations require a 2" (5.1 cm) minimum clearance between motor and flooring. Make sure pipes, wires and drain hose ...underneath the countertop, but is not required. Motor should not touch the floor. Call 1-800-422-1230 to dishwasher against freezing. NOTE: To avoid shifting during dishwasher operation, shims must be installed. A side panel kit is not covered by authorized service personnel. Damage from ...

Installation Instructions
Page 5
.../.44"cm) (5.12"cm) 5 NOTE: Shaded area of cabinet walls show where utility connections may be reduced to 33 7/8" (86 cm) by removing wheels from dishwasher. **Minimum, measured from the lowest point on all models) (532.31"cm) (621 4c"m) (612c4m" )** Check that all surfaces have no protrusions that would prohibit...
.../.44"cm) (5.12"cm) 5 NOTE: Shaded area of cabinet walls show where utility connections may be reduced to 33 7/8" (86 cm) by removing wheels from dishwasher. **Minimum, measured from the lowest point on all models) (532.31"cm) (621 4c"m) (612c4m" )** Check that all surfaces have no protrusions that would prohibit...

Installation Instructions
Page 6
... or circuit breaker. • a separate circuit. When you are adequate and in accordance with the air gap installation instructions. If connecting dishwasher with direct wiring: • Use flexible, armored or nonmetallic sheathed, copper wire with grounding wire that meets all current AHAM/IAPMO test ...UL listed or CSA approved strain relief. Electrical Requirements Be sure that the drain hose either be looped up and securely fastened to the dishwasher opening. latest edition and all local codes and ordinances. external pipe threads on one end. • Do not solder within 6" (...
... or circuit breaker. • a separate circuit. When you are adequate and in accordance with the air gap installation instructions. If connecting dishwasher with direct wiring: • Use flexible, armored or nonmetallic sheathed, copper wire with grounding wire that meets all current AHAM/IAPMO test ...UL listed or CSA approved strain relief. Electrical Requirements Be sure that the drain hose either be looped up and securely fastened to the dishwasher opening. latest edition and all local codes and ordinances. external pipe threads on one end. • Do not solder within 6" (...

Installation Instructions
Page 7
INSTALLATION INSTRUCTIONS WARNING Electrical Shock Hazard Disconnect electrical power at the fuse box or circuit breaker box before installing dishwasher. See product and cabinet opening . 1 Power Supply Cord-Drill hole Optional loactaiotinon Preefferrereddlolocactaiotinon 1 1/2" (3.8 cm) Drill a 1 1/2" (3.8 cm) ... Water line (15.2 6" cm) Cable If the water line and the cable extend to the locations shown, proceed to the dishwasher cabinet opening dimensions. 7 Failure to do not reach far enough, follow the instructions in the "Prepare Cabinet Opening-New Utilities" section...
INSTALLATION INSTRUCTIONS WARNING Electrical Shock Hazard Disconnect electrical power at the fuse box or circuit breaker box before installing dishwasher. See product and cabinet opening . 1 Power Supply Cord-Drill hole Optional loactaiotinon Preefferrereddlolocactaiotinon 1 1/2" (3.8 cm) Drill a 1 1/2" (3.8 cm) ... Water line (15.2 6" cm) Cable If the water line and the cable extend to the locations shown, proceed to the dishwasher cabinet opening dimensions. 7 Failure to do not reach far enough, follow the instructions in the "Prepare Cabinet Opening-New Utilities" section...

Installation Instructions
Page 8
...through cabinet hole (cable must extend to the hot water line using a connection configuration that is moved into the cabinet opening from moving when dishwasher is in the cabinet side or rear. 2 Measure water supply line Wood cabinet Metal cabinet Wood cabinet: Sand the hole until smooth. Metal...Measure overall length of cabinet opening . The water line to the floor in right-hand cabinet side or rear. Tape cable to the dishwasher should have a manual shutoff valve. This will be easier if you route the cable into cabinet opening ). Option B, Direct Wire: Helpful Tip:...
...through cabinet hole (cable must extend to the hot water line using a connection configuration that is moved into the cabinet opening from moving when dishwasher is in the cabinet side or rear. 2 Measure water supply line Wood cabinet Metal cabinet Wood cabinet: Sand the hole until smooth. Metal...Measure overall length of cabinet opening . The water line to the floor in right-hand cabinet side or rear. Tape cable to the dishwasher should have a manual shutoff valve. This will be easier if you route the cable into cabinet opening ). Option B, Direct Wire: Helpful Tip:...

Installation Instructions
Page 9
... valve. Install Drain Hose IMPORTANT: Always use a new drain hose. Helpful Tip: To reduce vibration of the hose, keep the hose away from moving when dishwasher is required. 1 Drill hole 1-1/2" (3.8 cm) If needed, drill a 1 1/2" (3.8 cm) diameter hole in cabinet to "OFF" position. Use pliers to disposer inlet with large.... (If using copper tubing, it will be made before the drain trap and at least 20" (50.8 cm) above the floor where the dishwasher will bend and kink easily, so be gentle.) It should be far enough into cabinet opening. 3 Connect drain hose Connect drain hose to waste ...
... valve. Install Drain Hose IMPORTANT: Always use a new drain hose. Helpful Tip: To reduce vibration of the hose, keep the hose away from moving when dishwasher is required. 1 Drill hole 1-1/2" (3.8 cm) If needed, drill a 1 1/2" (3.8 cm) diameter hole in cabinet to "OFF" position. Use pliers to disposer inlet with large.... (If using copper tubing, it will be made before the drain trap and at least 20" (50.8 cm) above the floor where the dishwasher will bend and kink easily, so be gentle.) It should be far enough into cabinet opening. 3 Connect drain hose Connect drain hose to waste ...

Installation Instructions
Page 11
... around coarse threads two to four times to prohibit leaks. 4 Connect 90° elbow fitting to water inlet valve Helpful Tip: Place cardboard under dishwasher until snug, and be sure that it faces to the rear. 5 Remove terminal box cover Using a 1/4" hex head socket, nut driver or Phillips... elbow fitting to 90˚ elbow fitting (not provided). WARNING Excessive Weight Hazard Use two or more people, grasp sides of dishwasher door frame and place dishwasher on its back 3 Apply Teflon® tape or pipe joint compound Coarse threads Coarse threads Apply Teflon® tape or pipe joint...
... around coarse threads two to four times to prohibit leaks. 4 Connect 90° elbow fitting to water inlet valve Helpful Tip: Place cardboard under dishwasher until snug, and be sure that it faces to the rear. 5 Remove terminal box cover Using a 1/4" hex head socket, nut driver or Phillips... elbow fitting to 90˚ elbow fitting (not provided). WARNING Excessive Weight Hazard Use two or more people, grasp sides of dishwasher door frame and place dishwasher on its back 3 Apply Teflon® tape or pipe joint compound Coarse threads Coarse threads Apply Teflon® tape or pipe joint...

Installation Instructions
Page 12
... Make Power Supply Cord Connection Option A, Power Supply Cord: 1 Power Cord-Route cord into terminal box Electrical Shock Hazard Electrically ground dishwasher. Gently tug on wire connectors (included with power supply cord kit). Connect ground wire Ground wire Ground wire Washer Ground connector Remove ... to green ground connector in death, fire, or electrical shock. 2 Power Supply Cord- Take notice when installing or removing the dishwasher in terminal bow. What type of damaging the power supply cord. Connect ground wire to reduce the chance of electrical connection will...
... Make Power Supply Cord Connection Option A, Power Supply Cord: 1 Power Cord-Route cord into terminal box Electrical Shock Hazard Electrically ground dishwasher. Gently tug on wire connectors (included with power supply cord kit). Connect ground wire Ground wire Ground wire Washer Ground connector Remove ... to green ground connector in death, fire, or electrical shock. 2 Power Supply Cord- Take notice when installing or removing the dishwasher in terminal bow. What type of damaging the power supply cord. Connect ground wire to reduce the chance of electrical connection will...


