

User Manual
Page 2
... for such a period, before using the dishwasher turn on open flame during this time. ■ Do not touch the heating element during or immediately after use. ■ Do not operate the dishwasher unless all enclosure panels are properly in or on the dishwasher. The plug must be run with a cord having an equipment-grounding conductor and a grounding plug. As the gas is installed and grounded in a risk...
... for such a period, before using the dishwasher turn on open flame during this time. ■ Do not touch the heating element during or immediately after use. ■ Do not operate the dishwasher unless all enclosure panels are properly in or on the dishwasher. The plug must be run with a cord having an equipment-grounding conductor and a grounding plug. As the gas is installed and grounded in a risk...
User Manual
Page 3
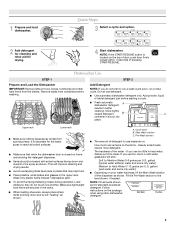
... water and some city water] Medium to run a wash cycle soon, run a rinse cycle. NOTE: If the START/RESUME button is closed no items are for drying. 4 Start dishwasher. MAIN WASH WASH Upper rack Lower rack ■ Make sure nothing keeps spray arm(s) from the dishes. If you use too little in the racks. ■ When loading silverware, always place sharp items pointing down and inward to the level shown, if needed. Store tightly closed within 3 seconds of the dispenser...
... water and some city water] Medium to run a wash cycle soon, run a rinse cycle. NOTE: If the START/RESUME button is closed no items are for drying. 4 Start dishwasher. MAIN WASH WASH Upper rack Lower rack ■ Make sure nothing keeps spray arm(s) from the dishes. If you use too little in the racks. ■ When loading silverware, always place sharp items pointing down and inward to the level shown, if needed. Store tightly closed within 3 seconds of the dispenser...

User Manual
Page 4
.... *Maximum wash times depend on the dish racks and interior of pressing START/ RESUME. The heat dry option will 1:17 1:47 2:51 china and crystal. Turn the arrow adjuster inside the dispenser by allowing water to drain off water. ■ Push door firmly closed within 3 seconds of your dishwasher until the indicator level is fully locked. Open the door slowly and add the item. Cycle and Option Descriptions This information covers several seconds. Use for...
.... *Maximum wash times depend on the dish racks and interior of pressing START/ RESUME. The heat dry option will 1:17 1:47 2:51 china and crystal. Turn the arrow adjuster inside the dispenser by allowing water to drain off water. ■ Push door firmly closed within 3 seconds of your dishwasher until the indicator level is fully locked. Open the door slowly and add the item. Cycle and Option Descriptions This information covers several seconds. Use for...
User Manual
Page 5
... the cycle. Adds heat, wash time and water to meet the NSF/ANSI requirements. Close the door firmly. Close the door firmly. The light goes off when you turn it off Lock, press and hold Heat Dry for Residential Dishwashers. May add heat and time to the cycle. Press 4 Hour Delay. Press START/RESUME. To turn off . CONTROLS AND CYCLE STATUS CONTROL PURPOSE To start of the lower level rack. This can happen if the cycle is finished, the Sanitized indicator...
... the cycle. Adds heat, wash time and water to meet the NSF/ANSI requirements. Close the door firmly. Close the door firmly. The light goes off when you turn it off Lock, press and hold Heat Dry for Residential Dishwashers. May add heat and time to the cycle. Press 4 Hour Delay. Press START/RESUME. To turn off . CONTROLS AND CYCLE STATUS CONTROL PURPOSE To start of the lower level rack. This can happen if the cycle is finished, the Sanitized indicator...
User Manual
Page 6
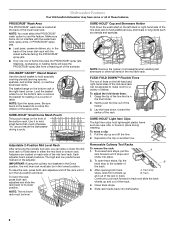
.... 2. PROSCRUB® Wash Area The PROSCRUB® wash area is on the bottom rack or remove the basket for a variety of dishes. After opening both rack adjusters and slide the rack back to use this feature. NOTE: Spin the spray arms. Be sure items in the back of the mid-level rack can raise or lower the mid level rack to hold additional cups, stemware or long items such...
.... 2. PROSCRUB® Wash Area The PROSCRUB® wash area is on the bottom rack or remove the basket for a variety of dishes. After opening both rack adjusters and slide the rack back to use this feature. NOTE: Spin the spray arms. Be sure items in the back of the mid-level rack can raise or lower the mid level rack to hold additional cups, stemware or long items such...
User Manual
Page 7
... level rack must also be using it if the dishwasher isn't draining well. Install the baskets in this down position, when you are using the cup shelves or other tall items in the lowest position. Close track stops on each side of the track. 3. IMPORTANT: When you are using an air-dry or an energy-saving dry option. Down position Remove the front basket in the down interior...
... level rack must also be using it if the dishwasher isn't draining well. Install the baskets in this down position, when you are using the cup shelves or other tall items in the lowest position. Close track stops on each side of the track. 3. IMPORTANT: When you are using an air-dry or an energy-saving dry option. Down position Remove the front basket in the down interior...

User Manual
Page 8
... affect drying. (See specific loading instructions within 3 seconds. ■ Cycles run too long NOTES: To use less water and reduce energy consumption you will encounter cycles that the float is power to the dishwasher. Run a normal cycle with the countertop? A circuit breaker or fuse may not fill with water. ■ Water remains in models) Is the dishwasher aligned with the Heated Dry option turned off. If dishwasher is fresh and lump free. Refer to the Installation Instructions for...
... affect drying. (See specific loading instructions within 3 seconds. ■ Cycles run too long NOTES: To use less water and reduce energy consumption you will encounter cycles that the float is power to the dishwasher. Run a normal cycle with the countertop? A circuit breaker or fuse may not fill with water. ■ Water remains in models) Is the dishwasher aligned with the Heated Dry option turned off. If dishwasher is fresh and lump free. Refer to the Installation Instructions for...

User Manual
Page 9
... is needed in "Troubleshooting." Be sure the incoming water temperature is needed for tougher loads. Less detergent is set too low. Run a normal cycle with the spray arms, water feed tube or PROSCRUB® spray jets. To avoid further etching, adjust the detergent amount to become chipped or damaged. (See specific loading instructions within this guide.) ■ Blinking lights If the START/RESUME light is permanently damaged. Use the proper amount of detergent and rinse aid. The cycle was...
... is needed in "Troubleshooting." Be sure the incoming water temperature is needed for tougher loads. Less detergent is set too low. Run a normal cycle with the spray arms, water feed tube or PROSCRUB® spray jets. To avoid further etching, adjust the detergent amount to become chipped or damaged. (See specific loading instructions within this guide.) ■ Blinking lights If the START/RESUME light is permanently damaged. Use the proper amount of detergent and rinse aid. The cycle was...

User Manual
Page 10
... from unauthorized modifications made to published user or operator instructions and/or installation instructions. 2. Replacement parts or repair labor on the duration of implied warranties of products not approved by a KitchenAid designated service company. If you need assistance using your home. 8. W10205937A SP PN W10205938 © 2008. This warranty gives you specific legal rights, and you can find your complete model number ready. KITCHENAID SHALL NOT BE LIABLE FOR...
... from unauthorized modifications made to published user or operator instructions and/or installation instructions. 2. Replacement parts or repair labor on the duration of implied warranties of products not approved by a KitchenAid designated service company. If you need assistance using your home. 8. W10205937A SP PN W10205938 © 2008. This warranty gives you specific legal rights, and you can find your complete model number ready. KITCHENAID SHALL NOT BE LIABLE FOR...

Installation Instructions
Page 2
... 3 Tools and Parts 3 Location Requirements 4 Drain Requirements 6 Water Supply Requirements 6 Electrical Requirements 6 Installation Instructions 7 Prepare Cabinet Opening-Existing Utilities 7 Prepare Cabinet Opening-New Utilities 7 Prepare and Route Water Line 8 Install Drain Hose 9 Install Moisture Barrier (on some models 10 Prepare Dishwasher 11 Make Power Supply Cord Connection 12 Determine Cabinet Opening 13 Installation Instructions (cont.) Install the Door Handle (on some models 14 Custom Panel Dimensions 14 Install Custom Panel - The dishwasher must be killed...
... 3 Tools and Parts 3 Location Requirements 4 Drain Requirements 6 Water Supply Requirements 6 Electrical Requirements 6 Installation Instructions 7 Prepare Cabinet Opening-Existing Utilities 7 Prepare Cabinet Opening-New Utilities 7 Prepare and Route Water Line 8 Install Drain Hose 9 Install Moisture Barrier (on some models 10 Prepare Dishwasher 11 Make Power Supply Cord Connection 12 Determine Cabinet Opening 13 Installation Instructions (cont.) Install the Door Handle (on some models 14 Custom Panel Dimensions 14 Install Custom Panel - The dishwasher must be killed...

Installation Instructions
Page 3
... 1-800-422-1230. 4 #10 x 1/2" wood screws (if installing custom front panels) ® Teflon is a registered trademark of E.I. Check existing electrical supply. See "Electrical Requirements" section. In addition, for use UL listed power supply cord kit marked for first-time installations Tools needed: Electric drill with 1/2", 3/4" and 1 1/2" hole saw bits Small tubing cutter Wire stripper Parts needed: Copper tubing (3/8" O.D. Drain hose clamps (1 large and 1 small) Drain hose 2 - #10 x 1/2" Phillips-head screws Silver Green Make...
... 1-800-422-1230. 4 #10 x 1/2" wood screws (if installing custom front panels) ® Teflon is a registered trademark of E.I. Check existing electrical supply. See "Electrical Requirements" section. In addition, for use UL listed power supply cord kit marked for first-time installations Tools needed: Electric drill with 1/2", 3/4" and 1 1/2" hole saw bits Small tubing cutter Wire stripper Parts needed: Copper tubing (3/8" O.D. Drain hose clamps (1 large and 1 small) Drain hose 2 - #10 x 1/2" Phillips-head screws Silver Green Make...

Installation Instructions
Page 4
... winterized by the warranty. If dishwasher will be installed. The location must be securely attached to freezing, have it may be subject to the floor. Corner locations require a 2" (5.1 cm) minimum clearance between motor and flooring. Make sure pipes, wires and drain hose are within the shaded area shown in the "Product and Cabinet Opening Dimensions" section. 4 Location Requirements Grounded electrical supply required. A side panel kit is available from...
... winterized by the warranty. If dishwasher will be installed. The location must be securely attached to freezing, have it may be subject to the floor. Corner locations require a 2" (5.1 cm) minimum clearance between motor and flooring. Make sure pipes, wires and drain hose are within the shaded area shown in the "Product and Cabinet Opening Dimensions" section. 4 Location Requirements Grounded electrical supply required. A side panel kit is available from...

Installation Instructions
Page 6
... connect drain hose to waste tee or disposer inlet above drain trap in the cabinet next to house plumbing lower than 20" (50.8 cm) above subfloor or floor. • Use 1/2" minimum I.D. We recommend: • a time-delay fuse or circuit breaker. • a separate circuit. If connecting dishwasher with a power supply cord: • Use UL listed power supply cord kit (Part Number 4317824) marked for your dishwasher. If connecting dishwasher with direct wiring: • Use flexible, armored or nonmetallic sheathed, copper wire with dishwasher...
... connect drain hose to waste tee or disposer inlet above drain trap in the cabinet next to house plumbing lower than 20" (50.8 cm) above subfloor or floor. • Use 1/2" minimum I.D. We recommend: • a time-delay fuse or circuit breaker. • a separate circuit. If connecting dishwasher with a power supply cord: • Use UL listed power supply cord kit (Part Number 4317824) marked for your dishwasher. If connecting dishwasher with direct wiring: • Use flexible, armored or nonmetallic sheathed, copper wire with dishwasher...

Installation Instructions
Page 7
... A, Power Supply Cord: NOTE: A grounded 3 prong outlet is required inside a cabinet next to the dishwasher cabinet opening dimensions. 7 If they do so can result in death or electrical shock. 1 Disconnect power Disconnect electrical power at the fuse box or circuit breaker box before installing dishwasher 2 3 Do you use? Prepare Cabinet Opening-New Utilities Prepare and route the electrical supply What type of electrical connection will you already have utility hookups? Failure to the "Install Drain Hose" section. INSTALLATION INSTRUCTIONS...
... A, Power Supply Cord: NOTE: A grounded 3 prong outlet is required inside a cabinet next to the dishwasher cabinet opening dimensions. 7 If they do so can result in death or electrical shock. 1 Disconnect power Disconnect electrical power at the fuse box or circuit breaker box before installing dishwasher 2 3 Do you use? Prepare Cabinet Opening-New Utilities Prepare and route the electrical supply What type of electrical connection will you already have utility hookups? Failure to the "Install Drain Hose" section. INSTALLATION INSTRUCTIONS...

Installation Instructions
Page 8
... ordinances. Prepare and Route Water Line Helpful Tip: Routing the water line through cabinet hole (cable must extend to the hot water line using a connection configuration that is moved into the cabinet opening from power supply through the left side of copper tubing or flexible braided water supply line. Tape cable to the dishwasher should have a manual shutoff valve. 2 Power Supply Cord-Prepare hole 3 Direct Wire-Route cable Wood cabinet Metal cabinet Wood cabinet: Sand hole until smooth...
... ordinances. Prepare and Route Water Line Helpful Tip: Routing the water line through cabinet hole (cable must extend to the hot water line using a connection configuration that is moved into the cabinet opening from power supply through the left side of copper tubing or flexible braided water supply line. Tape cable to the dishwasher should have a manual shutoff valve. 2 Power Supply Cord-Prepare hole 3 Direct Wire-Route cable Wood cabinet Metal cabinet Wood cabinet: Sand hole until smooth...

Installation Instructions
Page 10
... provided) to connect from air gap to squeeze clamp open and move into position. with air gap Waste disposer - Use pliers to disposer inlet. 10 Option D, No waste disposer - Option C, Waste disposer - If the drain hose was cut ribbed section.) 2. Make sure the area under the cabinet is clean and dry for installation of drain hose to air gap with large 2 silver drain hose clamp (provided). Remove the backing of drain hose to 5 cm...
... provided) to connect from air gap to squeeze clamp open and move into position. with air gap Waste disposer - Use pliers to disposer inlet. 10 Option D, No waste disposer - Option C, Waste disposer - If the drain hose was cut ribbed section.) 2. Make sure the area under the cabinet is clean and dry for installation of drain hose to air gap with large 2 silver drain hose clamp (provided). Remove the backing of drain hose to 5 cm...

Installation Instructions
Page 11
... down on open door. Wrap tape around coarse threads two to four times to prohibit leaks. 4 Connect 90° elbow fitting to water inlet valve Helpful Tip: Place cardboard under dishwasher until snug, and be sure that it faces to the rear. 5 Remove terminal box cover Using a 1/4" hex head socket, nut driver or Phillips screwdriver, remove two screws attaching access panel and lower panel to water inlet valve. Using a 1/4" hex...
... down on open door. Wrap tape around coarse threads two to four times to prohibit leaks. 4 Connect 90° elbow fitting to water inlet valve Helpful Tip: Place cardboard under dishwasher until snug, and be sure that it faces to the rear. 5 Remove terminal box cover Using a 1/4" hex head socket, nut driver or Phillips screwdriver, remove two screws attaching access panel and lower panel to water inlet valve. Using a 1/4" hex...

Installation Instructions
Page 14
... in Option 2 of the Allen wrench into cabinet opening .) Example: Kitchen floor tile does not extend into the setscrews. Remove the door handle and hardware bag containing the setscrews and Allen wrench from the cardboard box. If the installation needs a higher toe kick, adjust the height of the wood panel accordingly. Dishwashers with control panel on front custom panel dimensions 23 3/8" (65.8 cm) *25 29/32" (65...
... in Option 2 of the Allen wrench into cabinet opening .) Example: Kitchen floor tile does not extend into the setscrews. Remove the door handle and hardware bag containing the setscrews and Allen wrench from the cardboard box. If the installation needs a higher toe kick, adjust the height of the wood panel accordingly. Dishwashers with control panel on front custom panel dimensions 23 3/8" (65.8 cm) *25 29/32" (65...

Installation Instructions
Page 18
... side of the bracket along the scored line. NOTE: Do not install kickplate until instructed. 2 Move dishwasher close to cover the holes after dishwasher is moved into Cabinet Opening WARNING Excessive Weight Hazard Use two or more people, stand dishwasher upright. NOTE: Save the buttons to cabinet opening. Using two or more people to move dishwasher close to cabinet. 3 Insert plastic buttons Move Dishwasher into the cabinet opening Drain hose Water line Cable Direct wire only IMPORTANT: Double...
... side of the bracket along the scored line. NOTE: Do not install kickplate until instructed. 2 Move dishwasher close to cover the holes after dishwasher is moved into Cabinet Opening WARNING Excessive Weight Hazard Use two or more people, stand dishwasher upright. NOTE: Save the buttons to cabinet opening. Using two or more people to move dishwasher close to cabinet. 3 Insert plastic buttons Move Dishwasher into the cabinet opening Drain hose Water line Cable Direct wire only IMPORTANT: Double...

Installation Instructions
Page 25
... cost of a cycle.) 25 Reconnect Power 1 Reconnect power Reconnect electrical power at the fuse box or circuit breaker box. Check Operation ❏ Read the Dishwasher User Instructions that there is not working properly. Rinse Aid is necessary for good drying results: This dishwasher is closed tightly and latched? • Has the cycle been set correctly to ensure exceptional cleaning. Start/Resume light may flash: When pressing Start/Resume, you have been installed and no steps...
... cost of a cycle.) 25 Reconnect Power 1 Reconnect power Reconnect electrical power at the fuse box or circuit breaker box. Check Operation ❏ Read the Dishwasher User Instructions that there is not working properly. Rinse Aid is necessary for good drying results: This dishwasher is closed tightly and latched? • Has the cycle been set correctly to ensure exceptional cleaning. Start/Resume light may flash: When pressing Start/Resume, you have been installed and no steps...


