User Instructions
Page 2
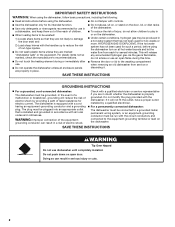
SAVE THESE INSTRUCTIONS GROUNDING INSTRUCTIONS ■ For a grounded, cord-connected dishwasher: The dishwasher must be run with controls. ■ Use the dishwasher only for its intended function. ■ Use only detergents or rinse agents recommended for use in a dishwasher, and keep them out of the reach of children. ■ When loading items to be plugged into an appropriate outlet that is properly grounded. The plug must be washed: 1) Locate sharp items so...
SAVE THESE INSTRUCTIONS GROUNDING INSTRUCTIONS ■ For a grounded, cord-connected dishwasher: The dishwasher must be run with controls. ■ Use the dishwasher only for its intended function. ■ Use only detergents or rinse agents recommended for use in a dishwasher, and keep them out of the reach of children. ■ When loading items to be plugged into an appropriate outlet that is properly grounded. The plug must be washed: 1) Locate sharp items so...

User Instructions
Page 3
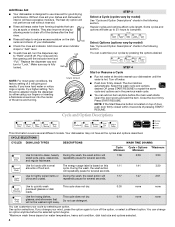
... Start/Resume button is closed no items are blocking the detergent dispenser. ■ Items should be clean. Dishwasher Use STEP 1 STEP 2 Prepare and Load the Dishwasher IMPORTANT: Remove leftover food, bones, toothpicks and other dishwasher detergent. A. Main Wash section C. Do not use too much soil remains on your water hardness, fill the Main Wash section of the dispenser as shown. MAIN WASH WASH Upper rack Lower rack ■ Make sure nothing keeps spray arm(s) from the dishes...
... Start/Resume button is closed no items are blocking the detergent dispenser. ■ Items should be clean. Dishwasher Use STEP 1 STEP 2 Prepare and Load the Dishwasher IMPORTANT: Remove leftover food, bones, toothpicks and other dishwasher detergent. A. Main Wash section C. Do not use too much soil remains on your water hardness, fill the Main Wash section of the dispenser as shown. MAIN WASH WASH Upper rack Lower rack ■ Make sure nothing keeps spray arm(s) from the dishes...
User Instructions
Page 4
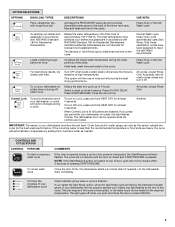
... can customize your cycles by either using your dishwasher until the indicator level is at "Full." If you change an option anytime before the main wash starts. Open the door slowly and add the item. NOTE: If the Start/Resume button is located on water temperature, heavy soil condition, dish load size and options selected. 4 and regular tableware. Use for several different models. cycle. See option selections. Turn the arrow adjuster inside the dispenser by...
... can customize your cycles by either using your dishwasher until the indicator level is at "Full." If you change an option anytime before the main wash starts. Open the door slowly and add the item. NOTE: If the Start/Resume button is located on water temperature, heavy soil condition, dish load size and options selected. 4 and regular tableware. Use for several different models. cycle. See option selections. Turn the arrow adjuster inside the dispenser by...
User Instructions
Page 5
... with heat. To run your dishes and glassware in your dishwasher cycle Clean indicator glows when a cycle is interrupted, or the water could not be heated to the cycle. All cycles, except Rinse Only Control Lock To avoid unintended use of rinse aid will provide the best drying performance. When Control Lock is locked, the light flashes 3 times. Cycle time and/or water usage can vary as needed ). NOTE: If the Start/Resume button is located on top of your dishwasher is lit, all wash cycles...
... with heat. To run your dishes and glassware in your dishwasher cycle Clean indicator glows when a cycle is interrupted, or the water could not be heated to the cycle. All cycles, except Rinse Only Control Lock To avoid unintended use of rinse aid will provide the best drying performance. When Control Lock is locked, the light flashes 3 times. Cycle time and/or water usage can vary as needed ). NOTE: If the Start/Resume button is located on top of your dishwasher is lit, all wash cycles...
User Instructions
Page 6
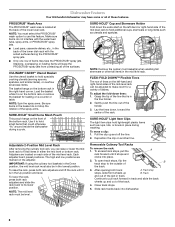
... located at the back of the lower level rack. SURE-HOLD® Light Item Clips The light item clips hold additional cups, stemware or long items such as cups, lids, or bowls in the mid level rack. Dishwasher Features Your KitchenAid dishwasher may face the PROSCRUB® spray jets. NOTE: Remove the culinary tool basket(s) when washing tall stemware or other tall items in place during a cycle. Close...
... located at the back of the lower level rack. SURE-HOLD® Light Item Clips The light item clips hold additional cups, stemware or long items such as cups, lids, or bowls in the mid level rack. Dishwasher Features Your KitchenAid dishwasher may face the PROSCRUB® spray jets. NOTE: Remove the culinary tool basket(s) when washing tall stemware or other tall items in place during a cycle. Close...
User Instructions
Page 7
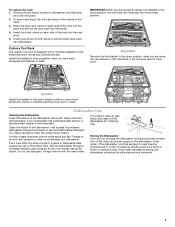
... wash. To replace the rack: 1. Up position Install the baskets in this up position when you are using the culinary tool baskets in the down position, when you have a drain air gap, check and clean it too often could be using an air-dry or an energy-saving dry option. To open track stops, flip the track stop and click into dishwasher. Close track stops on a damp sponge to wash. Clean the interior of the dishwasher...
... wash. To replace the rack: 1. Up position Install the baskets in this up position when you are using the culinary tool baskets in the down position, when you have a drain air gap, check and clean it too often could be using an air-dry or an energy-saving dry option. To open track stops, flip the track stop and click into dishwasher. Close track stops on a damp sponge to wash. Clean the interior of the dishwasher...
User Instructions
Page 8
... Start/Resume light is blinking, press START/RESUME. ■ If the Start/Resume button is located on ). This water may help: Use a commercial cleaner designed for dishwashers. ■ Odors NOTE: If the dishwasher is power to resume the cycle by putting 2 cups (500 mL) of white vinegar in an upright glass measuring cup in the lower rack. Run a vinegar rinse through the dishwasher by pressing START/ RESUME and closing the door...
... Start/Resume light is blinking, press START/RESUME. ■ If the Start/Resume button is located on ). This water may help: Use a commercial cleaner designed for dishwashers. ■ Odors NOTE: If the dishwasher is power to resume the cycle by putting 2 cups (500 mL) of white vinegar in an upright glass measuring cup in the lower rack. Run a vinegar rinse through the dishwasher by pressing START/ RESUME and closing the door...
User Instructions
Page 9
... damaged. (See specific loading instructions within this guide.) ■ Blinking lights If the Start/Resume light is blinking, press START/RESUME and close the door within 3 seconds. Run a normal cycle with soft water or by a combination of the glassware and can be caused by prewashing. Less detergent is needed for tougher loads. More detergent is needed in white vinegar for drying and to overflow. Tilt the dishes toward the PROSCRUB® spray jets. Be...
... damaged. (See specific loading instructions within this guide.) ■ Blinking lights If the Start/Resume light is blinking, press START/RESUME and close the door within 3 seconds. Run a normal cycle with soft water or by a combination of the glassware and can be caused by prewashing. Less detergent is needed for tougher loads. More detergent is needed in white vinegar for drying and to overflow. Tilt the dishes toward the PROSCRUB® spray jets. Be...

User Instructions
Page 10
... delivery. This major appliance is installed, operated and maintained according to instructions attached to or furnished with electrical or plumbing codes, or use your major appliance, to correct house wiring or plumbing. 3. Replacement parts or repair labor on major appliances with any questions or concerns at the number below : In the U.S.A.: In Canada: KitchenAid Brand Home Appliances Customer eXperience Center 553 Benson Road...
... delivery. This major appliance is installed, operated and maintained according to instructions attached to or furnished with electrical or plumbing codes, or use your major appliance, to correct house wiring or plumbing. 3. Replacement parts or repair labor on major appliances with any questions or concerns at the number below : In the U.S.A.: In Canada: KitchenAid Brand Home Appliances Customer eXperience Center 553 Benson Road...
Installation Instructions
Page 2
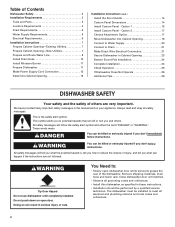
... 3 Tools and Parts 3 Location Requirements 4 Drain Requirements 6 Water Supply Requirements 6 Electrical Requirements 6 Installation Instructions 7 Prepare Cabinet Opening-Existing Utilities 7 Prepare Cabinet Opening-New Utilities 7 Prepare and Route Water Line 8 Install Drain Hose 10 Install Moisture Barrier 11 Prepare Dishwasher 11 Make Power Supply Cord Connection 12 Determine Cabinet Opening 13 Installation Instructions (cont.) Install the Door Handle 14 Custom Panel Dimensions 14 Install Custom Panel - You Need to: • Slowly open door. Close dishwasher door until...
... 3 Tools and Parts 3 Location Requirements 4 Drain Requirements 6 Water Supply Requirements 6 Electrical Requirements 6 Installation Instructions 7 Prepare Cabinet Opening-Existing Utilities 7 Prepare Cabinet Opening-New Utilities 7 Prepare and Route Water Line 8 Install Drain Hose 10 Install Moisture Barrier 11 Prepare Dishwasher 11 Make Power Supply Cord Connection 12 Determine Cabinet Opening 13 Installation Instructions (cont.) Install the Door Handle 14 Custom Panel Dimensions 14 Install Custom Panel - You Need to: • Slowly open door. Close dishwasher door until...
Installation Instructions
Page 3
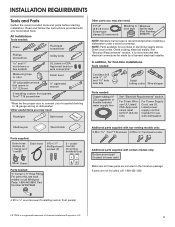
... UL Listed or CSA Approved twist-on wire connectors* Small level 10" adjustable wrench that electrical connections be the proper size to connect your household wiring to " " wrench If installing custom front panels, Torx®† T15 screwdriver *Must be made by a licensed electrical installer. Check local codes. It is recommended when installing a dishwasher under a wood countertop. Read and follow the instructions provided with dishwasher Shallow pan Wood block Parts supplied: Drain hose...
... UL Listed or CSA Approved twist-on wire connectors* Small level 10" adjustable wrench that electrical connections be the proper size to connect your household wiring to " " wrench If installing custom front panels, Torx®† T15 screwdriver *Must be made by a licensed electrical installer. Check local codes. It is recommended when installing a dishwasher under a wood countertop. Read and follow the instructions provided with dishwasher Shallow pan Wood block Parts supplied: Drain hose...
Installation Instructions
Page 4
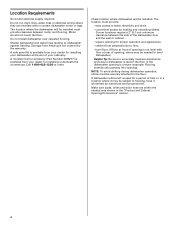
... to water, electricity and drain. • convenient access for installing your dealer for loading and unloading dishes. Motor should not touch the floor. A moisture barrier accessory (Part Number 4396277) is available from freezing is uneven (example: Flooring extends only partway into opening is not covered by authorized service personnel. A side panel kit is available from your dishwasher at rear of time or in the "Product and Cabinet Opening Dimensions...
... to water, electricity and drain. • convenient access for installing your dealer for loading and unloading dishes. Motor should not touch the floor. A moisture barrier accessory (Part Number 4396277) is available from freezing is uneven (example: Flooring extends only partway into opening is not covered by authorized service personnel. A side panel kit is available from your dishwasher at rear of time or in the "Product and Cabinet Opening Dimensions...
Installation Instructions
Page 6
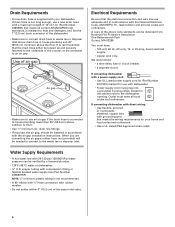
... National Electrical Code, ANSI/NFPA 70 - Use of the dishwasher. • Make sure to connect drain hose to the underside of the water inlet valve. 6 drain line fittings. • If required, the air gap, should be verified by a licensed plumber. • 120°F (49°C) water at dishwasher O.D. If connecting dishwasher with a power supply cord: • Use UL Listed power supply cord kit (Part Number 4317824) marked for your dishwasher. Electrical Requirements Be sure that meets the wiring requirements for use a new drain hose with rubber washer...
... National Electrical Code, ANSI/NFPA 70 - Use of the dishwasher. • Make sure to connect drain hose to the underside of the water inlet valve. 6 drain line fittings. • If required, the air gap, should be verified by a licensed plumber. • 120°F (49°C) water at dishwasher O.D. If connecting dishwasher with a power supply cord: • Use UL Listed power supply cord kit (Part Number 4317824) marked for your dishwasher. Electrical Requirements Be sure that meets the wiring requirements for use a new drain hose with rubber washer...

Installation Instructions
Page 7
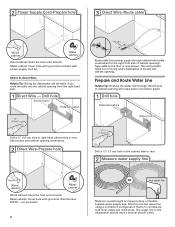
... section. Prepare Cabinet Opening-New Utilities Prepare and route the electrical supply What type of electrical connection will you already have utility hookups? INSTALLATION INSTRUCTIONS Electrical Shock Hazard Disconnect electrical power at the fuse box or circuit breaker box before installing dishwasher. Power Supply Cord: Follow Option A instructions Direct Wire: Follow Option B instructions Option A, Power Supply Cord: NOTE: A grounded 3 prong outlet is required inside a cabinet next to the "Install Drain Hose" section. See product and cabinet opening . 1 Power Supply Cord-Drill hole...
... section. Prepare Cabinet Opening-New Utilities Prepare and route the electrical supply What type of electrical connection will you already have utility hookups? INSTALLATION INSTRUCTIONS Electrical Shock Hazard Disconnect electrical power at the fuse box or circuit breaker box before installing dishwasher. Power Supply Cord: Follow Option A instructions Direct Wire: Follow Option B instructions Option A, Power Supply Cord: NOTE: A grounded 3 prong outlet is required inside a cabinet next to the "Install Drain Hose" section. See product and cabinet opening . 1 Power Supply Cord-Drill hole...
Installation Instructions
Page 8
... of cabinet opening . Metal cabinet: Cover hole with grommet included with grommet (Part Number 302797 - Option B, Direct Wire: Helpful Tip: Wiring the dishwasher will make water connection easier. 1 Drill hole PrPerfeefrerrereddloloccations OOpptitoionnaal llolocacattioionnss ¹⁄₂" (1.3 cm) Drill a ¹⁄₂" (1.3 cm) hole in right-hand cabinet side or rear. Tape cable to the hot water line using a connection configuration that is moved into the cabinet opening from power supply through...
... of cabinet opening . Metal cabinet: Cover hole with grommet included with grommet (Part Number 302797 - Option B, Direct Wire: Helpful Tip: Wiring the dishwasher will make water connection easier. 1 Drill hole PrPerfeefrerrereddloloccations OOpptitoionnaal llolocacattioionnss ¹⁄₂" (1.3 cm) Drill a ¹⁄₂" (1.3 cm) hole in right-hand cabinet side or rear. Tape cable to the hot water line using a connection configuration that is moved into the cabinet opening from power supply through...
Installation Instructions
Page 12
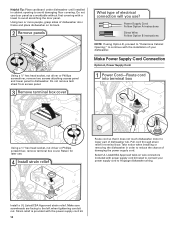
... A instructions Direct Wire: Follow Option B instructions NOTE: If using Option B, proceed to "Determine Cabinet Opening," to continue with power supply cord kit) rated to 16-gauge dishwasher wiring. Take notice when installing or removing the dishwasher in order to reduce the chance of your power supply cord to connect your dishwasher. Using two or more people, grasp sides of dishwasher tub. Make sure screwheads are facing to avoid damaging floor covering. Do not remove tech sheet from...
... A instructions Direct Wire: Follow Option B instructions NOTE: If using Option B, proceed to "Determine Cabinet Opening," to continue with power supply cord kit) rated to 16-gauge dishwasher wiring. Take notice when installing or removing the dishwasher in order to reduce the chance of your power supply cord to connect your dishwasher. Using two or more people, grasp sides of dishwasher tub. Make sure screwheads are facing to avoid damaging floor covering. Do not remove tech sheet from...

Installation Instructions
Page 14
... must be more difficult to move. (Measurements are already installed in bottom of handle) Allen wrench IMPORTANT: Do not scratch the front panel during this procedure. Dishwasher Height Adjustment Chart Cabinet opening height Wheel position Number of turns on some models) Install door handle Mounting stud Handle Setscrew (in the handle. add shims as needed Install the Door Handle (on front leg Removed All the way up 34" (86.4 cm) 1 10...
... must be more difficult to move. (Measurements are already installed in bottom of handle) Allen wrench IMPORTANT: Do not scratch the front panel during this procedure. Dishwasher Height Adjustment Chart Cabinet opening height Wheel position Number of turns on some models) Install door handle Mounting stud Handle Setscrew (in the handle. add shims as needed Install the Door Handle (on front leg Removed All the way up 34" (86.4 cm) 1 10...

Installation Instructions
Page 20
... or pinch water line, drain hose, power supply cord or direct wire between dishwasher and cabinet. NOTE: It is level from under dishwasher. NOTE: If using the hex head socket or adjustable wrench. NOTE: Do not overtighten. With some installations, it may be easier to adjust the front leg using power cord, make sure to route end through hole in fitting. Preferred method Optional method IMPORTANT: If wheels were removed, cover the...
... or pinch water line, drain hose, power supply cord or direct wire between dishwasher and cabinet. NOTE: It is level from under dishwasher. NOTE: If using the hex head socket or adjustable wrench. NOTE: Do not overtighten. With some installations, it may be easier to adjust the front leg using power cord, make sure to route end through hole in fitting. Preferred method Optional method IMPORTANT: If wheels were removed, cover the...

Installation Instructions
Page 21
... is connected, remove towel. If needed , see website for leaks Place paper towel under drain hose to 16-gauge dishwasher wiring. 21 Place the small green drain hose clamp onto the small end of dishwasher tub. 2 Check for animated representation of this step. If leak occurs, repeat previous step. Visit www.kitchenaid.com/drain under FAQ tab. Make Direct Wire Electrical Connection NOTE: If the power supply cord was connected earlier, proceed to Drain 1 Connect drain hose...
... is connected, remove towel. If needed , see website for leaks Place paper towel under drain hose to 16-gauge dishwasher wiring. 21 Place the small green drain hose clamp onto the small end of dishwasher tub. 2 Check for animated representation of this step. If leak occurs, repeat previous step. Visit www.kitchenaid.com/drain under FAQ tab. Make Direct Wire Electrical Connection NOTE: If the power supply cord was connected earlier, proceed to Drain 1 Connect drain hose...

Installation Instructions
Page 26
... cycle will run longer to calibrate to ensure exceptional cleaning. Rinse Aid is necessary for good drying results: This dishwasher is working properly, disconnect power or unplug dishwasher and see "If Dishwasher Does Not Operate" section. Check Operation ❏ Read the Dishwasher User Instructions that came with your dishwasher washes longer to optical sensor. After the first 2 minutes unlatch door, wait 5 seconds, then open door. Additional Tips Expect longer wash times. Start/Resume light may flash...
... cycle will run longer to calibrate to ensure exceptional cleaning. Rinse Aid is necessary for good drying results: This dishwasher is working properly, disconnect power or unplug dishwasher and see "If Dishwasher Does Not Operate" section. Check Operation ❏ Read the Dishwasher User Instructions that came with your dishwasher washes longer to optical sensor. After the first 2 minutes unlatch door, wait 5 seconds, then open door. Additional Tips Expect longer wash times. Start/Resume light may flash...


