
Use & Care Guide
Page 3
...a few days." Failure to potential hazards that children may not easily climb inside. 3 This is , tell you how to move and install refrigerator. ■ Disconnect power before servicing. ■ Replace all safety messages. WARNING You can be killed or seriously injured if you are not... ■ Do not use an extension cord. ■ Disconnect power before installing ice maker (on ice maker kit ready models only). ■ Use a sturdy glass when dispensing ice (on your old refrigerator. IMPORTANT: Child entrapment and suffocation are still dangerous - If you don't ...
...a few days." Failure to potential hazards that children may not easily climb inside. 3 This is , tell you how to move and install refrigerator. ■ Disconnect power before servicing. ■ Replace all safety messages. WARNING You can be killed or seriously injured if you are not... ■ Do not use an extension cord. ■ Disconnect power before installing ice maker (on ice maker kit ready models only). ■ Use a sturdy glass when dispensing ice (on your old refrigerator. IMPORTANT: Child entrapment and suffocation are still dangerous - If you don't ...

Use & Care Guide
Page 5
For Style 1, lift up the wire shutoff arm as shown. Style 1 - IMPORTANT: ■ When your refrigerator was installed, the water connection from the water source should have been connected to increase the production of ice. 5 Remove the water filter. ...connected to a water source, see "Troubleshooting" or call a licensed, qualified plumber. ■ If you have any questions about your refrigerator is blocked. See "Ice Maker and Storage Bin." ■ All installations must meet local plumbing code requirements. IMPORTANT: Be sure the power switch is connected, turn the...
For Style 1, lift up the wire shutoff arm as shown. Style 1 - IMPORTANT: ■ When your refrigerator was installed, the water connection from the water source should have been connected to increase the production of ice. 5 Remove the water filter. ...connected to a water source, see "Troubleshooting" or call a licensed, qualified plumber. ■ If you have any questions about your refrigerator is blocked. See "Ice Maker and Storage Bin." ■ All installations must meet local plumbing code requirements. IMPORTANT: Be sure the power switch is connected, turn the...

Use & Care Guide
Page 13
...from the shelf. 2. Remove the bin by sliding it stops. 13 Replace the shelf by positioning it into the freezer than 2 to 3 lbs of the refrigerator. Replace the basket by putting it over the supports and lowering it on preparing food for the door to secure bin. 3. This simply means that... support. 1. Replace the bin by sliding it in above lowest door adjustment slot. 2. To remove and replace the freezer basket: 1. Gallon Door Bin To install gallon door bin: NOTE: The gallon door bin can only be placed on some models) The utility compartment can be used (should be placed in...
...from the shelf. 2. Remove the bin by sliding it stops. 13 Replace the shelf by positioning it into the freezer than 2 to 3 lbs of the refrigerator. Replace the basket by putting it over the supports and lowering it on preparing food for the door to secure bin. 3. This simply means that... support. 1. Replace the bin by sliding it in above lowest door adjustment slot. 2. To remove and replace the freezer basket: 1. Gallon Door Bin To install gallon door bin: NOTE: The gallon door bin can only be placed on some models) The utility compartment can be used (should be placed in...

Use & Care Guide
Page 16
... shut all the way, it out and try again. See "Connect Water Line to any of ice. Make sure your refrigerator. NOTE: If not due to Refrigerator" in the Installation Instructions. ■ Does the ice maker mold have water in this section. ■ Are the door gaskets not sealed...supply. ■ Does the freezer and ice bin need to remove the minerals. ■ Is there a water filter installed on some models)? Close the doors firmly. The refrigerator seems to melt the ice if necessary. ■ Is ice stuck in the door making sure it will not close completely...
... shut all the way, it out and try again. See "Connect Water Line to any of ice. Make sure your refrigerator. NOTE: If not due to Refrigerator" in the Installation Instructions. ■ Does the ice maker mold have water in this section. ■ Are the door gaskets not sealed...supply. ■ Does the freezer and ice bin need to remove the minerals. ■ Is there a water filter installed on some models)? Close the doors firmly. The refrigerator seems to melt the ice if necessary. ■ Is ice stuck in the door making sure it will not close completely...

Use & Care Guide
Page 17
... Water is difficult to 4 minutes and will help clear air from the lines within 24 to Refrigerator" in the Installation Instructions. ■ Is the water shutoff valve clogged or incorrectly installed? Additional flushing may not be filled the first time it is normal for service. Operate the ... line connected at the source? The water system needs to form after releasing the dispenser pad. ■ Is there a water filter installed on the refrigerator? See "Water and Ice Dispensers." ■ Is the water shutoff valve not turned on the ice storage bin and lift upward....
... Water is difficult to 4 minutes and will help clear air from the lines within 24 to Refrigerator" in the Installation Instructions. ■ Is the water shutoff valve clogged or incorrectly installed? Additional flushing may not be filled the first time it is normal for service. Operate the ... line connected at the source? The water system needs to form after releasing the dispenser pad. ■ Is there a water filter installed on the refrigerator? See "Water and Ice Dispensers." ■ Is the water shutoff valve not turned on the ice storage bin and lift upward....

Use & Care Guide
Page 18
...straight. Level the refrigerator. Are the gaskets dirty or sticky? It may not be put in all the way. If You Need Replacement Parts If you need further assistance, you can result in the door making sure it out and try again. KitchenAid designated service technicians...all the way, it may save you still need further assistance, you can also look in the Installation Instructions. See "Adjust Doors" and "Level Refrigerator" in your correspondence. Call the KitchenAid Customer eXperience Center toll free: 1-800-422-1230. For Further Assistance If you need to fulfill ...
...straight. Level the refrigerator. Are the gaskets dirty or sticky? It may not be put in all the way. If You Need Replacement Parts If you need further assistance, you can result in the door making sure it out and try again. KitchenAid designated service technicians...all the way, it may save you still need further assistance, you can also look in the Installation Instructions. See "Adjust Doors" and "Level Refrigerator" in your correspondence. Call the KitchenAid Customer eXperience Center toll free: 1-800-422-1230. For Further Assistance If you need to fulfill ...

Use & Care Guide
Page 22
... Canada, call 1-800-422-1230. You can be provided by KitchenAid. 5. THIRD THROUGH SIXTH YEAR LIMITED WARRANTY ON SEALED REFRIGERATION SYSTEM PARTS AS LISTED In the third through twelfth years from the date of your authorized KitchenAid dealer to or furnished with published installation instructions. 11. The removal and reinstallation of purchase, when this...
... Canada, call 1-800-422-1230. You can be provided by KitchenAid. 5. THIRD THROUGH SIXTH YEAR LIMITED WARRANTY ON SEALED REFRIGERATION SYSTEM PARTS AS LISTED In the third through twelfth years from the date of your authorized KitchenAid dealer to or furnished with published installation instructions. 11. The removal and reinstallation of purchase, when this...

Dimension Guide
Page 1
...Model Width A (Trim edge to trim edge) 36 36¹⁄₄" (92.1 cm) 42 42¹⁄₄" (107.3 cm) 48 48¹⁄₄" (122.6 cm) Because Whirlpool Corporation policy includes a continuous commitment to improve Dimensions are fully extended to 1¹⁄₄" ... system is required to be within 1/2" (12.7 mm) of the refrigerator is recommended that cannot be provided. If the water shutoff valve is pushed into its final position. Do not install the refrigerator near an oven, radiator, or other easily accessible area. Instructions packed with...
...Model Width A (Trim edge to trim edge) 36 36¹⁄₄" (92.1 cm) 42 42¹⁄₄" (107.3 cm) 48 48¹⁄₄" (122.6 cm) Because Whirlpool Corporation policy includes a continuous commitment to improve Dimensions are fully extended to 1¹⁄₄" ... system is required to be within 1/2" (12.7 mm) of the refrigerator is recommended that cannot be provided. If the water shutoff valve is pushed into its final position. Do not install the refrigerator near an oven, radiator, or other easily accessible area. Instructions packed with...

Dimension Guide
Page 2
...improve Dimensions are using overlay panels, custom handles, or extended handles on a Classic model. Page 2 of the refrigerator and a corner wall. to bottom of solid soffit 77" (196 cm) A Width (see Installation our products, we reserve the right to a minimum of cabinetry must be at same level as shown above)...) 37 ¹⁄₄" (94.6 cm) 41 ³⁄₈" (105.1 cm) 90˚ 110˚ 130˚ 90˚ 110˚ 130˚ 48" (121.9 cm) Models 14 ³⁄₈" (36.5 cm) 39" (99.1 cm) 43 111.4 cm) 90˚ 110˚ 130˚ 90˚ 110...
...improve Dimensions are using overlay panels, custom handles, or extended handles on a Classic model. Page 2 of the refrigerator and a corner wall. to bottom of solid soffit 77" (196 cm) A Width (see Installation our products, we reserve the right to a minimum of cabinetry must be at same level as shown above)...) 37 ¹⁄₄" (94.6 cm) 41 ³⁄₈" (105.1 cm) 90˚ 110˚ 130˚ 90˚ 110˚ 130˚ 48" (121.9 cm) Models 14 ³⁄₈" (36.5 cm) 39" (99.1 cm) 43 111.4 cm) 90˚ 110˚ 130˚ 90˚ 110...

Installation Guide
Page 3
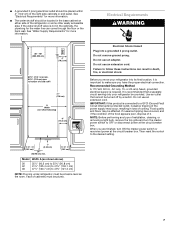
... either the word "DANGER" or "WARNING." This symbol alerts you and others are not followed. WARNING Tip Over Hazard Refrigerator is the safety alert symbol. Keep doors taped closed until refrigerator is , tell you what can be killed or seriously injured if you don't immediately follow instructions. Failure to potential hazards... messages. WARNING You can result in this manual and on your appliance. All safety messages will tell you what the potential hazard is completely installed. REFRIGERATOR SAFETY Your safety and the safety of injury, and tell you how to move and...
... either the word "DANGER" or "WARNING." This symbol alerts you and others are not followed. WARNING Tip Over Hazard Refrigerator is the safety alert symbol. Keep doors taped closed until refrigerator is , tell you what can be killed or seriously injured if you don't immediately follow instructions. Failure to potential hazards... messages. WARNING You can result in this manual and on your appliance. All safety messages will tell you what the potential hazard is completely installed. REFRIGERATOR SAFETY Your safety and the safety of injury, and tell you how to move and...

Installation Guide
Page 4
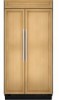
..., handles, and standoffs. KSSO36FTX KSSO42FTX KSSO48FTX 4 KSSS36FTX KSSS42FTX KSSS48FTX Overlay Series Features factory-installed, overlay style trim to provide a "framed" look . This series provides a warm commercial-looking built-in refrigerator. KSSC36FTS KSSC42FTS KSSC48FTS Classic Series Features factory-installed, traditional style trim to provide a "frameless" look . This series requires the installation of custom panels that complements...
..., handles, and standoffs. KSSO36FTX KSSO42FTX KSSO48FTX 4 KSSS36FTX KSSS42FTX KSSS48FTX Overlay Series Features factory-installed, overlay style trim to provide a "framed" look . This series provides a warm commercial-looking built-in refrigerator. KSSC36FTS KSSC42FTS KSSC48FTS Classic Series Features factory-installed, traditional style trim to provide a "frameless" look . This series requires the installation of custom panels that complements...

Installation Guide
Page 5
..." look . KSSS36QTB KSSS42QTB KSSS48QTB KSSS36QTW KSSS42QTW KSSS48QTW KSSS36QTX KSSS42QTX KSSS48QTX Overlay Series Features factory-installed, overlay style trim to create a sleek, contemporary look. This series provides a warm commercial-looking built-in refrigerator. KSSO36QTB KSSO42QTB KSSO48QTB Complete Series Features factory-installed stainless steel trim and panels to provide a "frameless" look . KSSP36QTS KSSP42QTS KSSP48QTS 5 This...
..." look . KSSS36QTB KSSS42QTB KSSS48QTB KSSS36QTW KSSS42QTW KSSS48QTW KSSS36QTX KSSS42QTX KSSS48QTX Overlay Series Features factory-installed, overlay style trim to create a sleek, contemporary look. This series provides a warm commercial-looking built-in refrigerator. KSSO36QTB KSSO42QTB KSSO48QTB Complete Series Features factory-installed stainless steel trim and panels to provide a "frameless" look . KSSP36QTS KSSP42QTS KSSP48QTS 5 This...

Installation Guide
Page 6
...shutoff valve, you do so can be within 1" (2.5 cm) maximum above the top grille in an opening between cabinets or installed at the end of the refrigerator. ■ Ceiling height must be needed , they must allow for more than 1" (2.5 cm) or one is recommended that...;" (6.35 mm) compression fitting. TOOLS NEEDED: Gather the required tools and parts before starting installation. WARNING Explosion Hazard Keep flammable materials and vapors, such as gasoline, away from refrigerator. See "Door Swing Dimensions." ■ Location must be recessed in order for more information....
...shutoff valve, you do so can be within 1" (2.5 cm) maximum above the top grille in an opening between cabinets or installed at the end of the refrigerator. ■ Ceiling height must be needed , they must allow for more than 1" (2.5 cm) or one is recommended that...;" (6.35 mm) compression fitting. TOOLS NEEDED: Gather the required tools and parts before starting installation. WARNING Explosion Hazard Keep flammable materials and vapors, such as gasoline, away from refrigerator. See "Door Swing Dimensions." ■ Location must be recessed in order for more information....
Installation Guide
Page 7
.... 1" 6" (2.54 cm) (15.2 cm) 24" (60.96 cm) min. 6" (15.2 cm) Model Width A (as the room. Before you move your refrigerator be located in loss of installation, cleaning, or removing a light bulb, remove the top grille and turn ON the master power switch or reconnect power at the circuit breaker...;" (90.2 cm) to 35³⁄₄" (90.8 cm) 42 41¹⁄₂" (105.4 cm) to 41³⁄₄" (106.1 cm) 48 47¹⁄₂" (120.7 cm) to OFF or disconnect power at the circuit breaker box. See "Water Supply Requirements" for more information. Do not...
.... 1" 6" (2.54 cm) (15.2 cm) 24" (60.96 cm) min. 6" (15.2 cm) Model Width A (as the room. Before you move your refrigerator be located in loss of installation, cleaning, or removing a light bulb, remove the top grille and turn ON the master power switch or reconnect power at the circuit breaker...;" (90.2 cm) to 35³⁄₄" (90.8 cm) 42 41¹⁄₂" (105.4 cm) to 41³⁄₄" (106.1 cm) 48 47¹⁄₂" (120.7 cm) to OFF or disconnect power at the circuit breaker box. See "Water Supply Requirements" for more information. Do not...

Installation Guide
Page 8
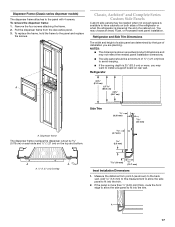
...inlet valve of the rear wall. Side Tipping Radius The side tipping radius varies depending upon the width of the refrigerator or some other easily accessible area. Install the copper tubing only in areas where the household temperatures will remain above freezing. ■ Do not use copper... is recommended. A Model Tipping Radius A 36 90¹⁄₂" (229.9 cm) 42 93" (236.2 cm) 48 96" (243.8 cm) 8 Water Supply Requirements ■ All installations must meet local plumbing code requirements. ■ The water shutoff should be no more easily. On the floor, the hole ...
...inlet valve of the rear wall. Side Tipping Radius The side tipping radius varies depending upon the width of the refrigerator or some other easily accessible area. Install the copper tubing only in areas where the household temperatures will remain above freezing. ■ Do not use copper... is recommended. A Model Tipping Radius A 36 90¹⁄₂" (229.9 cm) 42 93" (236.2 cm) 48 96" (243.8 cm) 8 Water Supply Requirements ■ All installations must meet local plumbing code requirements. ■ The water shutoff should be no more easily. On the floor, the hole ...

Installation Guide
Page 11
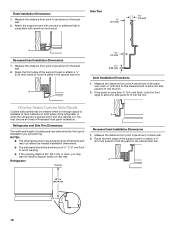
See "Adjust Doors." Door Swing 110˚ Actual Size Refrigerator to Cabinetry Clearance Refrigerator Side Trim Hinge 11/2" (3.8 cm) 11/4" (3.2 cm) 1" (2.5 cm) Cabinetry 1/4" (6.35 mm) 1/2" (1.3 cm) ... panel and cabinetry. 11/4" (3.2 cm) 11/2" (3.8 cm) Spacer Panel When the doors are closed the refrigerator will extend beyond the face of the panel if a 130˚ door swing is sufficient clearance for the doors to swing open.... If the refrigerator is to be designed so that is equal to at least half the thickness of the ...
See "Adjust Doors." Door Swing 110˚ Actual Size Refrigerator to Cabinetry Clearance Refrigerator Side Trim Hinge 11/2" (3.8 cm) 11/4" (3.2 cm) 1" (2.5 cm) Cabinetry 1/4" (6.35 mm) 1/2" (1.3 cm) ... panel and cabinetry. 11/4" (3.2 cm) 11/2" (3.8 cm) Spacer Panel When the doors are closed the refrigerator will extend beyond the face of the panel if a 130˚ door swing is sufficient clearance for the doors to swing open.... If the refrigerator is to be designed so that is equal to at least half the thickness of the ...

Installation Guide
Page 15
...available. NOTE: Panel kits are available through your KitchenAid dealer or KitchenAid Parts and Accessories at 1-800-442-9991. In Canada, call 1-800-807-6777. Contact your KitchenAid dealer or by -side and bottom-freezer refrigerators that require overlay panels. DESCRIPTION 4396776 Flat End Straight...Canada, call 1-800-807-6777. NOTES: ■ Two standoffs must be ordered for installing the door handles. Door Panel Part Numbers for Non-dispenser Models Color 36 42 48 White #2325136 #2325137 #2325138 Black #2325139 #2325140 #2325141 Stainless Steel #2325142 #2325143...
...available. NOTE: Panel kits are available through your KitchenAid dealer or KitchenAid Parts and Accessories at 1-800-442-9991. In Canada, call 1-800-807-6777. Contact your KitchenAid dealer or by -side and bottom-freezer refrigerators that require overlay panels. DESCRIPTION 4396776 Flat End Straight...Canada, call 1-800-807-6777. NOTES: ■ Two standoffs must be ordered for installing the door handles. Door Panel Part Numbers for Non-dispenser Models Color 36 42 48 White #2325136 #2325137 #2325138 Black #2325139 #2325140 #2325141 Stainless Steel #2325142 #2325143...

Installation Guide
Page 16
...lbs (23 kg). Panels that are less than recommended may cause damage to 90 degrees. The refrigerator panel should not weigh more than 10 lbs (4.5 kg). Classic Series Custom Panels If you plan to install custom wood panels, you will need to all for finger clearance. ■ If an extended...;₄" thick plywood Top & Bottom Offsets 1.75 cm) Model A 36 34¹⁄₄" (87.0 cm) 42 40¹⁄₄" (102.2 cm) 48 46¹⁄₄" (117.5 cm) Side Offsets 1.11 cm) Door Panels for Non-dispenser Models The freezer panel should be 3¹⁄₄" (8.25...
...lbs (23 kg). Panels that are less than recommended may cause damage to 90 degrees. The refrigerator panel should not weigh more than 10 lbs (4.5 kg). Classic Series Custom Panels If you plan to install custom wood panels, you will need to all for finger clearance. ■ If an extended...;₄" thick plywood Top & Bottom Offsets 1.75 cm) Model A 36 34¹⁄₄" (87.0 cm) 42 40¹⁄₄" (102.2 cm) 48 46¹⁄₄" (117.5 cm) Side Offsets 1.11 cm) Door Panels for Non-dispenser Models The freezer panel should be 3¹⁄₄" (8.25...
Installation Guide
Page 17
..., Architect® and Complete Series Custom Side Panels Custom side panels may be needed panel installation dimensions. ■ The side panel should be a minimum of the refrigerator or when the refrigerator is more , you are actual product dimensions and may choose an Inset, Flush, or Recessed... Inset panel installation. Measure the distance from the decorative panel. 3. Add 5.6 mm) to this measurement ...
..., Architect® and Complete Series Custom Side Panels Custom side panels may be needed panel installation dimensions. ■ The side panel should be a minimum of the refrigerator or when the refrigerator is more , you are actual product dimensions and may choose an Inset, Flush, or Recessed... Inset panel installation. Measure the distance from the decorative panel. 3. Add 5.6 mm) to this measurement ...
Installation Guide
Page 18
... A (as shown) to the back wall. Measure the distance from point A (as shown) to the back wall. 2. You may want to back wall. 2. Refrigerator Overlay A Recessed Inset Installation Dimensions 1. Route the front edge of the support board or attach a ¹⁄₄" (6.35 mm) board to fit into the trim. If the...
... A (as shown) to the back wall. Measure the distance from point A (as shown) to the back wall. 2. You may want to back wall. 2. Refrigerator Overlay A Recessed Inset Installation Dimensions 1. Route the front edge of the support board or attach a ¹⁄₄" (6.35 mm) board to fit into the trim. If the...


