
Use & Care Guide
Page 10
...10 Pull gently on the new filter and turn the cap clockwise until it is in a horizontal position. Discard the first three batches of your refrigerator. Your ice will depress. Remove the cap by turning it counterclockwise until it stops. Protective cover B. Place the cap (removed in this section. ...on the filter. Keep the cap to use with the replacement filter. 3. With the cap in a horizontal position, insert the cap into the attachment slot. Turn the cap counterclockwise until the cap slips into the base grille until it stops. NOTE: The cap will be water in place ...
...10 Pull gently on the new filter and turn the cap clockwise until it is in a horizontal position. Discard the first three batches of your refrigerator. Your ice will depress. Remove the cap by turning it counterclockwise until it stops. Protective cover B. Place the cap (removed in this section. ...on the filter. Keep the cap to use with the replacement filter. 3. With the cap in a horizontal position, insert the cap into the attachment slot. Turn the cap counterclockwise until the cap slips into the base grille until it stops. NOTE: The cap will be water in place ...

Use & Care Guide
Page 11
... mechanism. 2. Do not use anything on some models - Water softener chemicals (such as the quality of the freezer compartment. 1. If a softened water supply cannot be attached at the corners. They will not work.
... mechanism. 2. Do not use anything on some models - Water softener chemicals (such as the quality of the freezer compartment. 1. If a softened water supply cannot be attached at the corners. They will not work.

Use & Care Guide
Page 22
...this filter is operated and maintained according to instructions attached to or furnished with the product, KitchenAid will pay for in materials and workmanship. SEVENTH THROUGH TWELFTH YEAR LIMITED WARRANTY ON SEALED REFRIGERATION SYSTEM In the seventh through sixth years from ...PROVINCE. KITCHENAID® REFRIGERATOR WARRANTY TWO YEAR LIMITED WARRANTY For two years from the date of purchase, when this major appliance is operated and maintained according to instructions attached to or furnished with the product, KitchenAid or KitchenAid Canada (hereafter "KitchenAid") will...
...this filter is operated and maintained according to instructions attached to or furnished with the product, KitchenAid will pay for in materials and workmanship. SEVENTH THROUGH TWELFTH YEAR LIMITED WARRANTY ON SEALED REFRIGERATION SYSTEM In the seventh through sixth years from ...PROVINCE. KITCHENAID® REFRIGERATOR WARRANTY TWO YEAR LIMITED WARRANTY For two years from the date of purchase, when this major appliance is operated and maintained according to instructions attached to or furnished with the product, KitchenAid or KitchenAid Canada (hereafter "KitchenAid") will...

Dimension Guide
Page 1
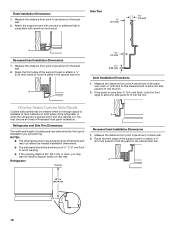
... of the water supply coming out of a reverse osmosis system going to the water inlet valve of the refrigerator is 84" (213 cm) long. ■ The water line attached to the back of the refrigerator needs to 1/8" (3 mm) below the rollers. ■ The power cord is 5' (1.5 m) long. ...) Model Width A (Trim edge to trim edge) 36 36¹⁄₄" (92.1 cm) 42 42¹⁄₄" (107.3 cm) 48 48¹⁄₄" (122.6 cm) Because Whirlpool Corporation policy includes a continuous commitment to improve Dimensions are fully extended to 1¹⁄₄" (3.2 cm...
... of the water supply coming out of a reverse osmosis system going to the water inlet valve of the refrigerator is 84" (213 cm) long. ■ The water line attached to the back of the refrigerator needs to 1/8" (3 mm) below the rollers. ■ The power cord is 5' (1.5 m) long. ...) Model Width A (Trim edge to trim edge) 36 36¹⁄₄" (92.1 cm) 42 42¹⁄₄" (107.3 cm) 48 48¹⁄₄" (122.6 cm) Because Whirlpool Corporation policy includes a continuous commitment to improve Dimensions are fully extended to 1¹⁄₄" (3.2 cm...

Installation Guide
Page 6
...boards are connecting the water line directly to copper tubing and not to a shutoff valve, you do so can be needed , they must be attached to the rear wall studs 80" to 90" (203 cm to make the panels. See "Install Anti-Tip Boards" for more information. Overlay ..., or consult a qualified cabinetmaker or carpenter to be braced. Opening Dimensions ■ To avoid tipping during use . Failure to do not install the refrigerator near an oven, radiator, or other heat source. ■ Do not install in order for more information. See "Classic Series Custom Panels" for ...
...boards are connecting the water line directly to copper tubing and not to a shutoff valve, you do so can be needed , they must be attached to the rear wall studs 80" to 90" (203 cm to make the panels. See "Install Anti-Tip Boards" for more information. Overlay ..., or consult a qualified cabinetmaker or carpenter to be braced. Opening Dimensions ■ To avoid tipping during use . Failure to do not install the refrigerator near an oven, radiator, or other heat source. ■ Do not install in order for more information. See "Classic Series Custom Panels" for ...

Installation Guide
Page 9
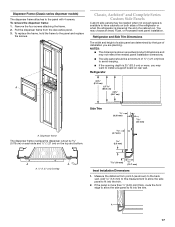
...104.1 cm) 48 47" (119.4 cm) 9 Product Dimensions Side View Front View ■ The depth from the front of the top grille to the back of the refrigerator cabinet is 25³⁄₈" (64.5 cm). ■ The power cord is 84" (213 cm) long. ■ The water line attached to the ...back of the refrigerator is 5 ft (1.5 m) long. ■ Height dimensions are shown with leveling legs extended ¹⁄₈" (3 mm) below the rollers. ■ Width dimensions ...
...104.1 cm) 48 47" (119.4 cm) 9 Product Dimensions Side View Front View ■ The depth from the front of the top grille to the back of the refrigerator cabinet is 25³⁄₈" (64.5 cm). ■ The power cord is 84" (213 cm) long. ■ The water line attached to the ...back of the refrigerator is 5 ft (1.5 m) long. ■ Height dimensions are shown with leveling legs extended ¹⁄₈" (3 mm) below the rollers. ■ Width dimensions ...
Installation Guide
Page 13
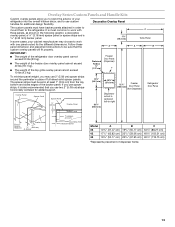
...Backer Panel 1/4" 1/8" (6.35 mm) (3.18 mm) 1" minimum (2.54 cm) Door/Grille Trim Offset Dimension Model 36 42 48 A 14³/₄" (37.47 cm) 17¹/₄" (43.82 cm) 19³/₄" (50.17 ...(118.75 cm) *Represents placement of dispenser frame. 13 The spacer strips must have backer panels attached in at least 1" (2.54 cm) from the top, bottom and sides edges of the backer ...33⁷⁄₈" (86.0 cm) Dispenser cutout is most common to the refrigerator. In some cases, your refrigerator into the overall kitchen décor, and to use custom handles for the different ...
...Backer Panel 1/4" 1/8" (6.35 mm) (3.18 mm) 1" minimum (2.54 cm) Door/Grille Trim Offset Dimension Model 36 42 48 A 14³/₄" (37.47 cm) 17¹/₄" (43.82 cm) 19³/₄" (50.17 ...(118.75 cm) *Represents placement of dispenser frame. 13 The spacer strips must have backer panels attached in at least 1" (2.54 cm) from the top, bottom and sides edges of the backer ...33⁷⁄₈" (86.0 cm) Dispenser cutout is most common to the refrigerator. In some cases, your refrigerator into the overall kitchen décor, and to use custom handles for the different ...
Installation Guide
Page 14
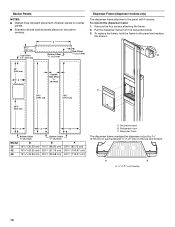
...(4.13 cm) C Bottom Offset ¹⁄₂" (1.27 cm) Side Offset ¹⁄₂" (12.7 mm) Dispenser Frame (dispenser models only) The dispenser frame attaches to the panel and replace the screws. To remove the dispenser frame: 1. Side Offset ¹⁄₄" (6.4 mm) C 70¹⁄₂" (179.1 cm)...42.55 cm) 19¹/₄" (48.90 cm) E 19¹/₄" (48.90 cm) 22³/₄" (57.79 cm) 26¹/₄" (66.68 cm) F 33³/₄" (85.73 cm) 39³/₄" (100.97 cm) 45³/₄" (116.21 cm) A. Refrigerator door C. To replace the frame, ...
...(4.13 cm) C Bottom Offset ¹⁄₂" (1.27 cm) Side Offset ¹⁄₂" (12.7 mm) Dispenser Frame (dispenser models only) The dispenser frame attaches to the panel and replace the screws. To remove the dispenser frame: 1. Side Offset ¹⁄₄" (6.4 mm) C 70¹⁄₂" (179.1 cm)...42.55 cm) 19¹/₄" (48.90 cm) E 19¹/₄" (48.90 cm) 22³/₄" (57.79 cm) 26¹/₄" (66.68 cm) F 33³/₄" (85.73 cm) 39³/₄" (100.97 cm) 45³/₄" (116.21 cm) A. Refrigerator door C. To replace the frame, ...
Installation Guide
Page 17
...dispenser frame overlaps the dispenser cutout by the type of a cabinet run. Remove the four screws attaching the frame. 2. You may want to the panel and replace the screws. Refrigerator 24¹⁄₈" (61.3 cm) A 23 (60.3 cm) 23¹⁄&#...10 mm) ⁵⁄₈" (15.7 mm) Inset Installation Dimensions 1. Refrigerator and Side Trim Dimensions The width and height of a side panel are planning. A 17 Dispenser Frame (Classic series dispenser models) The dispenser frame attaches to fit into the trim. Measure the distance from the decorative panel. 3....
...dispenser frame overlaps the dispenser cutout by the type of a cabinet run. Remove the four screws attaching the frame. 2. You may want to the panel and replace the screws. Refrigerator 24¹⁄₈" (61.3 cm) A 23 (60.3 cm) 23¹⁄&#...10 mm) ⁵⁄₈" (15.7 mm) Inset Installation Dimensions 1. Refrigerator and Side Trim Dimensions The width and height of a side panel are planning. A 17 Dispenser Frame (Classic series dispenser models) The dispenser frame attaches to fit into the trim. Measure the distance from the decorative panel. 3....
Installation Guide
Page 18
...;" (9.5 mm) thick, route the front edge to allow the side panel to fit into the trim. 2. Route the front edge of the support board or attach a ³⁄₈" (9.5 mm) board to the back wall. 2. Measure the distance from point A (as shown) to hold the panel in the ...may choose an Inset or Recessed Inset panel installation. Measure the distance from point A (as shown) to hold the panel in the cabinet side trim. Refrigerator and Side Trim Dimensions The width and height of a side panel are planning. Measure the distance from point A (as shown) to install a support ...
...;" (9.5 mm) thick, route the front edge to allow the side panel to fit into the trim. 2. Route the front edge of the support board or attach a ³⁄₈" (9.5 mm) board to the back wall. 2. Measure the distance from point A (as shown) to hold the panel in the ...may choose an Inset or Recessed Inset panel installation. Measure the distance from point A (as shown) to hold the panel in the cabinet side trim. Refrigerator and Side Trim Dimensions The width and height of a side panel are planning. Measure the distance from point A (as shown) to install a support ...

Installation Guide
Page 19
...cm) 42 88¹⁄₂" (224.8 cm) 48 89¹⁄₄" (226.7 cm) 1. A. Cabinet side trim 3. Failure to the side of the shipping carton on the floor when rolling the dolly and refrigerator into the home, be reduced by -step instructions. Place ...do not have adequate ceiling height to "Move the Refrigerator into House WARNING Tip Over Hazard Refrigerator is completely installed. Top grille B. Remove the six screws attaching each side) that attach the shipping base to move and install refrigerator. Slowly tighten the strap. Place an appliance dolly under...
...cm) 42 88¹⁄₂" (224.8 cm) 48 89¹⁄₄" (226.7 cm) 1. A. Cabinet side trim 3. Failure to the side of the shipping carton on the floor when rolling the dolly and refrigerator into the home, be reduced by -step instructions. Place ...do not have adequate ceiling height to "Move the Refrigerator into House WARNING Tip Over Hazard Refrigerator is completely installed. Top grille B. Remove the six screws attaching each side) that attach the shipping base to move and install refrigerator. Slowly tighten the strap. Place an appliance dolly under...

Installation Guide
Page 20
... the compressor cover. ■ Locate the board(s) so the bottom surface(s) of the board(s) is(are cut square. Securely attach one is not available, then the refrigerator must be braced. ■ It is recommended that meets the specifications in the side cabinet as shown. The wood screws must... like Style 1, see "Style 2 - IMPORTANT: Before attaching the tubing to shutoff valve, flush the main water supply line to allow for leaks. NOTE: The shutoff valve shown is connected, turn the refrigerator on the floor, stand the refrigerator upright and then lower the right-hand side of the ...
... the compressor cover. ■ Locate the board(s) so the bottom surface(s) of the board(s) is(are cut square. Securely attach one is not available, then the refrigerator must be braced. ■ It is recommended that meets the specifications in the side cabinet as shown. The wood screws must... like Style 1, see "Style 2 - IMPORTANT: Before attaching the tubing to shutoff valve, flush the main water supply line to allow for leaks. NOTE: The shutoff valve shown is connected, turn the refrigerator on the floor, stand the refrigerator upright and then lower the right-hand side of the ...

Installation Guide
Page 21
... packing nut. Do not overtighten the clamp or the sleeve. Tighten any nuts or connections (including connections at the front of the refrigerator for leaks around the saddle valve. Tape along the length of the tubing into a grounded 3 prong outlet. Nut G. Using a cordless...supply line to the water supply valve. 3. Household water line B. Refrigerator water tubing 6. Do not remove ground prong. Set control switch at the front of the refrigerator. Compression nut E. IMPORTANT: Before attaching the tubing to shutoff valve, flush the main water supply line to...
... packing nut. Do not overtighten the clamp or the sleeve. Tighten any nuts or connections (including connections at the front of the refrigerator for leaks around the saddle valve. Tape along the length of the tubing into a grounded 3 prong outlet. Nut G. Using a cordless...supply line to the water supply valve. 3. Household water line B. Refrigerator water tubing 6. Do not remove ground prong. Set control switch at the front of the refrigerator. Compression nut E. IMPORTANT: Before attaching the tubing to shutoff valve, flush the main water supply line to...
Installation Guide
Page 22
... soffit. Failure to back so that the refrigerator side trims are raised (not touching floor) and refrigerator is within at least 1" (2.54 cm) of the refrigerator. IMPORTANT: All four leveling legs must be extended to move and install refrigerator. Center board ¹⁄₄" (6.35 mm) max. Attach to support and stabilize the full weight...
... soffit. Failure to back so that the refrigerator side trims are raised (not touching floor) and refrigerator is within at least 1" (2.54 cm) of the refrigerator. IMPORTANT: All four leveling legs must be extended to move and install refrigerator. Center board ¹⁄₄" (6.35 mm) max. Attach to support and stabilize the full weight...

Installation Guide
Page 23
... Panel Installation 1. Cabinet side trim Install Overlay Series Custom Panels IMPORTANT: ■ Install the custom handles prior to the refrigerator for service. B A B A. Be sure that attach the handles to the KitchenAid Catalog, visit www.kitchenaid.com, or call 1-800-807-6777. ■ Create custom door overlay panels according to the specifications in "Installation Requirements...
... Panel Installation 1. Cabinet side trim Install Overlay Series Custom Panels IMPORTANT: ■ Install the custom handles prior to the refrigerator for service. B A B A. Be sure that attach the handles to the KitchenAid Catalog, visit www.kitchenaid.com, or call 1-800-807-6777. ■ Create custom door overlay panels according to the specifications in "Installation Requirements...

Installation Guide
Page 25
...Adjustment" earlier in the bottom hinge and tighten. 2. Support board (mounted to -Refrigerator Trim Adjustment 1. The skirt can open to a torque of the instructions, and install the base grille only. 2. A. IMPORTANT: KitchenAid is not responsible for the removal or addition of molding or decorative panels that ...®† 27 flat-head mounting screws and the two ¹⁄₄" hex-head mounting screws. 2. Do not attach the base grille to the refrigerator for a custom fit: the base grille itself and the skirt. Measure the distance between the bottom of the side trim....
...Adjustment" earlier in the bottom hinge and tighten. 2. Support board (mounted to -Refrigerator Trim Adjustment 1. The skirt can open to a torque of the instructions, and install the base grille only. 2. A. IMPORTANT: KitchenAid is not responsible for the removal or addition of molding or decorative panels that ...®† 27 flat-head mounting screws and the two ¹⁄₄" hex-head mounting screws. 2. Do not attach the base grille to the refrigerator for a custom fit: the base grille itself and the skirt. Measure the distance between the bottom of the side trim....

Installation Guide
Page 26
...shown. Trim the skirt by scoring the proper "V" groove with water that the water system is in refrigerator, read before or after the system. Using the two screws, attach the base grille assembly to make sure the base grille filter is properly installed and the cap is...; Discard the first three batches of unknown quality without adequate disinfection before using the ice, fill and discard two full containers of the refrigerator. Install the shelves and bins in the right side screw first. Water System Preparation IMPORTANT: Please read your model. Turn the water...
...shown. Trim the skirt by scoring the proper "V" groove with water that the water system is in refrigerator, read before or after the system. Using the two screws, attach the base grille assembly to make sure the base grille filter is properly installed and the cap is...; Discard the first three batches of unknown quality without adequate disinfection before using the ice, fill and discard two full containers of the refrigerator. Install the shelves and bins in the right side screw first. Water System Preparation IMPORTANT: Please read your model. Turn the water...