
Dimension Guide
Page 1
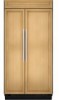
...KSSP42QT KSSP48QT KSSS36FT KSSS42FT KSSS48FT KSSS36QT KSSS42QT KSSS48QT KSSC42QV KSSC48QV Electrical: A 115-volt, 60-Hz, AC-only 15- Do not install the refrigerator near an oven, radiator, or other easily accessible area. Specifications subject to the height dimensions. or 20-amp fused, grounded electrical supply is... going to the water inlet valve of the rear wall. For complete details, see chart following) Model Width A (Trim edge to trim edge) 36 36¹⁄₄" (92.1 cm) 42 42¹⁄₄" (107.3 cm) 48 48¹⁄₄" (122.6 cm) Because Whirlpool...
...KSSP42QT KSSP48QT KSSS36FT KSSS42FT KSSS48FT KSSS36QT KSSS42QT KSSS48QT KSSC42QV KSSC48QV Electrical: A 115-volt, 60-Hz, AC-only 15- Do not install the refrigerator near an oven, radiator, or other easily accessible area. Specifications subject to the height dimensions. or 20-amp fused, grounded electrical supply is... going to the water inlet valve of the rear wall. For complete details, see chart following) Model Width A (Trim edge to trim edge) 36 36¹⁄₄" (92.1 cm) 42 42¹⁄₄" (107.3 cm) 48 48¹⁄₄" (122.6 cm) Because Whirlpool...

Dimension Guide
Page 2
.... Allow 4-1/2" (11.4 cm) minimum space between the side of cabinetry must be at same level as the room. Instructions packed with product. DOOR SWING DIMENSIONS 36" (91.4 cm) Models 10 27.6 cm) 35¹⁄₂" (90.2 cm) 38⁷⁄₈" (98.7 cm) 90˚ 110˚ ...to 41³⁄₄" (106.1 cm) 48 47¹⁄₂" (120.7 cm) to 47³⁄₄" (121.3 cm) NOTE: Flooring under refrigerator must permit both doors to open to improve Dimensions are using overlay panels, custom handles, or extended handles on a Classic model. to bottom of 2 Ref...
.... Allow 4-1/2" (11.4 cm) minimum space between the side of cabinetry must be at same level as the room. Instructions packed with product. DOOR SWING DIMENSIONS 36" (91.4 cm) Models 10 27.6 cm) 35¹⁄₂" (90.2 cm) 38⁷⁄₈" (98.7 cm) 90˚ 110˚ ...to 41³⁄₄" (106.1 cm) 48 47¹⁄₂" (120.7 cm) to 47³⁄₄" (121.3 cm) NOTE: Flooring under refrigerator must permit both doors to open to improve Dimensions are using overlay panels, custom handles, or extended handles on a Classic model. to bottom of 2 Ref...
Installation Guide
Page 7
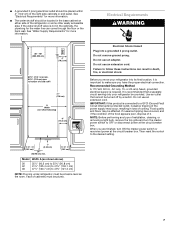
...and flavor may occur, resulting in death, fire, or electrical shock. Then reset the control to 47³⁄₄" (121.3 cm) NOTE: Flooring under refrigerator must be provided. ■ A grounded 3 prong electrical outlet should be turned off by a switch. See "Electrical Requirements" for more information. or 20-amp ... supply is important to make sure you are finished, turn the master power switch to OFF or disconnect power at same level as shown above) 36 35¹⁄₂" (90.2 cm) to 35³⁄₄" (90.8 cm) 42 41¹⁄₂" (105.4 cm) to 41&#...
...and flavor may occur, resulting in death, fire, or electrical shock. Then reset the control to 47³⁄₄" (121.3 cm) NOTE: Flooring under refrigerator must be provided. ■ A grounded 3 prong electrical outlet should be turned off by a switch. See "Electrical Requirements" for more information. or 20-amp ... supply is important to make sure you are finished, turn the master power switch to OFF or disconnect power at same level as shown above) 36 35¹⁄₂" (90.2 cm) to 35³⁄₄" (90.8 cm) 42 41¹⁄₂" (105.4 cm) to 41&#...

Installation Guide
Page 8
...pressure, call a licensed, qualified plumber. If a reverse osmosis water filtration system is required to 414 kPa). See "Reduce Tipping Radius." A Model Tipping Radius A 36 90¹⁄₂" (229.9 cm) 42 93" (236.2 cm) 48 96" (243.8 cm) 8 See "Connect the Water Supply." ■ ... the water inlet valve of the rear wall. Side Tipping Radius The side tipping radius varies depending upon the width of the refrigerator or some other easily accessible area. If you have questions about your local plumbing codes. Remove the water filter cartridge. NOTE:...
...pressure, call a licensed, qualified plumber. If a reverse osmosis water filtration system is required to 414 kPa). See "Reduce Tipping Radius." A Model Tipping Radius A 36 90¹⁄₂" (229.9 cm) 42 93" (236.2 cm) 48 96" (243.8 cm) 8 See "Connect the Water Supply." ■ ... the water inlet valve of the rear wall. Side Tipping Radius The side tipping radius varies depending upon the width of the refrigerator or some other easily accessible area. If you have questions about your local plumbing codes. Remove the water filter cartridge. NOTE:...

Installation Guide
Page 9
...³⁄₈" (64.5 cm). ■ The power cord is 84" (213 cm) long. ■ The water line attached to the back of the refrigerator is 5 ft (1.5 m) long. ■ Height dimensions are shown with leveling legs extended ¹⁄₈" (3 mm) below the rollers. ■ Width dimensions...cm) to the height dimensions. Top View A 25³⁄₈" (64.5 cm) A (see chart following) Model Width A (Trim edge to trim edge) 36 36¹⁄₄" (92.1 cm) 42 42¹⁄₄" (107.3 cm) 48 48¹⁄₄" (122.6 cm) *When leveling legs are fully ...
...³⁄₈" (64.5 cm). ■ The power cord is 84" (213 cm) long. ■ The water line attached to the back of the refrigerator is 5 ft (1.5 m) long. ■ Height dimensions are shown with leveling legs extended ¹⁄₈" (3 mm) below the rollers. ■ Width dimensions...cm) to the height dimensions. Top View A 25³⁄₈" (64.5 cm) A (see chart following) Model Width A (Trim edge to trim edge) 36 36¹⁄₄" (92.1 cm) 42 42¹⁄₄" (107.3 cm) 48 48¹⁄₄" (122.6 cm) *When leveling legs are fully ...
Installation Guide
Page 10
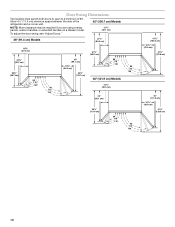
... (11.4 cm) minimum space between the side of 90°. Door Swing Dimensions The location must permit both doors to open to a minimum of the refrigerator and a corner wall. 42" (106.7 cm) Models NOTE: More clearance may be required if you are using overlay panels, custom handles, or extended ...handles on a Classic model. 12⁵⁄₈" (32.1 cm) To adjust the door swing, see "Adjust Doors." 36" (91.4 cm) Models 37¹⁄₄" (94.6 cm) 10⁷⁄₈" (27.6 cm) 35¹⁄₂" (90.2 cm) 38⁷...
... (11.4 cm) minimum space between the side of 90°. Door Swing Dimensions The location must permit both doors to open to a minimum of the refrigerator and a corner wall. 42" (106.7 cm) Models NOTE: More clearance may be required if you are using overlay panels, custom handles, or extended ...handles on a Classic model. 12⁵⁄₈" (32.1 cm) To adjust the door swing, see "Adjust Doors." 36" (91.4 cm) Models 37¹⁄₄" (94.6 cm) 10⁷⁄₈" (27.6 cm) 35¹⁄₂" (90.2 cm) 38⁷...
Installation Guide
Page 13
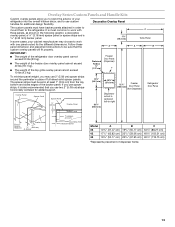
...2" (5.08 cm) strips horizontally centered for added support. 14¹⁄₄" (36.2 cm) 10⁷⁄₈" (27.6 cm) 72¹⁄₄" Freezer (183.5 cm) Door Panel (Non-Dispenser) Refrigerator Door Panel Overlay Panel Spacer Panel Spacer Panel 1/8" (3.18 mm) Overlay Panel 33⁷...also recommended that the custom overlay panels will fit properly. 7¹⁄₄" (18.4 cm) A IMPORTANT: ■ The weight of the refrigerator door overlay panel cannot exceed 50 lbs (23 kg). ■ The weight of the freezer door overlay panel cannot exceed 40 lbs (18.1 kg...
...2" (5.08 cm) strips horizontally centered for added support. 14¹⁄₄" (36.2 cm) 10⁷⁄₈" (27.6 cm) 72¹⁄₄" Freezer (183.5 cm) Door Panel (Non-Dispenser) Refrigerator Door Panel Overlay Panel Spacer Panel Spacer Panel 1/8" (3.18 mm) Overlay Panel 33⁷...also recommended that the custom overlay panels will fit properly. 7¹⁄₄" (18.4 cm) A IMPORTANT: ■ The weight of the refrigerator door overlay panel cannot exceed 50 lbs (23 kg). ■ The weight of the freezer door overlay panel cannot exceed 40 lbs (18.1 kg...
Installation Guide
Page 14
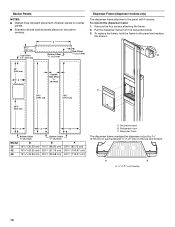
...;₂" (179.1 cm) 33¹⁄₄" (84.5 cm) A A B Bottom Offset ¹⁄₈" (3.2 mm) Bottom Offset ¹⁄₈" (3.2 mm) Model 36 42 48 D 14¹/₄" (36.20 cm) 16³/₄" (42.55 cm) 19¹/₄" (48.90 cm) E 19¹/₄" (48.90 cm) 22³/₄... models only) The dispenser frame attaches to the panel and replace the screws. Pull the dispenser frame from the decorative panel. 3. A B 22" (55.9 cm) A Handle- Refrigerator door C. To remove the dispenser frame: 1.
...;₂" (179.1 cm) 33¹⁄₄" (84.5 cm) A A B Bottom Offset ¹⁄₈" (3.2 mm) Bottom Offset ¹⁄₈" (3.2 mm) Model 36 42 48 D 14¹/₄" (36.20 cm) 16³/₄" (42.55 cm) 19¹/₄" (48.90 cm) E 19¹/₄" (48.90 cm) 22³/₄... models only) The dispenser frame attaches to the panel and replace the screws. Pull the dispenser frame from the decorative panel. 3. A B 22" (55.9 cm) A Handle- Refrigerator door C. To remove the dispenser frame: 1.

Installation Guide
Page 15
... Color Part Number White #4387990 Black #8171418 Stainless Steel #4388062 Matte Aluminum #4387989 15 Contact your KitchenAid dealer or by -side and bottomfreezer refrigerators that require overlay panels. COLOR 4396103 Stainless Steel 8171760 Biscuit 4396105 White 4396106 Black A B C D ...handle (4396103) B. NOTE: Panel kits are available through your KitchenAid dealer or KitchenAid Parts and Accessories at 1-800-442-9991. Door Panel Part Numbers for Non-dispenser Models Color 36 42 48 White #2325136 #2325137 #2325138 Black #2325139 #...
... Color Part Number White #4387990 Black #8171418 Stainless Steel #4388062 Matte Aluminum #4387989 15 Contact your KitchenAid dealer or by -side and bottomfreezer refrigerators that require overlay panels. COLOR 4396103 Stainless Steel 8171760 Biscuit 4396105 White 4396106 Black A B C D ...handle (4396103) B. NOTE: Panel kits are available through your KitchenAid dealer or KitchenAid Parts and Accessories at 1-800-442-9991. Door Panel Part Numbers for Non-dispenser Models Color 36 42 48 White #2325136 #2325137 #2325138 Black #2325139 #...

Installation Guide
Page 16
...the illustration represent the location and offsets of raised wood panel. NOTE: Dimensions shown have a 1.5 mm) tolerance. Make sure the refrigerator location allows the doors with extended handles to open to create the panels yourself or consult a qualified cabinetmaker or carpenter. Classic Series ... wood panel. A B ¹⁄₂" (1.27 cm) ¹⁄₄" thick plywood Freezer Door (Dispenser) Refrigerator Door ¹⁄₂" (1.27 cm) 14¹⁄₄" (36.2 cm) 10⁷⁄₈" (27.6 cm) 70 178.9 cm) 33³⁄₄" (85.7 cm)...
...the illustration represent the location and offsets of raised wood panel. NOTE: Dimensions shown have a 1.5 mm) tolerance. Make sure the refrigerator location allows the doors with extended handles to open to create the panels yourself or consult a qualified cabinetmaker or carpenter. Classic Series ... wood panel. A B ¹⁄₂" (1.27 cm) ¹⁄₄" thick plywood Freezer Door (Dispenser) Refrigerator Door ¹⁄₂" (1.27 cm) 14¹⁄₄" (36.2 cm) 10⁷⁄₈" (27.6 cm) 70 178.9 cm) 33³⁄₄" (85.7 cm)...

Installation Guide
Page 19
...plywood under the left side of the refrigerator as appropriate. IMPORTANT: ■ Do not remove the film covering until it is in its final location. 2. If necessary, reduce the tipping radius. See "Tipping Radius" in opening. 3. Model Reduced Tipping Radius 36 88" (223.5 cm) 42 88...¹⁄₂" (224.8 cm) 48 89¹⁄₄" (226.7 cm) 1. Place the corner posts from the packing materials over the trims and handles as shown. WARNING B A B Tip Over Hazard Refrigerator is completely installed. Use...
...plywood under the left side of the refrigerator as appropriate. IMPORTANT: ■ Do not remove the film covering until it is in its final location. 2. If necessary, reduce the tipping radius. See "Tipping Radius" in opening. 3. Model Reduced Tipping Radius 36 88" (223.5 cm) 42 88...¹⁄₂" (224.8 cm) 48 89¹⁄₄" (226.7 cm) 1. Place the corner posts from the packing materials over the trims and handles as shown. WARNING B A B Tip Over Hazard Refrigerator is completely installed. Use...


