User Instructions
Page 1
...REFRIGERATOR SAFETY 1 SÉCURITÉ DU RÉFRIGÉRATEUR 17 INSTALLATION INSTRUCTIONS 2 INSTRUCTIONS D'INSTALLATION 18 REFRIGERATOR USE 5 UTILISATION DU RÉFRIGÉRATEUR 21 REFRIGERATOR...www.kitchenaid.com for purchasing this manual and on the right-hand side of the refrigerator ...serie en la etiqueta ubicada al lado derecho del interior del refrigerador. All safety messages will follow instructions. This symbol alerts you to potential hazards that can be killed or seriously injured if you still need your model and serial number located on your appliance...
...REFRIGERATOR SAFETY 1 SÉCURITÉ DU RÉFRIGÉRATEUR 17 INSTALLATION INSTRUCTIONS 2 INSTRUCTIONS D'INSTALLATION 18 REFRIGERATOR USE 5 UTILISATION DU RÉFRIGÉRATEUR 21 REFRIGERATOR...www.kitchenaid.com for purchasing this manual and on the right-hand side of the refrigerator ...serie en la etiqueta ubicada al lado derecho del interior del refrigerador. All safety messages will follow instructions. This symbol alerts you to potential hazards that can be killed or seriously injured if you still need your model and serial number located on your appliance...
User Instructions
Page 4
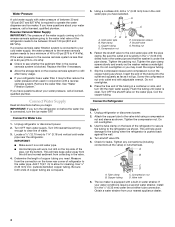
... is connected to your water pressure, call a licensed, qualified plumber. Add 7 ft (2.1 m) to 414 kPa). Compression nut D E. Shutoff valve G. Slip the compression sleeve and compression nut on the back of the refrigerator to secure the tubing to see whether the sediment filter in water strainer. Insert the...to be a minimum of 40 to 60 psi (276 to allow for leaks. Do not overtighten. 3. If you have questions about your nearest appliance dealer. 4 Connect Water Supply Read all directions before the water line is pushed back against the wall. 4. Obtain a water strainer from the...
... is connected to your water pressure, call a licensed, qualified plumber. Add 7 ft (2.1 m) to 414 kPa). Compression nut D E. Shutoff valve G. Slip the compression sleeve and compression nut on the back of the refrigerator to secure the tubing to see whether the sediment filter in water strainer. Insert the...to be a minimum of 40 to 60 psi (276 to allow for leaks. Do not overtighten. 3. If you have questions about your nearest appliance dealer. 4 Connect Water Supply Read all directions before the water line is pushed back against the wall. 4. Obtain a water strainer from the...
User Instructions
Page 16
... correct house wiring or plumbing. 2. Replacement parts or repair labor costs when the major appliance is operated and maintained according to instructions attached to or furnished with the product, KitchenAid will pay for replacement or repair of the refrigerator/freezer cavity liner (including labor costs) if the part cracks due to defective materials...
... correct house wiring or plumbing. 2. Replacement parts or repair labor costs when the major appliance is operated and maintained according to instructions attached to or furnished with the product, KitchenAid will pay for replacement or repair of the refrigerator/freezer cavity liner (including labor costs) if the part cracks due to defective materials...


