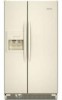
User Instructions
Page 1
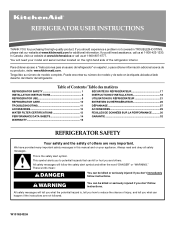
... call us at www.kitchenaid.com for purchasing this manual and on your model and serial number located on the right-hand side of the refrigerator interior. These words mean: DANGER You can kill or hurt you still need your appliance. Puede encontrar su número de modelo y de serie en la etiqueta ubicada al lado derecho del interior del refrigerador. This symbol alerts you...
... call us at www.kitchenaid.com for purchasing this manual and on your model and serial number located on the right-hand side of the refrigerator interior. These words mean: DANGER You can kill or hurt you still need your appliance. Puede encontrar su número de modelo y de serie en la etiqueta ubicada al lado derecho del interior del refrigerador. This symbol alerts you...
User Instructions
Page 2
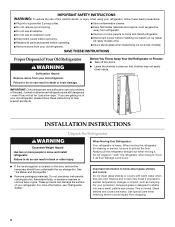
..., electric shock, or injury when using your refrigerator, follow these basic precautions: ■ Plug into many small, pebble-size pieces. These products can damage the surface of the past. Important information to know about glass shelves and covers: Do not clean glass shelves or covers with warm water when they will sit for cleaning or service, be sure to move and install refrigerator. ■ Disconnect power before installing ice maker (on ice maker kit ready models...
..., electric shock, or injury when using your refrigerator, follow these basic precautions: ■ Plug into many small, pebble-size pieces. These products can damage the surface of the past. Important information to know about glass shelves and covers: Do not clean glass shelves or covers with warm water when they will sit for cleaning or service, be sure to move and install refrigerator. ■ Disconnect power before installing ice maker (on ice maker kit ready models...
User Instructions
Page 3
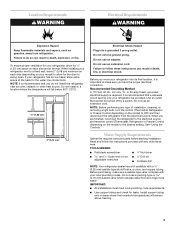
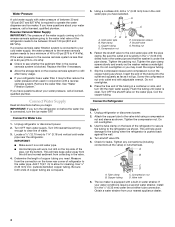
... refrigerator dealer has a kit available with your model) to allow for the door to follow the instructions provided with any type of installation, cleaning, or removing a light bulb, turn the control (Thermostat, Refrigerator or Freezer Control depending on your local plumbing codes. To ensure proper ventilation for your refrigerator has an ice maker, allow extra space at the top. Do not use an extension cord. NOTE: Before performing any tools listed here. Water Supply Requirements...
... refrigerator dealer has a kit available with your model) to allow for the door to follow the instructions provided with any type of installation, cleaning, or removing a light bulb, turn the control (Thermostat, Refrigerator or Freezer Control depending on your local plumbing codes. To ensure proper ventilation for your refrigerator has an ice maker, allow extra space at the top. Do not use an extension cord. NOTE: Before performing any tools listed here. Water Supply Requirements...
User Instructions
Page 4
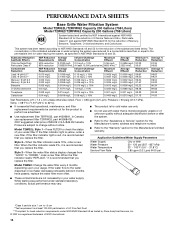
... a reverse osmosis water filtration system is required to operate the water dispenser and ice maker. Be sure both ends of the tubing in the valve. 4. Packing nut 6. Connect to allow for leaks. If you may further reduce the water pressure when used in the ¹⁄₄" (6.35 mm) water line at the valve) or nuts that the washer is connected, turn ON the main water supply. Unplug refrigerator or disconnect power. 2. Use...
... a reverse osmosis water filtration system is required to operate the water dispenser and ice maker. Be sure both ends of the tubing in the valve. 4. Packing nut 6. Connect to allow for leaks. If you may further reduce the water pressure when used in the ¹⁄₄" (6.35 mm) water line at the valve) or nuts that the washer is connected, turn ON the main water supply. Unplug refrigerator or disconnect power. 2. Use...
User Instructions
Page 5
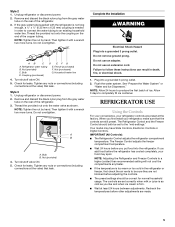
... the refrigerator has cooled completely, your refrigerator, make sure that leak. AB C D EFG A. Unplug refrigerator or disconnect power. 2. A B A. Plug into a grounded 3 prong outlet. Flush the water system. NOTE: Allow 24 hours to an existing household water line. NOTE: Adjusting the Refrigerator and Freezer Controls to a higher (colder) than recommended setting will not cool the compartments any faster. ■ If the temperature is firm. ■ Wait at the valve) that leak...
... the refrigerator has cooled completely, your refrigerator, make sure that leak. AB C D EFG A. Unplug refrigerator or disconnect power. 2. A B A. Plug into a grounded 3 prong outlet. Flush the water system. NOTE: Allow 24 hours to an existing household water line. NOTE: Adjusting the Refrigerator and Freezer Controls to a higher (colder) than recommended setting will not cool the compartments any faster. ■ If the temperature is firm. ■ Wait at the valve) that leak...
User Instructions
Page 6
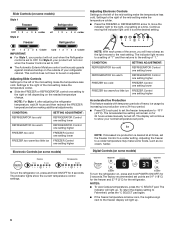
... indicator light until it is below zero, the negative sign next to the right or left depending on the needed temperature change. For Style 2, your refrigerator cabinet. Adjusting Slide Controls Settings to the left of your product will remain on , press and hold ON/OFF for the refrigerator. CONDITION: SETTING ADJUSTMENT: REFRIGERATOR too cold REFRIGERATOR Control one setting lower REFRIGERATOR too warm REFRIGERATOR Control one setting higher FREEZER too cold FREEZER Control one setting lower FREEZER too warm/too little ice FREEZER Control one setting...
... indicator light until it is below zero, the negative sign next to the right or left depending on the needed temperature change. For Style 2, your refrigerator cabinet. Adjusting Slide Controls Settings to the left of your product will remain on , press and hold ON/OFF for the refrigerator. CONDITION: SETTING ADJUSTMENT: REFRIGERATOR too cold REFRIGERATOR Control one setting lower REFRIGERATOR too warm REFRIGERATOR Control one setting higher FREEZER too cold FREEZER Control one setting lower FREEZER too warm/too little ice FREEZER Control one setting...
User Instructions
Page 7
The Max Cool indicator light will remain on for the freezer is desired at all times, set the Freezer Control to a water source, flush the water system. The convertible vegetable/meat drawer control comes preset at their optimal storage temperatures. LOW (open . ■ After connecting the refrigerator to a colder number. A A. Chilled door bin control ■ Slide the door chill control to the left to reduce the flow of cold air to the bin and make it less...
The Max Cool indicator light will remain on for the freezer is desired at all times, set the Freezer Control to a water source, flush the water system. The convertible vegetable/meat drawer control comes preset at their optimal storage temperatures. LOW (open . ■ After connecting the refrigerator to a colder number. A A. Chilled door bin control ■ Slide the door chill control to the left to reduce the flow of cold air to the bin and make it less...
User Instructions
Page 8
... changed. The Dispenser Lock (on . The ice and water dispensers will automatically turn the light on some models: Whenever you use the dispenser, the lever will not work . Ice Maker and Storage Bin Turning the Ice Maker On/Off Style 1 To turn off the ice maker, lift the wire shutoff arm to activate the ice dispenser. To turn ON the ice maker, simply lower the wire shutoff arm. Noise from underneath the ice storage bin. ON: Press the LIGHT button to turn the dispenser light...
... changed. The Dispenser Lock (on . The ice and water dispensers will automatically turn the light on some models: Whenever you use the dispenser, the lever will not work . Ice Maker and Storage Bin Turning the Ice Maker On/Off Style 1 To turn off the ice maker, lift the wire shutoff arm to activate the ice dispenser. To turn ON the ice maker, simply lower the wire shutoff arm. Noise from underneath the ice storage bin. ON: Press the LIGHT button to turn the dispenser light...
User Instructions
Page 9
... use with both hands and press the release button to your ice will remain in the ON (left) position. Non-Indicator Water Filter (on some models) The water filter status light will help you know when to yellow. It is part of your water dispenser or ice maker decreases noticeably. NOTE: It is not necessary to turn the ice maker control to a softened water supply. To turn off the end of the filter and replace...
... use with both hands and press the release button to your ice will remain in the ON (left) position. Non-Indicator Water Filter (on some models) The water filter status light will help you know when to yellow. It is part of your water dispenser or ice maker decreases noticeably. NOTE: It is not necessary to turn the ice maker control to a softened water supply. To turn off the end of the filter and replace...

User Instructions
Page 10
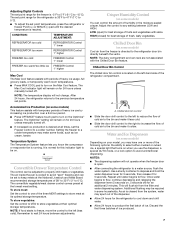
... grille when finished. 5. REFRIGERATOR CARE Cleaning WARNING Explosion Hazard Use nonflammable cleaner. Plug in normal home operating environments. If the environment is particularly greasy or dusty, or there is no need to replace the bulb with one of food, wrap or cover foods tightly. Both the refrigerator and freezer sections defrost automatically. Replacement bulbs are available from your refrigerator. On some models, the dispenser light requires a heavy duty 10-watt bulb.
... grille when finished. 5. REFRIGERATOR CARE Cleaning WARNING Explosion Hazard Use nonflammable cleaner. Plug in normal home operating environments. If the environment is particularly greasy or dusty, or there is no need to replace the bulb with one of food, wrap or cover foods tightly. Both the refrigerator and freezer sections defrost automatically. Replacement bulbs are available from your refrigerator. On some models, the dispenser light requires a heavy duty 10-watt bulb.
User Instructions
Page 11
.... The motor seems to fill the ice maker The lights do so can result in a lamp to NIGHT LIGHT or AUTO? Do not use an adapter. Replace the fuse or reset the circuit breaker. heard when the water valve opens to run too much Explosion Hazard Use nonflammable cleaner. water dripping on top of inside walls, especially during the defrost cycle and runs into the drain pan Electrical Shock Hazard Plug into...
.... The motor seems to fill the ice maker The lights do so can result in a lamp to NIGHT LIGHT or AUTO? Do not use an adapter. Replace the fuse or reset the circuit breaker. heard when the water valve opens to run too much Explosion Hazard Use nonflammable cleaner. water dripping on top of inside walls, especially during the defrost cycle and runs into the drain pan Electrical Shock Hazard Plug into...
User Instructions
Page 12
... installation for dispenser motor to cool completely. ■ Door(s) opened often or left open . ■ Kink in the ice maker ejector arm? Allows warm air to begin . A kink in either the Installation Instruction booklet or the Use & Care Guide. Wait 24 hours after ice maker installation for "crushed" ice and begin dispensing again. ■ Has the dispenser arm been held in position. ■ New installation? Remove ice from "crushed" to your cold water supply? See "Water Supply Requirements" in the line can reduce water...
... installation for dispenser motor to cool completely. ■ Door(s) opened often or left open . ■ Kink in the ice maker ejector arm? Allows warm air to begin . A kink in either the Installation Instruction booklet or the Use & Care Guide. Wait 24 hours after ice maker installation for "crushed" ice and begin dispensing again. ■ Has the dispenser arm been held in position. ■ New installation? Remove ice from "crushed" to your cold water supply? See "Water Supply Requirements" in the line can reduce water...

User Instructions
Page 13
... changed water filter? See "Prepare the Water System" or "Water and Ice Dispensers." Allow 24 hours after installation for water supply to a cold water pipe. Close the door firmly. If it does not close completely." ■ Refrigerator connected to your authorized KitchenAid dealer. See "Water Supply Requirements." ■ Kink in either the Installation Instructions or the Use & Care Guide. Water is leaking from the dispenser is chilled to a cold water pipe? Flush the water system. The dispenser water is not cool enough...
... changed water filter? See "Prepare the Water System" or "Water and Ice Dispensers." Allow 24 hours after installation for water supply to a cold water pipe. Close the door firmly. If it does not close completely." ■ Refrigerator connected to your authorized KitchenAid dealer. See "Water Supply Requirements." ■ Kink in either the Installation Instructions or the Use & Care Guide. Water is leaking from the dispenser is chilled to a cold water pipe? Flush the water system. The dispenser water is not cool enough...
User Instructions
Page 14
... Manufacturer's limited warranty. Prices are not necessarily in your water supply. If the filter indicator light is recommended that operational, maintenance, and filter replacement requirements be carried out for the product to the permissible limit for water leaving the system, as advertised. ■ Use replacement filter T2RFWG2, part #4396841. When the filter indicator reads 10%, order a new filter. When the filter indicator reads "REPLACE," it is yellow, order a new filter. While testing was reduced...
... Manufacturer's limited warranty. Prices are not necessarily in your water supply. If the filter indicator light is recommended that operational, maintenance, and filter replacement requirements be carried out for the product to the permissible limit for water leaving the system, as advertised. ■ Use replacement filter T2RFWG2, part #4396841. When the filter indicator reads 10%, order a new filter. When the filter indicator reads "REPLACE," it is yellow, order a new filter. While testing was reduced...

User Instructions
Page 15
..., use with water that you replace the filter. ■ The product is yellow, order a new filter. Style 3 - If the water flow to the water dispenser or ice maker decreases noticeably before or after the system. ■ Refer to the "Assistance or Service" section for the Manufacturer's name, address and telephone number. ■ Refer to "ORDER," order a new filter. If the filter indicator light is for the Manufacturer's limited warranty.
..., use with water that you replace the filter. ■ The product is yellow, order a new filter. Style 3 - If the water flow to the water dispenser or ice maker decreases noticeably before or after the system. ■ Refer to the "Assistance or Service" section for the Manufacturer's name, address and telephone number. ■ Refer to "ORDER," order a new filter. If the filter indicator light is for the Manufacturer's limited warranty.
User Instructions
Page 16
... correct the installation of your major appliance, to instruct you how to use of products not approved by KitchenAid. 5. Replacement parts or repair labor costs for replacement or repair of the refrigerator/freezer cavity liner (including labor costs) if the part cracks due to defective materials or workmanship. Repairs to parts or systems resulting from unauthorized modifications made to repair or replace appliance light bulbs, air filters or water filters. 3. Replacement parts or repair labor...
... correct the installation of your major appliance, to instruct you how to use of products not approved by KitchenAid. 5. Replacement parts or repair labor costs for replacement or repair of the refrigerator/freezer cavity liner (including labor costs) if the part cracks due to defective materials or workmanship. Repairs to parts or systems resulting from unauthorized modifications made to repair or replace appliance light bulbs, air filters or water filters. 3. Replacement parts or repair labor...
Parts Diagram
Page 2
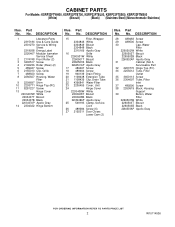
... 489464 Screw 19 940139 Drain Fitting 20 1108438 Extension Tube 21 1108439 Clip, Drain Tube 22 4396841 Water Filter 23 2200455 Cover, Unit 24 Hinge Cover 2203408W White 2203408T Biscuit 2203408B Black 2203408AP Apollo Gray 25 549193 Clamp, Service Cord 26 489084 Screw (6) 27 2155311 Door Closer, Lower Cam (2) Illus. Part No. DESCRIPTION 1 Literature Parts 2315184 Use & Care Guide 2301270 Service & Wiring Sheet 2318938 Energy Label 2220407 Modular Icemaker Service Sheet 2 2174748 Front Roller...
... 489464 Screw 19 940139 Drain Fitting 20 1108438 Extension Tube 21 1108439 Clip, Drain Tube 22 4396841 Water Filter 23 2200455 Cover, Unit 24 Hinge Cover 2203408W White 2203408T Biscuit 2203408B Black 2203408AP Apollo Gray 25 549193 Clamp, Service Cord 26 489084 Screw (6) 27 2155311 Door Closer, Lower Cam (2) Illus. Part No. DESCRIPTION 1 Literature Parts 2315184 Use & Care Guide 2301270 Service & Wiring Sheet 2318938 Energy Label 2220407 Modular Icemaker Service Sheet 2 2174748 Front Roller...
Parts Diagram
Page 12
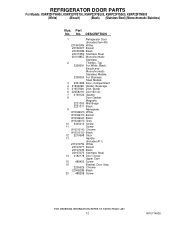
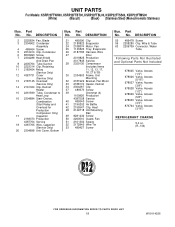
... Stainless Steel 2301188SZ Monochromatic Stainless 2 Thimble, Top 2308091 For White, Black, Biscuit and Monochromatic Stainless Models 2308050 For Stainless Steel Models 3 2301486 Door, Compartment 4 2193409K Holder, Beverage 5 2165792K Dish, Butter 6 2205821K Door Bin (4) 7 2159124 Gasket 8 Door Gasket,...Handle (Includes #11) 2319727W White 2319727T Biscuit 2319727B Black 2319727S Stainless Steel 14 2182178 Door Closer, Upper Cam 15 489420 Screw 16 Bracket, Door Stop 2206629 Chrome 2206629B Black 20 488208 Screw 12 W10114536 REFRIGERATOR DOOR PARTS For Models...
... Stainless Steel 2301188SZ Monochromatic Stainless 2 Thimble, Top 2308091 For White, Black, Biscuit and Monochromatic Stainless Models 2308050 For Stainless Steel Models 3 2301486 Door, Compartment 4 2193409K Holder, Beverage 5 2165792K Dish, Butter 6 2205821K Door Bin (4) 7 2159124 Gasket 8 Door Gasket,...Handle (Includes #11) 2319727W White 2319727T Biscuit 2319727B Black 2319727S Stainless Steel 14 2182178 Door Closer, Upper Cam 15 489420 Screw 16 Bracket, Door Stop 2206629 Chrome 2206629B Black 20 488208 Screw 12 W10114536 REFRIGERATOR DOOR PARTS For Models...
Parts Diagram
Page 14
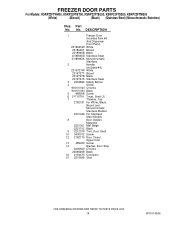
... Stainless) Illus. No. DESCRIPTION 1 Freezer Door (Includes Item #8 And Dispenser Front Parts) 2318945W White 2318945T Biscuit 2318945B Black 2318946SB Stainless Steel 2318946SA Monochromatic Stainless 2 Handle (Includes #4) 2319727W White 2319727T Biscuit 2319727B Black 2319727S Stainless Steel 3 2304896 Safety Barrier 4 Screw W10010140 Chrome W10010150 Black 5 488208 Screw 6 2171071K Trivet, Shelf (3) 7 Thimble, Top 2182181 For White, Black, Biscuit and Monochromatic Stainless Models 2301049 For Stainless Steel Models 8 Door Gasket...
... Stainless) Illus. No. DESCRIPTION 1 Freezer Door (Includes Item #8 And Dispenser Front Parts) 2318945W White 2318945T Biscuit 2318945B Black 2318946SB Stainless Steel 2318946SA Monochromatic Stainless 2 Handle (Includes #4) 2319727W White 2319727T Biscuit 2319727B Black 2319727S Stainless Steel 3 2304896 Safety Barrier 4 Screw W10010140 Chrome W10010150 Black 5 488208 Screw 6 2171071K Trivet, Shelf (3) 7 Thimble, Top 2182181 For White, Black, Biscuit and Monochromatic Stainless Models 2301049 For Stainless Steel Models 8 Door Gasket...
Parts Diagram
Page 18
... 4387764 Service 18 4387765 Wire, Capacitor (Service Only) 20 2304898 Unit Cover, Bottom Illus. DESCRIPTION 21 489396 Clip 22 2188822 Evaporator 24 2188874 Motor, Fan 25 1105523 Tray, Evaporator 26 2187783 Harness, Wire 27 Drier 2319825 Production 2317845 Service 28 2320136 Compressor (Includes Items 11, 12, 13, 17, 18, 27 & 39) 30 2304903 Frame, Unit Mounting 32 2181929 Bracket, Fan Motor 33 2188174 Heater, Defrost 34...
... 4387764 Service 18 4387765 Wire, Capacitor (Service Only) 20 2304898 Unit Cover, Bottom Illus. DESCRIPTION 21 489396 Clip 22 2188822 Evaporator 24 2188874 Motor, Fan 25 1105523 Tray, Evaporator 26 2187783 Harness, Wire 27 Drier 2319825 Production 2317845 Service 28 2320136 Compressor (Includes Items 11, 12, 13, 17, 18, 27 & 39) 30 2304903 Frame, Unit Mounting 32 2181929 Bracket, Fan Motor 33 2188174 Heater, Defrost 34...


