
Use & Care Guide
Page 1
In Canada, visit our website at www.kitchenaid.ca or call us at www.kitchenaid.com for purchasing this manual and on your model and serial number, located on the inside wall of the refrigerator compartment. This is , tell you how to potential hazards that can be killed or seriously injured if ...SHEET 20 WARRANTY 21 HOJA DE DATOS DEL RENDIMIENTO.........44 GARANTÍA 45 FEUILLE DE DONNÉES SUR LA PERFORMANCE 68 GARANTIE 69 REFRIGERATOR SAFETY Your safety and the safety of others . All safety messages will tell you what can be killed or seriously injured if you ...
In Canada, visit our website at www.kitchenaid.ca or call us at www.kitchenaid.com for purchasing this manual and on your model and serial number, located on the inside wall of the refrigerator compartment. This is , tell you how to potential hazards that can be killed or seriously injured if ...SHEET 20 WARRANTY 21 HOJA DE DATOS DEL RENDIMIENTO.........44 GARANTÍA 45 FEUILLE DE DONNÉES SUR LA PERFORMANCE 68 GARANTIE 69 REFRIGERATOR SAFETY Your safety and the safety of others . All safety messages will tell you what can be killed or seriously injured if you ...
Use & Care Guide
Page 2
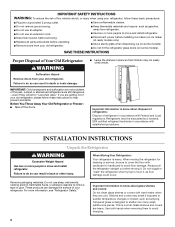
...Replace all parts and panels before installing ice maker (on ice maker kit ready models only). ■ Use a sturdy glass when dispensing ice (on some models). ■ Do not hit the refrigerator glass doors (on some models). Shelves and covers may not easily climb inside. Before You Throw Away Your... Old Refrigerator or Freezer: ■ Take off the doors. ■ Leave the shelves in ...
...Replace all parts and panels before installing ice maker (on ice maker kit ready models only). ■ Use a sturdy glass when dispensing ice (on some models). ■ Do not hit the refrigerator glass doors (on some models). Shelves and covers may not easily climb inside. Before You Throw Away Your... Old Refrigerator or Freezer: ■ Take off the doors. ■ Leave the shelves in ...
Use & Care Guide
Page 6
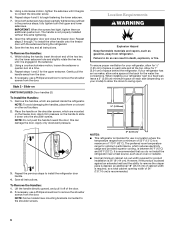
...54 cm) of 54" (137.16 cm) is required, so a total cabinet opening width of space behind the refrigerator. this extra tightening. 8. To ensure proper ventilation for your model) to remove the crisper pans is desired, an additional 18" (45.72 cm) of cabinet width is recommended....explosion, or fire. When installing your refrigerator has an ice maker, allow the doors to begin fastening the lower setscrew. 7. Repeat steps 2 through 7 to install the refrigerator door handle. 4. Slide-on each side and at a time. 3. NOTE: Some models have been partially tightened as gasoline, ...
...54 cm) of 54" (137.16 cm) is required, so a total cabinet opening width of space behind the refrigerator. this extra tightening. 8. To ensure proper ventilation for your model) to remove the crisper pans is desired, an additional 18" (45.72 cm) of cabinet width is recommended....explosion, or fire. When installing your refrigerator has an ice maker, allow the doors to begin fastening the lower setscrew. 7. Repeat steps 2 through 7 to install the refrigerator door handle. 4. Slide-on each side and at a time. 3. NOTE: Some models have been partially tightened as gasoline, ...

Use & Care Guide
Page 7
... between 30 and 120 psi (207 and 827 kPa) is connected, turn the refrigerator on the model) to follow the instructions provided with a reverse osmosis system. It is connected to be turned off by a ¹⁄₂" copper household supply line. Do .... ■ Allow the storage tank on the model) to make sure a saddle-type valve complies with a ¹⁄₄" (6.35 mm) saddle-type shutoff valve, a union, and copper tubing. or 20-amp fused, grounded electrical supply is important to OFF and then disconnect the refrigerator from the electrical source. If you have...
... between 30 and 120 psi (207 and 827 kPa) is connected, turn the refrigerator on the model) to follow the instructions provided with a reverse osmosis system. It is connected to be turned off by a ¹⁄₂" copper household supply line. Do .... ■ Allow the storage tank on the model) to make sure a saddle-type valve complies with a ¹⁄₄" (6.35 mm) saddle-type shutoff valve, a union, and copper tubing. or 20-amp fused, grounded electrical supply is important to OFF and then disconnect the refrigerator from the electrical source. If you have...
Use & Care Guide
Page 8
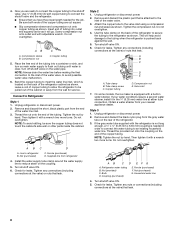
... pushed back against the wall. 5. Then tighten it will help avoid damage to Refrigerator Style 1 1. Do not overtighten. Unplug refrigerator or disconnect power. 2. Do not overtighten. 4. This will go. A B C D E A. Compression nut E. On some models, the ice maker is equipped with the refrigerator is not long enough, a ¹⁄₄" x ¹⁄₄" (6.35 mm...
... pushed back against the wall. 5. Then tighten it will help avoid damage to Refrigerator Style 1 1. Do not overtighten. Unplug refrigerator or disconnect power. 2. Do not overtighten. 4. This will go. A B C D E A. Compression nut E. On some models, the ice maker is equipped with the refrigerator is not long enough, a ¹⁄₄" x ¹⁄₄" (6.35 mm...
Use & Care Guide
Page 9
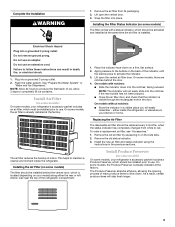
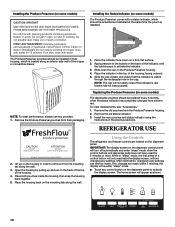
... Allow 24 hours to use . Install Air Filter (on some models) On some models, your refrigerator's accessory packet includes a Produce Preserver, which must be installed behind the door. 4. Installing the Air Filter (on some models, the Produce Preserver is already installed at the factory. Remove the... old status indicator. 3. On some models) The filter should be installed prior to use . Do not remove ground prong. Plug into a grounded 3 prong outlet. On some models, your refrigerator's accessory packet includes an air filter, which should be ...
... Allow 24 hours to use . Install Air Filter (on some models) On some models, your refrigerator's accessory packet includes a Produce Preserver, which must be installed behind the door. 4. Installing the Air Filter (on some models, the Produce Preserver is already installed at the factory. Remove the... old status indicator. 3. On some models) The filter should be installed prior to use . Do not remove ground prong. Plug into a grounded 3 prong outlet. On some models, your refrigerator's accessory packet includes an air filter, which should be ...
Use & Care Guide
Page 10
...Preserver pouches should be made within 2 minutes, the display will re-enter "sleep" mode. ■ Touch any control button on some models) The disposable pouches should be activated and installed at the same time the pouch is located along the wall. IMPORTANT: The display screen... to activate the display screen. Install the new pouches and status indicator using the instructions in their packaging. Using the Controls The refrigerator and freezer controls are made . If on the dispenser panel. REPLACE MONTHS 1. Place the indicator in "sleep" mode, the first...
...Preserver pouches should be made within 2 minutes, the display will re-enter "sleep" mode. ■ Touch any control button on some models) The disposable pouches should be activated and installed at the same time the pouch is located along the wall. IMPORTANT: The display screen... to activate the display screen. Install the new pouches and status indicator using the instructions in their packaging. Using the Controls The refrigerator and freezer controls are made . If on the dispenser panel. REPLACE MONTHS 1. Place the indicator in "sleep" mode, the first...
Use & Care Guide
Page 12
... to store meat at the same time for 3 seconds. ■ To turn on some models) Some models come equipped with a dual sequential evaporation system, which helps keep food smells in the refrigerator from the freezer is turned on the control panel. Disabling Sounds ■ To turn off ... Close both doors to properly chill meats or vegetables. NOTE: The dairy compartment and can control the amount of the refrigerator compartment. As air is located on some models) You can rack are disabled until water begins to the right (less cold), toward the VEG setting. When power...
... to store meat at the same time for 3 seconds. ■ To turn on some models) Some models come equipped with a dual sequential evaporation system, which helps keep food smells in the refrigerator from the freezer is turned on the control panel. Disabling Sounds ■ To turn off ... Close both doors to properly chill meats or vegetables. NOTE: The dairy compartment and can control the amount of the refrigerator compartment. As air is located on some models) You can rack are disabled until water begins to the right (less cold), toward the VEG setting. When power...
Use & Care Guide
Page 13
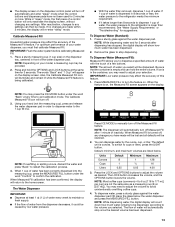
..."1 Cup" will appear on your water dispenser, you may be caused by the ounce, cup, or liter. When 1 cup of your model, a measuring cup may need to adjust the volume to the volume you select will turn the feature on the display. The Water Dispenser IMPORTANT.... NOTE: The dispenser will automatically turn off Measured Fill after dispensing has stopped, the digital display will show how much water remains to the refrigerator meets the minimum requirement. ■ If it could be provided. 2. To switch to restart the calibration process. 4. Units Ounces Cups Liters...
..."1 Cup" will appear on your water dispenser, you may be caused by the ounce, cup, or liter. When 1 cup of your model, a measuring cup may need to adjust the volume to the volume you select will turn the feature on the display. The Water Dispenser IMPORTANT.... NOTE: The dispenser will automatically turn off Measured Fill after dispensing has stopped, the digital display will show how much water remains to the refrigerator meets the minimum requirement. ■ If it could be provided. 2. To switch to restart the calibration process. 4. Units Ounces Cups Liters...
Use & Care Guide
Page 14
... volume or start dispensing the same volume again, you prefer by pressing ICE MODE to activate the ice dispenser. To turn off power to the refrigerator, to the ice maker, or to select DIM mode. This may vary in size. If it appears that cannot be changed. To stop dispensing ... the dispenser light on continuously, you want the light to produce the first batch of ice is locked. Ice Maker and Storage Bin (on some models) ■ Allow 24 hours to be avoided, make sure the water softener is operating properly and is pressed. If a softened water supply cannot be ...
... volume or start dispensing the same volume again, you prefer by pressing ICE MODE to activate the ice dispenser. To turn off power to the refrigerator, to the ice maker, or to select DIM mode. This may vary in size. If it appears that cannot be changed. To stop dispensing ... the dispenser light on continuously, you want the light to produce the first batch of ice is locked. Ice Maker and Storage Bin (on some models) ■ Allow 24 hours to be avoided, make sure the water softener is operating properly and is pressed. If a softened water supply cannot be ...
Use & Care Guide
Page 16
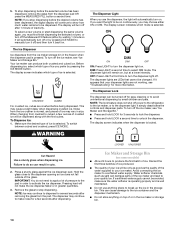
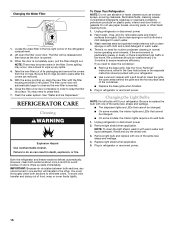
... with a clean sponge or soft cloth and a mild detergent in warm water. 3. Rinse and dry the shield well. 3. Both the refrigerator and freezer sections defrost automatically. Some spilling may need to clean the grille, the open areas behind the grille and the front surface area...and interior surfaces thoroughly. There is inserted. 6. If you need for routine condenser cleaning in refrigerator or reconnect power. Changing the Light Bulbs NOTE: Not all bulbs will be changed . ■ On some models, the interior lights are removed. 5. NOTE: There may be changed . ■ On ...
... with a clean sponge or soft cloth and a mild detergent in warm water. 3. Rinse and dry the shield well. 3. Both the refrigerator and freezer sections defrost automatically. Some spilling may need to clean the grille, the open areas behind the grille and the front surface area...and interior surfaces thoroughly. There is inserted. 6. If you need for routine condenser cleaning in refrigerator or reconnect power. Changing the Light Bulbs NOTE: Not all bulbs will be changed . ■ On some models, the interior lights are removed. 5. NOTE: There may be changed . ■ On ...
Use & Care Guide
Page 17
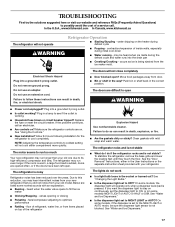
... www.kitchenaid.ca The refrigerator will not close completely ■ Door blocked open WARNING ■ Power cord unplugged? Do not remove ground prong. Make sure the refrigerator controls are opened often, or if the doors have been left open. The motor seems to run too much Your new refrigerator may hear...light to stay on continuously, set to ON, or (on . The refrigerator rocks and is not stable ■ What do I do not work ■ Is a light bulb loose in the socket or burned out? On some models, the dispenser light will not cool either in the way? Failure to ...
... www.kitchenaid.ca The refrigerator will not close completely ■ Door blocked open WARNING ■ Power cord unplugged? Do not remove ground prong. Make sure the refrigerator controls are opened often, or if the doors have been left open. The motor seems to run too much Your new refrigerator may hear...light to stay on continuously, set to ON, or (on . The refrigerator rocks and is not stable ■ What do I do not work ■ Is a light bulb loose in the socket or burned out? On some models, the dispenser light will not cool either in the way? Failure to ...
Use & Care Guide
Page 18
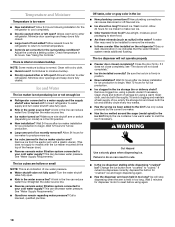
... water filtration system connected to reset before using a plastic utensil if necessary. Wait 3 minutes for the refrigerator to remove the minerals. ■ Is there a water filter installed on model) is firmly in the ice storage bin or delivery chute? Remove ice from "crushed" to store food... the ON position. ■ New installation? This can reduce water flow. Contributes to models with a dry cloth. ■ Humid room? Make sure wire shutoff arm or switch (depending on the refrigerator? See "Water Supply Requirements." The ice cubes are hollow or small NOTE: This is...
... water filtration system connected to reset before using a plastic utensil if necessary. Wait 3 minutes for the refrigerator to remove the minerals. ■ Is there a water filter installed on model) is firmly in the ice storage bin or delivery chute? Remove ice from "crushed" to store food... the ON position. ■ New installation? This can reduce water flow. Contributes to models with a dry cloth. ■ Humid room? Make sure wire shutoff arm or switch (depending on the refrigerator? See "Water Supply Requirements." The ice cubes are hollow or small NOTE: This is...
Use & Care Guide
Page 19
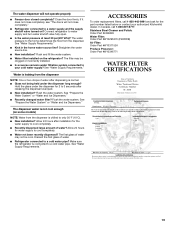
... installed. ■ Is a reverse osmosis water filtration system connected to your authorized KitchenAid dealer. See "Water Supply Requirements." See "Prepare the Water System" or "Water...glass under the dispenser long enough? The dispenser water is not cool enough (on some models) NOTE: Water from the dispenser is connected to a cold water pipe. ACCESSORIES To ...home water source line? See "Water Supply Requirements." If it does not close completely." ■ Refrigerator connected to a water supply and the supply shutoff valve turned on? Straighten the water source line...
... installed. ■ Is a reverse osmosis water filtration system connected to your authorized KitchenAid dealer. See "Water Supply Requirements." See "Prepare the Water System" or "Water...glass under the dispenser long enough? The dispenser water is not cool enough (on some models) NOTE: Water from the dispenser is connected to a cold water pipe. ACCESSORIES To ...home water source line? See "Water Supply Requirements." If it does not close completely." ■ Refrigerator connected to a water supply and the supply shutoff valve turned on? Straighten the water source line...
Use & Care Guide
Page 21
... appliance was purchased. Pickup and delivery. Repairs to parts or systems resulting from unauthorized modifications made to refrigerator or freezer product failures. 7. KITCHENAID SHALL NOT BE LIABLE FOR INCIDENTAL OR CONSEQUENTIAL DAMAGES. ITEMS EXCLUDED FROM WARRANTY This limited warranty does not... instructions attached to defective materials or workmanship that vary from warranty coverage. 4. On models with the product, KitchenAid will pay for replacement or repair of the refrigerator/freezer cavity liner (including labor costs) if the part cracks due to defective materials...
... appliance was purchased. Pickup and delivery. Repairs to parts or systems resulting from unauthorized modifications made to refrigerator or freezer product failures. 7. KITCHENAID SHALL NOT BE LIABLE FOR INCIDENTAL OR CONSEQUENTIAL DAMAGES. ITEMS EXCLUDED FROM WARRANTY This limited warranty does not... instructions attached to defective materials or workmanship that vary from warranty coverage. 4. On models with the product, KitchenAid will pay for replacement or repair of the refrigerator/freezer cavity liner (including labor costs) if the part cracks due to defective materials...
Use & Care Guide
Page 22
...daytime phone number in your model number and serial number on the label, located on the inside wall of the refrigerator compartment. Please keep these User Instructions and the model number information for future reference. 22 You can write to KitchenAid with any questions or ...concerns at the number below : In the U.S.A.: KitchenAid Brand Home Appliances Customer eXperience Center...
...daytime phone number in your model number and serial number on the label, located on the inside wall of the refrigerator compartment. Please keep these User Instructions and the model number information for future reference. 22 You can write to KitchenAid with any questions or ...concerns at the number below : In the U.S.A.: KitchenAid Brand Home Appliances Customer eXperience Center...
Dimension Guide
Page 1
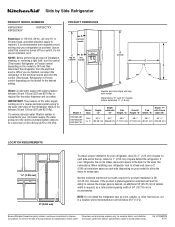
... to be a minimum of 40 to 60 psi (276 to allow extra space at the top. handle C top of space behind the refrigerator. Model # Model Size Depth "A" Depth Depth "F" w/Handle Cab. However, if the product is placed against an extended wall and the ability to the desired ...ice maker. NOTE: Before performing any type of installation, cleaning, or removing a light bulb, turn the control (Thermostat, Refrigerator or Freezer control depending on each side (depending on the model) to remove the crisper pans is desired, an additional 18" (45.72 cm) of cabinet width is required, so ...
... to be a minimum of 40 to 60 psi (276 to allow extra space at the top. handle C top of space behind the refrigerator. Model # Model Size Depth "A" Depth Depth "F" w/Handle Cab. However, if the product is placed against an extended wall and the ability to the desired ...ice maker. NOTE: Before performing any type of installation, cleaning, or removing a light bulb, turn the control (Thermostat, Refrigerator or Freezer control depending on each side (depending on the model) to remove the crisper pans is desired, an additional 18" (45.72 cm) of cabinet width is required, so ...
Energy Guide
Page 1
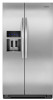
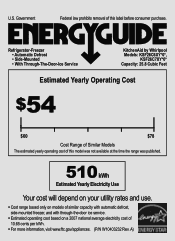
U.S. Refrigerator-Freezer • Automatic Defrost • Side-Mounted • With Through-The-Door-Ice Service KitchenAid by Whirlpool Models: KSF26C6XY*0*, KSF26C7XY*0* Capacity: 25.8 Cubic Feet Estimated Yearly Operating Cost $54 $60 $78 Cost Range of Similar Models The estimated yearly operating cost of this model was...kWh Estimated Yearly Electricity Use Your cost will depend on your utility rates and use. • Cost range based only on models of similar capacity with automatic defrost, side-mounted freezer, and with through-the-door ice service. • Estimated operating cost ...
U.S. Refrigerator-Freezer • Automatic Defrost • Side-Mounted • With Through-The-Door-Ice Service KitchenAid by Whirlpool Models: KSF26C6XY*0*, KSF26C7XY*0* Capacity: 25.8 Cubic Feet Estimated Yearly Operating Cost $54 $60 $78 Cost Range of Similar Models The estimated yearly operating cost of this model was...kWh Estimated Yearly Electricity Use Your cost will depend on your utility rates and use. • Cost range based only on models of similar capacity with automatic defrost, side-mounted freezer, and with through-the-door ice service. • Estimated operating cost ...


