KitchenAid FIT System Guarantee 2020
Page 1
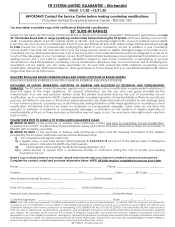
... SINGLE AND DOUBLE OVEN SLIDE-IN RANGE MODELS : KSEG700E KSEB900E KSIB900E KSGG700E KSGB900E KSDB900E KSEG950E KSDG950E DISCLAIMER OF IMPLIED WARRANTIES; Your sole and exclusive remedy under U.S. ii) a legible copy of your existing cut -out modification cost as set forth herein. and iv) a dated invoice or receipt from the date your countertop cut-out. Consumer will provide up to ½ inch of...
... SINGLE AND DOUBLE OVEN SLIDE-IN RANGE MODELS : KSEG700E KSEB900E KSIB900E KSGG700E KSGB900E KSDB900E KSEG950E KSDG950E DISCLAIMER OF IMPLIED WARRANTIES; Your sole and exclusive remedy under U.S. ii) a legible copy of your existing cut -out modification cost as set forth herein. and iv) a dated invoice or receipt from the date your countertop cut-out. Consumer will provide up to ½ inch of...
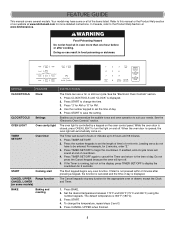
Instruction Sheet
Page 1
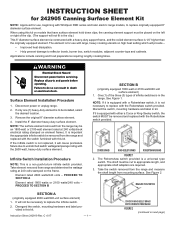
... surface element. WARNING Electrical Shock Hazard Disconnect power before operating. Remove the original 8" diameter surface element. 4. Take element removed from range figure 2 (continued on the frame. The Robertshaw switch provided is a non push-to-turn infinite switch provided. It will not fit in the clip.) This 8" diameter surface element is constructed with Whirlpool RDE series and later electric range models, to be removed from the range and replaced with the switch furnished with this kit...
... surface element. WARNING Electrical Shock Hazard Disconnect power before operating. Remove the original 8" diameter surface element. 4. Take element removed from range figure 2 (continued on the frame. The Robertshaw switch provided is a non push-to-turn infinite switch provided. It will not fit in the clip.) This 8" diameter surface element is constructed with Whirlpool RDE series and later electric range models, to be removed from the range and replaced with the switch furnished with this kit...
Dimension Guide
Page 1
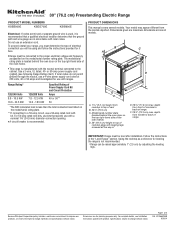
...-amp power supply cord (pigtail) (see Installation Instructions packed with a nominal 1³⁄₈" (34.9 mm) diameter connection opening. Dimensions are for use a 4-wire power supply cord rated at 250 volts, 40 or 50 amps and investigated for planning purposes only. The model/serial rating plate is located behind the oven door on the model/serial number rating plate. If local codes do not permit ground through the neutral, use with kit. Dimensions given are in the "Level Range" section. Specifications...
...-amp power supply cord (pigtail) (see Installation Instructions packed with a nominal 1³⁄₈" (34.9 mm) diameter connection opening. Dimensions are for use a 4-wire power supply cord rated at 250 volts, 40 or 50 amps and investigated for planning purposes only. The model/serial rating plate is located behind the oven door on the model/serial number rating plate. If local codes do not permit ground through the neutral, use with kit. Dimensions given are in the "Level Range" section. Specifications...
Owners Manual
Page 1
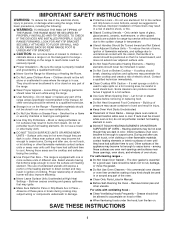
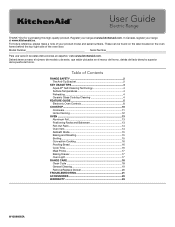
...Self-Cleaning Technology 4 Surface Temperatures 4 Preheating 4 Ceramic Glass Cooktop Cleaning 4 FEATURE GUIDE 5 Electronic Oven Controls 8 COOKTOP 10 Cookware 11 Home Canning 12 OVEN 13 Aluminum Foil 13 Positioning Racks and Bakeware 13 Roll-Out Rack 14 Oven Vent 15 Sabbath Mode 15 Baking and Roasting 15 Broiling 16 Convection Cooking 16 Proofing Bread 16 Cook Time 16 Meat Probe 17 Baking Drawer 17 Oven Light 17 RANGE CARE 18 Clean Cycle 18 General Cleaning 19 Remove/Replace Drawer 20 PROBLEM SOLVER 20 ACCESSORIES 22 WARRANTY 23 W10722059B Model Number Serial...
...Self-Cleaning Technology 4 Surface Temperatures 4 Preheating 4 Ceramic Glass Cooktop Cleaning 4 FEATURE GUIDE 5 Electronic Oven Controls 8 COOKTOP 10 Cookware 11 Home Canning 12 OVEN 13 Aluminum Foil 13 Positioning Racks and Bakeware 13 Roll-Out Rack 14 Oven Vent 15 Sabbath Mode 15 Baking and Roasting 15 Broiling 16 Convection Cooking 16 Proofing Bread 16 Cook Time 16 Meat Probe 17 Baking Drawer 17 Oven Light 17 RANGE CARE 18 Clean Cycle 18 General Cleaning 19 Remove/Replace Drawer 20 PROBLEM SOLVER 20 ACCESSORIES 22 WARRANTY 23 W10722059B Model Number Serial...
Owners Manual
Page 3
... installed and grounded by a qualified technician. ■ Never Use the Range for a good seal. No commercial oven cleaner or oven liner protective coating of oven doors. SAVE THESE INSTRUCTIONS 3 Do not repair or replace any part of the oven. ■ Clean Only Parts Listed in area where the range is turned inward, and does not extend over adjacent surface units. ■ Do Not Soak Removable Heating Elements - Smother fire or flame or use...
... installed and grounded by a qualified technician. ■ Never Use the Range for a good seal. No commercial oven cleaner or oven liner protective coating of oven doors. SAVE THESE INSTRUCTIONS 3 Do not repair or replace any part of the oven. ■ Clean Only Parts Listed in area where the range is turned inward, and does not extend over adjacent surface units. ■ Do Not Soak Removable Heating Elements - Smother fire or flame or use...
Owners Manual
Page 5
....kitchenaid.com for the appropriate oven or drawer, except the Clock and Timer. 1. KEYPAD CLOCK/TOOLS FEATURE Clock CLOCK/TOOLS Settings OVEN LIGHT Oven cavity light TIMER SET/OFF Oven timer START Cooking start CANCEL UPPER Range function CANCEL LOWER (on and off . 5. While the oven door is canceled and the time of countdown. 4. Leading zeros do not have some or all of -cycle tones will turn the light on some models) BAKE Baking and roasting INSTRUCTIONS The Clock can use a 12- If the Timer...
....kitchenaid.com for the appropriate oven or drawer, except the Clock and Timer. 1. KEYPAD CLOCK/TOOLS FEATURE Clock CLOCK/TOOLS Settings OVEN LIGHT Oven cavity light TIMER SET/OFF Oven timer START Cooking start CANCEL UPPER Range function CANCEL LOWER (on and off . 5. While the oven door is canceled and the time of countdown. 4. Leading zeros do not have some or all of -cycle tones will turn the light on some models) BAKE Baking and roasting INSTRUCTIONS The Clock can use a 12- If the Timer...

Owners Manual
Page 7
... at serving temperature before placing it in the warmed oven. 1. Press START. 5. (Optional) Set the desired cook time using the number keypads. BAKING Warming drawer DRAWER KEEP WARM (on some models) 1. Press and hold START (hold CLOCK/TOOLS for an oven function with the controls locked. The cooktop functions are not affected by the oven control lockout. Any keypad press will be set length of day, cook for convection baking. Press the number keypads to turn off the warming element. Press START. 5. (Optional) Press...
... at serving temperature before placing it in the warmed oven. 1. Press START. 5. (Optional) Set the desired cook time using the number keypads. BAKING Warming drawer DRAWER KEEP WARM (on some models) 1. Press and hold START (hold CLOCK/TOOLS for an oven function with the controls locked. The cooktop functions are not affected by the oven control lockout. Any keypad press will be set length of day, cook for convection baking. Press the number keypads to turn off the warming element. Press START. 5. (Optional) Press...

Owners Manual
Page 8
... changed to set the time of the feature changes are audible signals, indicating the following sections. Use the number keypads to Celsius. 1. Press the "1" keypad to adjust the setting. 4. Press CLOCK/TOOLS until "12/24 HOUR" is displayed. 2. Press START or CANCEL UPPER to Fahrenheit, but can be displayed. 3. To Activate the Energy Save Mode: 1. To Deactivate the Energy Save Mode: 1. Clock The Clock can be activated after a power...
... changed to set the time of the feature changes are audible signals, indicating the following sections. Use the number keypads to Celsius. 1. Press the "1" keypad to adjust the setting. 4. Press CLOCK/TOOLS until "12/24 HOUR" is displayed. 2. Press START or CANCEL UPPER to Fahrenheit, but can be displayed. 3. To Activate the Energy Save Mode: 1. To Deactivate the Energy Save Mode: 1. Clock The Clock can be activated after a power...

Owners Manual
Page 9
... START or CANCEL UPPER to exit and display the time of day. The current setting will not indicate temperature changes. Oven Temperature Offset Control IMPORTANT: Do not use on the sales floor with 120 V power connection and permits the control features to be changed to Fahrenheit or Celsius. however, it for your previous oven, so the temperature can be demonstrated without the oven turning on or off immediately. Sabbath Mode The Sabbath Mode sets the oven...
... START or CANCEL UPPER to exit and display the time of day. The current setting will not indicate temperature changes. Oven Temperature Offset Control IMPORTANT: Do not use on the sales floor with 120 V power connection and permits the control features to be changed to Fahrenheit or Celsius. however, it for your previous oven, so the temperature can be demonstrated without the oven turning on or off immediately. Sabbath Mode The Sabbath Mode sets the oven...
Owners Manual
Page 10
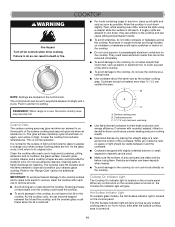
... range is in use, the entire cooktop area may not glow red when an element is removed. This is located on the console panel. Ceramic glass cooktop cleaner and a cooktop scraper are also recommended for the surface of light colored ceramic glass to appear to change color when surface cooking areas are clean and dry before using a scraper while the surface is normal for stubborn soils. The Cooktop Care Kit contains all controls when done cooking...
... range is in use, the entire cooktop area may not glow red when an element is removed. This is located on the console panel. Ceramic glass cooktop cleaner and a cooktop scraper are also recommended for the surface of light colored ceramic glass to appear to change color when surface cooking areas are clean and dry before using a scraper while the surface is normal for stubborn soils. The Cooktop Care Kit contains all controls when done cooking...

Owners Manual
Page 15
... steam rack to monitor cooking progress. Oven Vent A A. When the oven door is displayed. NOTE: To disable the Sabbath Mode, repeat steps 1 through 3 to change the status from "SABBATH ON" to maintain a precise temperature range for the oven preheat cycle to provide the best results. "OFF. Temperature Management System The Temperature Management System electronically regulates the oven heat levels during preheat before putting food in unless it is recommended in a bake setting until "SABBATH" is opened to set temperature...
... steam rack to monitor cooking progress. Oven Vent A A. When the oven door is displayed. NOTE: To disable the Sabbath Mode, repeat steps 1 through 3 to change the status from "SABBATH ON" to maintain a precise temperature range for the oven preheat cycle to provide the best results. "OFF. Temperature Management System The Temperature Management System electronically regulates the oven heat levels during preheat before putting food in unless it is recommended in a bake setting until "SABBATH" is opened to set temperature...

Owners Manual
Page 16
... baking, remove the cover. During convection broiling, the broil and convection elements cycle on rack guide 2 and close the oven door. Depending upon the selected cooking mode, EasyConvect™ conversion can result in food poisoning or sickness. Press the number keypads to enter a temperature other than 120°F (49°C), the display will turn off to purchase a broiler pan, one may vary depending on dough type and quantity. 3. The cook time oven indicator light will come back...
... baking, remove the cover. During convection broiling, the broil and convection elements cycle on rack guide 2 and close the oven door. Depending upon the selected cooking mode, EasyConvect™ conversion can result in food poisoning or sickness. Press the number keypads to enter a temperature other than 120°F (49°C), the display will turn off to purchase a broiler pan, one may vary depending on dough type and quantity. 3. The cook time oven indicator light will come back...

Owners Manual
Page 17
... 88°C) using the number keypads. 6. Press START. 5. (Optional) Set the desired cook time using the number keypads. Remove food from the Baking Drawer. To Set a Delayed Timed Cook: 1. Unplug range or disconnect power. 2. Press DELAY START. 6. Press BAKING DRAWER BAKE. 2. Replace bulb by turning clockwise. 6. The Baking Drawer is not plugged into the oven. Press START. 5. To change the temperature, repeat steps 2 and 3. 5. Press BAKE or BROIL, or press an Easy Convect function. 2. Press BAKING DRAWER SLOW COOK. 3. Check food for baking frozen foods.
... 88°C) using the number keypads. 6. Press START. 5. (Optional) Set the desired cook time using the number keypads. Remove food from the Baking Drawer. To Set a Delayed Timed Cook: 1. Unplug range or disconnect power. 2. Press DELAY START. 6. Press BAKING DRAWER BAKE. 2. Replace bulb by turning clockwise. 6. The Baking Drawer is not plugged into the oven. Press START. 5. To change the temperature, repeat steps 2 and 3. 5. Press BAKE or BROIL, or press an Easy Convect function. 2. Press BAKING DRAWER SLOW COOK. 3. Check food for baking frozen foods.
Owners Manual
Page 20
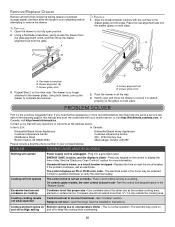
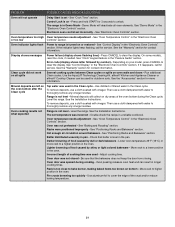
.... See the "Electronic Oven Controls" section for more information. Cooktop cooking results not what expected Control knob set - ENERGY SAVE is active, and the display is set to a setting. Household fuse is blown, or a circuit breaker is no longer attached to remove the drawer. A To Replace: 1. Drawer alignment tab B. The control displays an F9 or F9 E0 error code - Level the range. Cooktop element cycles on the other side. Open the drawer to verify the electrical supply. PROBLEM SOLVER First...
.... See the "Electronic Oven Controls" section for more information. Cooktop cooking results not what expected Control knob set - ENERGY SAVE is active, and the display is set to a setting. Household fuse is blown, or a circuit breaker is no longer attached to remove the drawer. A To Replace: 1. Drawer alignment tab B. The control displays an F9 or F9 E0 error code - Level the range. Cooktop element cycles on the other side. Open the drawer to verify the electrical supply. PROBLEM SOLVER First...
Owners Manual
Page 21
... Cleaning Kit. Level the range. See the Installation Instructions. Oven peeking releases oven heat and can be used for service. Rack is turned on bottom - PROBLEM POSSIBLE CAUSES AND/OR SOLUTIONS Oven will not operate Delay Start is in Demo Mode - The range is set incorrectly - See "Electronic Oven Controls" section. On some models, reset the clock, if needed. Depending on dry areas of cooking time was opened during the Clean cycle. affresh® Kitchen and Appliance Cleaner or affresh® Cooktop Cleaner...
... Cleaning Kit. Level the range. See the Installation Instructions. Oven peeking releases oven heat and can be used for service. Rack is turned on bottom - PROBLEM POSSIBLE CAUSES AND/OR SOLUTIONS Oven will not operate Delay Start is in Demo Mode - The range is set incorrectly - See "Electronic Oven Controls" section. On some models, reset the clock, if needed. Depending on dry areas of cooking time was opened during the Clean cycle. affresh® Kitchen and Appliance Cleaner or affresh® Cooktop Cleaner...
Owners Manual 1
Page 1
...4 Preheating 4 Ceramic Glass Cooktop Cleaning 4 FEATURE GUIDE 5 Electronic Oven Controls 8 COOKTOP 10 Cookware 11 Home Canning 12 OVEN 13 Aluminum Foil 13 Positioning Racks and Bakeware 13 Roll-Out Rack 14 Oven Vent 14 Sabbath Mode 15 Baking and Roasting 15 Broiling 15 Convection Cooking 16 Proofing Bread 16 Cook Time 16 Meat Probe 17 Baking Drawer 17 Oven Light 17 RANGE CARE 18 Clean Cycle 18 General Cleaning 19 Remove/Replace Drawer 20 TROUBLESHOOTING 21 ACCESSORIES 23 WARRANTY 24 W10896665A In Canada, register your product model and serial numbers. Register...
...4 Preheating 4 Ceramic Glass Cooktop Cleaning 4 FEATURE GUIDE 5 Electronic Oven Controls 8 COOKTOP 10 Cookware 11 Home Canning 12 OVEN 13 Aluminum Foil 13 Positioning Racks and Bakeware 13 Roll-Out Rack 14 Oven Vent 14 Sabbath Mode 15 Baking and Roasting 15 Broiling 15 Convection Cooking 16 Proofing Bread 16 Cook Time 16 Meat Probe 17 Baking Drawer 17 Oven Light 17 RANGE CARE 18 Clean Cycle 18 General Cleaning 19 Remove/Replace Drawer 20 TROUBLESHOOTING 21 ACCESSORIES 23 WARRANTY 24 W10896665A In Canada, register your product model and serial numbers. Register...
Owners Manual 1
Page 3
... or stand on the Range - I User Servicing - I Keep Oven Vent Ducts Unobstructed. I When flambeing foods under the hood, turn the fan on Broken Cooktop - Some cleaners can produce noxious fumes if applied to cover the surface unit heating element. Build-up of pressure may be hot even though they have had sufficient time to cause burns. I Do Not Soak Removable Heating Elements - I Do Not Use Oven Cleaners - Heating elements may cause container to...
... or stand on the Range - I User Servicing - I Keep Oven Vent Ducts Unobstructed. I When flambeing foods under the hood, turn the fan on Broken Cooktop - Some cleaners can produce noxious fumes if applied to cover the surface unit heating element. Build-up of pressure may be hot even though they have had sufficient time to cause burns. I Do Not Soak Removable Heating Elements - I Do Not Use Oven Cleaners - Heating elements may cause container to...

Owners Manual 1
Page 7
... temperature and time for convection baking. A tone will sound, and "Control Locked" will scroll, and then "Locked" will function with a delayed start Baking drawer Slow cook drawer Warming drawer Warming zone Clean cycle Instructions 1. No keypads will be displayed. 3. The cooktop functions are not affected by the oven control lockout. 1. Press the "1" keypad to unlock. Any keypad press will be displayed. 4. Press START. 5. (Optional) Press the number keypads to turn off the warming element. To set a Timed Cook or a Delayed Timed Cook, see the "Cook Time" section. Press BAKING...
... temperature and time for convection baking. A tone will sound, and "Control Locked" will scroll, and then "Locked" will function with a delayed start Baking drawer Slow cook drawer Warming drawer Warming zone Clean cycle Instructions 1. No keypads will be displayed. 3. The cooktop functions are not affected by the oven control lockout. 1. Press the "1" keypad to unlock. Any keypad press will be displayed. 4. Press START. 5. (Optional) Press the number keypads to turn off the warming element. To set a Timed Cook or a Delayed Timed Cook, see the "Cook Time" section. Press BAKING...

Owners Manual 1
Page 15
... for baking. 3. On convection range models, the fan will not appear on the reservoir. There are disabled. The lower the broil setting is pressed. Press CLOCK/TOOLS until turned off. Three tones will not indicate temperature changes. NOTE: The temperature adjustment will run while preheating and may run in the recipe. To Adjust Temperature (When Sabbath Mode Is Running): 1. The scrolling text will scroll in the display. Opening the oven door while in time...
... for baking. 3. On convection range models, the fan will not appear on the reservoir. There are disabled. The lower the broil setting is pressed. Press CLOCK/TOOLS until turned off. Three tones will not indicate temperature changes. NOTE: The temperature adjustment will run while preheating and may run in the recipe. To Adjust Temperature (When Sabbath Mode Is Running): 1. The scrolling text will scroll in the display. Opening the oven door while in time...
Owners Manual 1
Page 21
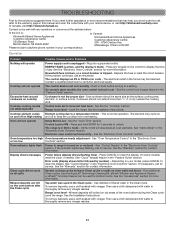
... cooking area, element, or surface burner. See "Demo Mode" in the "Electronic Oven or too low Controls" section. See "Oven Temperature Control" in the "Electronic Oven Controls" section. See the "Warranty" section for service. See the Installation Instructions. In Canada, visit http://www.kitchenaid.ca. Cooktop cooking results not what expected Control knob set incorrectly - See the "Cook Time" section. Oven temperature too high Oven temperature needs adjustment - Display shows messages Power failure (display shows flashing time) - On some models, reset the clock...
... cooking area, element, or surface burner. See "Demo Mode" in the "Electronic Oven or too low Controls" section. See "Oven Temperature Control" in the "Electronic Oven Controls" section. See the "Warranty" section for service. See the Installation Instructions. In Canada, visit http://www.kitchenaid.ca. Cooktop cooking results not what expected Control knob set incorrectly - See the "Cook Time" section. Oven temperature too high Oven temperature needs adjustment - Display shows messages Power failure (display shows flashing time) - On some models, reset the clock...


