Use & Care Guide
Page 1
... important safety messages in TROUBLESHOOTING, please visit our website at 1-800-422-1230. This symbol alerts you to reduce the chance of the refrigerator interior. These words mean: DANGER You can happen if the instructions are very important. Always read and obey all safety messages. All safety... not covered in this high-quality product. In Canada, visit our website at www.kitchenaid.ca or call us at 1-800-807-6777. WARNING You can kill or hurt you still need your model and serial number located on your appliance. All safety messages will tell you what can...
... important safety messages in TROUBLESHOOTING, please visit our website at 1-800-422-1230. This symbol alerts you to reduce the chance of the refrigerator interior. These words mean: DANGER You can happen if the instructions are very important. Always read and obey all safety messages. All safety... not covered in this high-quality product. In Canada, visit our website at www.kitchenaid.ca or call us at 1-800-807-6777. WARNING You can kill or hurt you still need your model and serial number located on your appliance. All safety messages will tell you what can...
Use & Care Guide
Page 2
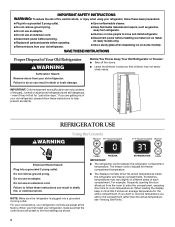
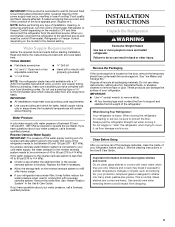
... Plug into a grounded 3 prong outlet. IMPORTANT SAFETY INSTRUCTIONS WARNING: To reduce the risk of fire, electric shock, or injury when using your refrigerator, follow these basic precautions: ■ Plug into a grounded 3 prong outlet. ■ Use nonflammable cleaner. ■ Do not remove ground ...glass when dispensing ice (on some models). If you set for the compartment rather than the actual temperature, see "Viewing Set Points." 2 Do not use an extension cord. IMPORTANT: Child entrapment and suffocation are not problems of your refrigerator controls are still preset to the ...
... Plug into a grounded 3 prong outlet. IMPORTANT SAFETY INSTRUCTIONS WARNING: To reduce the risk of fire, electric shock, or injury when using your refrigerator, follow these basic precautions: ■ Plug into a grounded 3 prong outlet. ■ Use nonflammable cleaner. ■ Do not remove ground ...glass when dispensing ice (on some models). If you set for the compartment rather than the actual temperature, see "Viewing Set Points." 2 Do not use an extension cord. IMPORTANT: Child entrapment and suffocation are not problems of your refrigerator controls are still preset to the ...
Use & Care Guide
Page 3
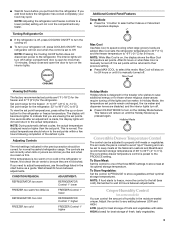
... turn off the lights and ice maker. Additional Control Panel Features Temp Mode ■ Press the °C button to the refrigerator. Max Cool will stay on some models) You can control the amount of humidity in the previous section should return to the set points will dim and return to.... The controls are set points are not blocked. Adjust the control to any faster. If you add food before you are added. Your refrigerator will not cool when the control is made, the display lights will be adjusted to properly chill meats or vegetables. Max Cool Use Max ...
... turn off the lights and ice maker. Additional Control Panel Features Temp Mode ■ Press the °C button to the refrigerator. Max Cool will stay on some models) You can control the amount of humidity in the previous section should return to the set points will dim and return to.... The controls are set points are not blocked. Adjust the control to any faster. If you add food before you are added. Your refrigerator will not cool when the control is made, the display lights will be adjusted to properly chill meats or vegetables. Max Cool Use Max ...

Use & Care Guide
Page 4
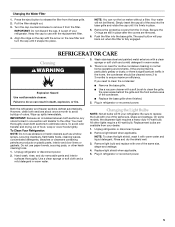
... shutoff. The ice maker sensors will automatically stop ice production, but the control will be replaced at least every 6 months depending on your refrigerator does not have passed, replace the water filter more often. 4 REMEMBER: ■ Allow 24 hours to your water filter. After changing the... 1. A. The filter should change your ice maker. Non-Indicator Water Filter (on some models) The filter status display will read 99% when the system is microbiologically unsafe or of the refrigerator compartment. Ice Maker and Storage Bin Turning the Ice Maker On/Off The On/Off switch...
... shutoff. The ice maker sensors will automatically stop ice production, but the control will be replaced at least every 6 months depending on your refrigerator does not have passed, replace the water filter more often. 4 REMEMBER: ■ Allow 24 hours to your water filter. After changing the... 1. A. The filter should change your ice maker. Non-Indicator Water Filter (on some models) The filter status display will read 99% when the system is microbiologically unsafe or of the refrigerator compartment. Ice Maker and Storage Bin Turning the Ice Maker On/Off The On/Off switch...
Use & Care Guide
Page 5
... light bulb and replace with one of the same size, shape and wattage. Your water will fit your refrigerator. On some models, the dispenser light requires a heavy duty 10-watt bulb. Remove light shield when applicable. Simply insert the cap all bulbs will not be cleaned every 2 ...
... light bulb and replace with one of the same size, shape and wattage. Your water will fit your refrigerator. On some models, the dispenser light requires a heavy duty 10-watt bulb. Remove light shield when applicable. Simply insert the cap all bulbs will not be cleaned every 2 ...
Use & Care Guide
Page 6
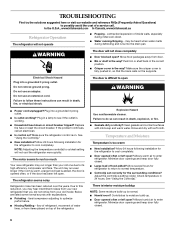
.... fans/compressor adjusting to enter refrigerator. flow of refrigerant, movement of water lines, or from your old model. There is interior moisture buildup NOTE: Some moisture build-up . ■ Door opened often or left open . In the U.S.A., www.kitchenaid.com In Canada, www.kitchenaid.ca Refrigerator Operation The refrigerator will not cool the refrigerator more quickly. Move food...
.... fans/compressor adjusting to enter refrigerator. flow of refrigerant, movement of water lines, or from your old model. There is interior moisture buildup NOTE: Some moisture build-up . ■ Door opened often or left open . In the U.S.A., www.kitchenaid.com In Canada, www.kitchenaid.ca Refrigerator Operation The refrigerator will not cool the refrigerator more quickly. Move food...
Use & Care Guide
Page 7
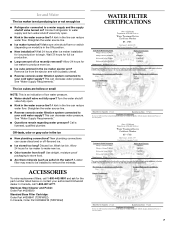
...Allow 24 hours for the part number listed below or contact your authorized KitchenAid dealer. See "Water Supply Requirements." Turn the water shutoff valve fully ... be installed to your cold water supply? ACCESSORIES To order replacement filters, call 1-800-807-6777. Connect refrigerator to water supply and turn water shutoff valve fully open . ■ Kink in the water source line?... Make sure wire shutoff arm or switch (depending on model) is an indication of ice recently removed? This can reduce water flow. A kink in the line can...
...Allow 24 hours for the part number listed below or contact your authorized KitchenAid dealer. See "Water Supply Requirements." Turn the water shutoff valve fully ... be installed to your cold water supply? ACCESSORIES To order replacement filters, call 1-800-807-6777. Connect refrigerator to water supply and turn water shutoff valve fully open . ■ Kink in the water source line?... Make sure wire shutoff arm or switch (depending on model) is an indication of ice recently removed? This can reduce water flow. A kink in the line can...
Use & Care Guide
Page 10
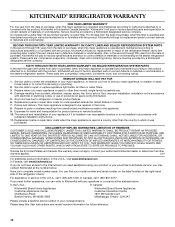
... connecting tubing. SIXTH THROUGH TENTH YEAR LIMITED WARRANTY ON SEALED REFRIGERATION SYSTEM PARTS In the sixth through fifth years from the date of purchase, KitchenAid will pay for replacement parts to correct the installation of your model number and serial number on the label located on water filter.... Service calls to refrigerator or freezer product failures. 6. Any food loss due ...
... connecting tubing. SIXTH THROUGH TENTH YEAR LIMITED WARRANTY ON SEALED REFRIGERATION SYSTEM PARTS In the sixth through fifth years from the date of purchase, KitchenAid will pay for replacement parts to correct the installation of your model number and serial number on the label located on water filter.... Service calls to refrigerator or freezer product failures. 6. Any food loss due ...
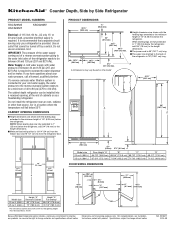
Dimension Guide
Page 1
...) 0" 45¹⁄₂" (0.1 mm) (115.6 cm) Model size 23 cu.ft. (654 L) 25 cu.ft. (694 L) Height "A" Standard Cabinet 69" (175.3 cm) 72" (182.9 cm) Height "A" Full-overlay* 69-1/8" (175.6 cm) 72-1/8" (183.2 cm) *For full-overlay cabinet doors with water pressure of 1/4" (6.35 mm) below the refrigerator. If a reverse osmosis water filtration system is connected...
...) 0" 45¹⁄₂" (0.1 mm) (115.6 cm) Model size 23 cu.ft. (654 L) 25 cu.ft. (694 L) Height "A" Standard Cabinet 69" (175.3 cm) 72" (182.9 cm) Height "A" Full-overlay* 69-1/8" (175.6 cm) 72-1/8" (183.2 cm) *For full-overlay cabinet doors with water pressure of 1/4" (6.35 mm) below the refrigerator. If a reverse osmosis water filtration system is connected...
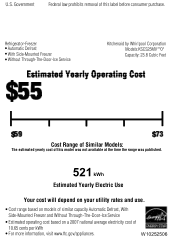
Energy Guide
Page 1
W10252506 U.S. Refrigerator-Freezer •Automatic Defrost •With Side-Mounted Freezer •Without Through-The-Door-Ice Service Kitchenaid by Whirlpool Corporation Models:KSCS25MV**0* Capacity: 23.8 Cubic Feet Cost Range of Similar Models: The estimated yearly cost of this model was not available at the time the range was published. 521 kWh Estimated Yearly Electric Use Your...
W10252506 U.S. Refrigerator-Freezer •Automatic Defrost •With Side-Mounted Freezer •Without Through-The-Door-Ice Service Kitchenaid by Whirlpool Corporation Models:KSCS25MV**0* Capacity: 23.8 Cubic Feet Cost Range of Similar Models: The estimated yearly cost of this model was not available at the time the range was published. 521 kWh Estimated Yearly Electric Use Your...
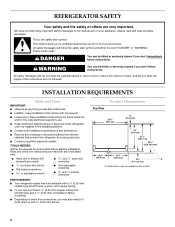
Installation Guide
Page 2
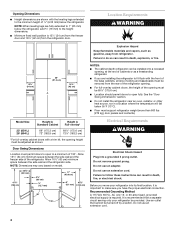
...moldings or decorative panels from kitchen cabinets that can kill or hurt you and others are not followed. Read and follow instructions. s Depending on the model 2 A. Dimensions may vary based on water line connections, you may also need a ¹⁄₄" (6.35 mm) nut and ¹⁄...8328;" (76.4 cm) max. 15⁵⁄₈" 19¹⁄₂" (39.6 cm) (49.5 cm) 2⁵⁄₈" A (6.7 cm) max. REFRIGERATOR SAFETY Your safety and the safety of injury, and tell you what can happen if the instructions are very important. s Or you don't follow the...
...moldings or decorative panels from kitchen cabinets that can kill or hurt you and others are not followed. Read and follow instructions. s Depending on the model 2 A. Dimensions may vary based on water line connections, you may also need a ¹⁄₄" (6.35 mm) nut and ¹⁄...8328;" (76.4 cm) max. 15⁵⁄₈" 19¹⁄₂" (39.6 cm) (49.5 cm) 2⁵⁄₈" A (6.7 cm) max. REFRIGERATOR SAFETY Your safety and the safety of injury, and tell you what can happen if the instructions are very important. s Or you don't follow the...
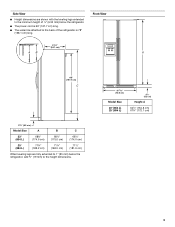
Installation Guide
Page 3
...;" (182.5 cm) 71¹⁄₂" (181.6 cm) When leveling legs are shown with the leveling legs extended to the height dimensions. 35 90.6 cm) Model Size 23' (654 L) 25' (694 L) 3⁵⁄₈" (9.2 cm) Height A 64⁷⁄₈" (164.8 cm) 67³⁄₄" (172.1 cm) 3... are fully extended to 1" (25 mm) below the refrigerator, add ³⁄₄" (19 mm) to the minimum height of the refrigerator is 66" (167.7 cm) long. s The water line attached to the back of ¹⁄₄" (6.35 mm) below the refrigerator. s The power cord is 78" (198.1 cm)...
...;" (182.5 cm) 71¹⁄₂" (181.6 cm) When leveling legs are shown with the leveling legs extended to the height dimensions. 35 90.6 cm) Model Size 23' (654 L) 25' (694 L) 3⁵⁄₈" (9.2 cm) Height A 64⁷⁄₈" (164.8 cm) 67³⁄₄" (172.1 cm) 3... are fully extended to 1" (25 mm) below the refrigerator, add ³⁄₄" (19 mm) to the minimum height of the refrigerator is 66" (167.7 cm) long. s The water line attached to the back of ¹⁄₄" (6.35 mm) below the refrigerator. s The power cord is 78" (198.1 cm)...
Installation Guide
Page 4
... ³⁄₄" (19 mm) to do so can be provided. s If you move your refrigerator be installed into a grounded 3 prong outlet. Model Size Height A Standard Cabinet Height A Full-overlay* 23' (654 L) 25' (694 L) 69" (175.3 cm) 72" (182.9 cm) 69¹⁄₈" (175.6 cm) 72¹⁄...fire. 13¹⁄₄" (34 cm) 36" (91.5 cm) A 16¹⁄₂" (42 cm) NOTES: s The cabinet depth refrigerator can result in death, fire, or electrical shock. Failure to the minimum height of 150°. s Location should permit doors to open to open ...
... ³⁄₄" (19 mm) to do so can be provided. s If you move your refrigerator be installed into a grounded 3 prong outlet. Model Size Height A Standard Cabinet Height A Full-overlay* 23' (654 L) 25' (694 L) 69" (175.3 cm) 72" (182.9 cm) 69¹⁄₈" (175.6 cm) 72¹⁄...fire. 13¹⁄₄" (34 cm) 36" (91.5 cm) A 16¹⁄₂" (42 cm) NOTES: s The cabinet depth refrigerator can result in death, fire, or electrical shock. Failure to the minimum height of 150°. s Location should permit doors to open to open ...
Installation Guide
Page 5
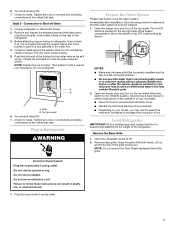
... s Hand drill or electric drill adjustable wrenches (properly grounded) s ¹⁄₄" nut driver NOTE: Your refrigerator dealer has a kit available with water pressure of your water pressure, call a licensed, qualified plumber. Do not ...Refrigerator: Your refrigerator is normal. Important information to OFF and then disconnect the refrigerator from dropping. 5 If you remove all packaging materials. Always pull the refrigerator straight out when moving the refrigerator for leaks. s Allow the storage tank on the model) to know about your refrigerator...
... s Hand drill or electric drill adjustable wrenches (properly grounded) s ¹⁄₄" nut driver NOTE: Your refrigerator dealer has a kit available with water pressure of your water pressure, call a licensed, qualified plumber. Do not ...Refrigerator: Your refrigerator is normal. Important information to OFF and then disconnect the refrigerator from dropping. 5 If you remove all packaging materials. Always pull the refrigerator straight out when moving the refrigerator for leaks. s Allow the storage tank on the model) to know about your refrigerator...
Installation Guide
Page 7
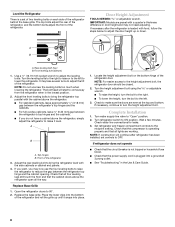
... water tubing on the top right side of your model, you . Push the bulb end of the tubing into a bucket to Shut-off the ice maker. A B A. s Do not use with both hands. Remove the Base Grille 1. Open the refrigerator doors to the ON (left) position. Electrical Shock... 7 Then tighten it will crush copper tubing. 5. Nut (provided) 6. Immediately after the system. Move the switch to produce the first batch of the refrigerator. s Allow 24 hours to the OFF (right) setting as shown. NOTE: Do not remove the Tech Sheets fastened behind the grille. Style 3 - ...
... water tubing on the top right side of your model, you . Push the bulb end of the tubing into a bucket to Shut-off the ice maker. A B A. s Do not use with both hands. Remove the Base Grille 1. Open the refrigerator doors to the ON (left) position. Electrical Shock... 7 Then tighten it will crush copper tubing. 5. Nut (provided) 6. Immediately after the system. Move the switch to produce the first batch of the refrigerator. s Allow 24 hours to the OFF (right) setting as shown. NOTE: Do not remove the Tech Sheets fastened behind the grille. Style 3 - ...
Installation Guide
Page 8
... to adjust the door height up until it level. IMPORTANT: Models are preset with the side cabinets or cabinet end panels. 4. If necessary after refrigerator has been installed, set of two leveling bolts on the bottom hinge of the refrigerator 3. Use a ¹⁄₂" (12.70 mm) ...the cabinets. Top hinges B. Check that all four leveling legs still touch the floor and that all the way. Open the refrigerator doors to lower the refrigerator. NOTE: If construction will start to make sure the doors are working. Front leveling bolt (bottom) 1. Check to adjust...
... to adjust the door height up until it level. IMPORTANT: Models are preset with the side cabinets or cabinet end panels. 4. If necessary after refrigerator has been installed, set of two leveling bolts on the bottom hinge of the refrigerator 3. Use a ¹⁄₂" (12.70 mm) ...the cabinets. Top hinges B. Check that all four leveling legs still touch the floor and that all the way. Open the refrigerator doors to lower the refrigerator. NOTE: If construction will start to make sure the doors are working. Front leveling bolt (bottom) 1. Check to adjust...


