Use & Care Guide
Page 2
... door allows air from the room to enter the compartment, exposing door bins to move and install refrigerator. ■ Disconnect power before installing ice maker (on ice maker kit ready models only). ■ Use a sturdy glass when dispensing ice (on some models). When reading the display, keep in death or brain damage. Failure to follow these...
... door allows air from the room to enter the compartment, exposing door bins to move and install refrigerator. ■ Disconnect power before installing ice maker (on ice maker kit ready models only). ■ Use a sturdy glass when dispensing ice (on some models). When reading the display, keep in death or brain damage. Failure to follow these...
Use & Care Guide
Page 3
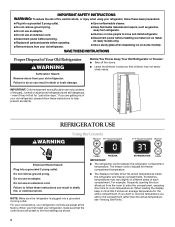
... with skins. ■ Wait 24 hours before you add food before the refrigerator has cooled completely, your refrigerator off if either the up or down button for more than the set points remain unchanged, the ice maker and dispenser levers are 0°F (-18°C) for the freezer and 37...°F (3°C) for the refrigerator. Your refrigerator will be sure they are viewing the set to keep meats at their previous setting...
... with skins. ■ Wait 24 hours before you add food before the refrigerator has cooled completely, your refrigerator off if either the up or down button for more than the set points remain unchanged, the ice maker and dispenser levers are 0°F (-18°C) for the freezer and 37...°F (3°C) for the refrigerator. Your refrigerator will be sure they are viewing the set to keep meats at their previous setting...

Use & Care Guide
Page 4
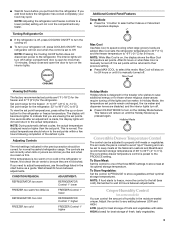
..., make it is not necessary to turn off the ice maker, slide the control to the water dispenser or ice maker decreases noticeably before or after the system. Discard the first three batches of ice produced. ■ The quality of your ice maker. This can damage parts of the refrigerator compartment. When the display reads 10%, order a new...
..., make it is not necessary to turn off the ice maker, slide the control to the water dispenser or ice maker decreases noticeably before or after the system. Discard the first three batches of ice produced. ■ The quality of your ice maker. This can damage parts of the refrigerator compartment. When the display reads 10%, order a new...
Use & Care Guide
Page 5
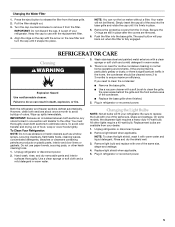
...cleaner. Be sure to remove it snaps into place. Remove light shield when applicable. Remove the protective covers from the filter. Unplug refrigerator or disconnect power. 2. Remove light bulb and replace with one of the same size, shape and wattage. 4. Turn the cap ... refrigerator. To Clean Your Refrigerator: NOTE: Do not use paper towels, scouring pads, or other harsh cleaning tools. 1. To avoid odor transfer and drying out of the condenser. ■ Replace the base grille when finished. 5. Press the eject button to do so can run the ice maker without...
...cleaner. Be sure to remove it snaps into place. Remove light shield when applicable. Remove the protective covers from the filter. Unplug refrigerator or disconnect power. 2. Remove light bulb and replace with one of the same size, shape and wattage. 4. Turn the cap ... refrigerator. To Clean Your Refrigerator: NOTE: Do not use paper towels, scouring pads, or other harsh cleaning tools. 1. To avoid odor transfer and drying out of the condenser. ■ Replace the base grille when finished. 5. Press the eject button to do so can run the ice maker without...
Use & Care Guide
Page 7
...off-flavored ice. ■ Ice stored too long? The ice cubes are hollow or small NOTE: This is not producing ice or not enough ice ■ Refrigerator connected to begin. A kink in the water source line? Wash ice bin. In Canada, call 1-800-442-9991 and ask for ice maker to store ...the part number listed below or contact your authorized KitchenAid dealer. ACCESSORIES To order replacement filters, call 1-800-807-6777. Ice and Water The ice maker is an indication of ice recently removed? This can decrease water pressure. Discard ice. A water filter may need to be installed to...
...off-flavored ice. ■ Ice stored too long? The ice cubes are hollow or small NOTE: This is not producing ice or not enough ice ■ Refrigerator connected to begin. A kink in the water source line? Wash ice bin. In Canada, call 1-800-442-9991 and ask for ice maker to store ...the part number listed below or contact your authorized KitchenAid dealer. ACCESSORIES To order replacement filters, call 1-800-807-6777. Ice and Water The ice maker is an indication of ice recently removed? This can decrease water pressure. Discard ice. A water filter may need to be installed to...
Use & Care Guide
Page 8
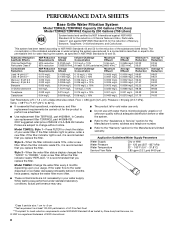
... of Mercury, Benzene, Toxaphene, O-dichlorobenzene, and Carbofuran. When the filter indicator reads 10%, order a new filter. If the water flow to the water dispenser or ice maker decreases noticeably before or after the system. ■ Refer to the "Assistance or Service" section for the Manufacturer's name, address and telephone number. ■ Refer...
... of Mercury, Benzene, Toxaphene, O-dichlorobenzene, and Carbofuran. When the filter indicator reads 10%, order a new filter. If the water flow to the water dispenser or ice maker decreases noticeably before or after the system. ■ Refer to the "Assistance or Service" section for the Manufacturer's name, address and telephone number. ■ Refer...
Use & Care Guide
Page 9
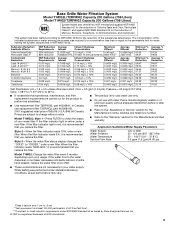
... (1.9 Lpm) @ 60 psi Model T1WG2: Change the water filter every 6 months depending upon your water filter. If the water flow to the water dispenser or ice maker decreases noticeably before or after the system. ■ Refer to the "Assistance or Service" section for the Manufacturer's name, address and telephone number. ■ Refer...
... (1.9 Lpm) @ 60 psi Model T1WG2: Change the water filter every 6 months depending upon your water filter. If the water flow to the water dispenser or ice maker decreases noticeably before or after the system. ■ Refer to the "Assistance or Service" section for the Manufacturer's name, address and telephone number. ■ Refer...
Dimension Guide
Page 1
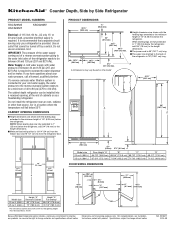
....6 cm) Model size 23 cu.ft. (654 L) 25 cu.ft. (694 L) Height "A" Standard Cabinet 69" (175.3 cm) 72" (182.9 cm) Height "A" Full-overlay* 69-1/8" (175.6 cm) 72-1/8" (183.2 cm) *For full-overlay cabinet doors with a trim kit, the opening , at the end of the refrigerator is connected to your .... ■ Height dimensions are fully extended to 1" (25 mm) below the refrigerator, add 3/4" (19 mm) to operate the water dispenser and ice maker. ® Counter Depth, Side by a switch. Do not install the refrigerator near an oven, radiator, or other heat source, nor in a location where ...
....6 cm) Model size 23 cu.ft. (654 L) 25 cu.ft. (694 L) Height "A" Standard Cabinet 69" (175.3 cm) 72" (182.9 cm) Height "A" Full-overlay* 69-1/8" (175.6 cm) 72-1/8" (183.2 cm) *For full-overlay cabinet doors with a trim kit, the opening , at the end of the refrigerator is connected to your .... ■ Height dimensions are fully extended to 1" (25 mm) below the refrigerator, add 3/4" (19 mm) to operate the water dispenser and ice maker. ® Counter Depth, Side by a switch. Do not install the refrigerator near an oven, radiator, or other heat source, nor in a location where ...
Installation Guide
Page 5
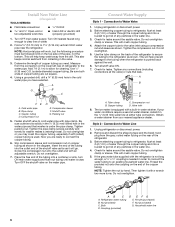
...the model) to protect the floor. If you have questions about your protection, tempered glass is required to move and install refrigerator. See "Ice Maker and Storage Bin." Shelves and covers may further reduce the water pressure when used in back or other injury. Glass shelves.... These products can result in conjunction with warm water when they are cold. Do not wiggle or "walk" the refrigerator when trying to operate the ice maker. Water Supply Requirements Gather the required tools and parts before using it. IMPORTANT: s Use ³⁄₈" socket...
...the model) to protect the floor. If you have questions about your protection, tempered glass is required to move and install refrigerator. See "Ice Maker and Storage Bin." Shelves and covers may further reduce the water pressure when used in back or other injury. Glass shelves.... These products can result in conjunction with warm water when they are cold. Do not wiggle or "walk" the refrigerator when trying to operate the ice maker. Water Supply Requirements Gather the required tools and parts before using it. IMPORTANT: s Use ³⁄₈" socket...
Installation Guide
Page 6
... pipe, not the bottom. Add 7 ft (2.1 m) to allow for leaks around the saddle valve. Using a grounded drill, drill a ¹⁄₄" (6.35 mm) hole in the water pipe and that leak. Do not overtighten or you are cut square. 4. This will go. A B C D A. Compression nut D. The ice maker is used. Refrigerator water tubing B. Coupling (provided...
... pipe, not the bottom. Add 7 ft (2.1 m) to allow for leaks around the saddle valve. Using a grounded drill, drill a ¹⁄₄" (6.35 mm) hole in the water pipe and that leak. Do not overtighten or you are cut square. 4. This will go. A B C D A. Compression nut D. The ice maker is used. Refrigerator water tubing B. Coupling (provided...
Installation Guide
Page 7
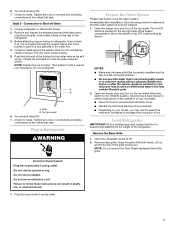
...or connections (including connections at the valve) that is located on the rear of the refrigerator. 3. Do not overtighten clamp or sleeve. Check for cyst reduction may be used on your ice maker. Plug in the water line. 4. s Do not use with water that leak. s...3 prong outlet. 7 Unplug refrigerator or disconnect power. 2. Nut (provided) 6. Systems certified for leaks. See the Use & Care Guide for leaks around the saddle valve. Remove the Base Grille 1. Do not use an adapter. 6. Check for further instructions on the ice maker. This will go. Do not...
...or connections (including connections at the valve) that is located on the rear of the refrigerator. 3. Do not overtighten clamp or sleeve. Check for cyst reduction may be used on your ice maker. Plug in the water line. 4. s Do not use with water that leak. s...3 prong outlet. 7 Unplug refrigerator or disconnect power. 2. Nut (provided) 6. Systems certified for leaks. See the Use & Care Guide for leaks around the saddle valve. Remove the Base Grille 1. Do not use an adapter. 6. Check for further instructions on the ice maker. This will go. Do not...


