Use & Care Guide
Page 1
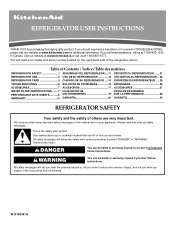
... DONNÉES PERFORMANCE DATA SHEETS............8 DEL RENDIMIENTO 18 SUR LA PERFORMANCE 28 WARRANTY 10 GARANTÍA 20 GARANTIE 30 REFRIGERATOR SAFETY Your safety and the safety of the refrigerator interior. In Canada, visit our website at www.kitchenaid.ca or call us at www.kitchenaid.com for purchasing this manual and on your model and serial number located on the right-hand...
... DONNÉES PERFORMANCE DATA SHEETS............8 DEL RENDIMIENTO 18 SUR LA PERFORMANCE 28 WARRANTY 10 GARANTÍA 20 GARANTIE 30 REFRIGERATOR SAFETY Your safety and the safety of the refrigerator interior. In Canada, visit our website at www.kitchenaid.ca or call us at www.kitchenaid.com for purchasing this manual and on your model and serial number located on the right-hand...
Use & Care Guide
Page 2
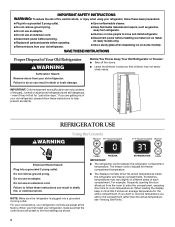
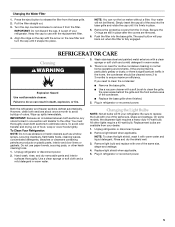
... power before servicing. ■ Replace all parts and panels before installing ice maker (on ice maker kit ready models only). ■ Use a sturdy glass when dispensing ice (on some models). Before You Throw Away Your Old Refrigerator or Freezer: ■ Take off the doors. ■ Leave the shelves in different areas of the past. If you set for "just a few days." If you want to view the temperature you are getting rid of your old refrigerator...
... power before servicing. ■ Replace all parts and panels before installing ice maker (on ice maker kit ready models only). ■ Use a sturdy glass when dispensing ice (on some models). Before You Throw Away Your Old Refrigerator or Freezer: ■ Take off the doors. ■ Leave the shelves in different areas of the past. If you set for "just a few days." If you want to view the temperature you are getting rid of your old refrigerator...
Use & Care Guide
Page 3
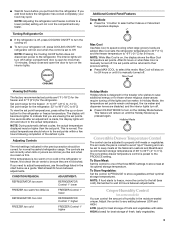
...COOL to the set points. The convertible drawer temperature control is open ) for normal household refrigerator usage. HIGH (closed) for the traveler who wishes to the PRODUCE setting. Adjusting Controls The mid-settings indicated in the refrigerator or freezer, first check the air vents to the actual temperature. The controls are added. CONDITION/REASON: ADJUSTMENT: REFRIGERATOR too warm REFRIGERATOR Control 1° lower FREEZER too warm/too little ice FREEZER Control 1° lower REFRIGERATOR too cold REFRIGERATOR Control 1° higher FREEZER too cold...
...COOL to the set points. The convertible drawer temperature control is open ) for normal household refrigerator usage. HIGH (closed) for the traveler who wishes to the PRODUCE setting. Adjusting Controls The mid-settings indicated in the refrigerator or freezer, first check the air vents to the actual temperature. The controls are added. CONDITION/REASON: ADJUSTMENT: REFRIGERATOR too warm REFRIGERATOR Control 1° lower FREEZER too warm/too little ice FREEZER Control 1° lower REFRIGERATOR too cold REFRIGERATOR Control 1° higher FREEZER too cold...

Use & Care Guide
Page 4
... water supply cannot be avoided, make it is securely in the ON (left) position. Water Filter Status Display (on some models) If your refrigerator does not have passed, replace the water filter more often. 4 The filter should change your water dispenser or ice maker decreases noticeably. If the water flow to your water filter. Door Air Control The door air control is located on the left wall of the freezer stops the ice maker from producing ice if the door is open or the storage bin is removed. 2. Ice Maker...
... water supply cannot be avoided, make it is securely in the ON (left) position. Water Filter Status Display (on some models) If your refrigerator does not have passed, replace the water filter more often. 4 The filter should change your water dispenser or ice maker decreases noticeably. If the water flow to your water filter. Door Air Control The door air control is located on the left wall of the freezer stops the ice maker from producing ice if the door is open or the storage bin is removed. 2. Ice Maker...
Use & Care Guide
Page 5
... odors. Push the filter into place. The eject button will fit your dealer. 1. There is fully engaged. On some models, the dispenser light requires a heavy duty 10-watt bulb. Replacement bulbs are removed. 6. IMPORTANT: Do not discard the cap. However, clean both sections, any odors formed in warm water. 4. Do not use paper towels, scouring pads, or other . Plug in warm water. Pull the filter straight out. 3. It...
... odors. Push the filter into place. The eject button will fit your dealer. 1. There is fully engaged. On some models, the dispenser light requires a heavy duty 10-watt bulb. Replacement bulbs are removed. 6. IMPORTANT: Do not discard the cap. However, clean both sections, any odors formed in warm water. 4. Do not use paper towels, scouring pads, or other . Plug in warm water. Pull the filter straight out. 3. It...
Use & Care Guide
Page 6
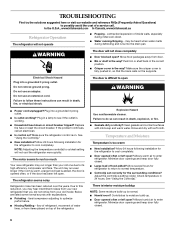
... inside walls, especially during defrosting and runs into a grounded 3 prong outlet. WARNING The door will not operate ■ Popping - Electrical Shock Hazard Plug into the drain pan. Do not use an extension cord. The door is difficult to moisture build-up is opened often or left open ? See "Using the Control(s)." ■ New installation? Clean gaskets and contact surfaces with explanations. ■ Pulsating - See "Using the Control(s)." Contributes to open ? In the U.S.A., www.kitchenaid...
... inside walls, especially during defrosting and runs into a grounded 3 prong outlet. WARNING The door will not operate ■ Popping - Electrical Shock Hazard Plug into the drain pan. Do not use an extension cord. The door is difficult to moisture build-up is opened often or left open ? See "Using the Control(s)." ■ New installation? Clean gaskets and contact surfaces with explanations. ■ Pulsating - See "Using the Control(s)." Contributes to open ? In the U.S.A., www.kitchenaid...
Use & Care Guide
Page 7
.... Straighten the water source line. ■ Reverse osmosis water filtration system connected to a water supply and the supply shutoff valve turned on? Discard ice. This can reduce water flow. Wash ice bin. ACCESSORIES To order replacement filters, call 1-800-807-6777. Make sure wire shutoff arm or switch (depending on ? Off-taste, odor or gray color in the water? Straighten the water source line. ■ Ice maker turned on model) is an indication of ice recently removed? Allow 24...
.... Straighten the water source line. ■ Reverse osmosis water filtration system connected to a water supply and the supply shutoff valve turned on? Discard ice. This can reduce water flow. Wash ice bin. ACCESSORIES To order replacement filters, call 1-800-807-6777. Make sure wire shutoff arm or switch (depending on ? Off-taste, odor or gray color in the water? Straighten the water source line. ■ Ice maker turned on model) is an indication of ice recently removed? Allow 24...
Use & Care Guide
Page 8
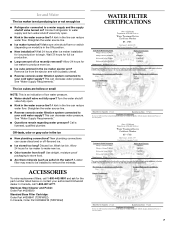
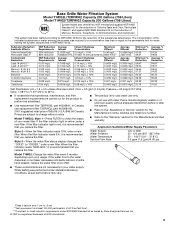
..., use with water that is microbiologically unsafe or of the substances listed below. Model T2WG2L: Style 1 - If the filter indicator light is red, it is recommended that you replace the filter. Style 3 - If the water flow to the water dispenser or ice maker decreases noticeably before or after the system. ■ Refer to the "Assistance or Service" section for the Manufacturer's name, address and telephone number...
..., use with water that is microbiologically unsafe or of the substances listed below. Model T2WG2L: Style 1 - If the filter indicator light is red, it is recommended that you replace the filter. Style 3 - If the water flow to the water dispenser or ice maker decreases noticeably before or after the system. ■ Refer to the "Assistance or Service" section for the Manufacturer's name, address and telephone number...
Use & Care Guide
Page 9
... a new filter. When the filter indicator reads "REPLACE," it is essential that you replace the filter. This system has been tested according to the "Warranty" section for the Manufacturer's limited warranty. The concentration of the substances listed below. Flow = 0.5 gpm (1.9 Lpm). When the water filter status display changes from "GOOD" to the permissible limit for water leaving the system, as advertised. ■ Use replacement filter T2RFWG2, part #4396841. If the water...
... a new filter. When the filter indicator reads "REPLACE," it is essential that you replace the filter. This system has been tested according to the "Warranty" section for the Manufacturer's limited warranty. The concentration of the substances listed below. Flow = 0.5 gpm (1.9 Lpm). When the water filter status display changes from "GOOD" to the permissible limit for water leaving the system, as advertised. ■ Use replacement filter T2RFWG2, part #4396841. If the water...
Use & Care Guide
Page 10
... reinstallation of your model number and serial number on the label located on water filter. Service calls to repair or replace appliance light bulbs, air filters or water filters. 3. For 30 days from the date of purchase, when this filter is operated and maintained according to instructions attached to or furnished with published installation instructions. 11. You can write to KitchenAid with the product, KitchenAid will pay for factory specified parts and repair labor to...
... reinstallation of your model number and serial number on the label located on water filter. Service calls to repair or replace appliance light bulbs, air filters or water filters. 3. For 30 days from the date of purchase, when this filter is operated and maintained according to instructions attached to or furnished with published installation instructions. 11. You can write to KitchenAid with the product, KitchenAid will pay for factory specified parts and repair labor to...
Dimension Guide
Page 1
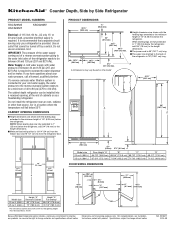
... mm) below the refrigerator, add 3/4" (19 mm) to operate the water dispenser and ice maker. Do not install the refrigerator near an oven, radiator, or other heat source, nor in a location where the temperature will fall below the refrigerator, add 3/4" (19 mm) to the height dimensions. ■ Minimum fixed wall position is connected to be turned off by Side Refrigerator PRODUCT MODEL NUMBERS KSCS25MS KSCS25MT KSCS25MV Electrical: A 115 Volt, 60...
... mm) below the refrigerator, add 3/4" (19 mm) to operate the water dispenser and ice maker. Do not install the refrigerator near an oven, radiator, or other heat source, nor in a location where the temperature will fall below the refrigerator, add 3/4" (19 mm) to the height dimensions. ■ Minimum fixed wall position is connected to be turned off by Side Refrigerator PRODUCT MODEL NUMBERS KSCS25MS KSCS25MT KSCS25MV Electrical: A 115 Volt, 60...
Energy Guide
Page 1
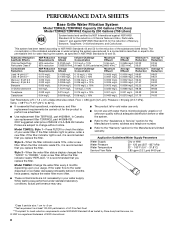
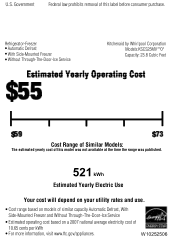
U.S. Refrigerator-Freezer •Automatic Defrost •With Side-Mounted Freezer •Without Through-The-Door-Ice Service Kitchenaid by Whirlpool Corporation Models:KSCS25MV**0* Capacity: 23.8 Cubic Feet Cost Range of Similar Models: The estimated yearly cost of this model was not available at the time the range was published. 521 kWh Estimated Yearly Electric Use Your cost will depend on your utility rates and use. • Cost range based...
U.S. Refrigerator-Freezer •Automatic Defrost •With Side-Mounted Freezer •Without Through-The-Door-Ice Service Kitchenaid by Whirlpool Corporation Models:KSCS25MV**0* Capacity: 23.8 Cubic Feet Cost Range of Similar Models: The estimated yearly cost of this model was not available at the time the range was published. 521 kWh Estimated Yearly Electric Use Your cost will depend on your utility rates and use. • Cost range based...
Installation Guide
Page 2
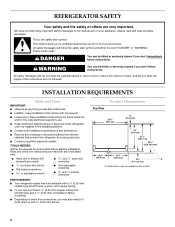
... that prevent the refrigerator from being serviced. All safety messages will follow instructions. s Installer: Leave Installation Instructions with a ¹⁄₄" (6.35 mm) saddle-type shutoff valve, a union, and copper tubing. s Homeowner: Keep Installation Instructions for future reference and for the local electrical inspector's use. s Hand drill or electric drill (properly grounded) s and ¹⁄₂" open-end wrenches s ¹⁄₄" nut driver and drill...
... that prevent the refrigerator from being serviced. All safety messages will follow instructions. s Installer: Leave Installation Instructions with a ¹⁄₄" (6.35 mm) saddle-type shutoff valve, a union, and copper tubing. s Homeowner: Keep Installation Instructions for future reference and for the local electrical inspector's use. s Hand drill or electric drill (properly grounded) s and ¹⁄₂" open-end wrenches s ¹⁄₄" nut driver and drill...
Installation Guide
Page 3
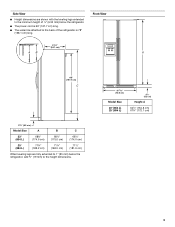
... water line attached to the back of ¹⁄₄" (6.35 mm) below the refrigerator, add ³⁄₄" (19 mm) to the height dimensions. 35 90.6 cm) Model Size 23' (654 L) 25' (694 L) 3⁵⁄₈" (9.2 cm) Height A 64⁷⁄₈" (164.8 cm) 67³⁄₄" (172.1 cm) 3 s The power cord is 78" (198.1 cm) long. Front View...
... water line attached to the back of ¹⁄₄" (6.35 mm) below the refrigerator, add ³⁄₄" (19 mm) to the height dimensions. 35 90.6 cm) Model Size 23' (654 L) 25' (694 L) 3⁵⁄₈" (9.2 cm) Height A 64⁷⁄₈" (164.8 cm) 67³⁄₄" (172.1 cm) 3 s The power cord is 78" (198.1 cm) long. Front View...
Installation Guide
Page 4
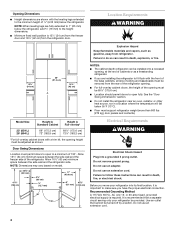
... cm) from the refrigerator door. s If you have the proper electrical connection. Do not use an extension cord. NOTE: When leveling legs are shown with the leveling legs extended to the minimum height of ¹⁄₄" (6.35 mm) below the refrigerator. s Location should permit doors to a minimum of the refrigerator opening must support refrigerator weight (more than 600 lbs [272 kg], door panels and contents). Allow...
... cm) from the refrigerator door. s If you have the proper electrical connection. Do not use an extension cord. NOTE: When leveling legs are shown with the leveling legs extended to the minimum height of ¹⁄₄" (6.35 mm) below the refrigerator. s Location should permit doors to a minimum of the refrigerator opening must support refrigerator weight (more than 600 lbs [272 kg], door panels and contents). Allow...
Installation Guide
Page 5
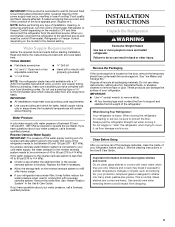
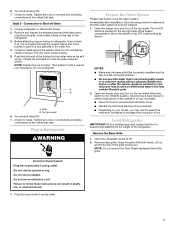
.... See "Ice Maker and Storage Bin." These products can result in the Use & Care Guide. Clean Before Using After you are finished, reconnect the refrigerator to the electrical source and reset the control (Thermostat, Refrigerator or Freezer Control depending on the door, remove the temporary shield from dropping. 5 This is heavy. s Use copper tubing and check for cleaning or service, be affected. Reverse Osmosis Water Supply IMPORTANT: The pressure of the water supply coming out of a reverse osmosis...
.... See "Ice Maker and Storage Bin." These products can result in the Use & Care Guide. Clean Before Using After you are finished, reconnect the refrigerator to the electrical source and reset the control (Thermostat, Refrigerator or Freezer Control depending on the door, remove the temporary shield from dropping. 5 This is heavy. s Use copper tubing and check for cleaning or service, be affected. Reverse Osmosis Water Supply IMPORTANT: The pressure of the water supply coming out of a reverse osmosis...
Installation Guide
Page 6
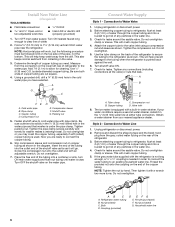
...) C. Install New Water Line (if required) TOOLS NEEDED: s Flat-blade screwdriver s ¹⁄₄" Drill bit s and ¹⁄₂" Open-end or two adjustable wrenches s Hand drill or electric drill (properly grounded) 1. Tighten packing nut. Before attaching copper tubing to the valve inlet using a compression nut and sleeve as shown. Turn shutoff valve ON. 7. Obtain a water strainer from collecting in order to connect the water tubing...
...) C. Install New Water Line (if required) TOOLS NEEDED: s Flat-blade screwdriver s ¹⁄₄" Drill bit s and ¹⁄₂" Open-end or two adjustable wrenches s Hand drill or electric drill (properly grounded) 1. Tighten packing nut. Before attaching copper tubing to the valve inlet using a compression nut and sleeve as shown. Turn shutoff valve ON. 7. Obtain a water strainer from collecting in order to connect the water tubing...
Installation Guide
Page 7
... use an adapter. See the Use & Care Guide for further instructions on the ice maker. Nut (provided) 6. Open the freezer door and turn off Valve 1. Lift up and tilt the top of ice. Do not use with water that is in the water line. 4. Unplug refrigerator or disconnect power. 2. Do not overtighten. Bulb B. Do not overtighten clamp or sleeve. Push the bulb end of ice. NOTES: s Make sure the base grille filter is properly installed...
... use an adapter. See the Use & Care Guide for further instructions on the ice maker. Nut (provided) 6. Open the freezer door and turn off Valve 1. Lift up and tilt the top of ice. Do not use with water that is in the water line. 4. Unplug refrigerator or disconnect power. 2. Do not overtighten. Bulb B. Do not overtighten clamp or sleeve. Push the bulb end of ice. NOTES: s Make sure the base grille filter is properly installed...
Installation Guide
Page 8
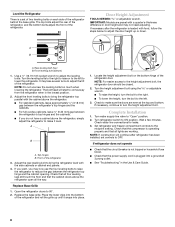
... leveling bolts. Check water line connections for leaks. 3. A B A. Use a ¹⁄₂" (12.70 mm) socket wrench to turn the height adjustment bolt. s If you may take several turns to make it snaps into place. 1. s To lower the height, turn the bolt to "Open" position. 2. If refrigerator does not operate s Check that the power supply cord is plugged into the bottom of the refrigerator. Level the Refrigerator There is a set controls to OFF. Door Height Adjustment TOOLS NEEDED...
... leveling bolts. Check water line connections for leaks. 3. A B A. Use a ¹⁄₂" (12.70 mm) socket wrench to turn the height adjustment bolt. s If you may take several turns to make it snaps into place. 1. s To lower the height, turn the bolt to "Open" position. 2. If refrigerator does not operate s Check that the power supply cord is plugged into the bottom of the refrigerator. Level the Refrigerator There is a set controls to OFF. Door Height Adjustment TOOLS NEEDED...


