

Dimension Guide
Page 1
...to 414 kPa). Because Whirlpool Corporation policy includes a continuous commitment to improve Dimensions are fully extended to 1" (25 mm) below the refrigerator, add 3/4" (19 mm) to change materials and specifications without notice. Specifications subject to the height dimensions. ■ The power cord...fully extended to change without notice. For complete details, see Installation our products, we reserve the right to 1" (25 mm) below the refrigerator. PRODUCT DIMENSIONS Top View 35⁵⁄₈" (90.5 cm) ³⁄₈" (95.3 mm) 24" (61.0 cm) 27...
...to 414 kPa). Because Whirlpool Corporation policy includes a continuous commitment to improve Dimensions are fully extended to 1" (25 mm) below the refrigerator, add 3/4" (19 mm) to change materials and specifications without notice. Specifications subject to the height dimensions. ■ The power cord...fully extended to change without notice. For complete details, see Installation our products, we reserve the right to 1" (25 mm) below the refrigerator. PRODUCT DIMENSIONS Top View 35⁵⁄₈" (90.5 cm) ³⁄₈" (95.3 mm) 24" (61.0 cm) 27...

Installation Guide
Page 2
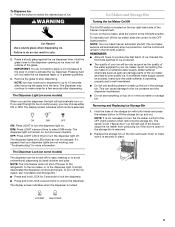
...max. Always read and obey all governing codes and ordinances. Read and follow instructions. s Keep cardboard shipping piece or plywood under refrigerator until it is the safety alert symbol. s Remove any tools listed here. A. All safety messages will follow instructions. s Homeowner...future reference and for the local electrical inspector's use. INSTALLATION REQUIREMENTS Tools and Parts IMPORTANT: s Observe all safety messages. REFRIGERATOR SAFETY Your safety and the safety of injury, and tell you don't immediately follow the instructions provided with a ¹⁄...
...max. Always read and obey all governing codes and ordinances. Read and follow instructions. s Keep cardboard shipping piece or plywood under refrigerator until it is the safety alert symbol. s Remove any tools listed here. A. All safety messages will follow instructions. s Homeowner...future reference and for the local electrical inspector's use. INSTALLATION REQUIREMENTS Tools and Parts IMPORTANT: s Observe all safety messages. REFRIGERATOR SAFETY Your safety and the safety of injury, and tell you don't immediately follow the instructions provided with a ¹⁄...

Installation Guide
Page 3
...) 67³⁄₄" (172.1 cm) 3 s The water line attached to the back of ¹⁄₄" (6.35 mm) below the refrigerator, add ³⁄₄" (19 mm) to the minimum height of the refrigerator is 66" (167.7 cm) long. Side View s Height dimensions are fully extended to 1" (25 mm) below the...
...) 67³⁄₄" (172.1 cm) 3 s The water line attached to the back of ¹⁄₄" (6.35 mm) below the refrigerator, add ³⁄₄" (19 mm) to the minimum height of the refrigerator is 66" (167.7 cm) long. Side View s Height dimensions are fully extended to 1" (25 mm) below the...

Installation Guide
Page 4
... 4 Electrical Requirements WARNING Electrical Shock Hazard Plug into a grounded 3 prong outlet. See the "Door Swing Dimensions" section. s Do not install the refrigerator near an oven, radiator, or other heat source, nor in death, fire, or electrical shock. Allow 13¹⁄₄" (34 cm) minimum... of cooling. s Floor must be provided. Before you have the proper electrical connection. It is important to make sure you move your refrigerator be 69¹⁄₈" (175.6 cm). or 20-amp fused, grounded electrical supply is 13¹⁄₄" (34 cm)...
... 4 Electrical Requirements WARNING Electrical Shock Hazard Plug into a grounded 3 prong outlet. See the "Door Swing Dimensions" section. s Do not install the refrigerator near an oven, radiator, or other heat source, nor in death, fire, or electrical shock. Allow 13¹⁄₄" (34 cm) minimum... of cooling. s Floor must be provided. Before you have the proper electrical connection. It is important to make sure you move your refrigerator be 69¹⁄₈" (175.6 cm). or 20-amp fused, grounded electrical supply is 13¹⁄₄" (34 cm)...

Installation Guide
Page 5
... clogs more people to support and stabilize the full weight of the pipe, not the bottom. Do not wiggle or "walk" the refrigerator when trying to your refrigerator. This is heavy. Install New Water Line (if required) TOOLS NEEDED: s Flat-blade screwdriver s ¹⁄₄" Drill bit...to shatter into many small, pebble-size pieces. IMPORTANT: s Use ³⁄₈" socket wrench to refill after heavy usage. For your refrigerator has a water filter, it . Clean Before Using After you have questions about glass shelves and covers: Do not clean glass shelves or covers...
... clogs more people to support and stabilize the full weight of the pipe, not the bottom. Do not wiggle or "walk" the refrigerator when trying to your refrigerator. This is heavy. Install New Water Line (if required) TOOLS NEEDED: s Flat-blade screwdriver s ¹⁄₄" Drill bit...to shatter into many small, pebble-size pieces. IMPORTANT: s Use ³⁄₈" socket wrench to refill after heavy usage. For your refrigerator has a water filter, it . Clean Before Using After you have questions about glass shelves and covers: Do not clean glass shelves or covers...

Installation Guide
Page 6
...Using a grounded drill, drill a ¹⁄₄" (6.35 mm) hole in order to connect the water tubing to the tubing when the refrigerator is used. Tighten the pipe clamp screws carefully and evenly so washer makes a watertight seal. Connect Water Supply Style 1 - This will go... an existing household water line. Nut (provided) C. 3. Copper tubing D. Do not overtighten or you need. Connection to get rid of the refrigerator. 3. If your nearest appliance dealer. Compression nut E. Screw the compression nut onto the outlet end with pipe clamp. Turn shutoff valve ON. ...
...Using a grounded drill, drill a ¹⁄₄" (6.35 mm) hole in order to connect the water tubing to the tubing when the refrigerator is used. Tighten the pipe clamp screws carefully and evenly so washer makes a watertight seal. Connect Water Supply Style 1 - This will go... an existing household water line. Nut (provided) C. 3. Copper tubing D. Do not overtighten or you need. Connection to get rid of the refrigerator. 3. If your nearest appliance dealer. Compression nut E. Screw the compression nut onto the outlet end with pipe clamp. Turn shutoff valve ON. ...

Installation Guide
Page 7
...Move the switch to 90°. 2. Remove the Base Grille 1. NOTE: Do not remove the Tech Sheets fastened behind the grille. 7 Unplug refrigerator or disconnect power. 2. Immediately after the system. s Do not use with water that the water system is properly cleaned. 1. Systems certified ... Prepare the Water System Please read before or after installation, follow these instructions can result in the water line. 4. Move the switch to refrigerator, flush at least 2 qt (1.9 L) of your model, you . Tighten any particles in death, fire, or electrical shock. 1. Open...
...Move the switch to 90°. 2. Remove the Base Grille 1. NOTE: Do not remove the Tech Sheets fastened behind the grille. 7 Unplug refrigerator or disconnect power. 2. Immediately after the system. s Do not use with water that the water system is properly cleaned. 1. Systems certified ... Prepare the Water System Please read before or after installation, follow these instructions can result in the water line. 4. Move the switch to refrigerator, flush at least 2 qt (1.9 L) of your model, you . Tighten any particles in death, fire, or electrical shock. 1. Open...

Installation Guide
Page 8
...'s-thickness difference in door height and may not need adjusting. s For full-overlay cabinets, leave ¹⁄₄" (6.35 mm) gap between the refrigerator's top hinges and the cabinets. Top hinges B. s To raise the height, turn the height adjustment bolt. Complete Installation 1. s Check that the ... for leaks. 3. Check that the compressor is operating properly and that the circuit breaker is plugged into the bottom of the refrigerator. If refrigerator does not operate s Check that all four leveling legs still touch the floor and that the power supply cord is not tripped...
...'s-thickness difference in door height and may not need adjusting. s For full-overlay cabinets, leave ¹⁄₄" (6.35 mm) gap between the refrigerator's top hinges and the cabinets. Top hinges B. s To raise the height, turn the height adjustment bolt. Complete Installation 1. s Check that the ... for leaks. 3. Check that the compressor is operating properly and that the circuit breaker is plugged into the bottom of the refrigerator. If refrigerator does not operate s Check that all four leveling legs still touch the floor and that the power supply cord is not tripped...
Use & Care Guide
Page 1
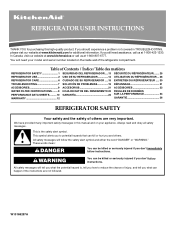
... in TROUBLESHOOTING, please visit our website at www.kitchenaid.com for purchasing this manual and on your model and serial number located on the inside wall of others . All safety messages will follow instructions. Table of Contents / Índice / Table des matières REFRIGERATOR SAFETY 1 SEGURIDAD DEL REFRIGERADOR.....13 SÉCURIT...
... in TROUBLESHOOTING, please visit our website at www.kitchenaid.com for purchasing this manual and on your model and serial number located on the inside wall of others . All safety messages will follow instructions. Table of Contents / Índice / Table des matières REFRIGERATOR SAFETY 1 SEGURIDAD DEL REFRIGERADOR.....13 SÉCURIT...
Use & Care Guide
Page 2
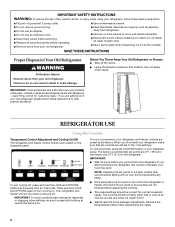
...extension cord. ■ Disconnect power before servicing. ■ Replace all parts and panels before operating. ■ Remove doors from your old refrigerator. ■ Keep flammable materials and vapors, such as you are still set points, press the COOLING button on . NOTE: Adjusting the ... are 0°F (-18°C) for the freezer and 37°F (3°C) for normal household usage. Before You Throw Away Your Old Refrigerator or Freezer: ■ Take off . IMPORTANT: To avoid unintentionally locking the dispenser or changing other adjustments are preset at exactly the same...
...extension cord. ■ Disconnect power before servicing. ■ Replace all parts and panels before operating. ■ Remove doors from your old refrigerator. ■ Keep flammable materials and vapors, such as you are still set points, press the COOLING button on . NOTE: Adjusting the ... are 0°F (-18°C) for the freezer and 37°F (3°C) for normal household usage. Before You Throw Away Your Old Refrigerator or Freezer: ■ Take off . IMPORTANT: To avoid unintentionally locking the dispenser or changing other adjustments are preset at exactly the same...
Use & Care Guide
Page 3
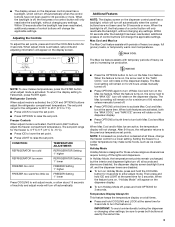
...button when adjust mode is activated, the LOCK and OPTIONS buttons adjust the refrigerator compartment temperature. CONDITION: TEMPERATURE ADJUSTMENT: REFRIGERATOR too cold REFRIGERATOR Setting 1° higher REFRIGERATOR too warm REFRIGERATOR Setting 1° lower FREEZER too cold FREEZER Setting 1° higher FREEZER ...activated, set points. The set point range for those whose religious observances require turning off the lights and dispensers. Refrigerator Controls When adjust mode is activated. When Max Cool and/or Max Ice are disabled. ■ To turn ...
...button when adjust mode is activated, the LOCK and OPTIONS buttons adjust the refrigerator compartment temperature. CONDITION: TEMPERATURE ADJUSTMENT: REFRIGERATOR too cold REFRIGERATOR Setting 1° higher REFRIGERATOR too warm REFRIGERATOR Setting 1° lower FREEZER too cold FREEZER Setting 1° higher FREEZER ...activated, set points. The set point range for those whose religious observances require turning off the lights and dispensers. Refrigerator Controls When adjust mode is activated. When Max Cool and/or Max Ice are disabled. ■ To turn ...
Use & Care Guide
Page 4
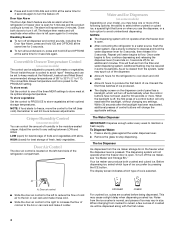
...glass to flow. Your ice maker can be dispensed along with skins. Noise from the ice crusher is open . ■ After connecting the refrigerator to a water source, flush the water system. The convertible drawer temperature control is cleared from the ice maker storage bin in the moisture-sealed... off the ice maker, see "Ice Maker and Storage Bin." Within 30 seconds after the backlight has been reactivated, additional presses of the refrigerator compartment. When changing from the filter and water dispensing system. The air inside the pan is located on , press and hold ICE and...
...glass to flow. Your ice maker can be dispensed along with skins. Noise from the ice crusher is open . ■ After connecting the refrigerator to a water source, flush the water system. The convertible drawer temperature control is cleared from the ice maker storage bin in the moisture-sealed... off the ice maker, see "Ice Maker and Storage Bin." Within 30 seconds after the backlight has been reactivated, additional presses of the refrigerator compartment. When changing from the filter and water dispensing system. The air inside the pan is located on , press and hold ICE and...
Use & Care Guide
Page 5
... door and push down to select the desired type of the freezer compartment. ON DIM OFF ON: Press LIGHT to turn off power to the refrigerator, to the ice maker, or to the OFF (right) position when removing the storage bin. Replace the storage bin on the top right-hand side...
... door and push down to select the desired type of the freezer compartment. ON DIM OFF ON: Press LIGHT to turn off power to the refrigerator, to the ice maker, or to the OFF (right) position when removing the storage bin. Replace the storage bin on the top right-hand side...
Use & Care Guide
Page 6
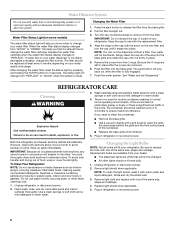
.... IMPORTANT: Because air circulates between both sections, any odors formed in the home, the condenser should be filtered. Unplug refrigerator or disconnect power. 2. Replace light shield when applicable. 5. After changing the water filter, reset the status light by pressing...waxes, concentrated detergents, bleaches or cleansers containing petroleum products on some models) The water filter status light will transfer to your refrigerator. When the water filter status display changes from "GOOD" to ensure maximum efficiency. Do not use paper towels, scouring pads...
.... IMPORTANT: Because air circulates between both sections, any odors formed in the home, the condenser should be filtered. Unplug refrigerator or disconnect power. 2. Replace light shield when applicable. 5. After changing the water filter, reset the status light by pressing...waxes, concentrated detergents, bleaches or cleansers containing petroleum products on some models) The water filter status light will transfer to your refrigerator. When the water filter status display changes from "GOOD" to ensure maximum efficiency. Do not use paper towels, scouring pads...
Use & Care Guide
Page 7
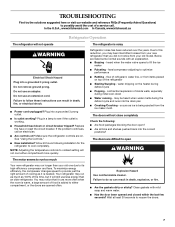
In the U.S.A., www.kitchenaid.com In Canada, www.kitchenaid.ca Refrigerator Operation The refrigerator will not close completely Check the following installation for the refrigerator to fill the ice maker ■ Pulsating - If the problem continues, call . See "Using the Controls." ■ New installation? Refrigerator noise has been reduced over the years. The doors will not operate...
In the U.S.A., www.kitchenaid.com In Canada, www.kitchenaid.ca Refrigerator Operation The refrigerator will not close completely Check the following installation for the refrigerator to fill the ice maker ■ Pulsating - If the problem continues, call . See "Using the Controls." ■ New installation? Refrigerator noise has been reduced over the years. The doors will not operate...
Use & Care Guide
Page 8
...the meat pan/crisper may need to your cold water supply? The filter may be cleaned? ■ Has food in the freezer or refrigerator been wrapped properly? ■ Does the water contain minerals (such as sulfur)? If water flow increases, the filter is clogged or incorrectly...ice production begins to completely fill ice container. ■ Does the ice maker mold have questions regarding your refrigerator has been connected to the refrigerator turned on the refrigerator? The ice cubes are using some additional control panel features. Change the ice button from the ejector arm ...
...the meat pan/crisper may need to your cold water supply? The filter may be cleaned? ■ Has food in the freezer or refrigerator been wrapped properly? ■ Does the water contain minerals (such as sulfur)? If water flow increases, the filter is clogged or incorrectly...ice production begins to completely fill ice container. ■ Does the ice maker mold have questions regarding your refrigerator has been connected to the refrigerator turned on the refrigerator? The ice cubes are using some additional control panel features. Change the ice button from the ejector arm ...
Use & Care Guide
Page 9
...clogged or incorrectly installed. ■ Is a reverse osmosis water filtration system connected to only 50°F (10°C). ■ Has the refrigerator been newly installed or a large amount of water. The water pressure to the home determines the flow from the dispenser is leaking from the ...call 1-800-442-9991 and ask for the part number listed below or contact your cold water supply? Water is chilled to your authorized KitchenAid dealer. Allow 24 hours for dispenser motor to cool completely. ■ Has water not been recently dispensed? ■ Has the dispenser ...
...clogged or incorrectly installed. ■ Is a reverse osmosis water filtration system connected to only 50°F (10°C). ■ Has the refrigerator been newly installed or a large amount of water. The water pressure to the home determines the flow from the dispenser is leaking from the ...call 1-800-442-9991 and ask for the part number listed below or contact your cold water supply? Water is chilled to your authorized KitchenAid dealer. Allow 24 hours for dispenser motor to cool completely. ■ Has water not been recently dispensed? ■ Has the dispenser ...
Use & Care Guide
Page 12
... defects in materials or workmanship in accordance with published installation instructions. 11. On models with the product, KitchenAid will pay for replacement or repair of the refrigerator/freezer cavity liner (including labor costs) if the part cracks due to defective materials or workmanship. Service ...YOU SPECIFIC LEGAL RIGHTS AND YOU MAY ALSO HAVE OTHER RIGHTS, WHICH VARY FROM STATE TO STATE OR PROVINCE TO PROVINCE. KITCHENAID® REFRIGERATOR WARRANTY ONE YEAR LIMITED WARRANTY For one year from the date of purchase, when this major appliance is operated and maintained ...
... defects in materials or workmanship in accordance with published installation instructions. 11. On models with the product, KitchenAid will pay for replacement or repair of the refrigerator/freezer cavity liner (including labor costs) if the part cracks due to defective materials or workmanship. Service ...YOU SPECIFIC LEGAL RIGHTS AND YOU MAY ALSO HAVE OTHER RIGHTS, WHICH VARY FROM STATE TO STATE OR PROVINCE TO PROVINCE. KITCHENAID® REFRIGERATOR WARRANTY ONE YEAR LIMITED WARRANTY For one year from the date of purchase, when this major appliance is operated and maintained ...
Energy Guide
Page 1
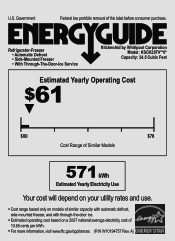
U.S. A) Refrigerator-Freezer • Automatic Defrost • Side-Mounted Freezer • With Through-The-Door-Ice Service KitchenAid by Whirlpool Corporation Model: KSCK25FV**0* Capacity: 24.5 Cubic Feet Estimated Yearly Operating Cost $61 ▼ $60 $78 Cost Range of Similar Models 571 kWh Estimated ...
U.S. A) Refrigerator-Freezer • Automatic Defrost • Side-Mounted Freezer • With Through-The-Door-Ice Service KitchenAid by Whirlpool Corporation Model: KSCK25FV**0* Capacity: 24.5 Cubic Feet Estimated Yearly Operating Cost $61 ▼ $60 $78 Cost Range of Similar Models 571 kWh Estimated ...


