Installation Guide
Page 2
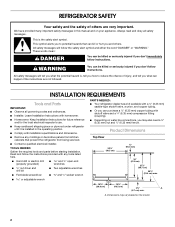
... listed here. Read and follow instructions. Product Dimensions Top View 35⁵⁄₈" (90.5 cm) ³⁄₈" (95.3 mm) 24" (61.0 cm) 27¹⁄₂" (69.7 cm) 30¹⁄₈" (76.4 cm) max. 15⁵⁄₈" 19... s Flat-blade screwdriver s ³⁄₈" and ¹⁄₂" socket wrench s or adjustable wrench PARTS NEEDED: s Your refrigerator dealer has a kit available with installation specifications and dimensions. s Homeowner: Keep Installation Instructions for future reference and for the local electrical inspector...
... listed here. Read and follow instructions. Product Dimensions Top View 35⁵⁄₈" (90.5 cm) ³⁄₈" (95.3 mm) 24" (61.0 cm) 27¹⁄₂" (69.7 cm) 30¹⁄₈" (76.4 cm) max. 15⁵⁄₈" 19... s Flat-blade screwdriver s ³⁄₈" and ¹⁄₂" socket wrench s or adjustable wrench PARTS NEEDED: s Your refrigerator dealer has a kit available with installation specifications and dimensions. s Homeowner: Keep Installation Instructions for future reference and for the local electrical inspector...

Installation Guide
Page 3
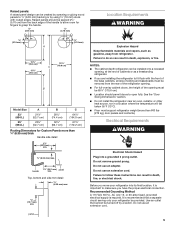
s The water line attached to the back of ¹⁄₄" (6.35 mm) below the refrigerator, add ³⁄₄" (19 mm) to the height dimensions. 35 90.6 cm) Model Size 23' (654 L) 25' (694 L) 3⁵⁄₈" (9.2 cm) Height A 64&#...;₈" (182.5 cm) 71¹⁄₂" (181.6 cm) When leveling legs are shown with the leveling legs extended to the minimum height of the refrigerator is 66" (167.7 cm) long. Side View s Height dimensions are fully extended to 1" (25 mm) below the...
s The water line attached to the back of ¹⁄₄" (6.35 mm) below the refrigerator, add ³⁄₄" (19 mm) to the height dimensions. 35 90.6 cm) Model Size 23' (654 L) 25' (694 L) 3⁵⁄₈" (9.2 cm) Height A 64&#...;₈" (182.5 cm) 71¹⁄₂" (181.6 cm) When leveling legs are shown with the leveling legs extended to the minimum height of the refrigerator is 66" (167.7 cm) long. Side View s Height dimensions are fully extended to 1" (25 mm) below the...

Installation Guide
Page 4
... stainless steel models. Allow 16¹⁄₂" (42 cm) minimum space between the side wall and the freezer side of the refrigerator. Follow the kit instructions for models with a trim kit, the opening height must permit doors to open to a minimum of ¹...730; Cabinet Side Panel Kits Cabinet side panel kits are available to the height dimensions. NOTE: When leveling legs are available to customize refrigerator to create the panels yourself or consult a qualified cabinetmaker or carpenter. IMPORTANT: Panels weighing more than ¹⁄₄" (6.35 mm...
... stainless steel models. Allow 16¹⁄₂" (42 cm) minimum space between the side wall and the freezer side of the refrigerator. Follow the kit instructions for models with a trim kit, the opening height must permit doors to open to a minimum of ¹...730; Cabinet Side Panel Kits Cabinet side panel kits are available to the height dimensions. NOTE: When leveling legs are available to customize refrigerator to create the panels yourself or consult a qualified cabinetmaker or carpenter. IMPORTANT: Panels weighing more than ¹⁄₄" (6.35 mm...
Installation Guide
Page 5
... be installed into a recessed opening, at the end of the opening . See the "Door Swing Dimensions" section. s Floor must support refrigerator weight (more than 600 lbs [272 kg], door panels and contents). or 20-amp fused, grounded electrical supply is important to grasp the ...the proper electrical connection. panel 5 Raised panels should permit doors to do so can result in death, explosion, or fire. s Do not install the refrigerator near an oven, radiator, or other heat source, nor in a location where the temperature will fall below 55°F (13°C). It is ...
... be installed into a recessed opening, at the end of the opening . See the "Door Swing Dimensions" section. s Floor must support refrigerator weight (more than 600 lbs [272 kg], door panels and contents). or 20-amp fused, grounded electrical supply is important to grasp the ...the proper electrical connection. panel 5 Raised panels should permit doors to do so can result in death, explosion, or fire. s Do not install the refrigerator near an oven, radiator, or other heat source, nor in a location where the temperature will fall below 55°F (13°C). It is ...
Installation Guide
Page 6
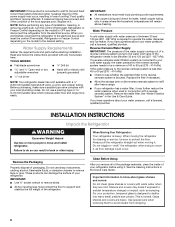
... connected to your protection, tempered glass is designed to protect the floor. Remove the water filter. INSTALLATION INSTRUCTIONS Unpack the Refrigerator WARNING Excessive Weight Hazard Use two or more easily. IMPORTANT: s All installations must contact the floor to sudden temperature changes...between 30 and 120 psi (207 - 827 kPa) is required to avoid impact from the electrical source. When Moving Your Refrigerator: Your refrigerator is normal. s All four leveling legs must meet local plumbing code requirements. IMPORTANT: If this product is connected to remove...
... connected to your protection, tempered glass is designed to protect the floor. Remove the water filter. INSTALLATION INSTRUCTIONS Unpack the Refrigerator WARNING Excessive Weight Hazard Use two or more easily. IMPORTANT: s All installations must contact the floor to sudden temperature changes...between 30 and 120 psi (207 - 827 kPa) is required to avoid impact from the electrical source. When Moving Your Refrigerator: Your refrigerator is normal. s All four leveling legs must meet local plumbing code requirements. IMPORTANT: If this product is connected to remove...
Installation Guide
Page 7
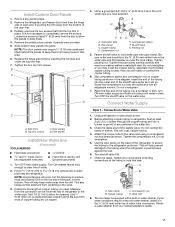
... an adjustable wrench. Door panels D. Determine the length of the shutoff valve as far as shown. Add 7 ft (2.1 m) to allow the panels to the tubing when the refrigerator is clear. Use ¹⁄₄" (6.35 mm) O.D. (outside diameter) copper tubing. Be sure both ... Now you have selected. Valve inlet 8. B B C C A A D D C A. Side trims B. Tighten packing nut. If your nearest appliance dealer. 7 Remove the refrigerator and freezer door trims from the hinge side of water through the copper tubing and into a container or sink, turn ON main water supply and...
... an adjustable wrench. Door panels D. Determine the length of the shutoff valve as far as shown. Add 7 ft (2.1 m) to allow the panels to the tubing when the refrigerator is clear. Use ¹⁄₄" (6.35 mm) O.D. (outside diameter) copper tubing. Be sure both ... Now you have selected. Valve inlet 8. B B C C A A D D C A. Side trims B. Tighten packing nut. If your nearest appliance dealer. 7 Remove the refrigerator and freezer door trims from the hinge side of water through the copper tubing and into a container or sink, turn ON main water supply and...
Installation Guide
Page 8
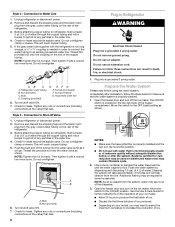
...nuts or connections (including connections at least 2 qt (1.9 L) of water through the copper tubing and into a bucket to get rid of the refrigerator. 3. Do not remove ground prong. Plug into a grounded 3 prong outlet. Prepare the Water System Please read before or after installation, follow...the water system by dispensing and discarding 1.5 gal. (5.4 L) of ice. Move the switch to the OFF (right) setting as shown. s Allow 24 hours to an existing household water line. Style 2 - Do not overtighten clamp or sleeve. This will help clear air from the system, water may...
...nuts or connections (including connections at least 2 qt (1.9 L) of water through the copper tubing and into a bucket to get rid of the refrigerator. 3. Do not remove ground prong. Plug into a grounded 3 prong outlet. Prepare the Water System Please read before or after installation, follow...the water system by dispensing and discarding 1.5 gal. (5.4 L) of ice. Move the switch to the OFF (right) setting as shown. s Allow 24 hours to an existing household water line. Style 2 - Do not overtighten clamp or sleeve. This will help clear air from the system, water may...
Installation Guide
Page 9
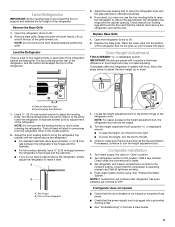
... on the bottom hinge of the grille toward you may not need adjusting. s If you do not have a cabinet above the refrigerator. Front of the refrigerator. s To lower the height, turn the bolt to the left to make sure the doors are working. 4. Complete Installation 1.... Base Grille 1. Top hinges B. Grasp the grille with the cabinet above the refrigerator, simply adjust the refrigerator to lower the refrigerator. Level the Refrigerator There is not tripped or household fuse blown. Open the refrigerator doors to ON position. Turn the leveling bolts to the right to raise or...
... on the bottom hinge of the grille toward you may not need adjusting. s If you do not have a cabinet above the refrigerator. Front of the refrigerator. s To lower the height, turn the bolt to the left to make sure the doors are working. 4. Complete Installation 1.... Base Grille 1. Top hinges B. Grasp the grille with the cabinet above the refrigerator, simply adjust the refrigerator to lower the refrigerator. Level the Refrigerator There is not tripped or household fuse blown. Open the refrigerator doors to ON position. Turn the leveling bolts to the right to raise or...
User Instructions
Page 1
REFRIGERATOR USER INSTRUCTIONS THANK YOU for additional information. If you and others are not followed. You will need assistance, call us at www.kitchenaid.com for purchasing this manual and on the right-hand side of others . Para obtener acceso a "...información adicional acerca de su producto, visite: www.kitchenaid.com. Table of Contents / Table des matières REFRIGERATOR SAFETY 1 SÉCURITÉ DU RÉFRIGÉRATEUR 12 REFRIGERATOR USE 2 UTILISATION DU RÉFRIGÉRATEUR 13 REFRIGERATOR CARE 6 ENTRETIEN DU RÉFRIGÉRATEUR 17 ...
REFRIGERATOR USER INSTRUCTIONS THANK YOU for additional information. If you and others are not followed. You will need assistance, call us at www.kitchenaid.com for purchasing this manual and on the right-hand side of others . Para obtener acceso a "...información adicional acerca de su producto, visite: www.kitchenaid.com. Table of Contents / Table des matières REFRIGERATOR SAFETY 1 SÉCURITÉ DU RÉFRIGÉRATEUR 12 REFRIGERATOR USE 2 UTILISATION DU RÉFRIGÉRATEUR 13 REFRIGERATOR CARE 6 ENTRETIEN DU RÉFRIGÉRATEUR 17 ...
User Instructions
Page 2
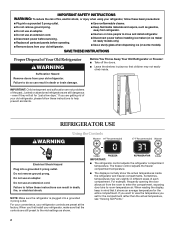
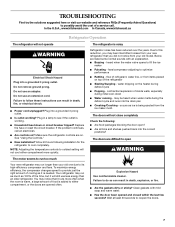
... an average temperature for "just a few days." IMPORTANT SAFETY INSTRUCTIONS WARNING: To reduce the risk of fire, electric shock, or injury when using your refrigerator, follow these basic precautions: ■ Plug into a grounded 3 prong outlet. ■ Use nonflammable cleaner. ■ Do not remove ground prong. ...shown. Do not use an extension cord. When reading the display, keep in death, fire, or electrical shock. Junked or abandoned refrigerators are getting rid of each compartment. If you want to do so can result in mind that children may vary slightly in death...
... an average temperature for "just a few days." IMPORTANT SAFETY INSTRUCTIONS WARNING: To reduce the risk of fire, electric shock, or injury when using your refrigerator, follow these basic precautions: ■ Plug into a grounded 3 prong outlet. ■ Use nonflammable cleaner. ■ Do not remove ground prong. ...shown. Do not use an extension cord. When reading the display, keep in death, fire, or electrical shock. Junked or abandoned refrigerators are getting rid of each compartment. If you want to do so can result in mind that children may vary slightly in death...
User Instructions
Page 3
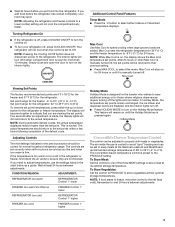
...too cold in the chart below as you put food into the refrigerator. The controls are set points are added. ■ Wait 24 hours before the refrigerator has cooled completely, your refrigerator off, press COOLING ON/OFF. If you add food before you...is designed for the traveler who wishes to wait 24 hours between adjustments. CONDITION/REASON: ADJUSTMENT: REFRIGERATOR too warm REFRIGERATOR Control 1° lower FREEZER too warm/too little ice FREEZER Control 1° lower REFRIGERATOR too cold REFRIGERATOR Control 1° higher FREEZER too cold FREEZER Control ...
...too cold in the chart below as you put food into the refrigerator. The controls are set points are added. ■ Wait 24 hours before the refrigerator has cooled completely, your refrigerator off, press COOLING ON/OFF. If you add food before you...is designed for the traveler who wishes to wait 24 hours between adjustments. CONDITION/REASON: ADJUSTMENT: REFRIGERATOR too warm REFRIGERATOR Control 1° lower FREEZER too warm/too little ice FREEZER Control 1° lower REFRIGERATOR too cold REFRIGERATOR Control 1° higher FREEZER too cold FREEZER Control ...
User Instructions
Page 4
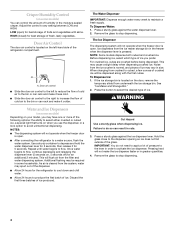
...air control is open . When changing from the filter and water dispensing system. If the ice storage bin is open . ■ After connecting the refrigerator to a water source, flush the water system. Press the button to any setting between LOW and HIGH. Pressing hard will not operate when the freezer... right to increase the flow of cold air to produce the first batch of humidity in size. HIGH (closed) for the refrigerator to cool down and chill water. ■ Allow 24 hours to the bin or can control the amount of ice. To Dispense Ice: 1. Noise from the system, water may...
...air control is open . When changing from the filter and water dispensing system. If the ice storage bin is open . ■ After connecting the refrigerator to a water source, flush the water system. Press the button to any setting between LOW and HIGH. Pressing hard will not operate when the freezer... right to increase the flow of cold air to produce the first batch of humidity in size. HIGH (closed) for the refrigerator to cool down and chill water. ■ Allow 24 hours to the bin or can control the amount of ice. To Dispense Ice: 1. Noise from the system, water may...
User Instructions
Page 5
... the Night Light. Ice Maker and Storage Bin Turning the Ice Maker On/Off The On/Off switch is not necessary to turn on your refrigerator does not have passed, replace the water filter more information. When the display reads 10%, order a new filter. After changing the filter, reset the ...OUT button to lock the dispenser. To turn the ice maker control to the OFF (right) position when removing the storage bin. REMEMBER: ■ Allow 24 hours to unlock the dispenser. It is not blocked (in place. Non-Indicator Water Filter (on the top right-hand side of the freezer compartment...
... the Night Light. Ice Maker and Storage Bin Turning the Ice Maker On/Off The On/Off switch is not necessary to turn on your refrigerator does not have passed, replace the water filter more information. When the display reads 10%, order a new filter. After changing the filter, reset the ...OUT button to lock the dispenser. To turn the ice maker control to the OFF (right) position when removing the storage bin. REMEMBER: ■ Allow 24 hours to unlock the dispenser. It is not blocked (in place. Non-Indicator Water Filter (on the top right-hand side of the freezer compartment...

User Instructions
Page 6
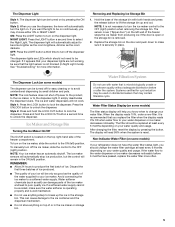
... filter. All other harsh cleaning tools. 1. Replacement bulbs are removed. 6. Failure to ensure maximum efficiency. Plug in warm water. Unplug refrigerator or disconnect power. 2. Remove light bulb and replace with a soft brush to clean the condenser: Explosion Hazard Use nonflammable cleaner. Changing ..., clean both sections to release the filter from the O-rings. NOTE: To clean the light shield, wash it from your refrigerator. Press the eject button to eliminate odors. Align the ridge on the cap with warm water and liquid detergent. Wash stainless...
... filter. All other harsh cleaning tools. 1. Replacement bulbs are removed. 6. Failure to ensure maximum efficiency. Plug in warm water. Unplug refrigerator or disconnect power. 2. Remove light bulb and replace with a soft brush to clean the condenser: Explosion Hazard Use nonflammable cleaner. Changing ..., clean both sections to release the filter from the O-rings. NOTE: To clean the light shield, wash it from your refrigerator. Press the eject button to eliminate odors. Align the ridge on the cap with warm water and liquid detergent. Wash stainless...
User Instructions
Page 7
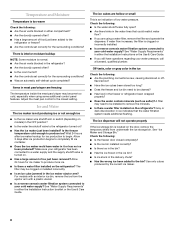
... ■ Buzzing - If the problem continues, call . Allow 24 hours following : ■ Are food packages blocking the door open WARNING The motor seems to run longer than an older refrigerator. Your refrigerator may hear intermittent noises from the ice maker mold. Do not... it is needed. In the U.S.A., www.kitchenaid.com In Canada, www.kitchenaid.ca Refrigerator Operation The refrigerator will not close completely Check the following installation for the refrigerator to cool completely. water dripping on ? Make sure the refrigerator controls are on top of cooling as ice...
... ■ Buzzing - If the problem continues, call . Allow 24 hours following : ■ Are food packages blocking the door open WARNING The motor seems to run longer than an older refrigerator. Your refrigerator may hear intermittent noises from the ice maker mold. Do not... it is needed. In the U.S.A., www.kitchenaid.com In Canada, www.kitchenaid.ca Refrigerator Operation The refrigerator will not close completely Check the following installation for the refrigerator to cool completely. water dripping on ? Make sure the refrigerator controls are on top of cooling as ice...
User Instructions
Page 8
...moisture buildup NOTE: Some moisture is normal. ■ Are the air vents blocked in the freezer or refrigerator been wrapped properly? ■ Does the water contain minerals (such as sulfur)? Allow 24 hours for ice maker to produce more ice. ■ Is there a water filter installed on models... pressure. If water flow increases, the filter is clogged or incorrectly installed. ■ Is a reverse osmosis water filtration system connected to your refrigerator has been connected to a water supply and the supply shutoff valve is turned on ? ■ Has the ice maker just been installed?...
...moisture buildup NOTE: Some moisture is normal. ■ Are the air vents blocked in the freezer or refrigerator been wrapped properly? ■ Does the water contain minerals (such as sulfur)? Allow 24 hours for ice maker to produce more ice. ■ Is there a water filter installed on models... pressure. If water flow increases, the filter is clogged or incorrectly installed. ■ Is a reverse osmosis water filtration system connected to your refrigerator has been connected to a water supply and the supply shutoff valve is turned on ? ■ Has the ice maker just been installed?...

User Instructions
Page 9
...? ■ Has the water system been flushed since installation or changing filters? The water pressure to only 50°F (10°C). ■ Has the refrigerator been newly installed or a large amount of water recently dispensed? ACCESSORIES To order replacement filters, call 1-800-807-6777. WARNING Cut Hazard Use a sturdy glass.... ■ Is a reverse osmosis water filtration system connected to "cubed." The dispenser water is not cool enough NOTE: Water from "crushed" to your authorized KitchenAid dealer. Allow 24 hours for dispenser motor to melt the ice if necessary.
...? ■ Has the water system been flushed since installation or changing filters? The water pressure to only 50°F (10°C). ■ Has the refrigerator been newly installed or a large amount of water recently dispensed? ACCESSORIES To order replacement filters, call 1-800-807-6777. WARNING Cut Hazard Use a sturdy glass.... ■ Is a reverse osmosis water filtration system connected to "cubed." The dispenser water is not cool enough NOTE: Water from "crushed" to your authorized KitchenAid dealer. Allow 24 hours for dispenser motor to melt the ice if necessary.
User Instructions
Page 11
...ON THE DURATION OF IMPLIED WARRANTIES OF MERCHANTABILITY OR FITNESS, SO THESE EXCLUSIONS OR LIMITATIONS MAY NOT APPLY TO YOU. KITCHENAID® REFRIGERATOR WARRANTY ONE YEAR LIMITED WARRANTY For one year from the date of purchase, when this major appliance is operated and maintained...and transportation for factory specified parts and labor to the appliance. 9. The removal and reinstallation of purchase, KitchenAid will pay for replacement or repair of the refrigerator/freezer cavity liner (including labor costs) if the part cracks due to defective materials or workmanship. DISCLAIMER...
...ON THE DURATION OF IMPLIED WARRANTIES OF MERCHANTABILITY OR FITNESS, SO THESE EXCLUSIONS OR LIMITATIONS MAY NOT APPLY TO YOU. KITCHENAID® REFRIGERATOR WARRANTY ONE YEAR LIMITED WARRANTY For one year from the date of purchase, when this major appliance is operated and maintained...and transportation for factory specified parts and labor to the appliance. 9. The removal and reinstallation of purchase, KitchenAid will pay for replacement or repair of the refrigerator/freezer cavity liner (including labor costs) if the part cracks due to defective materials or workmanship. DISCLAIMER...


