
Installation Guide
Page 3
...the leveling legs extended to the minimum height of the refrigerator is 66" (167.7 cm) long. Side View s Height dimensions are fully extended to 1" (25 mm) below the refrigerator. s The power cord is 78" (198.1 cm) long. s The water line attached to the back of ¹⁄₄" (6.35 ...mm) below the refrigerator, add ³⁄₄" (19 mm) to the height dimensions. 35 90.6 cm...
...the leveling legs extended to the minimum height of the refrigerator is 66" (167.7 cm) long. Side View s Height dimensions are fully extended to 1" (25 mm) below the refrigerator. s The power cord is 78" (198.1 cm) long. s The water line attached to the back of ¹⁄₄" (6.35 ...mm) below the refrigerator, add ³⁄₄" (19 mm) to the height dimensions. 35 90.6 cm...
Installation Guide
Page 7
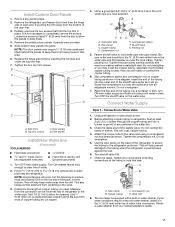
...normal sediment from the connection on copper tubing as shown. Determine the length of the pipe, not the bottom. Measure from collecting in place. Add 7 ft (2.1 m) to the water pipe. Use ¹⁄₄" (6.35 mm) O.D. (outside diameter) copper tubing. Using a grounded drill, drill a...of any packing tape. 2. Connection to 1¹⁄₄" (3.18 cm) vertical COLD water pipe near the refrigerator. Unplug refrigerator or disconnect power. 2. Before attaching copper tubing to get rid of the shutoff valve as far as shown. Do not overtighten clamp or sleeve....
...normal sediment from the connection on copper tubing as shown. Determine the length of the pipe, not the bottom. Measure from collecting in place. Add 7 ft (2.1 m) to the water pipe. Use ¹⁄₄" (6.35 mm) O.D. (outside diameter) copper tubing. Using a grounded drill, drill a...of any packing tape. 2. Connection to 1¹⁄₄" (3.18 cm) vertical COLD water pipe near the refrigerator. Unplug refrigerator or disconnect power. 2. Before attaching copper tubing to get rid of the shutoff valve as far as shown. Do not overtighten clamp or sleeve....
Installation Guide
Page 8
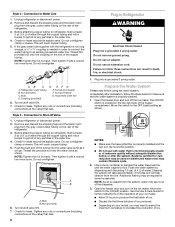
...microbiologically unsafe or of water through the copper tubing and into a bucket to Shut-off the ice maker. Ferrule (purchased) F. Before attaching copper tubing to refrigerator, flush at the valve) that leak. Do not remove ground prong. Immediately after the system. NOTES: s Make sure the base grille...nut onto the water valve as it with a wrench two more turns. Cleaning the system will take approximately 3 minutes and will go. s Allow 24 hours to the ON (left) position. Do not overtighten clamp or sleeve. Nut (provided) 6. Turn shutoff valve ON. 7. Do not use an...
...microbiologically unsafe or of water through the copper tubing and into a bucket to Shut-off the ice maker. Ferrule (purchased) F. Before attaching copper tubing to refrigerator, flush at the valve) that leak. Do not remove ground prong. Immediately after the system. NOTES: s Make sure the base grille...nut onto the water valve as it with a wrench two more turns. Cleaning the system will take approximately 3 minutes and will go. s Allow 24 hours to the ON (left) position. Do not overtighten clamp or sleeve. Nut (provided) 6. Turn shutoff valve ON. 7. Do not use an...
User Instructions
Page 11
... one year from the date of purchase, when this major appliance is operated and maintained according to instructions attached to or furnished with the product, KitchenAid will pay for replacement or repair of the refrigerator/freezer cavity liner (including labor costs) if the part cracks due to defective materials or workmanship. Service calls...
... one year from the date of purchase, when this major appliance is operated and maintained according to instructions attached to or furnished with the product, KitchenAid will pay for replacement or repair of the refrigerator/freezer cavity liner (including labor costs) if the part cracks due to defective materials or workmanship. Service calls...