Owners Manual
Page 3
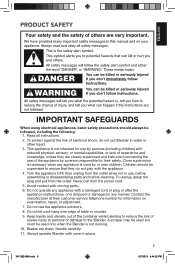
... out of the container while blending to reduce the risk of severe injury to persons or damage to ensure that they are sharp. Always operate Blender with a damaged cord or plug or after the appliance malfunctions, or is not running. 10. A scraper may be used but must be used ...moving parts. 6. Close supervision is necessary when any manner. Do not use of experience and knowledge, unless they do not put Blender in any appliance is used only when the Blender is dropped or damaged in water or other liquid. 3. W11382496A.indb 3 3 8/7/2019 4:44:52 PM PRODUCT SAFETY ENGLISH ...
... out of the container while blending to reduce the risk of severe injury to persons or damage to ensure that they are sharp. Always operate Blender with a damaged cord or plug or after the appliance malfunctions, or is not running. 10. A scraper may be used but must be used ...moving parts. 6. Close supervision is necessary when any manner. Do not use of experience and knowledge, unless they do not put Blender in any appliance is used only when the Blender is dropped or damaged in water or other liquid. 3. W11382496A.indb 3 3 8/7/2019 4:44:52 PM PRODUCT SAFETY ENGLISH ...
Owners Manual
Page 5
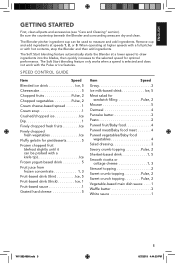
...areas are dry and clean. Remove cup and add ingredients at higher speeds with a full pitcher or with hot contents, stop the Blender and then add ingredients. The Soft Start blending feature only works when a speed is selected and does not work with a knife tip.../desserts 5 Frozen chopped fruit (defrost slightly until it can be probed with the Pulse or Ice features. When operating at speeds 1, 2, or 3. The Blender pitcher ingredient cup can be used to the selected speed for sandwich filling Pulse, 2 Mousse 5 Oatmeal 4 Pancake batter 3 Pesto 2 Pureed fruit/Baby food...
...areas are dry and clean. Remove cup and add ingredients at higher speeds with a full pitcher or with hot contents, stop the Blender and then add ingredients. The Soft Start blending feature only works when a speed is selected and does not work with a knife tip.../desserts 5 Frozen chopped fruit (defrost slightly until it can be probed with the Pulse or Ice features. When operating at speeds 1, 2, or 3. The Blender pitcher ingredient cup can be used to the selected speed for sandwich filling Pulse, 2 Mousse 5 Oatmeal 4 Pancake batter 3 Pesto 2 Pureed fruit/Baby food...
Owners Manual
Page 6
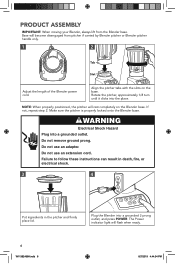
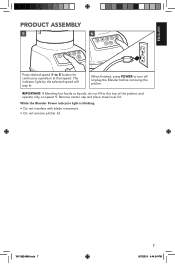
...When properly positioned, the pitcher will rest completely on the base. Do not use an extension cord. Plug the Blender into the place. The Power indicator light will become disengaged from the Blender base. Failure to follow these instructions can result in death, fire, or electrical shock. 3 4 Put ingredients in.... WARNING Electrical Shock Hazard Plug into a grounded outlet. Do not use an adapter. Make sure the pitcher is properly locked onto the Blender base. Base will flash when ready. 6 W11382496A.indb 6 8/7/2019 4:44:54 PM Align the pitcher tabs with the slots on the...
...When properly positioned, the pitcher will rest completely on the base. Do not use an extension cord. Plug the Blender into the place. The Power indicator light will become disengaged from the Blender base. Failure to follow these instructions can result in death, fire, or electrical shock. 3 4 Put ingredients in.... WARNING Electrical Shock Hazard Plug into a grounded outlet. Do not use an adapter. Make sure the pitcher is properly locked onto the Blender base. Base will flash when ready. 6 W11382496A.indb 6 8/7/2019 4:44:54 PM Align the pitcher tabs with the slots on the...
Owners Manual
Page 7
... not interfere with blade movement. • Do not remove pitcher lid. When finished, press POWER to 5) button for continuous operation at that speed. Unplug the Blender before removing the pitcher. ENGLISH PRODUCT ASSEMBLY 5 6 Press desired speed (1 to turn off. IMPORTANT: If blending hot foods or liquids, do not fill to the...
... not interfere with blade movement. • Do not remove pitcher lid. When finished, press POWER to 5) button for continuous operation at that speed. Unplug the Blender before removing the pitcher. ENGLISH PRODUCT ASSEMBLY 5 6 Press desired speed (1 to turn off. IMPORTANT: If blending hot foods or liquids, do not fill to the...
Owners Manual
Page 8
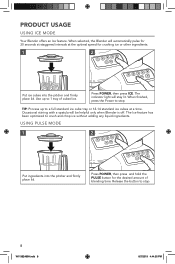
... and firmly place lid. TIP: Process up to stop . Release the button to 1 tray of blending time. The indicator light will be helpful only when Blender is off. Press POWER, then press ICE. Occasional stirring with a spatula will stay lit. The Ice feature has been optimized to stop . 8 W11382496A.indb 8...2019 4:44:55 PM When finished, press the Power to crush and chop ice without adding any liquid ingredients. PRODUCT USAGE USING ICE MODE Your Blender offers an Ice feature. USING PULSE MODE 1 2 Put ingredients into the pitcher and firmly place lid. When selected, the...
... and firmly place lid. TIP: Process up to stop . Release the button to 1 tray of blending time. The indicator light will be helpful only when Blender is off. Press POWER, then press ICE. Occasional stirring with a spatula will stay lit. The Ice feature has been optimized to stop . 8 W11382496A.indb 8...2019 4:44:55 PM When finished, press the Power to crush and chop ice without adding any liquid ingredients. PRODUCT USAGE USING ICE MODE Your Blender offers an Ice feature. USING PULSE MODE 1 2 Put ingredients into the pitcher and firmly place lid. When selected, the...
Owners Manual
Page 9
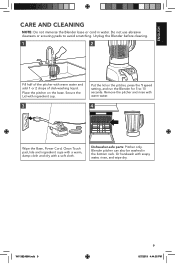
... cleaning. 1 2 Fill half of the pitcher with ingredient cup. 3 Put the lid on the base. Blender pitcher can also be washed in water. Do not use abrasive cleansers or scouring pads to 10 seconds. Secure the Lid with warm water and ... 1 or 2 drops of dish-washing liquid. W11382496A.indb 9 9 8/7/2019 4:44:55 PM Place the pitcher on the pitcher, press the 1 speed setting, and run the Blender for 5 to avoid scratching. Remove the pitcher and rinse with warm water. 4 Wipe the Base, Power Cord, Clean Touch pad, lids and ingredient cups with...
... cleaning. 1 2 Fill half of the pitcher with ingredient cup. 3 Put the lid on the base. Blender pitcher can also be washed in water. Do not use abrasive cleansers or scouring pads to 10 seconds. Secure the Lid with warm water and ... 1 or 2 drops of dish-washing liquid. W11382496A.indb 9 9 8/7/2019 4:44:55 PM Place the pitcher on the pitcher, press the 1 speed setting, and run the Blender for 5 to avoid scratching. Remove the pitcher and rinse with warm water. 4 Wipe the Base, Power Cord, Clean Touch pad, lids and ingredient cups with...
Owners Manual
Page 10
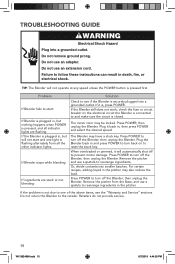
...Service" sections. Remove the pitcher from all indicator lights are stuck or not blending: Solution Check to turn back on the electrical circuit the Blender is connected to one light is flashing alternately from the Base, and use a spatula to prevent motor damage. Do not use an adapter.... Remove the pitcher and use a spatula to the retailer. TROUBLESHOOTING GUIDE WARNING Electrical Shock Hazard Plug into smaller batches. then unplug the Blender. When overloaded or jammed, it back in , but nothing happens when POWER is pressed, and all the other indicator lights, If...
...Service" sections. Remove the pitcher from all indicator lights are stuck or not blending: Solution Check to turn back on the electrical circuit the Blender is connected to one light is flashing alternately from the Base, and use a spatula to prevent motor damage. Do not use an adapter.... Remove the pitcher and use a spatula to the retailer. TROUBLESHOOTING GUIDE WARNING Electrical Shock Hazard Plug into smaller batches. then unplug the Blender. When overloaded or jammed, it back in , but nothing happens when POWER is pressed, and all the other indicator lights, If...
Owners Manual
Page 11
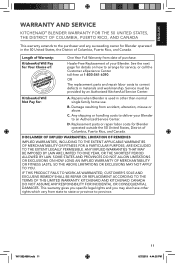
... Year Full Warranty from date of Columbia, Puerto Rico, and Canada. KitchenAid Will Not Pay for details on how to correct defects in materials and workmanship. Any shipping or handling costs to deliver your Blender. OR The replacement parts and repair labor costs to arrange for service... to an Authorized Service Center. DISCLAIMER OF IMPLIED WARRANTIES; W11382496A.indb 11 11 8/7/2019 4:44:55 PM ENGLISH WARRANTY AND SERVICE KITCHENAID® BLENDER WARRANTY FOR THE 50 UNITED STATES, THE DISTRICT OF COLUMBIA, PUERTO RICO, AND CANADA This warranty extends to the purchaser and any...
... Year Full Warranty from date of Columbia, Puerto Rico, and Canada. KitchenAid Will Not Pay for details on how to correct defects in materials and workmanship. Any shipping or handling costs to deliver your Blender. OR The replacement parts and repair labor costs to arrange for service... to an Authorized Service Center. DISCLAIMER OF IMPLIED WARRANTIES; W11382496A.indb 11 11 8/7/2019 4:44:55 PM ENGLISH WARRANTY AND SERVICE KITCHENAID® BLENDER WARRANTY FOR THE 50 UNITED STATES, THE DISTRICT OF COLUMBIA, PUERTO RICO, AND CANADA This warranty extends to the purchaser and any...

Owners Manual
Page 12
...receive this manner call our toll-free Customer eXperience Centre at 1-800-541-6390 Monday through Friday. Your replacement Blender will also be required to : Customer eXperience Centre KitchenAid Canada 200 - 6750 Century Ave. Mississauga, ON L5N 0B7 ARRANGING FOR SERVICE AFTER THE WARRANTY EXPIRES, OR... STATES, DISTRICT OF COLUMBIA, AND PUERTO RICO We're so confident the quality of our products meets the exacting standards of KitchenAid that , if your Blender should fail within the first year of ownership, simply call our toll-free Customer eXperience Center at 1-800-807-6777. Box...
...receive this manner call our toll-free Customer eXperience Centre at 1-800-541-6390 Monday through Friday. Your replacement Blender will also be required to : Customer eXperience Centre KitchenAid Canada 200 - 6750 Century Ave. Mississauga, ON L5N 0B7 ARRANGING FOR SERVICE AFTER THE WARRANTY EXPIRES, OR... STATES, DISTRICT OF COLUMBIA, AND PUERTO RICO We're so confident the quality of our products meets the exacting standards of KitchenAid that , if your Blender should fail within the first year of ownership, simply call our toll-free Customer eXperience Center at 1-800-807-6777. Box...


