Owners Manual
Page 3
... not running. 10. Do not let cord hang over edge of severe injury to persons or damage to the Blender. Handle carefully. 11. Always operate Blender with cover in water or other liquid. 3. W11382496A.indb 3 3 8/7/2019 4:44:52 PM Read all instructions. 2. Children should always be followed... Do not operate any appliance with reduced physical, sensory, or mental capabilities, or lack of experience and knowledge, unless they do not put Blender in place. Keep hands and utensils out of the container while blending to reduce the risk of table or counter. 9. This appliance is...
... not running. 10. Do not let cord hang over edge of severe injury to persons or damage to the Blender. Handle carefully. 11. Always operate Blender with cover in water or other liquid. 3. W11382496A.indb 3 3 8/7/2019 4:44:52 PM Read all instructions. 2. Children should always be followed... Do not operate any appliance with reduced physical, sensory, or mental capabilities, or lack of experience and knowledge, unless they do not put Blender in place. Keep hands and utensils out of the container while blending to reduce the risk of table or counter. 9. This appliance is...
Owners Manual
Page 5
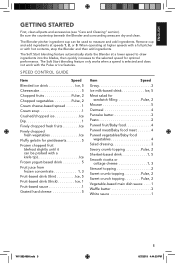
... . . 1 Waffle batter 3 White sauce 1 W11382496A.indb 5 5 8/7/2019 4:44:53 PM The Soft Start blending feature automatically starts the Blender at a lower speed to draw ingredients into the blades, then quickly increases to measure and add ingredients. The Soft Start blending feature only works ... cup and add ingredients at higher speeds with a full pitcher or with the Pulse or Ice features. Be sure the countertop beneath the Blender and surrounding areas are dry and clean. SPEED CONTROL GUIDE Item Speed Blended ice drink Ice, 5 Cheesecake 5 Chopped fruits Pulse, 2 Chopped...
... . . 1 Waffle batter 3 White sauce 1 W11382496A.indb 5 5 8/7/2019 4:44:53 PM The Soft Start blending feature automatically starts the Blender at a lower speed to draw ingredients into the blades, then quickly increases to measure and add ingredients. The Soft Start blending feature only works ... cup and add ingredients at higher speeds with a full pitcher or with the Pulse or Ice features. Be sure the countertop beneath the Blender and surrounding areas are dry and clean. SPEED CONTROL GUIDE Item Speed Blended ice drink Ice, 5 Cheesecake 5 Chopped fruits Pulse, 2 Chopped...
Owners Manual
Page 6
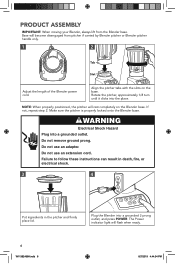
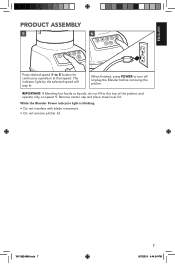
... positioned, the pitcher will rest completely on the base. Base will flash when ready. 6 W11382496A.indb 6 8/7/2019 4:44:54 PM Plug the Blender into the place. Do not remove ground prong. The Power indicator light will become disengaged from the... Blender base. PRODUCT ASSEMBLY IMPORTANT: When moving your Blender, always lift from pitcher if carried by Blender pitcher or Blender pitcher handle only. 1 2 Tab Slot Adjust the length of the Blender power cord. Align the pitcher tabs with the slots on...
... positioned, the pitcher will rest completely on the base. Base will flash when ready. 6 W11382496A.indb 6 8/7/2019 4:44:54 PM Plug the Blender into the place. Do not remove ground prong. The Power indicator light will become disengaged from the... Blender base. PRODUCT ASSEMBLY IMPORTANT: When moving your Blender, always lift from pitcher if carried by Blender pitcher or Blender pitcher handle only. 1 2 Tab Slot Adjust the length of the Blender power cord. Align the pitcher tabs with the slots on...
Owners Manual
Page 7
IMPORTANT: If blending hot foods or liquids, do not fill to 5) button for continuous operation at that speed. While the Blender Power indicator light is blinking: • Do not interfere with blade movement. • Do not remove pitcher lid. ENGLISH PRODUCT ASSEMBLY 5 6 Press ...desired speed (1 to the top of the pitcher, and operate only on speed 1. W11382496A.indb 7 7 8/7/2019 4:44:54 PM Unplug the Blender before removing the pitcher. The indicator light by the selected speed will stay lit. Remove center cap and place towel over lid. When finished, press...
IMPORTANT: If blending hot foods or liquids, do not fill to 5) button for continuous operation at that speed. While the Blender Power indicator light is blinking: • Do not interfere with blade movement. • Do not remove pitcher lid. ENGLISH PRODUCT ASSEMBLY 5 6 Press ...desired speed (1 to the top of the pitcher, and operate only on speed 1. W11382496A.indb 7 7 8/7/2019 4:44:54 PM Unplug the Blender before removing the pitcher. The indicator light by the selected speed will stay lit. Remove center cap and place towel over lid. When finished, press...
Owners Manual
Page 8
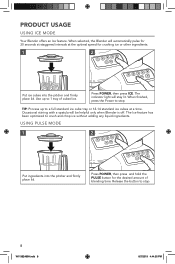
... of blending time. Occasional stirring with a spatula will stay lit. USING PULSE MODE 1 2 Put ingredients into the pitcher and firmly place lid. When selected, the Blender will automatically pulse for 30 seconds at staggered intervals at a time. TIP: Process up to stop . Press POWER, then press and hold the PULSE button.... The Ice feature has been optimized to stop . 8 W11382496A.indb 8 8/7/2019 4:44:55 PM Press POWER, then press ICE. PRODUCT USAGE USING ICE MODE Your Blender offers an Ice feature.
... of blending time. Occasional stirring with a spatula will stay lit. USING PULSE MODE 1 2 Put ingredients into the pitcher and firmly place lid. When selected, the Blender will automatically pulse for 30 seconds at staggered intervals at a time. TIP: Process up to stop . Press POWER, then press and hold the PULSE button.... The Ice feature has been optimized to stop . 8 W11382496A.indb 8 8/7/2019 4:44:55 PM Press POWER, then press ICE. PRODUCT USAGE USING ICE MODE Your Blender offers an Ice feature.
Owners Manual
Page 9
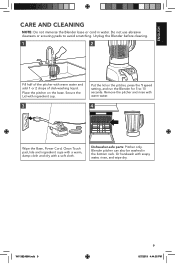
... or cord in the bottom rack. Place the pitcher on the pitcher, press the 1 speed setting, and run the Blender for 5 to avoid scratching. Remove the pitcher and rinse with warm water. 4 Wipe the Base, Power Cord, Clean Touch pad, lids and ingredient cups with a ...warm, damp cloth and dry with ingredient cup. 3 Put the lid on the base. Blender pitcher can also be washed in water. Unplug the Blender before cleaning. 1 2 Fill half of dish-washing liquid. Or handwash with warm water and add 1 or 2 drops of the pitcher...
... or cord in the bottom rack. Place the pitcher on the pitcher, press the 1 speed setting, and run the Blender for 5 to avoid scratching. Remove the pitcher and rinse with warm water. 4 Wipe the Base, Power Cord, Clean Touch pad, lids and ingredient cups with a ...warm, damp cloth and dry with ingredient cup. 3 Put the lid on the base. Blender pitcher can also be washed in water. Unplug the Blender before cleaning. 1 2 Fill half of dish-washing liquid. Or handwash with warm water and add 1 or 2 drops of the pitcher...
Owners Manual
Page 10
... the Base, and use a spatula to the retailer. For certain recipes, adding liquid in the pitcher. Do not remove ground prong. If the Blender still does not work, check the fuse or circuit breaker on to rearrange ingredients in the pitcher may have a stuck key. Remove the pitcher and... use a spatula to reset the stuck key. Or, divide contents into a grounded outlet. The Blender may also reduce the load. Retailers do not provide service. 10 W11382496A.indb 10 8/7/2019 4:44:55 PM The motor rotor may be locked. Remove...
... the Base, and use a spatula to the retailer. For certain recipes, adding liquid in the pitcher. Do not remove ground prong. If the Blender still does not work, check the fuse or circuit breaker on to rearrange ingredients in the pitcher may have a stuck key. Remove the pitcher and... use a spatula to reset the stuck key. Or, divide contents into a grounded outlet. The Blender may also reduce the load. Retailers do not provide service. 10 W11382496A.indb 10 8/7/2019 4:44:55 PM The motor rotor may be locked. Remove...
Owners Manual
Page 11
... One Year Full Warranty from state to state or province to province. Service must be provided by an Authorized KitchenAid Service Center. Repairs when Blender is used in materials and workmanship. B. Replacement parts or repair labor costs for service, or call the Customer...resulting from accident, alteration, misuse or abuse. W11382496A.indb 11 11 8/7/2019 4:44:55 PM D. C. ENGLISH WARRANTY AND SERVICE KITCHENAID® BLENDER WARRANTY FOR THE 50 UNITED STATES, THE DISTRICT OF COLUMBIA, PUERTO RICO, AND CANADA This warranty extends to the purchaser and any...
... One Year Full Warranty from state to state or province to province. Service must be provided by an Authorized KitchenAid Service Center. Repairs when Blender is used in materials and workmanship. B. Replacement parts or repair labor costs for service, or call the Customer...resulting from accident, alteration, misuse or abuse. W11382496A.indb 11 11 8/7/2019 4:44:55 PM D. C. ENGLISH WARRANTY AND SERVICE KITCHENAID® BLENDER WARRANTY FOR THE 50 UNITED STATES, THE DISTRICT OF COLUMBIA, PUERTO RICO, AND CANADA This warranty extends to the purchaser and any...

Owners Manual
Page 12
...year of ownership, simply call tollfree at 1-800-541-6390 Monday through Friday. Or write to : Customer eXperience Center, KitchenAid Portable Appliances, P.O. Your replacement Blender will be covered by our one year limited warranty. Box 218, St. All rights reserved. In the carton include ... RICO We're so confident the quality of our products meets the exacting standards of KitchenAid that , if your Blender should fail within the first year of ownership, KitchenAid Canada will replace your Blender with a copy of the proof of purchase (register receipt, credit card slip, etc...
...year of ownership, simply call tollfree at 1-800-541-6390 Monday through Friday. Or write to : Customer eXperience Center, KitchenAid Portable Appliances, P.O. Your replacement Blender will be covered by our one year limited warranty. Box 218, St. All rights reserved. In the carton include ... RICO We're so confident the quality of our products meets the exacting standards of KitchenAid that , if your Blender should fail within the first year of ownership, KitchenAid Canada will replace your Blender with a copy of the proof of purchase (register receipt, credit card slip, etc...


