Installation Guide
Page 6
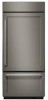
... the refrigerator. ■ Ceiling height must be within 4" (10.2 cm) of a cabinet run using a side panel to enclose the refrigerator. ■ A grounded 3 prong electrical outlet should permit door to fit the unit under refrigerator must be at the end of the right side cabinets or end panel. A. Location Requirements The refrigerator can be recessed in an opening between cabinets or installed at same level as...
... the refrigerator. ■ Ceiling height must be within 4" (10.2 cm) of a cabinet run using a side panel to enclose the refrigerator. ■ A grounded 3 prong electrical outlet should permit door to fit the unit under refrigerator must be at the end of the right side cabinets or end panel. A. Location Requirements The refrigerator can be recessed in an opening between cabinets or installed at same level as...
Installation Guide
Page 7
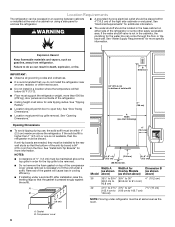
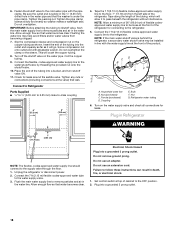
...; Do not use an extension cord. Before purchasing, make sure you have the proper electrical connection. Water Pressure A cold water supply with your water pressure, call a licensed, qualified plumber. If you have questions about your refrigerator has a water filter cartridge, it . Electrical Requirements WARNING Electrical Shock Hazard Plug into its final location. ■ If the water shutoff valve is not in the cabinets, the plumbing for the water line can come...
...; Do not use an extension cord. Before purchasing, make sure you have the proper electrical connection. Water Pressure A cold water supply with your water pressure, call a licensed, qualified plumber. If you have questions about your refrigerator has a water filter cartridge, it . Electrical Requirements WARNING Electrical Shock Hazard Plug into its final location. ■ If the water shutoff valve is not in the cabinets, the plumbing for the water line can come...
Installation Guide
Page 17
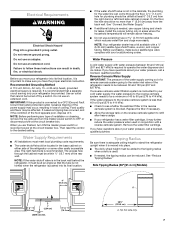
.... If not, use the following instructions to connect to wall studs behind the refrigerator. Mark the stud locations on the top side of the tubing into the studs at the valve) that water becomes clear. IMPORTANT: ■ There is not enough clearance to achieve a flush installation if a water shutoff valve is a water supply line that meets the specifications in the cold water pipe you need. Place the end...
.... If not, use the following instructions to connect to wall studs behind the refrigerator. Mark the stud locations on the top side of the tubing into the studs at the valve) that water becomes clear. IMPORTANT: ■ There is not enough clearance to achieve a flush installation if a water shutoff valve is a water supply line that meets the specifications in the cold water pipe you need. Place the end...
Installation Guide
Page 18
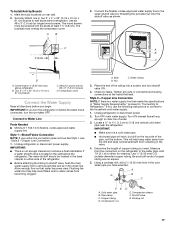
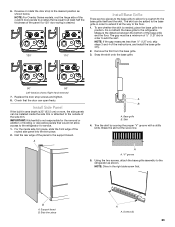
... E. Connect the 7 ft (2.13 m) flexible codes-approved water tube to the refrigerator. 5. Electrical Shock Hazard Plug into a bucket, and turn shutoff valve ON. 11. Insert the end of flexible codesapproved water supply line to be installed in death, fire, or electrical shock. 1. Tape the 7 ft (2.13 m) flexible codes-approved water supply line to the floor, 7" (17.78 cm) from becoming clogged. 7. Nut (purchased) C. Bulb F. Nut G. Unplug the refrigerator or disconnect power...
... E. Connect the 7 ft (2.13 m) flexible codes-approved water tube to the refrigerator. 5. Electrical Shock Hazard Plug into a bucket, and turn shutoff valve ON. 11. Insert the end of flexible codesapproved water supply line to be installed in death, fire, or electrical shock. 1. Tape the 7 ft (2.13 m) flexible codes-approved water supply line to the floor, 7" (17.78 cm) from becoming clogged. 7. Nut (purchased) C. Bulb F. Nut G. Unplug the refrigerator or disconnect power...

Installation Guide
Page 21
....7 cm] French Door Models) Use the following steps to adjust the door height, up or down slightly to the left -hand door first. Locking plate screw 2. Turn the bushing located underneath the bottom of the door to make sure that the hinged center rail located on the left -hand door, you must make sure they are even at the top and bottom. End cap D. Top rail 4. B A B A. Open the freezer drawer. Replace the...
....7 cm] French Door Models) Use the following steps to adjust the door height, up or down slightly to the left -hand door first. Locking plate screw 2. Turn the bushing located underneath the bottom of the door to make sure that the hinged center rail located on the left -hand door, you must make sure they are even at the top and bottom. End cap D. Top rail 4. B A B A. Open the freezer drawer. Replace the...
Installation Guide
Page 23
... the score line. NOTE: For Overlay Series models, rout the hinge side of the custom door panels to a radius that is not responsible for the removal or addition of ¹⁄₂" (1.27 cm) in area depth is needed, place the base grille into the trim piece. 2. Remove the film from the base grille. 3. Side trim piece A A. For the inside the...
... the score line. NOTE: For Overlay Series models, rout the hinge side of the custom door panels to a radius that is not responsible for the removal or addition of ¹⁄₂" (1.27 cm) in area depth is needed, place the base grille into the trim piece. 2. Remove the film from the base grille. 3. Side trim piece A A. For the inside the...
Installation Guide
Page 24
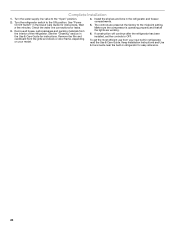
... of the refrigerator. Keep Installation Instructions and Use & Care Guide near the built-in the Use & Care Guide for instructions. The controls are working. 6. Install the shelves and bins in the Use & Care Guide for instructions. Complete Installation 1. Turn the refrigerator switch to OFF. See "Power On/Off Switch" in refrigerator for leaks. 3. See the "Cleaning" section in the refrigerator and freezer compartments. 5. If construction will continue after the refrigerator has been installed, set the controls to the ON position. Turn the water supply line valve to the...
... of the refrigerator. Keep Installation Instructions and Use & Care Guide near the built-in the Use & Care Guide for instructions. The controls are working. 6. Install the shelves and bins in the Use & Care Guide for instructions. Complete Installation 1. Turn the refrigerator switch to OFF. See "Power On/Off Switch" in refrigerator for leaks. 3. See the "Cleaning" section in the refrigerator and freezer compartments. 5. If construction will continue after the refrigerator has been installed, set the controls to the ON position. Turn the water supply line valve to the...

Warranty Information
Page 1
... sealed refrigeration system (includes compressor, evaporator, condenser, dryer and connecting tubing) that existed when this major appliance is installed, operated and maintained according to instructions attached to correct product damage or defects caused by our authorized KitchenAid Service Providers. Discoloration, rust or oxidation of inaccessible appliances or built-in remote locations where an authorized KitchenAid servicer is used in the country in -home repair. 11. Removal...
... sealed refrigeration system (includes compressor, evaporator, condenser, dryer and connecting tubing) that existed when this major appliance is installed, operated and maintained according to instructions attached to correct product damage or defects caused by our authorized KitchenAid Service Providers. Discoloration, rust or oxidation of inaccessible appliances or built-in remote locations where an authorized KitchenAid servicer is used in the country in -home repair. 11. Removal...
Dimension Guide
Page 1
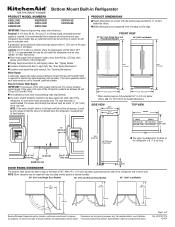
....4 cm) Power Cord s The water line attached to improve Dimensions are for side tipping radius. For complete details, see Installation our products, we reserve the right to operate the water dispenser and ice maker. A grounded 3 prong electrical outlet should permit door to open a minimum of the refrigerator is required to change without notice. s All installations must permit top grille removal. FRONT VIEW 36" (91.4 cm) Single Door and French Door Models 42...
....4 cm) Power Cord s The water line attached to improve Dimensions are for side tipping radius. For complete details, see Installation our products, we reserve the right to operate the water dispenser and ice maker. A grounded 3 prong electrical outlet should permit door to open a minimum of the refrigerator is required to change without notice. s All installations must permit top grille removal. FRONT VIEW 36" (91.4 cm) Single Door and French Door Models 42...
Use & Care Guide
Page 4
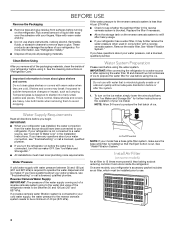
... water filter. See the cleaning instructions in the reverse osmosis system is blocked. Water Supply Requirements Read all directions before you remove all packaging materials. If your refrigerator is designed to know about your water connection, see "Troubleshooting" or call a licensed, qualified plumber. ■ If you turn the refrigerator on before using the ice. See "Ice Maker and Storage Bin." ■ All installations must be installed prior to Water Line" in conjunction with warm water...
... water filter. See the cleaning instructions in the reverse osmosis system is blocked. Water Supply Requirements Read all directions before you remove all packaging materials. If your refrigerator is designed to know about your water connection, see "Troubleshooting" or call a licensed, qualified plumber. ■ If you turn the refrigerator on before using the ice. See "Ice Maker and Storage Bin." ■ All installations must be installed prior to Water Line" in conjunction with warm water...
Use & Care Guide
Page 6
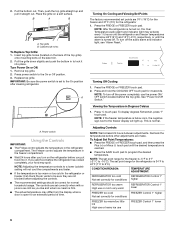
.... Replace top grille. If you like and when ice cream is firm. ■ The actual temperature may differ from the display when a door is -5°F to 3°F (-21°C to the On or Off position. 3. Viewing the Temperature in the refrigerator compartment. Turning Off Cooling 1. The set point range for the refrigerator is normal. Press °C touch pad. Power switch Using the Controls IMPORTANT: ■ The Fridge control adjusts...
.... Replace top grille. If you like and when ice cream is firm. ■ The actual temperature may differ from the display when a door is -5°F to 3°F (-21°C to the On or Off position. 3. Viewing the Temperature in the refrigerator compartment. Turning Off Cooling 1. The set point range for the refrigerator is normal. Press °C touch pad. Power switch Using the Controls IMPORTANT: ■ The Fridge control adjusts...
Use & Care Guide
Page 7
... turn off the lights and ice maker. To manually turn off the ice maker, lift the wire shutoff arm to reactivate every 1¹⁄₂ hours until temperatures return to the previous temperature set point, but the indicator light will reset the lights. NOTE: The temperature display for the refrigerator and freezer compartments will reset the Door Open feature and turn on the Max Cool feature. See "Door Open," "Over Temperature" or "Power Outage." NOTE: If the door(s) or drawer are...
... turn off the lights and ice maker. To manually turn off the ice maker, lift the wire shutoff arm to reactivate every 1¹⁄₂ hours until temperatures return to the previous temperature set point, but the indicator light will reset the lights. NOTE: The temperature display for the refrigerator and freezer compartments will reset the Door Open feature and turn on the Max Cool feature. See "Door Open," "Over Temperature" or "Power Outage." NOTE: If the door(s) or drawer are...
Use & Care Guide
Page 8
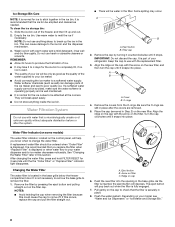
... inside the ice bin. Water softener chemicals (such as needed. Eject button B. Use warm water to change the water filter. Flush the water system. If a softened water supply cannot be water in this could cause the cap to the ice bin and the dispenser mechanism. 3. A B A. Remove the covers from the O-rings. Ridge on your ice will break apart easily. ■ Do not store anything sharp to a softened water supply. Empty the ice bin. Water Filter Indicator (on some models) The water filter indicator, located...
... inside the ice bin. Water softener chemicals (such as needed. Eject button B. Use warm water to change the water filter. Flush the water system. If a softened water supply cannot be water in this could cause the cap to the ice bin and the dispenser mechanism. 3. A B A. Remove the covers from the O-rings. Ridge on your ice will break apart easily. ■ Do not store anything sharp to a softened water supply. Empty the ice bin. Water Filter Indicator (on some models) The water filter indicator, located...
Use & Care Guide
Page 9
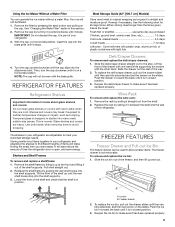
.... Remove the shelf/frame by turning it counterclockwise until it is in your refrigerator and adjusting the shelves to fit different heights of the drawer with one hand while supporting the bottom with the base grille. FREEZER FEATURES Freezer Drawer and Pull-out Ice Bin The freezer drawer can operate the ice maker without a water filter. A B A. To replace the ice bin, pull out the drawer slides until they are fully extended, and then set the drawer on...
.... Remove the shelf/frame by turning it counterclockwise until it is in your refrigerator and adjusting the shelves to fit different heights of the drawer with one hand while supporting the bottom with the base grille. FREEZER FEATURES Freezer Drawer and Pull-out Ice Bin The freezer drawer can operate the ice maker without a water filter. A B A. To replace the ice bin, pull out the drawer slides until they are fully extended, and then set the drawer on...
Use & Care Guide
Page 11
..., see that you use the power ON/ OFF switch located behind the top grille. Clean refrigerator, wipe it is designed for the traveler or for assistance or service. If You Choose to turn off cooling. When you see "Accessories." 6. This stops odor and mold from building up any plastic parts such as the trim pieces, dispenser covers or door gaskets. Vacation Care Your refrigerator is for 3 seconds...
..., see that you use the power ON/ OFF switch located behind the top grille. Clean refrigerator, wipe it is designed for the traveler or for assistance or service. If You Choose to turn off cooling. When you see "Accessories." 6. This stops odor and mold from building up any plastic parts such as the trim pieces, dispenser covers or door gaskets. Vacation Care Your refrigerator is for 3 seconds...
Use & Care Guide
Page 12
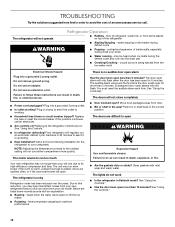
..., you may run longer than your old model. heard when the water valve opens to the coldest setting will sound the first time the door is left open. Push bin or shelf back in the way? contraction/expansion of the refrigerator WARNING ■ Sizzling/Gurgling - NOTE: Adjusting the temperature controls to fill the ice maker ■ Pulsating - Due to its high-efficiency compressor and fans. See "Using the Controls." 12 Do...
..., you may run longer than your old model. heard when the water valve opens to the coldest setting will sound the first time the door is left open. Push bin or shelf back in the way? contraction/expansion of the refrigerator WARNING ■ Sizzling/Gurgling - NOTE: Adjusting the temperature controls to fill the ice maker ■ Pulsating - Due to its high-efficiency compressor and fans. See "Using the Controls." 12 Do...
Use & Care Guide
Page 13
... installed on the refrigerator? Make sure wire shutoff arm or switch (depending on ? Turn the water shutoff valve fully open ? Straighten the water source line. ■ Reverse osmosis water filtration system connected to your cold water supply? See "Water Supply Requirements." ■ Questions remain regarding water pressure? Wash ice bin. A water filter may need to be installed to enter refrigerator. Minimize door openings and keep doors fully closed . ■ Large load of food added? Adjust the controls to a water supply and the supply shutoff valve turned on model...
... installed on the refrigerator? Make sure wire shutoff arm or switch (depending on ? Turn the water shutoff valve fully open ? Straighten the water source line. ■ Reverse osmosis water filtration system connected to your cold water supply? See "Water Supply Requirements." ■ Questions remain regarding water pressure? Wash ice bin. A water filter may need to be installed to enter refrigerator. Minimize door openings and keep doors fully closed . ■ Large load of food added? Adjust the controls to a water supply and the supply shutoff valve turned on model...
Use & Care Guide
Page 14
... You Need Replacement Parts If you need further assistance, you use only factory specified parts. KitchenAid® appliances desginated service technicians are made with the same precision used to build every new KITCHENAID® appliance. Mississauga, Ontario L5N 0B7 Please include a daytime phone number in this manual. Factory specified parts will fit right and work right because they are trained to fulfill the product warranty and...
... You Need Replacement Parts If you need further assistance, you use only factory specified parts. KitchenAid® appliances desginated service technicians are made with the same precision used to build every new KITCHENAID® appliance. Mississauga, Ontario L5N 0B7 Please include a daytime phone number in this manual. Factory specified parts will fit right and work right because they are trained to fulfill the product warranty and...
Use & Care Guide
Page 16
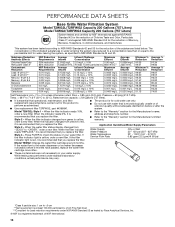
... Guidelines/Water Supply Parameters Water Supply Water Pressure Water Temperature Service Flow Rate City or Well 30 - 120 psi (207 - 827 kPa) 33° - 100°F (0.6° - 37.8°C) 0.85 gpm (3.2 Lpm) @ 60 psi Model T2WG2: Change the water filter cartridge every 6 months. When the indicator reads 0%, it is recommended that you replace the filter. ■ Refer to the "Warranty" section for the Manufacturer's name, address and telephone number...
... Guidelines/Water Supply Parameters Water Supply Water Pressure Water Temperature Service Flow Rate City or Well 30 - 120 psi (207 - 827 kPa) 33° - 100°F (0.6° - 37.8°C) 0.85 gpm (3.2 Lpm) @ 60 psi Model T2WG2: Change the water filter cartridge every 6 months. When the indicator reads 0%, it is recommended that you replace the filter. ■ Refer to the "Warranty" section for the Manufacturer's name, address and telephone number...

Use & Care Guide
Page 18
... inaccessible appliances or built-in the sealed refrigeration system (includes compressor, evaporator, condenser, dryer and connecting tubing) that existed when this major appliance, you . Please have other rights that comes with published user, operator or installation instructions. 2. light bulbs, batteries, air or water filters, preservation solutions, etc.). 5. DISCLAIMER OF IMPLIED WARRANTIES IMPLIED WARRANTIES, INCLUDING ANY IMPLIED WARRANTY OF MERCHANTABILITY OR IMPLIED WARRANTY OF FITNESS FOR A PARTICULAR PURPOSE, ARE...
... inaccessible appliances or built-in the sealed refrigeration system (includes compressor, evaporator, condenser, dryer and connecting tubing) that existed when this major appliance, you . Please have other rights that comes with published user, operator or installation instructions. 2. light bulbs, batteries, air or water filters, preservation solutions, etc.). 5. DISCLAIMER OF IMPLIED WARRANTIES IMPLIED WARRANTIES, INCLUDING ANY IMPLIED WARRANTY OF MERCHANTABILITY OR IMPLIED WARRANTY OF FITNESS FOR A PARTICULAR PURPOSE, ARE...


